Dan D'Agostino Momentum Owner's Manual
Stereo amplifier
Hide thumbs
Also See for Momentum:
- Owner's manual (21 pages) ,
- Owner's manual (11 pages) ,
- Owner's manual (11 pages)
Table of Contents
Advertisement
Quick Links
Advertisement
Table of Contents

Related Manuals for Dan D'Agostino Momentum


Summary of Contents for Dan D'Agostino Momentum
- Page 1 MOMENTUM STEREO AMPLIFIER OWNER’S MANUAL...
- Page 2 It took a lot of work to achieve this spec without aff ecting the sound quality of the Momentum Stereo amplifi er in any way, but I think the result was well worth the eff ort. I believe so much in this amplifi er that I put my signature on the front of it—the fi rst time in my long career that I’ve done this.
-
Page 3: Legal Notifications
lEGAl NotIFICAtIoNs Dan D’Agostino Master Audio Systems is a registered trademark of D’Agostino LLC. The information in this owner’s manual is subject to change without notice. Current Version 1.1 of this manual was produced by the Dan D’Agostino LLC engineering, sales and marketing departments. -
Page 4: Unpacking And Installation
NOTE: You may see slight blemishes in the machined metal parts of the Momentum Stereo amplifier’s chassis. This is a normal and unavoidable artifact of the machining process. -
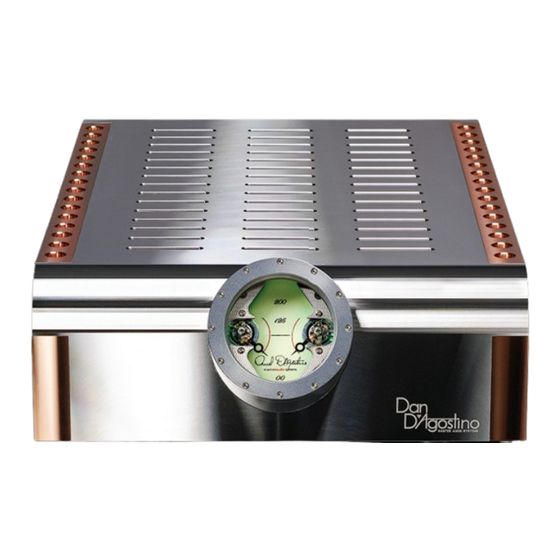
Page 5: Front Panel
FRoNt PANEl Power meter (L & R) Heat sink venturis Top panel vents Power button REAR PANEl 12-volt on/off trigger input 12-volt trigger output Three-position toggle switch for power meter brightness Three-position toggle switch for power meter sensitivity and on/off Speaker cable binding posts (L &... -
Page 6: Interconnect Cables
Speaker cables Install the speaker cables first. We recommend the use of high-quality cables terminated with spade or ring lugs that will fit the Momentum Stereo’s binding posts. We advise against the use of pin connectors, banana plugs, or bare-wire connections. -
Page 7: Operation And Maintenance
50-watt sensitivity. In the center position, the meter will read 200-watt sensitivity. Maintenance The Momentum Stereo amplifier requires no user maintenance other than to keep it clean and ensure that the vents remain unobstructed. To clean the amplifier, first disconnect the AC plug. Do not use polish or cleaners on the Momentum Stereo’s chassis. -
Page 8: Troubleshooting
tRoUblEshootING Amplifier will not power up If the front meter is not illuminated, follow the procedure outlined below. If one step succeeds in activating the power, stop there and ignore the other steps. Push the power switch on the front underside edge of the amplifier. Check to make sure the AC cord is plugged into the wall outlet. - Page 9 Front meter is illuminated but you hear no sound (cont.) If you have a spare pair of interconnect cables (even cheap ones will work temporarily), try using them instead of the interconnect cables between the source device and the preamp and between the preamp and the amplifier. If this restores sound, replace the defective cables.
- Page 10 Sound seems unclear or unfocused Follow the below steps in order. If one of these steps fixes the problem, stop there and ignore the other steps. Play a CD (not a record) of a vocalist and sit in your usual listening position, which should be equidistant from each speaker and typically 8 to 15 feet away from them.
-
Page 11: Limited Warranty
MoMENtUM stEREo AMPlIFIER lIMItED wARRANty D’Agostino LLC warrants the Momentum Stereo amplifier against manufacturing defects and defects in materials for five years from the date of purchase from an authorized Dan D’Agostino Master Audio Systems dealer, subject to the conditions listed below: The warranty covers only new products purchased from an authorized D’Agostino LLC dealer. - Page 12 (Including meter, feet and binding posts) UPGRADE PROGRAM: Your Momentum Stereo amplifier can be upgraded at modest cost to a Momentum 300-watt monoblock amplifier at the factory. You can then purchase a second Momentum monoblock to create a high-powered, dual-monoblock stereo system.
Need help?
Do you have a question about the Momentum and is the answer not in the manual?
Questions and answers