
Related Manuals for Samsung POWERbot SR20J9250U Series


Summary of Contents for Samsung POWERbot SR20J9250U Series
- Page 1 SR20J9250U✴ Series POWERbot user manual ✻ Before operating this unit, please read the instructions carefully. English ✻ For indoor use only. imagine the possibilities Thank you for purchasing a Samsung product.
-
Page 2: Table Of Contents
Cleaning the dustbin / Cleaning the sensors and the camera / Cleaning the Power brush / Cleaning the Driving wheel Samsung Smart Home App Preparing the network / Using the Samsung Smart Home app Notes and cautions Charging / In use / Cleaning and maintenance /... -
Page 3: Safety Information
Indicates that a risk of personal injury or material damage exists. cAutIoN otHer SymBoLS USeD Indicates that the following text contains additional important information. NotE This Smart Robot vacuum supports from Samsung Smart Home. More detailed information, please visit Samsung.com/Smarthome. ENGLISH-03... -
Page 4: Important Safety Instructions
Safety information important Safety inStrUCtionS When using an electrical appliance, basic precautions should be observed, including the following: reaD aLL inStrUCtionS Before USinG yoUr poWerbot. Unplug from outlet when not in use and before conducting maintenance. WarninG: to reduce the risk of fire, electric shock, or injury: GeneraL • Use only as described in this manual. - Page 5 poWerbot • Do not pick up hard or sharp objects such as glass, nails, screws, coins, and etc. • Do not use without a filter in place. When servicing the unit, never put fingers or other objects into the fan chamber in case the unit accidentally turns on. • Do not put any objects into openings.
- Page 6 – There is a risk of fire or electric shock. alcohol, thinners etc. f Please check with a Samsung Electronics f The POWERbot is intended for household service center when exchanging batteries. use therefore do not use it in an attic, –...
- Page 7 Before use in use CaUtion CaUtion f Insert the dustbin before using POWERbot. f Using POWERbot on thick carpet may damage both POWERbot and the carpet. f Open room doors before cleaning in order – The POWERbot cannot pass over carpet that is to have all rooms cleaned and install a thicker than 1 cm.
-
Page 8: Installation
installation power of the charger must be on at all times. Do not install the charger in a narrow passage or near a door. Install it in a place without obstacles and danger of falling. Power lamp (Red) D C - IN D C - I N Connect the Connect the... - Page 9 accessories remote control Batteries (aaa type) User manual Spare filter Cleaning brush Power cord adapter Virtual guard installation note Note f Install charger in a place where the floor and wall are level. f It is best to install the charger along the grain of wooden floors. f If the emergency switch is off, POWERbot will not charge even if it is docked on the charger.
-
Page 10: Charging
Charging It takes approximately 160 minutes to • Rated input voltage of this product completely charge when charging for the is 100 - 240 V~. WARNING first time after purchase and can be used for approximately 30 minutes in Max mode. Charging lamp during charging (green) turn on the manually charge... -
Page 11: Battery (Lo
automatic charging When the battery indicator blinks during cleaning, poWerbot will return to the charger to charge itself automatically. recharging you may command poWerbot to recharge at the charger while it is in cleaning process. Low battery (Lo) manually charge poWerbot by placing it on the charger. -
Page 12: Installing The Virtual Guard
installing the Virtual guard infrared ray from the Virtual guard will restrict poWerbot from approaching certain area. The distance of virtual wall is 2.5 m at minimum and may differ depending on surroundings and movement status of POWERbot. Virtual guard press the power install the Virtual guard button to turn it on... -
Page 13: Part Name Of The Virtual Guard
part name of the Virtual guard power button poWerbot detection sensor power lamp Power on: Red lamp blinks Distance detection sensor Power off: Lamp is off (infrared ray sensor) Battery cover inserting batteries Batteries for Virtual guard must be purchased separately. Open the battery cover Insert the alkaline Insert the tip of the... -
Page 14: Using Powerbot
Using poWerbot you must turn on the emergency switch before using poWerbot. turning the power on/off • When POWERbot is not used for 30 minutes, it will return to the charger press the button for more than WARNING to charge itself automatically. 3 second Using auto clean mode The POWERbot moves and cleans... -
Page 15: Selecting Cleaning Mode
Selecting cleaning mode cleaning mode How to select Displayed icon Auto clean Spot clean ✻ ✻ Spot clean mode can be selected only by pressing this button on the main body of the POWERbot. ✻ ✻ Manual clean mode can be selected Manual clean by the direction control buttons of the remote control. -
Page 16: Using The Remote Control
Remote control ✻ ✻ Wi-Fi connection should be done to control the POWERbot using Samsung Smart Home app. ✻ ✻ The previously selected setting will not change even if the emergency switch is turned off and then on. inserting batteries... -
Page 17: Cleaning
4 manual clean mode & Direction control Select to move forward Select to turn left Select to turn right ✻ ✻ Moving backward is not available. 5 point cleaning Refer to page 19 you can use the remote control to point and clean the desired spot while the poWerbot is in cleaning process. -
Page 18: Name Of Each Part
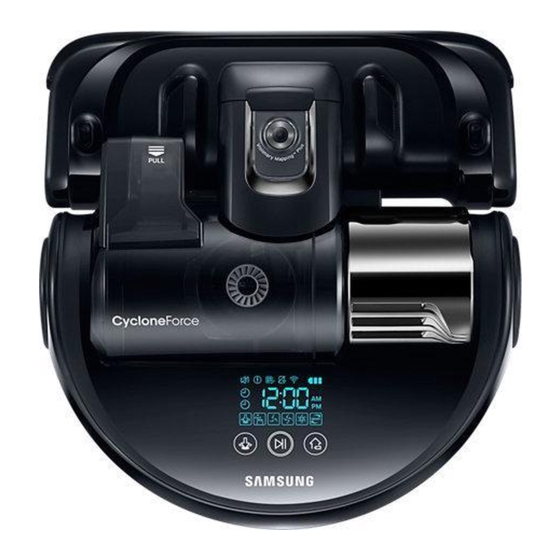
name of each part 1. Display panel 2. Dustbin holder 3. Remote control signal receiver 4. Virtual guard sensor 5. Obstacle sensor 6. Dustbin 7. Camera 8. Dustbin handle 9. Bumper sensor Bottom 1. Charge pins 2. Power brush 3. Power brush cover 4. -
Page 19: Setting Time/Schedule
Setting time/schedule only auto clean mode can be scheduled. Setting the time You must set the current time before using the One-time/daily schedule. Start setting Select "Hour" Select "Minute" Setting complete Select "AM/PM" Skip to previous, next setting Setting the schedule Setting/cancelling the schedule can only be done while POWERbot is docked on the charger. -
Page 20: Cleaning And Maintaining
Cleaning and maintaining you must turn off the emergency switch before cleaning poWerbot. Cleaning the dustbin Clean the dustbin when filter inspection indicator ( ) turns on or if there's too much dust in the dustbin. Remove the dustbin Remove the dustbin Remove dust in the cover dustbin and cyclone... -
Page 21: Cleaning The Driving Wheel
Cleaning the power brush Remove the Power Remove the Power Clean the Power brush brush cover brush Reassemble the Power Reassemble the Power brush brush cover Cleaning the Driving wheel Put a soft cloth on the floor and place Use a blunt rod or tweezers to remove the POWERbot upside-down. -
Page 22: Samsung Smart Home App
– Check if the operating mode of the wireless router is a router mode and retry the registration procedure. – If you have more than two POWERbot, turn off the others to register the one. The connection must be one to one. f Samsung Smart Home Service does not guarantee a normal operation under firewall environment. ENGLISH-22... -
Page 23: Smart Home App
Samsung smart home app immediately. Downloading Samsung Smart Home app You can download the Samsung Smart Home app by searching for “Samsung Smart Home App” at the Google Play Store, Samsung Galaxy Apps and Apple App store. Note f Samsung Smart Home apps are compatible with selected Samsung Galaxy S and Samsung Note series devices. -
Page 24: Smart Home App
Register the product to the Samsung Smart Home Service before using the Samsung Smart Home app. 1. Press the Add new icon on the device list screen of the Samsung Smart Home app to start the registration of the product. -
Page 25: Smart Home App
You can use more diverse functions through the Samsung Smart Robot vacuum App, which is exclusively for the POWERbot. 1. Select the Robot vacuum icon on the device list screen of the Samsung Smart Home app. If the Samsung Smart Robot vacuum app is not installed, you will be moved to the Google Play Store automatically. - Page 26 Robot vacuum icon on the main screen, and you can move to the POWERbot control screen. fYou can control your smart home appliances made by Samsung Electronics by Going out, Coming home, Good night, and Good morning icons.
- Page 27 Controlling poWerbot When accessing the Samsung Smart Robot vacuum app, the control screen will appear. 1. Power on/off 2. Option (Settings, Customer Service) 3. Current status indicator 4. Suction power 5. Recharging 6. Manual clean mode and Direction control (forward movement, left turn, right turn) 7.
-
Page 28: Notes And Cautions
notes and cautions f The POWERbot cannot vacuum clumps of Charging dirt, so some may remain on the floor after cleaning. Note – Please use another cleaning tool to clean them f If the battery overheats during charging, it regularly. may take longer to charge. - Page 29 The POWERbot uses 3 types of infrared f This battery is exclusive for Samsung devices and a device may not work in front of Electronics POWERbot; do not use it for any another device with a higher priority.
-
Page 30: Information Codes
information codes Below information Turn off the Information code codes appear on emergency switch will disappear the display panel and check the below when you turn on instructions and take the emergency appropriate action switch Information codes checklist the poWerbot is caught, stuck or trapped while moving around. -
Page 31: Troubleshooting
troubleshooting Symptom checklist fCheck if the emergency switch is on. fCheck if all the icons are displayed on display panel. the PoWERbot is not fCheck if the battery of POWERbot is depleted. working at all. – When "Lo" is displayed, carry POWERbot to the charger to charge it. fReplace the batteries (AAA type) when the remote controller is not working. - Page 32 Please try again after a while. Easy-Setup. the products do not fTurn off the Samsung Smart Home app and then run it again, or disconnect work even though the smart phone from the wireless router and then connect it again. Or turn off...
-
Page 33: Open Source Announcement
It is also possible to obtain the complete corresponding source code in a physical medium such as a CD-ROM; a minimal charge will be required. The following URL http://opensource.samsung.com/opensource/VR9200/seq/0 leads to the download page of the source code made available and open source license information as related to this product. This offer is valid to anyone in receipt of this information. -
Page 34: Specifications
Specifications classification Item Detail information Size 378 mm x 135 mm x 362 mm (Depth x Height x Length) Mechanical Weight 4.8 kg specifications Ceiling shape recognition (Visionary mapping plus (PoWERbot) Sensor Button type of POWERbot Touch type Power voltage 100 - 240 V~, 50 Hz / 60 Hz Power specifications Power consumption... - Page 35 note ENGLISH-35...
- Page 36 If you have any questions or comments relating to Samsung products, please contact the SAMSUNG customer care center. Country Customer Care Center Web Site 0330 SAMSUNG (7267864) www.samsung.com SOUTH AFRICA 0860 7267864 (SAMSUNG) www.samsung.com AUSTRALIA 1300 362 603 www.samsung.com www.samsung.com/hk...
Need help?
Do you have a question about the POWERbot SR20J9250U Series and is the answer not in the manual?
Questions and answers