
Related Manuals for Eaton EX RT 5 3:1


Summary of Contents for Eaton EX RT 5 3:1
- Page 1 EX RT 5 3:1 EX RT 7 3:1 EX RT 11 3:1 Installation and user manual English Français Deutsch Italiano Español Nederlands...
- Page 2 3400772400/AD...
- Page 3 EX RT 5 3:1 EX RT 7 3:1 EX RT 11 3:1 Installation and user manual...
-
Page 4: Environmental Protection
If the device must be installed in overvoltage category III or IV environments, additional upstream overvoltage protection must be provided for. To discover the entire range of EATON products and the options available for the EX RT range, we invite you to visit our web site at www.eaton.com or contact your EATON representative. -
Page 5: Table Of Contents
Contents Presentation Standard configurations ..................5 Tower configuration ....................5 Rack configuration ....................5 Rear panels ......................6 Power module EX RT 5/7/11 ..................6 Battery module EX RT EXB 7/11 ................6 Display and control panel ..................7 Options ...................... - Page 6 Contents Operation Initial start up ....................... 26 UPS personalisation ....................26 Accessing personalisation with front panel buttons ..........26 Access to the personalisation through external software ........27 Final start up sequence ..................27 Operating modes ....................28 Normal (double conversion) mode ................28 Eco mode ......................
-
Page 7: Presentation
1. Presentation 1.1 Standard configurations Tower configuration Dimensions in mm/ inches (H x W x D) EX RT 5 EX RT 7 444 x 131 x 635 EX RT 11 EX RT EXB 7 EX RT EXB 11 Weight in kg/lbs EX RT 5 22.5 EX RT 7... - Page 8 1. Presentation 1.2 Rear panels Power module EX RT 5/7/11 Slot for communication cards. Communication port by relays. Remote Emergency Power Off communication port (REPO). Connectors for automatic detection of battery module(s). RS232 communications port. Battery module connectors (to the UPS or to other battery modules).
-
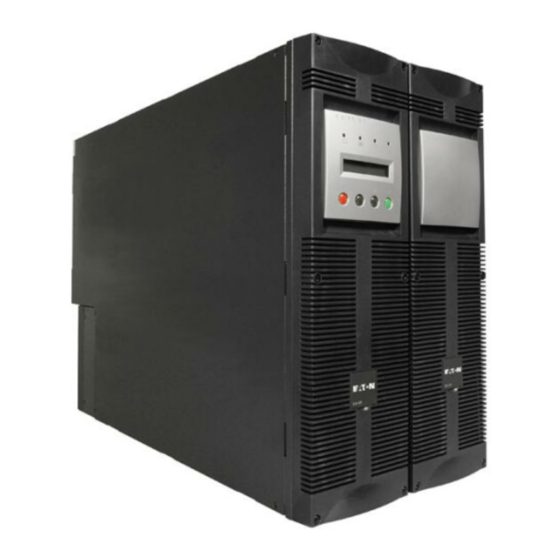
Page 9: Display And Control Panel
1. Presentation 1.3 Display and control panel Load protected LED. Operation on battery LED. E X 1 1 R T 3:1 Operation on bypass LED. Fault LED. Alphanumeric display. UPS OFF button. LOAD LEVEL Function buttons (scroll up / 4 kW / 5 kVA scroll down). -
Page 10: Transformer For Galvanic Isolation Or Earthing Arrangement Change
1. Presentation Transformer for galvanic isolation or earthing arrangement change (Part number 68003) This module is necessary either when a downstream neutral system from the UPS upstream is required, or when a different power source connects the automatic bypass for higher availability. Example of EX RT transformer connected upstream for EX RT galvanic isolation Battery module (EX RT EXB) Power module (EX RT 5/7/11) -
Page 11: Battery Extensions For Ups Backup Times Up To 60 Minutes
1. Presentation Battery extensions for UPS backup times up to 60 minutes (at full load) EX RT offers a standard backup time of 5/9 minutes at full load. To increase backup time, it is possible to connect EX RT EXB 7/11 modules to the UPSs. Battery extensions for EX RT 5, EX RT 7 or EX RT 11 EX RT 5/7 EX RT EXB 7... -
Page 12: Modules Integration System
1. Presentation Modules integration system (Part number 68005) Modules integration system for extended backup time configurations to conveniently stack and secure up to 8 modules on the same cart (swivel Transformer module wheels with brakes, leveling feet, seismic side panels, plates to lock modules and screws included). -
Page 13: Battery Extension Cable (1,8 M / 6 Ft)
2. Installation 2.1 Unpacking and parts check Power module Battery module Two sets of tower stands. Tower stand expanders. RS232 communications cable. Battery cable. Product documentation. Battery communication cable. Telescopic rails for rack enclosure with Input/Output junction box (with 11 insulated ferrules). mounting hardware (optional, or standard Network Management card (optional, or standard in with Network Pack version). -
Page 14: Installation In Tower Configuration
2. Installation 2.2 Installation in tower configuration Use the tower stand template provided with the battery module. Follow steps 1 to 4 to adjust the tower stands for the upright position. Always keep 150 mm free space behind the UPS rear panel. The distance between the tower stands should be 450 mm. -
Page 15: Installation In Rack Configuration
2. Installation 2.3 Installation in rack configuration We recommend to mount the battery module first, then mount the power module above the battery Adjustment of the orientation of the logo and control panels Battery module rack mounting (optional rails required, part number: 68002) The battery module is very heavy. -
Page 16: Power Or Battery Module Rack Mounting (Optional Rail Required)
Follow steps 1 to 4 for rack mounting the UPS onto the rails. The rails and the necessary mounting hardware are supplied by EATON. Note for step 1: it is possible to adjust the position of both front mounting ears. - Page 17 2. Installation Rear bracket system (included with rail kits, part numbers 68001 and 68002) To be used if you need to move the rack enclosure with UPS already rack-mounted inside. Input/output junction box bracket system (included with power module rail kit, part number 68001) This bracket will maintain the Input/Output box at the rear of the rack enclosure when hot-swapping the power module.
-
Page 18: Communication Ports
The output contact port is used for basic signaling or for protection of IT systems like IBM iSeries (formerly AS400) and more. The slot is compatible with any EATON communication card (check www.eaton.com web site for the complete list of compatible cards). -
Page 19: Remote Power Off
2. Installation Remote Power Off Installation of a Remote power off function must be carried out in compliance with applicable regulations. In order to fully de-energize devices and EX RT with an RPO port, it is necessary : - To use a two-position switch (Normally Open or Closed contact should be held more than 1 second to be taken into account). -
Page 20: Installation Depending On The System Earthing Arrangement (Sea)
2. Installation 2.5 Installation depending on the system earthing arrangement (SEA) EX RT must be fed from a 3-phase source with neutral. UPS with common Normal and Bypass AC inputs Main low-voltage switchboard (MLVS) Bypass AC Normal AC load Changement de SLT entre amont et aval ou isolation galvanique requis Main Bypass AC low-voltage... -
Page 21: Ups With Separate Normal And Bypass Ac Inputs, Supplied By Separate Sources
2. Installation UPS with separate Normal and Bypass AC inputs, supplied by separate sources Bypass AC MLVS 1 load MLVS 2 Normal AC Bypass AC MLVS 1 load MLVS 2 Normal AC Change in SEA between upstream and downstream or galvanic isolation required Bypass AC MLVS 1 load... -
Page 22: Required Protective Devices And Cable Cross-Sections
2. Installation 2.6 Required protective devices and cable cross-sections Recommended upstream protection Separate AC inputs Common AC inputs power Upstream circuit-breaker Upstream circuit-breaker Upstream circuit-breaker rating Normal / Bypass AC sources Normal AC source Bypass AC source 5 kVA D curve - 40 A C curve - 32 A D curve - 40 A 7 kVA... -
Page 23: Connections Of Input/Output Power Cables
2. Installation 2.7 Connections of input/output power cables This type of connection must be carried out by qualified electrical personnel. Before carrying out any connection, check that the battery circuit breaker and that the upstream protection devices (Normal and Bypass AC sources) are open ("0"). EX RT UPS always comes from factory with Normal and Bypass AC inputs already connected together, using a bridge. -
Page 24: Ups With Separate Normal And Bypass Ac Sources
2. Installation UPS with separate Normal and Bypass AC sources 1 - Remove the terminal block cover (5 screws), 2 - Remove the bridge connected O ut pu between L2 and L1, 3 - Insert the Normal AC cable through ss In pu By pa ie r In pu... -
Page 25: Frequency Converter
2. Installation Frequency converter 1 - Remove the terminal block cover (5 screws), 2 - Remove the bridge connected between L2 and L1, O ut pu 3 - Insert the Normal AC cable through ss In pu By pa ie r In pu the cable gland, R ec tif 4 - Connect the 5 wires to the Normal... -
Page 26: Connection Of Battery Cables
2. Installation Connection of battery cables 1 - Check that the battery circuit breaker is OFF ("0" position), 2 - Connect the battery power cable to the connectors of the power and battery modules, 3 - Connect the battery detection cable to the connectors of the power and battery modules,... -
Page 27: Connection Of Cla Module
2. Installation Connection of CLA module BATTERY AC INPUT To battery AC Input Connect the battery cable (provided with the CLA module) between the power module and the CLA module. Connect the cable (provided with the CLA module) between the power module and the CLA module. Connect the battery: - cable cross-section (not provided): 10 mm², solid or stranded wire (maximum 13 mm²... -
Page 28: Operation
If specific settings are required, it is recommended to enter the UPS personnalisation mode at this stage. It is possible to enter this mode through the front panel buttons or the Personal Solution-Pac software for Windows included in the EATON Solution-Pac power management suite CD-ROM. Accessing personalisation with front panel buttons Press "scroll up"... -
Page 29: Access To The Personalisation Through External Software
(see section 1.4 "Battery extensions"). Battery deep discharge Enabled Disabled If disabled, lost of EATON protection warranty. Use EXIT key when set up is completed. These parameters are only adjustable if UPS is OFF. Access to the personalisation through external software Insert the Solution-Pac CD ROM in your CD drive. -
Page 30: Operating Modes
3. Operation 3.3 Operating modes Normal (double conversion) mode This is the standard operating mode, set by default in the factory. Two possible choices. 1 - Normal AC source available: is ON. LOAD LEVEL The load is protected by the UPS. 4 kW / 5 kVA Scroll up and scroll down... -
Page 31: Operation On Battery Power
3. Operation 3.4 Operation on battery power The load continues to be protected by the UPS when the Normal AC source is not available. Power is supplied by the battery. Transfer to battery power is ON. is ON. The audio alarm beeps every 10 seconds. The load is supplied by the battery. -
Page 32: Shut Down
3. Operation 3.6 Shut down 1 - Press the OFF button more than 3 seconds. The load is no longer protected by the UPS. It is powered via the bypass AC source. If the UPS is set in frequency converter mode, the load will not be powered. -
Page 33: Maintenance
4.1 Troubleshooting If any of LEDs is on, there is an operating anomaly or an alarm. Use "scroll up" or "scroll down" function button to reset the audible alarm. Troubleshooting not requiring EATON after-sales support: Indication Signification Correction AC source is not connected... -
Page 34: Hot-Swapping The Power Module
4. Maintenance 4.2 Hot-swapping the power module This operation can be performed without interrupting the load. Disconnecting the power module Stop the UPS with the OFF button (press more than 3 seconds). Check if UPS is on bypass AC source: is on (If led is not on, do not turn the manual bypass and call the after sales support department). -
Page 35: Reconnecting The Power Module
4. Maintenance Reconnecting the power module Secure the Input/Output junction box using the three screws. Reconnect the battery cables to the power module. Switch the battery circuit breaker(s) to the "I" position. Switch the Normal AC source circuit-breaker to the "I" position. -
Page 36: Training Center
4. Maintenance 4.4 Training Center To allow you to use EATON products effectively and carry out basic maintenance, we offer a complete range of technical training courses in English and French. For further information, please visit our website: www.eaton.com Page 34 - 34007724EN/AD... -
Page 37: Appendices
5. Appendices 5.1 Technical specifications Electrical characteristics I/T network and industrial operating modes Mode Industrial mode I/T network mode Overload, and Bypass Same as I/T network mode, but the UPS Load is transfered to Bypass AC AC source in tolerance. does not return to normal mode if overload source. - Page 38 5. Appendices Time/current curves for UPS Normal AC source circuit-breaker t (s) I / In 1,25 Time/current curves for UPS input and output fuses t (s) t (s) I (A) Intput fuses of Intput fuses of EX RT 11: 30 A EX RT 5: 25 A EX RT 7: 25 A I (A)
- Page 39 5. Appendices UPS Input / output characteristics Source Voltage Frequency Normal AC source 320 to 465 Volts AC 40 to 70 Hz Bypass AC source 187 to 264 Volts AC* 48 to 52 Hz** Load output 230 Volts AC (200/208/220/240/250 V 50/60 Hz autoranging are possible values) (or frequency converter)
-
Page 40: Glossary
5. Appendices EX RT CLA module AC input voltage: 160-280 Volts AC, Input frequency: 40-70 Hz, Battery charge current: 6 A DC, Recharge time to recover 90% of the rated backup time after discharge at full load: Configuration for Configuration for Configuration for 2 hours backup time 4 hours backup time... - Page 41 EX RT 5 3:1 EX RT 7 3:1 EX RT 11 3:1 Manuel d'installation et d'utilisation...
- Page 42 être prévue en amont de celui-ci. Nous vous invitons à découvrir l'offre de EATON ainsi que les options de la gamme EX RT en visitant notre site WEB : www.eaton.com, ou en contactant votre représentant EATON.
- Page 43 Sommaire Présentation Positions standards ....................5 Position tour ......................5 Position rack ......................5 Faces arrières ......................6 Module de puissance EX RT 5/7/ 11 ...............6 Module batterie EX RT EXB 7/ 11 ................6 Panneau d'affichage et de commande ..............7 Options ......................7 Kits de montage en rack ..................7 Transformateur d'isolement galvanique ou d'adaptation aux schémas de liaison à...
- Page 44 Sommaire Utilisation Mise en service initiale ..................26 Personnalisation de l'ASI ..................26 Personnalisation par le panneau de commande ............26 Personnalisation par logiciel externe ..............27 Séquence de démarrage de l'ASI ..............27 Modes de fonctionnement .................28 Mode normal (double conversion) ................28 Mode Eco ......................28 Fonctionnement sur batterie ................29 Passage sur batterie ....................29...
-
Page 45: Présentation
1. Présentation 1.1 Positions standards Position tour Dimensions en mm (H x L x P) EX RT 5 EX RT 7 444 x 131 x 635 EX RT 11 EX RT EXB 7 EX RT EXB 11 Masse en kg EX RT 5 22,5 EX RT 7... - Page 46 1. Présentation 1.2 Faces arrières Module de puissance EX RT 5/7/11 Emplacement pour carte de communication. Port de communication par relais. Port d'arrêt d'urgence distant (REPO). Raccordement de la détection automatique de module(s) batterie. Port de communication RS232. Raccordement des câbles de puissance entre modules batterie et avec l'ASI.
-
Page 47: Panneau D'affichage Et De Commande
1. Présentation 1.3 Panneau d'affichage et de commande Voyant applications protégées. Voyant de fonctionnement sur batterie. E X 1 1 R T 3:1 Voyant de fonctionnement en Bypass. Voyant de défaut. Affichage alphanumerique. TAUX DE CHARGE Bouton d'arrêt de l'ASI. 4 kW / 5 kVA Boutons de fonctions (défilement haut et bas). -
Page 48: Transformateur D'isolement Galvanique Ou D'adaptation Aux Schémas De Liaison À La Terre
1. Présentation Transformateur d'isolement galvanique ou d'adaptation aux schémas de liaison à la terre (Référence 68003) Ce module est nécessaire soit pour obtenir un régime de neutre aval de l'ASI différent du régime de neutre amont, soit pour accroître la disponibilité de l'alimentation électrique avec un réseau séparé. Exemple d'un transformateur EX RT placé... - Page 49 1. Présentation Extensions batterie pour autonomies batterie de 60 minutes max. (à pleine puissance) EX RT offre une autonomie standard de 5/9 minutes à puissance nominale. Pour augmenter l'autonomie, il est possible de raccorder des modules EX RT EXB 7/11 supplémentaires. Extensions batterie pour EX RT 5, EX RT 7 ou EX RT 11 EX RT 5/7 + EX RT EXB 7 RT...
-
Page 50: Module Batterie Équipé D'arrêt D'urgence (Repo)
1. Présentation Système d'assemblage des modules batterie sur chariot (Référence 68005) Ce système permet d'assembler, dans le cas d'ASI à forte autonomie batterie, jusqu'à 8 modules empilés sur un même chariot (roulettes à rotules et Module transformateur freins, pieds de mise à niveau, plaques latérales anti-sismique, plaquettes d'assemblage intermodules et visserie Module de puissance... -
Page 51: Installation
2. Installation 2.1 Déballage et vérification du contenu Module de puissance Module batterie Pieds de maintien. Allonges pour pieds de maintien. Câble de communication RS232. Câble batterie. Manuels d'installation et d'utilisation. Cordon de détection batterie. Rails téléscopiques pour montage en Boîtier amovible d'entrées/sortie avec 11 embouts de rack dans une baie de 19"... -
Page 52: Installation En Position Tour
2. Installation 2.2 Installation en position tour Utiliser le gabarit de montage des pieds de maintien livré avec le module batterie. Suivre les étapes 1 à 4 pour ajuster les pieds de maintien en position verticale. Veiller à toujours conserver un espace libre de 150 mm à l'arrière de l'ASI. L'écartement entre les deux paires de pieds de maintien doit être de 450 mm. -
Page 53: Installation En Position Rack
2. Installation 2.3 Installation en position rack Il est recommandé de monter le module batterie en premier, puis de monter le module de puissance au-dessus. Modification de l'orientation du logo et du panneau de commande Montage en rack du module batterie (rails optionnels requis, référence 68006) Le module batterie est très lourd. - Page 54 Suivre les étapes 1 à 4 pour le montage du module sur ses rails. Les rails et le nécessaire de montage sont fournis par EATON. Note pour l'étape 1 : il est possible d'ajuster la position des équerres de fixation frontales.
- Page 55 2. Installation Système de fixation arrière (inclu avec le kit rails, références 68001 et 68002) Ce système est à utiliser pour transporter la baie équipée des modules. Système de fixation du boîtier d'entrées/sortie amovible (inclu avec le kit rails du module de puissance, référence 68001) Ce système de fixation permet de maintenir le boîtier d'entrées/sortie du module à...
-
Page 56: Ports De Communication
IT comme IBM iSeries (principalement AS400) ou autres. L'emplacement pour cartes de communication peut recevoir tous types de cartes EATON (voir le site Web www.eaton.com pour connaître la liste complète des cartes compatibles). Raccordement du port de communication RS232 1 - Raccorder le câble de... -
Page 57: Arrêt D'urgence
2. Installation Arrêt d'urgence L’installation d’un arrêt d’urgence doit être réalisée conformément aux normes en vigueur. Afin d’obtenir une mise hors tension totale de l’installation et de EX RT par l’action d’un arrêt d’urgence, il est nécessaire : - d’utiliser un bouton à accrochage (le contact NO ou NF doit être maintenu plus d’une seconde pour prise en compte), - d’utiliser le(s) module(s) batterie EX RT EXB EPO. -
Page 58: Choix D'installation Selon Le Schéma De Liaison À La Terre (Slt)
2. Installation 2.5 Choix d'installation selon le Schéma de Liaison à la Terre (SLT) EX RT doit être alimenté par un réseau électrique triphasé avec neutre. ASI avec réseaux d'entrée AC Normal et AC Bypass communs Tableau général basse tension AC Bypass (TGBT) AC Normal... -
Page 59: Redondance Secours
2. Installation ASI avec réseaux d'entrée AC Normal et AC Bypass séparés et provenant de sources différentes AC Bypass TGBT 1 Applications TGBT 2 AC Normal AC Bypass TGBT 1 Applications TGBT 2 AC Normal Changement de SLT entre amont et aval ou isolation galvanique requis AC Bypass TGBT 1 Applications... -
Page 60: Sections De Câbles Recommandées
2. Installation 2.6 Organes de protection et sections de câbles préconisés Protection amont préconisée Réseaux d'entrée séparés Puissance Réseaux d'entrée communs nominale de Disjoncteur de protection Disjoncteur de protection Disjoncteur de protection l'ASI amont AC Normal / AC Bypass amont AC Normal amont AC Bypass 5 kVA Courbe D - 40 A... -
Page 61: Raccordement Des Câbles De Puissance D'entrée Et Sortie
2. Installation 2.7 Raccordement des câbles de puissance d'entrée et sortie Ces raccordements doivent être réalisés par du personnel qualifié. Avant d'effectuer les raccordements, vérifier que le disjoncteur batterie et les disjoncteurs de protection amont des réseaux AC Normal et AC Bypass sont en position ouverts ("0" ou "OFF"). EX RT est toujours livré... -
Page 62: Raccordement D'une Asi Avec Réseaux D'entrée Ac Normal Et Ac Bypass Séparés
2. Installation Raccordement d'une ASI avec réseaux d'entrée AC Normal et AC Bypass séparés 1 - Enlever le capot de protection des borniers (fixé par 5 vis), 2 - Enlever le pont câblé entre les O ut pu bornes L2 et L1, 3 - Faire passer le câble AC Normal à... -
Page 63: Raccordement Du Convertisseur De Fréquence
2. Installation Raccordement du convertisseur de fréquence 1 - Enlever le capot de protection des borniers (fixé par 5 vis), 2 - Enlever le pont câblé entre L2 et L1, O ut pu 3 - Faire passer le câble AC Normal à travers le presse étoupe, ss In pu By pa... -
Page 64: Raccordement Des Câbles Batterie
2. Installation Raccordement des câbles batterie 1 - Vérifier que le disjoncteur batterie est en position ouvert "0", 2 - Raccorder le câble batterie le connecteur des modules de puissance et batterie, 3 - Raccorder le cordon de détection batterie sur les connecteurs des modules de puisssance et batterie. -
Page 65: Raccordement Du Module Chargeur Longue Autonomie (Cla)
2. Installation Raccordement du module Chargeur Longue Autonomie (CLA) BATTERY AC INPUT Vers batterie Vers réseau électrique Raccorder le câble batterie (livré avec le module CLA) entre le module de puissance et le module CLA. Raccorder le cordon (livré avec le module CLA) entre le module de puissance et le module CLA. Raccorder la batterie : Section du câble (non fourni) : 10 mm², câble rigide ou souple (maximum 13 mm²... -
Page 66: Utilisation
à cette étape. Ce mode est accessible par les touches du panneau de commande ou par le logiciel Personal Solution-Pac pour Windows inclu dans le CD-ROM Solution-Pac de EATON. Personnalisation par le panneau de commande Presser ensemble les touches de fonction pendant plus de 3 secondes. -
Page 67: Personnalisation Par Logiciel Externe
Protection de la batterie Active Inactive Si inactive, perte de la contre les décharges garantie EATON. profondes Presser la touche QUIT en fin de personnalisation. Ces paramètres ne sont modifiables que si l' ASI est à l'arrêt. Personnalisation par logiciel externe Insérer le CD ROM... -
Page 68: Modes De Fonctionnement
3. Utilisation 3.3 Modes de fonctionnement Mode Normal (double conversion) C'est le mode de fonctionnement standard, personnalisé en usine. Ce mode offre deux fonctionnements possibles. 1 - Le réseau AC Normal est disponible : Le voyant est allumé. TAUX DE CHARGE Les applications raccordées sont protégées par l'ASI. -
Page 69: Fonctionnement Sur Batterie
3. Utilisation 3.4 Fonctionnement sur batterie Les applications raccordées continuent à être alimentées par l'ASI quand le réseau AC Normal n'est plus disponible. L'énergie fournie provient de la batterie. Passage sur batterie Le voyant est allumé. Le voyant est allumé. L'alarme sonore émet un bip toutes les 10 secondes. -
Page 70: Arrêt De L'asi
3. Utilisation 3.6 Arrêt de l'ASI 1 - Presser la touche plus de 3 secondes. Les applications raccordées ne sont plus protégées par l'ASI. Elles sont alimentées par le réseau AC Bypass. Si l'ASI est en mode convertisseur de fréquence, les applications raccordées ne sont plus alimentées. -
Page 71: Maintenance
Si l'un des voyants est allumé, il y a une anomalie de fonctionnement ou une alarme. Utiliser la touche de fonction "scroll up" ou "scroll down" pour arrêter l'alarme sonore. Anomalies ne nécessitant pas l'intervention du service après vente EATON : Indication Signification... -
Page 72: Remplacement Du Module De Puissance
4. Maintenance 4.2 Remplacement du module de puissance Cette opération peut être effectuée sans interrompre l'alimentation des applications raccordées. Déconnexion du module de puissance Arrêter l'ASI à l'aide de la touche pressée plus de 3 secondes. Vérifier que l'ASI fonctionne en mode Bypass : le voyant doit être allumé... -
Page 73: Reconnexion Du Module De Puissance
4. Maintenance Reconnexion du module de puissance Fixer le boîtier d'entrées/sortie à l'arrière de l'ASI par les 3 vis prévues. Reconnecter les câbles batterie au module de puissance. Placer le(s) disjoncteur(s) batterie en position fermé "I". Placer le disjoncteur réseau AC Normal en position fermé... -
Page 74: Centre De Formation
4. Maintenance 4.4 Centre de formation Pour maîtriser l'exploitation de votre appareil EATON et intervenir au premier niveau, nous mettons à votre disposition un programme complet de formations techniques en langues anglaise et française. Pour plus d’informations, consulter notre site internet : www.eaton.com... -
Page 75: Annexes
5. Annexes 5.1 Spécifications techniques Caractéristiques électriques Modes de fonctionnement réseau I/T et industriel Mode industriel Mode réseau I/T Surcharge avec Même fonctionnement que le mode réseau Les applications raccordées sont réseau AC Bypass en I/T, mais pas de retour en mode Normal si transférées sur le réseau AC Bypass. - Page 76 5. Annexes Courbes Temps/Courant pour le disjoncteur d'entrée de l'ASI t (s) I / In 1,25 Courbes Temps/Courant pour les fusibles d'entrée et sortie de l'ASI t (s) t (s) I (A) Fusibles d'entrée de Fusibles d'entrée de EX RT 11 : 30 A EX RT 5 : 25 A EX RT 7 : 25 A I (A)
- Page 77 5. Annexes Caractéristiques d'entrée/sortie de l'ASI Source Tension Fréquence Réseau AC Normal 320 à 465 Volts AC 40 à 70 Hz Réseau AC Bypass 187 à 264 Volts AC* 48 à 52 Hz** Sortie applications 230 Volts AC (autres valeurs Sélection automatique 50/60 Hz possibles : 200/208/220/240/250 V).
-
Page 78: Caractéristiques Thermiques
5. Annexes Module EX RT CLA Tension d'alimentation : 160-280 Volts AC, Fréquence d'alimentation : 40-70 Hz, Courant de recharge : 6 A CC, Temps de recharge pour retrouver 90 % de l'autonomie nominale après une décharge à puissance nominale de l'ASI : Configuration Configuration Configuration... - Page 79 EX RT 5 3:1 EX RT 7 3:1 EX RT 11 3:1 Installations- und Bedienungsanleitung...
- Page 80 Einführung Wir danken Ihnen, daß Sie sich für ein Produkt von EATON zum Schutz Ihrer Geräte entschieden haben. Die Baureihe EX RT wurde mit größter Sorgfalt entwickelt. Um die Leistungen Ihrer USV (Unterbrechungsfreien Stromversorgung) optimal nutzen zu können, empfehlen wir Ihnen, sich ein wenig Zeit zu nehmen und das vorliegende Handbuch aufmerksam zu lesen.
- Page 81 Inhalt Ansichten und Beschreibung Aufstellungsarten ....................5 Tower-Modell ......................5 Rack-Modell ......................5 Rückansicht ......................6 USV-Module EX RT 5/7/11 ..................6 Batteriemodul EX RT EXB 7/11 ................6 Anzeige- und Bedienfeld ..................7 Optionen ......................... 7 Montagematerial für Rackeinbau ................7 Trenn- und Anpaßtransformator für unterschiedliche Netzformen ......
- Page 82 Inhalt Betriebszustände Erstinbetriebnahme ..................... 26 Kundenspezifische Anpassung der USV ..............26 Anpassung über das Bedien- und Anzeigefeld ............26 Anpassung über Software ..................27 Einschalten der USV .................... 27 Betriebsarten ....................... 28 Normalbetrieb (Doppelwandlerprinzip) ..............28 ECO-Mode ......................28 Batteriebetrieb ....................29 Umschaltung auf Batteriebetrieb ................
-
Page 83: Ansichten Und Beschreibung
1. Ansichten und Beschreibung 1.1 Aufstellungsarten Tower-Modell Abmessungen in mm (H x B x T) EX RT 5 EX RT 7 444 x 131 x 635 EX RT 11 EX RT EXB 7 EX RT EXB 11 Gewicht in kg EX RT 5 22.5 EX RT 7... - Page 84 1. Ansichten und Beschreibung 1.2 Rückansicht USV-ModuleEX RT 5/7/11 Steckplatz für zusätzliche Kommunikationskarte. Schnittstelle der Relais-Kommunikationskarte. Schnittstelle für Not-AUS per Fernbetätigung (REPO). Anschluß für automatische Batteriemodulerkennung. RS232-Schnittstelle. Anschluß der Leistungsverbindungen USV/Batteriemodule. Handumgehungsschalter. Ausgangsklemmen für Verbraucheranschlüsse. Eingangsschalter Netz 1 (AC Normal). Anschlußklemmen Netz 1 (AC Normal).
-
Page 85: Anzeige- Und Bedienfeld
1. Ansichten und Beschreibung 1.3 Anzeige- und Bedienfeld LED: Verbraucher geschützt. LED: Batteriebetrieb. E X 1 1 R T 3:1 LED: NRE-Betrieb. LED: Störung. Alphanumerische Anzeige. Taster USV-AUS. AUSLASTUNGSGRAD Scrolltasten (aufwärts/abwärts). 4 kW / 5 kVA Taster USV-EIN (bzw. Funktionstaste der Anzeige bei kundenspezifischer Anpassung). -
Page 86: Trenn- Und Anpaßtransformator Für Unterschiedliche Netzformen
1. Ansichten und Beschreibung Trenn- und Anpaßtransformator für unterschiedliche Netzformen (Bestell-Nr. 68003) Dieses Modul ist zur Anpassung bei unterschiedlichen Netzformen auf Einspeise- und Abgangsseite der USV bzw. zur Erhöhung der Verfügbarkeit durch galvanische Trennung der Stromversorgung erforderlich. Beispiel eines EX RT-Trafos zur galvanischen Trennung auf der Einspeiseite einer EX RT Batteriemodul (EX RT EXB) USV-Modul (EX RT 5/7/11) -
Page 87: Cla-Modul (Hochleistungsladegerät) Für Autonomiezeiten Von 2 Bis 8 Stunden
1. Ansichten und Beschreibung Batterie-Erweiterungsmodule für Autonomiezeiten bis zu 60 Minuten (bei Vollast) EX RT bietet standardmäßig eine Autonomiezeit von 5/9 Minuten bei Nennleistung. Zur Erhöhung der Autonomiezeit können zusätzliche Erweiterungsmodule EX RT EXB 7/11 angeschlossen werden. Batterie-Erweiterungsmodule für EX RT 5, EX RT 7 oder EX RT 11 EX RT 5/7 + EX RT EXB 7 RT EX RT EXB 7... -
Page 88: Fahrbares Rahmengestell Für Einbau Mehrerer Module
1. Ansichten und Beschreibung Fahrbares Rahmengestell für Einbau mehrerer Module (Bestell-Nr. 68005) Das fahrbare Rahmengestell erlaubt die Zusammenfassung von bis zu 8 Modulen, um USV-Systeme mit hohen Autonomiezeiten zu bilden. Die Trafomodul Module werden übereinander auf dem Gestell installiert, das einschließlich Gelenkrollen mit Feststellbremse, USV-Modul höhenverstellbaren Füßen,... -
Page 89: Aufstellung Und Installation
2. Aufstellung und Installation 2.1 Entfernen der Verpackung und Überprüfung des Lieferumfangs USV-Modul Batteriemodul Aufstellfüße. Verlängerungen für Aufstellfüße. RS232-Kommunikationskabel. Batteriekabel. Installations- und Bedienungsanleitung. Kabel für automatische Batteriemodulerkennung. Teleskopschienen und Abnehmbares Anschlußmodul für Ein- und Schraubenmaterial für Einbau in Ausgangsanschlüsse, incl. 11 Aderendhülsen. 19'’-Schränke (Standard bei Version Netzwerkkarte (Standard bei Network Pack, sonst Network Pack, sonst Option). -
Page 90: Aufstellung Des Tower-Modells
2. Aufstellung und Installation 2.2 Aufstellung des Tower-Modells Zum Zusammenbau der Aufstellfüße mitgelieferte Zwischenstücke verwenden. Zur vertikalen Ausrichtung der Füße Schritte 1 bis 4 befolgen. Achten Sie darauf, an der Rückseite der USV einen Abstand von 150 mm zu lassen. Der Abstand zwischen den zwei Paar Aufstellfüßen muss 450 mm betragen. -
Page 91: Einbau Des Rack-Modells
2. Aufstellung und Installation 2.3 Einbau des Rack-Modells Es empfiehlt sich, zunächst das Batteriemodul und anschließend das USV-Modul darüber einzubauen. Drehen des Firmenschilds und des Bedien- und Anzeigefelds Einbau des Batteriemoduls (optional erhältliche Montageschienen erforderlich; Bestell-Nr. 68006) Das Batteriemodul ist sehr schwer. Zur leichteren Handhabung empfiehlt es sich, die Batterieelemente wie nachstehend abgebildet für die Dauer der Montage herauszunehmen. - Page 92 (optional erhältliche Montageschienen erforderlich; Bestell-Nr. 68001) Zur Befestigung des Moduls auf den Schienen Schritte 1 bis 4 befolgen. Die Schienen und das benötigte Montagematerial werden von EATON geliefert. Hinweis zu Schritt 1: Die vorderen Befestigungswinkel können in mehreren Positionen montiert werden.
- Page 93 2. Aufstellung und Installation Hinteres Befestigungssystem (im Befestigungsmaterial der Module enthalten; Bestell-Nr. 68001 und 68002) Diese Befestigung ist für den Transport des Schranks mit eingebauten Modulen erforderlich. Befestigungssystem für das abnehmbare Anschlußmodul (im Befestigungsmaterial des USV-Moduls enthalten; Bestell-Nr. 68001) Dieses Befestigungssystem fixiert das Anschlußmodul im Schrank auch wenn die USV entfernt wird. Die angeschlossenen Verbraucher werden weiterversorgt.
-
Page 94: Kommunikationsanschlüsse
2.4 Kommunikationsanschlüsse EX RT bietet drei Kommunikationsverbindungen, die gleichzeitig genutzt werden können: Die Schnittstelle COM steht für eine RS232-Verbindung mit eigenem SHUT-Protokoll von EATON zur Verfügung. Diese Protokoll ist mit der auf CD-ROM mitgelieferten USV-Software Solution Pac kompatibel. Die Relaisschnittstelle wird für wichtige Meldefunktionen oder zum Schutz von IT-Systemen wie IBM... -
Page 95: Not-Aus-Vorrichtung
2. Aufstellung und Installation Not-AUS-Vorrichtung Die Installation einer Not-Aus-Vorrichtung muss in Übereinstimmung mit den gelten Normen erfolgen. Um eine vollständige Unterbrechung der Spannungsversorgung der Anlage und des EX RT durch Betätigung der Not-Aus-Vorrichtung zu gewährleisten, ist es erforderlich: - Einen Taster mit Rastfunktion zu benutzen (der S- oder Ö-Kontakt muss mehr als eine Sekunde gehalten werden, um berücksichtigt zu werden), - Das (die) Batteriemodul(e) EX RT EXB EPO zu benutzen. -
Page 96: Installation In Abhängigkeit Von Der Netzform (Erdungssystem)
2. Aufstellung und Installation 2.5 Installation in Abhängigkeit von der Netzform (Erdungssystem) Die EX RT benötigt an ihrem Eingang einen dreiphasigen Netzanschluß mit Neutralleiter. USV mit gemeinsamer Einspeisung von Netz 1 (Gleichrichter) und Netz 2 (Bypass) Nieder- spannungs- Haupt- verteilung (NS-HV) Netz 2 (AC Bypass) Netz 1 (AC Normal) -
Page 97: Usv Mit Getrennter Einspeisung Von Netz 1 (Gleichrichter) Und Netz 2 (Bypass) Aus Unterschiedlichen Netzen
2. Aufstellung und Installation USV mit getrennter Einspeisung von Netz 1 (Gleichrichter) und Netz 2 (Bypass) aus unterschiedlichen Netzen Netz 2 (AC Bypass) NS-HV 1 Verbraucher NS-HV 2 Netz 1 (AC Normal) oder Netz 2 (AC Bypass) NS-HV 1 Verbraucher NS-HV 2 Netz 1 (AC Normal) -
Page 98: Empfohlene Schutzorgane Und Leiterquerschnitte
2. Aufstellung und Installation 2.6 Empfohlene Schutzorgane und Leiterquerschnitte Netzseitige Absicherung USV mit gemeinsamer USV mit getrennter Einspeisung USV- Einspeisung Eingangschalter Netz 1 Eingangschalter Netz 2 Nennleistung Eingangschalter Netz 1/2 AC Normal AC Bypass AC Normal / AC Bypass 5 kVA 40 A, D-Kurve 32 A, C-Kurve 40 A, D-Kurve... -
Page 99: Anschluß Der Leistungskabel Am Usv-Eingang Und -Ausgang
2. Aufstellung und Installation 2.7 Anschluß der Leistungskabel am USV-Eingang und -Ausgang Die Anschlüsse müssen durch qualifiziertes Fachpersonal ausgeführt werden. Vor Ausführung der Anschlüsse ist sicherzustellen, daß der Batterie-Leitungsschalter und die Sicherungsautomaten am USV-Zuleitung (Netz 1 und Netz 2) ausgeschaltet sind (Stellung "0"). Bei Auslieferung der EX RT sind die Eingänge für Netz 1 (AC Normal) und Netz 2 (AC Bypass) durch ein Kabel am Klemmenblock gebrückt. -
Page 100: Anschluß Einer Usv Mit Getrennter Einspeisung Von Netz 1 (Gleichrichter)
2. Aufstellung und Installation Anschluß einer USV mit getrennter Einspeisung von Netz 1 (Gleichrichter) und Netz 2 (Bypass) 1 - Klemmenabdeckung entfernen (5 Befestigungsschrauben), 2 - Kabelbrücke zwischen den O ut pu Klemmen L2 und L1 entfernen. 3 - Eingangskabel für Netz 1 ss In pu By pa ie r In pu... -
Page 101: Anschluß Des Frequenzwandlers
2. Aufstellung und Installation Anschluß des Frequenzwandlers 1 - Klemmenabdeckung entfernen (5 Befestigungsschrauben), 2 - Kabelbrücke zwischen den Klemmen L2 und L1 entfernen. O ut pu 3 - Eingangskabel für Netz 1 durch die ss In pu By pa ie r In pu Stopfbuchse führen. -
Page 102: Anschluß Der Batteriekabel
2. Aufstellung und Installation Anschluß der Batteriekabel 1 - Der Batterie-Leistungsschalter muß ausgeschaltet sein (Stellung "0"). 2 - Batteriekabel an die Steckverbinder des USV-Moduls und des Batteriemoduls anschließen und festschrauben. 3 - Kabel zur automatischen Batterieerkennung an die Steckverbinder des USV-Moduls und des Batteriemoduls anschließen. - Page 103 2. Aufstellung und Installation Anschluß des CLA-Moduls (Hochleistungsladegerät) BATTERY AC INPUT zur Batterie Einspeisenetz Im Lieferumfang des Ladegeräts enthaltenes Batteriekabel zwischen USV und CLA-Modul anschließen. Im Lieferumfang des Ladegeräts enthaltenes Batterieerkennungskabel zwischen USV und CLA-Modul anschließen. Batterie anschließen: - Leiterquerschnitt (Kabel nicht mitgeliefert): 10 mm², starres oder flexibles Kabel (max. 13 mm² oder AWG 6).
-
Page 104: Betriebszustände
Einstellmodus in dieser Phase aufzurufen. Der Anpassungsmodus kann über die Tasten des Bedien- und Anzeigefelds oder über die USV-Software "Personal Solution-Pac für Windows" aufgerufen werden, die auf der mitgelieferten CD-ROM Solution-Pac von EATON enthalten ist. Anpassung über das Bedien- und Anzeigefeld Die beiden Funktionstasten gleichzeitig länger als... -
Page 105: Anpassung Über Software
RT CLA erforderlich (siehe Abschnitt 1.4 "Batterie- Erweiterungsmodule") Schutz gegen Tiefentladung Aktiv Inaktiv Bei Einstellung "inaktiv" Verlust der EATON-Garantie. Nach Beendigung der Anpassung Taste EXIT drücken. Diese Einstellungen können nur bei ausgeschalteter USV verändert werden. Anpassung über Software CD ROM "... -
Page 106: Betriebsarten
3. Betriebszustände 3.3 Betriebsarten Normalbetrieb (Doppelwandlerprinzip) Diese Betriebsart ist werksseitig voreingestellt. Es können zwei Betriebszustände vorliegen: 1 - Das Einspeisenetz (AC Normal) ist vorhanden : leuchtet. Die angeschlossenen Verbraucher sind durch die USV geschützt. AUSLASTUNGSGRAD 4 kW / 5 kVA Im Normalbetrieb können durch Betätigung der Scroll-Tasten die von der USV erfaßten Meßwerte (Spannung von Netz 1 und Netz 2, Betriebsart, Batteriekapazität und... -
Page 107: Batteriebetrieb
3. Betriebszustände 3.4 Batteriebetrieb Bei Ausfall von Netz 1 (AC Normal) bleiben die Verbraucher weiterhin durch die USV geschützt. Dabei liefern die Batterien die erforderliche Versorgungsenergie. Umschaltung auf Batteriebetrieb leuchtet. leuchtet. Summer ertönt alle 10 Sekunden. Die angeschlossenen Verbraucher werden über die Batterie versorgt. -
Page 108: Abschaltung Der Usv
3. Betriebszustände 3.6 Abschaltung der USV 1 - Taste OFF länger als 3 Sekunden drücken. Die angeschlossenen Verbraucher sind nicht mehr durch die USV geschützt. Die Versorgung erfolgt über Netz 2 (AC Bypass). Bei Frequenzwandlerbetrieb der USV ist die Versorgung der angeschlossenen AUSLASTUNGSGRAD Verbraucher unterbrochen. -
Page 109: Wartung Und Service
4.1 Betriebsstörungen Bei Aufleuchten einer der LEDs oder liegt eine Betriebsstörung oder ein Alarmzustand vor. Der akustische Alarm kann durch Betätigung einer der Scroll-Tasten abgeschaltet werden. Fehlerbehebung ohne Inanspruchnahme des EATON-Kundendienstes Fehleranzeige Fehlerursache Fehlerbehebung Falscher Anschluß von Netz 1 (AC Netz 1 richtig anschließen (L1-N-... -
Page 110: Austausch Des Usv-Moduls
4. Wartung und Service 4.2 Austausch des USV-Moduls Der Austausch kann ohne Unterbrechung der Verbraucherversorgung durchgeführt werden. Abschaltung und Lösen der Verbindungen Taste OFF länger als 3 Sekunden drücken, um die USV auszuschalten. Überprüfen, ob die USV auf Bypass (NRE) geschaltet ist. LED muß... -
Page 111: Wiederanschluß Des Usv-Moduls
Verbraucher werden weiter über die USV versorgt. Es können auch einzelne Batterieelemente anstelle des gesamten Moduls ausgetauscht werden. Wenden Sie sich bitte an die örtliche EATON-Vertretung. Zum Austausch einzelner Batterieelemente: Batterie-Leistungsschalter ausschalten (Stellung "0"). Zum Ausbau der Batterieelemente, siehe Abschnitt 2.3. -
Page 112: Schulungszentrum
4. Wartung und Service 4.4 Schulungszentrum Um Ihnen eine optimale Nutzung der Anlagen sowie eine umfassende Fehleranalyse und -behebung zu ermöglichen, bietet EATON umfangreiche Kundenschulungen in englischer und französischer Sprache an. For further information, please visit our website: www.eaton.com Page 34 - 34007724DE/AD... -
Page 113: Anhang
5. Anhang 5.1 Technische Kenndaten Elektrische Kenndaten Betriebsart IT-Anwendungen und Industrieanwendungen Industrieanwendung IT-Anwendungen Überlast am USV- Gleiches Betriebsverhalten wie bei Die Verbraucherversorgung wird auf Ausgang / Netz 2 IT-Anwendung allerdings keine automatische Netz 2 (AC Bypass) umgeschaltet. innerhalb der Toleranz. Rückkehr auf Netz 1 nach Wegfall der Rückkehr zu Netz 1 (AC Normal) bei Überlast. - Page 114 5. Anhang Schmelzkurven der Eingangs- und Ausgangsschalter der USV t (s) I / In 1,25 Schmelzkurven der Eingangs- und Ausgangssicherungen der USV t (s) t (s) I (A) Eingangssicherungen Eingangssicherungen EX RT 11 : 30 A EX RT 5 : 25 A EX RT 7 : 25 A I (A) Ausgangssicherungen...
- Page 115 5. Anhang Eingangs-/Ausgangs-Kenndaten der USV Einspeisenetz Spannungsbereich Frequenzbereich Netz 1 / AC Normal 320 bis 465 Volts AC 40 bis 70 Hz Netz 2 / AC Bypass 187 bis 264 Volts AC* 48 bis 52 Hz** Verbraucherabgänge 230 V AC (weitere mögliche Automatische Auswahl 50/60 Hz Werte: 200/208/220/240/250 V) (oder Frequenzwandlerbetrieb)
-
Page 116: Thermische Kenndaten
5. Anhang CLA-Modul (Hochleistungsladegerät) Eingangsspannung: 160 - 280 V AC, Eingangsfrequenz: 40-70 Hz, Ladestrom: 6 A CC, Wiederaufladezeit bis 90% Nennautonomie nach Entladung bei USV-Nennleistung: Konfiguration 2 Stunden Konfiguration 4 Stunden Konfiguration 8 Stunden Autonomiezeit Autonomiezeit Autonomiezeit EX RT 5 5 Stunden 12 Stunden 20 Stunden... - Page 117 EX RT 5 3:1 EX RT 7 3:1 EX RT 11 3:1 Manuale d’installazione e d’uso per l’utente...
- Page 118 Qualora l’apparecchio debba essere installato in ambienti in sovratensione di categoria III o IV, a monte di quest’ultimo deve essere prevista un’ulteriore protezione dalle sovratensioni. Vi invitiamo a scoprire l’offerta EATON, nonché le opzioni della gamma EX RT visitando il nostro sito WEB all’indirizzo www.eaton.com oppure contattando il vostro rappresentante EATON.
- Page 119 Indice Presentazione ....................5 Posizioni standard Posizione "tower" ...................... 5 Posizione "slot" ......................5 ......................6 Parti posteriori Modulo di potenza EX RT 5/7/11 ................6 Modulo batteria EX RT EXB 7/11 ................6 Pannello di visualizzazione e di controllo ..............7 ........................
- Page 120 Indice ..................26 Messa in servizio iniziale Personalizzazione dell’UPS ..................26 Personalizzazione tramite il pannello di controllo ............ 26 Personalizzazione tramite software esterno ............27 ................. 27 Sequenza di avviamento dell’UPS ................... 28 Modalità di funzionamento Modalità normale (conversione doppia) ..............28 Modalità...
-
Page 121: Presentazione
1. Presentazione 1.1 Posizioni standard Posizione "tower" Dimensioni in mm (A x L x P) EX RT 5 EX RT 7 444 x 131 x 635 EX RT 11 EX RT EXB 7 EX RT EXB 11 Peso in Kg EX RT 5 22,5 EX RT 7... -
Page 122: Parti Posteriori
1. Presentazione 1.2 Parti posteriori Modulo di potenza EX RT 5/7/11 Alloggiamento per scheda di comunicazione. Porta di comunicazione a relè. Porta di arresto di emergenza remoto (REPO). Collegamento del rilevamento automatico di modulo/i batteria. Porta di comunicazione RS232. Collegamento dei cavi di potenza tra moduli batteria e con l’UPS. - Page 123 1. Presentazione 1.3 Pannello di controllo Spia apparecchiature protette. Spia funzionamento a batteria. E X 1 1 R T 3:1 Spia funzionamento in modalità By-pass. Spia di difetto. Display alfanumerico. Pulsante di arresto dell’UPS. TASSO DI CARICO 4 kW / 5 kVA Tasti funzione (scorrimento verso l’alto e verso il basso).
-
Page 124: Modulo Di Potenza Ex Rt 5/7/11
1. Presentazione Trasformatore di isolamento galvanico o di adattamento agli schemi di collegamento alla terra (Riferimento 68003) Questo modulo è necessario sia per ottenere un regime di neutro a valle dell’UPS differente dal regime di neutro a monte, sia per accrescere la disponibilità dell’alimentazione elettrica con una rete separata. Esempio di un trasformatore EX RT posto a monte di EX RT per isolamento galvanico Modulo batteria (EX RT EXB) Modulo di potenza... - Page 125 1. Presentazione Estensioni batteria per autonomie batteria da 60 minuti max. (a piena potenza) EX RT offre un’autonomia standard di 5/9 minuti a potenza nominale. Per aumentare l’autonomia, è possibile collegare moduli EX RT EXB 7/11 supplementari. Estensioni batteria per EX RT 5, EX RT 7 o EX RT 11 EX RT 5/7 + EX RT EXB 7 RT EX RT EXB 7...
-
Page 126: Modulo Batteria Munito Di Arresto Di Emergenza (Repo)
1. Presentazione Sistema di assemblaggio dei moduli batteria su carrello (Riferimento 68005) Questo sistema consente di assemblare, nel caso di un UPS con un’autonomia elevata della batteria, fino a 8 moduli impilati su uno stesso Modulo trasformatore carrello (rotelle a raccordi sferici e freni, piedini di livellamento, piastre laterali antisismiche, piastrine di Modulo di potenza... -
Page 127: Installazione
2. Installazione 2.1 Apertura dell’imballaggio e verifica del contenuto Modulo di potenza Modulo batteria Piedini di sostegno. Estensioni per i piedini di sostegno. Cavo di comunicazione RS232. Cavo batteria. Manuali di installazione e d’uso. Cavo di rilevamento batteria. Guide telescopiche per montaggio in Morsettiera estraibile degli ingressi/uscita con uno slot da 19"... -
Page 128: Installazione Nella Posizione "Tower
2. Installazione 2.2 Installazione nella posizione "tower" Utilizzare la sagoma di montaggio dei piedini di sostegno fornita in dotazione con il modulo batteria. Seguire le tappe da 1 a 4 per regolare i piedini di sostegno in posizione verticale. Mantenere uno spazio libero di 150 mm dietro l'UPS. Lo scarto tra le due coppie di piedini di sostegno deve essere di 450 mm. -
Page 129: Installazione Nella Posizione "Slot
2. Installazione 2.3 Installazione nella posizione "slot" Si raccomanda di montare il modulo batteria per primo, poi di montare il modulo di potenza al di sopra di quest’ultimo. Modifica dell’orientamento del logo e del pannello di controllo Montaggio in slot del modulo batteria (guide opzionali richieste, riferimento 68006) Il modulo batteria è... - Page 130 Seguire le tappe da 1 a 4 per il montaggio del modulo sulle sue guide. Le guide ed il kit di montaggio sono forniti da EATON. Nota per la tappa 1: è possibile regolare la posizione delle squadrette di fissaggio frontali.
- Page 131 2. Installazione Sistema di fissaggio posteriore (incluso nel kit delle guide, riferimenti 68001 e 68002) Questo sistema è da utilizzare per il trasporto dello slot dotato dei moduli. Sistema di fissaggio della scatola degli ingressi/uscita estraibile (incluso nel kit delle guide del modulo di potenza, riferimento 68001) Questo sistema di fissaggio consente di mantenere la scatola degli ingressi/uscita del modulo sulla parte posteriore dello slot in fase di estrazione del modulo, evitando così...
-
Page 132: Porte Di Comunicazione
è utilizzata per segnalazioni di base o per la protezione dei sistemi informatici, quali IBM iSeries (principalmente AS400) o altri. L’alloggiamento per schede di comunicazione può ricevere tutti i tipi di schede EATON (cfr. il sito Web www.eaton.com per conoscere l’elenco completo delle schede compatibili). Collegamento della porta di comunicazione RS232 1. -
Page 133: Arresto Di Emergenza
2. Installazione Arresto di emergenza L’installazione di un arresto di emergenza deve essere effettuata nel rispetto delle norme in vigore. Per poter ottenere una messa fuori tensione completa dell’impianto e di EX RT mediante l’azionamento di un arresto di emergenza, è necessario: - utilizzare un pulsante ad aggancio (il contatto normalmente aperto o normalmente chiuso deve essere mantenuto almeno un secondo per poter essere trasmesso);... -
Page 134: Scelta Di Installazione Secondo Lo Schema Di Collegamento Alla Terra (Sct)
2. Installazione 2.5 Scelta di installazione secondo lo Schema di Collegamento alla Terra (SCT) EX RT deve essere alimentato da una rete elettrica trifase con neutro. UPS con reti di ingresso CA Normale e CA By-pass comuni Quadro generale a bassa tensione CA By-pass (QGBT) -
Page 135: Ridondanza Di Emergenza
2. Installazione UPS con reti di ingresso CA Normale e CA By-pass separate e provenienti da sorgenti differenti CA By-pass QGBT 1 Apparecchiature QGBT 2 CA Normale oppure CA By-pass QGBT 1 Apparecchiature QGBT 2 CA Normale Cambiamento dello SCT tra monte e valle o isolamento galvanico richiesto CA By-pass QGBT 1 Apparecchiature... -
Page 136: Organi Di Protezione E Sezioni Di Cavi Raccomandati
2. Installazione 2.6 Organi di protezione e sezioni di cavi raccomandati Protezione a monte raccomandata Reti di ingresso separate Reti di ingresso comuni Potenza Disgiuntore di protezione nominale Disgiuntore di protezione a Disgiuntore di protezione a monte CA Normale / CA dell’UPS monte CA Normale a monte CA By-pass... -
Page 137: Collegamento Dei Cavi Di Potenza Di Ingresso E Uscita
2. Installazione 2.7 Collegamento dei cavi di potenza di ingresso ed uscita È necessario che questi collegamenti siano realizzati ad opera di personale qualificato. Prima di effettuare i collegamenti, verificare che l’interruttore batteria sia sulla posizione "0" e che gli interruttori di protezione a monte delle reti CA Normale e CA By-pass siano aperti (posizione "0"). -
Page 138: Collegamento Di Un Ups Con Reti Di Ingresso Ca Normale E Ca By-Pass Separate
2. Installazione Collegamento di un UPS con reti di ingresso CA Normale e CA By-pass separate 1 - Rimuovere la copertura di protezione delle morsettiere (fissata con 5 viti), O ut pu 2 - Rimuovere il ponte cablato tra i morsetti L2 e L1, ss In pu By pa... -
Page 139: Collegamento Del Convertitore Di Frequenza
2. Installazione Collegamento del convertitore di frequenza 1 - Rimuovere la copertura di protezione delle morsettiere (fissata con 5 viti), 2 - Rimuovere il ponte cablato tra L2 O ut pu e L1, ss In pu By pa ie r In pu 3 - Far passare il cavo CA Normale R ec tif attraverso il serracavo,... -
Page 140: Collegamento Dei Cavi Batteria
2. Installazione Collegamento dei cavi batteria 1 - Verificare che l’interruttore batteria sia sulla posizione "0", 2 - Collegare il cavo batteria connettore dei moduli di potenza e batteria, 3 - Collegare il cavo di rilevamento batteria sui connettori moduli di potenza e batteria. Collegamento del trasformatore di isolamento galvanico INGRESSO INPUT... -
Page 141: Collegamento Del Modulo Caricatore A Lunga Autonomia (Cla)
2. Installazione Collegamento del modulo Caricatore a Lunga Autonomia (CLA) BATTERY AC INPUT Verso la batteria Verso la rete elettrica Batteria (fornito in dotazione con il modulo CLA) tra il modulo di potenza ed il modulo CLA. Collegare il cavo (fornito unitamente al modulo CLA) tra il modulo di potenza ed il modulo CLA. -
Page 142: Personalizzazione Dell'ups
Questa modalità è accessibile tramite i tasti del pannello di controllo oppure tramite il software Personal Solution Pac per Windows incluso nel CD-ROM Solution Pac di EATON. Personalizzazione tramite il pannello di controllo Premere contemporaneamente i tasti funzione più... -
Page 143: Personalizzazione Tramite Software Esterno
Attivata Disattivata Se disattivata, perdita della contro le scariche profonde garanzia EATON. Premere il tasto QUIT al termine della personalizzazione. Questi parametri sono modificabili soltanto nel caso in cui l’UPS sia in condizione di arresto. Personalizzazione tramite software esterno Inserire il CD-ROM Solution Pac nell’apposito lettore. -
Page 144: Modalità Di Funzionamento
3. Uso 3.3 Modalità di funzionamento Modalità Normale (conversione doppia) È la modalità di funzionamento standard, personalizzata in origine. Questa modalità offre due funzionamenti possibili. 1 - La rete CA Normale è disponibile: La spia è accesa. TASSO DI CARICO Le apparecchiature collegate sono protette dall’UPS. -
Page 145: Funzionamento A Batteria
3. Uso 3.4 Funzionamento a batteria Le apparecchiature collegate continuano ad essere alimentate dall’UPS, benché la rete CA Normale non sia più disponibile. L’energia fornita proviene dalla batteria. Passaggio sulla batteria La spia è accesa. La spia è accesa. L’allarme acustico emette un bip ogni 10 secondi.. Le apparecchiature collegate sono alimentate grazie alla batteria. -
Page 146: Arresto Dell'ups
3. Uso 3.6 Arresto dell’UPS 1 - Premere il tasto per più di 3 secondi. Le apparecchiature collegate non sono più protette dall’UPS. Sono alimentate dalla rete CA By-pass. Nel caso in cui l’UPS si trovi in modalità convertitore di frequenza, le apparecchiature collegate non sono più... -
Page 147: Manutenzione
Nel caso in cui una delle spie sia accesa, ciò significa che è presente un’anomalia di funzionamento o un allarme. Utilizzare il tasto funzione "scroll up" o "scroll down" per arrestare l’allarme acustico. Risoluzione avarie senza intervento del Servizio Assistenza EATON Indicazione Significato Rimedio... -
Page 148: Sostituzione Del Modulo Di Potenza
4. Manutenzione 4.2 Sostituzione del modulo di potenza Questa operazione può essere effettuata senza interrompere l’alimentazione delle apparecchiature collegate. Scollegamento del modulo di potenza Arrestare l’UPS per mezzo del tasto , tenendolo premuto per più di 3 secondi. Verificare che l’UPS funzioni in modalità By-pass: la spia deve essere accesa (in caso contrario, non girare il commutatore manuale di By-pass e chiamare il Servizio... -
Page 149: Ricollegamento Del Modulo Di Potenza
4. Manutenzione Ricollegamento del modulo di potenza Fissare la scatola degli ingressi/uscita sulla parte posteriore dell’UPS per mezzo delle 3 viti previste a tale scopo. Ricollegare i cavi batteria al modulo di potenza. Posizione lo/gli interruttore/i batteria sulla posizione "I". Posizionare il disgiuntore rete CA Normale sulla posizione "I". -
Page 150: Centro Di Formazione
4. Manutenzione 4.4 Centro di formazione Per trarre il massimo vantaggio dalle prestazioni del vostro apparecchio EATON ed intervenire nella risoluzione delle avarie di primo livello, mettiamo a vostra disposizione un programma completo di addestramento tecnico nelle lingue inglese e francese: For further information, please visit our website: www.eaton.com... -
Page 151: Allegati
5. Allegati 5.1 Specifiche tecniche Caratteristiche elettriche Modalità di funzionamento rete I/T e rete industriale Modalità industriale Modalità rete I/T Sovraccarico con Funzionamento identico alla modalità rete Le apparecchiature collegate sono rete CA By-pass in I/T, ma senza ritorno in modalità Normale nel trasferite sulla rete CA By-pass. - Page 152 5. Allegati Curve Tempo/Corrente per il disgiuntore di ingresso dell’UPS t (s) I / In 1,25 Curve Tempo/Corrente per i fusibili di ingresso ed uscita dell’UPS t (s) t (s) I (A) Fusibili di ingresso di Fusibili di ingresso di EX RT 11: 30 A EX RT 5: 25 A EX RT 7: 25 A...
- Page 153 5. Allegati Caratteristiche di ingresso/uscita dell’UPS Sorgente Voltaggio Frequenza Rete CA Normale Da 320 a 465 volt CA Da 40 a 70 Hz Rete CA By-pass Da 187 a 264 volt CA* 48 a 52 Hz** Uscita apparecchiature 230 volt CA (altri valori possibili: Selezione automatica 50/60 200/208/220/240/250 V).
-
Page 154: Caratteristiche Termiche
5. Allegati Modulo EX RT CLA Voltaggio di alimentazione: 160-280 Volt CA, Frequenza di alimentazione: 40-70 Hz, Corrente di ricarica: 6 A CC, Tempo di ricarica per ritrovare il 90% dell’autonomia nominale dopo una scarica a potenza nominale dell’UPS: Configurazione Configurazione Configurazione 2 ore di autonomia... - Page 155 EX RT 5 3:1 EX RT 7 3:1 EX RT 11 3:1 Manual de instalación y de utilización...
- Page 156 Si el aparato debe instalarse en entornos de sobretensión III o IV, prever una protección adicional contra las sobretensiones aguas arriba del aparato. Le invitamos a que descubra la oferta de EATON, así como las opciones de la gama EX RT visitando nuestro sitio web: www.eaton.com o poniéndose en contacto con su representante EATON.
- Page 157 Sumario 1. Presentación Posiciones estándares ................... 5 Posición torre ......................5 Posición rack ......................5 Caras traseras ......................6 Módulo de potencia EX RT 5/7/11 ................6 Módulo de batería EX RT EXB 7/11 ................. 6 Tablero de visualización y de mando ..............7 Opciones ......................
- Page 158 Sumario Utilización Puesta en servicio inicial ..................26 Personalización del SAI ..................26 Personalización mediante el tablero de mando ............26 Personalización mediante software exterior ............27 Secuencia de inicio del SAI ................. 27 Modos de funcionamiento .................. 28 Modo normal (doble conversión) ................28 Modo Eco ......................
-
Page 159: Presentación
1. Presentación 1.1 Positions standards Posición torre Dimensiones en mm (altura x ancho x prof.) EX RT 5 EX RT 7 444 x 131 x 635 EX RT 11 EX RT EXB 7 EX RT EXB 11 Pesos en kg EX RT 5 22,5 EX RT 7... -
Page 160: Caras Traseras
1. Presentación 1.2 Caras traseras Módulo de potencia EX RT 5/7/11 Emplazamiento para tarjeta de comunicación. Puerto de comunicación por relé. Puerto de parada de emergencia distante (REPO). Conexión de la detección automática de los módulo(s) de batería. Puerto de comunicación RS232. Conexión de los cables de potencia entre los módulos de batería y el SAI. -
Page 161: Tablero De Visualización Y De Mando
1. Presentación 1.3 Tablero de visualización y de mando Indicador de aplicaciones protegidas. Indicador de funcionamiento con E X 1 1 R T 3:1 batería. Indicador de funcionamiento en Bypass. Indicador de presencia de defecto. Visualización alfanumérica. NIVEL DE CARGA 4 kW / 5 kVA Botón de parada del SAI. -
Page 162: Transformador De Aislamiento Galvánico O De Adaptación Para Esquemas De Enlace A Tierra
1. Presentación Transformador de aislamiento galvánico o de adaptación para esquemas de enlace a tierra (Referencia 68003) Este módulo se utiliza para obtener un régimen de neutro aguas abajo del SAI diferente del régimen de neutro aguas arriba o bien, para incrementar la disponibilidad de la alimentación eléctrica con una red separada. -
Page 163: Extensiones De Batería Para Autonomías De La Batería De 60 Minutos Máximo
1. Presentación Extensiones de batería para autonomías de la batería de 60 minutos máximo (de potencia máxima) EX RT ofrece una autonomía estándar de 5/9 minutos de potencia nominal. Para incrementar la autonomía, se pueden conectar módulos EX RT EXB 7/11 adicionales. Extensiones de batería para EX RT 5, EX RT 7 o EX RT 11 EX RT 5/7 + EX RT EXB 7 RT... -
Page 164: Módulo De Batería Equipado Con Parada De Emergencia (Repo)
1. Presentación Sistema de ensamblaje de los módulos de batería en carro (Referencia 68005) Este sistema permite ensamblar, en el caso de un SAI de batería de muy larga autonomía, hasta 8 módulos apilados sobre un mismo carro Módulo transformador (ruedecillas con rótulas y frenos, pies de nivelación, placas laterales antisísmicas, placas de ensamblaje... -
Page 165: Instalación
2. Instalación 2.1 Desembalaje y comprobación del contenido Módulo de potencia Módulo de batería Pies de fijación. Piezas adicionales para pies de fijación. Cable de comunicación RS232. Cable de la batería. Manuales de instalación y de Cable de detección de batería. utilización. -
Page 166: Instalación En Posición Torre
2. Instalación 2.2 Instalación en posición torre Utilizar la plantilla de montaje de los pies de fijación que se entrega con el módulo de batería. Seguir las etapas 1 a 4 para ajustar los pies de fijación en posición vertical. Procurar siempe que haya un espacio libre de 150 mm detrás del SAI. -
Page 167: Instalación En Posición Rack
2. Instalación 2.3 Instalación en posición rack Se recomienda instalar en primer lugar el módulo de batería y luego instalar encima el módulo de potencia. Modificación de la orientación del logotipo y del tablero de mando Montaje en rack del módulo batería (se necesitan carriles opcionales, referencia 68006) El módulo de batería es muy pesado. -
Page 168: Montaje En Rack De Los Módulos Batería Y Potencia
(se necesitan carriles opcionales, referencia 68001) Seguir las etapas 1 a 4 para el montaje del módulo sobre sus carriles. EATON provee los carriles y los elementos de montaje. Nota para la etapa 1: se puede ajustar la posición de las escuadras frontales de fijación. - Page 169 2. Instalación Sistema de fijación trasera (incluido con el kit carriles, referencias 68001 y 68002) Este sistema se utiliza para transportar el bastidor equipado con los módulos. Sistema de fijación de la caja de entradas/salida amovible (incluido con el kit carriles del módulo de potencia, referencia 68001) Este sistema de fijación permite mantener la caja de entradas/salida del módulo atrás del rack cuando se extrae el módulo sin interrumpir la alimentación de las aplicaciones conectadas.
-
Page 170: Puertos De Comunicación
EX RT ofrece tres modos de comunicación que pueden utilizarse simultáneamente: El puerto COM brinda un enlace RS232 que utiliza el protocolo SHUT de EATON compatible con los softwares de supervisión y de protección incluidos en el CD-Rom Solution Pac. -
Page 171: Paro De Emergencia
2. Instalación Paro de emergencia La instalación de un paro de emergencia debe realizarse de acuerdo con las normas vigentes. A fin de obtener una puesta fuera de tensión total de la instalación y de EX RT mediante la acción de un paro de emergencia, es necesario: - utilizar un botón de enganche (el contacto NA o NC debe ser mantenido más de un segundo para que se tenga en cuenta),... -
Page 172: Selección De La Instalación Según El Esquema De Enlace A Tierra (Eet)
2. Instalación 2.5 Selección de la instalación según el Esquema de enlace a tierra (EET) El EX RT debe ser alimentado por una red eléctrica trifásica con neutro. SAI con redes de entrada AC Normal y AC Bypass comunes Cuadro general baja tensión... -
Page 173: Sai Con Redes De Entrada Ac Normal Y Ac Bypass Separadas Y Procedentes De Diferentes Fuentes
2. Instalación SAI con redes de entrada AC Normal y AC Bypass separadas y procedentes de diferentes fuentes AC Bypass CGBT 1 Aplicaciones CGBT 2 AC Normal AC Bypass CGBT 1 Aplicaciones CGBT 2 AC Normal Cambio de EET entre aguas arriba y aguas abajo o aislamiento galvánico requerido AC Bypass CGBT 1 Aplicaciones... -
Page 174: Organos De Protección Y Secciones De Cables Recomendados
2. Instalación 2.6 Organos de protección y secciones de cables recomendados Protección aguas arriba recomendada Redes de entrada separadas Redes de entrada comunes Potencia Interruptor automático de Interruptor automático de Interruptor automático de nominal protección aguas arriba protección aguas arriba protección aguas arriba del SAI AC Normal / AC Bypass... -
Page 175: Conexión De Los Cables De Potencia De Entrada Y Salida
2. Instalación 2.7 Conexión de los cables de potencia de entrada y salida Estas conexiones deben ser realizadas por personal cualificado. Antes de efectuar las conexiones, comprobar que el interruptor automático de batería esté en posición "0" y que los interruptores automáticos de protección aguas arriba de las redes AC Normal y AC Bypass estén abiertos (posición "0"). -
Page 176: Conexión De Un Sai Con Redes De Entrada Ac Normal Y Ac Bypass Separadas
2. Instalación Conexión de un SAI con redes de entrada AC Normal y AC Bypass separadas 1 - Retirar la tapa de protección de los bornes (fijada con 5 tornillos), 2 - Retirar el puente cableado situado O ut pu entre los bornes L2 y L1, 3 - Pasar el cable AC Normal a través ss In pu... -
Page 177: Conexión Del Convertidor De Frecuencia
2. Instalación Conexión del convertidor de frecuencia 1 - Retirar la tapa de protección de los bornes (fijada por 5 tornillos), 2 - Retirar el puente cableado situado entre L2 y L1, O ut pu 3 - Pasar el cable AC Normal a través ss In pu By pa del prensaestopas,... -
Page 178: Conexión De Los Cables De La Batería
2. Instalación Conexión de los cables de la batería 1 - Comprobar que el interruptor automático de la batería esté en posición "0", 2 - Conectar el cable de la batería en el conector de los módulos de potencia y batería, 3 - Conectar el cable de detección de la batería en los conectores... -
Page 179: Conexión Del Módulo Cargador De Larga Autonomía (Cla)
2. Instalación Conexión del módulo Cargador de Larga Autonomía (CLA) BATTERY AC INPUT Hacia batería Hacia red eléctrica Conectar el cable de batería (entregado con el módulo CLA) entre el módulo de potencia y el módulo CLA. Conectar el cable (entregado con el módulo CLA) entre el módulo de potencia y el módulo CLA. -
Page 180: Utilización
SAI en esta etapa. Se puede acceder a este modo mediante las teclas del tablero de mando o mediante el software Personal Solution-Pac para Windows incluido en el CD-ROM Solution-Pac de EATON. Personalización mediante el tablero de mando Pulsar simultáneamente las teclas de función durante más de 3 segundos. -
Page 181: Personalización Mediante Software Exterior
"Extensiones de la batería"). Protección de la batería Activa Inactiva Si inactiva, pérdida de la contra las descargas garantía EATON. profundas Pulsar la tecla QUIT al final de la personalización. Estos parámetros se modificarán únicamente con el SAI apagado. Personalización mediante software exterior Insertar el CD-ROM Solution-Pac en el lector En la primera pantalla del navegador, seleccionar "Instalación"... -
Page 182: Modos De Funcionamiento
3. Utilización 3.3 Modos de funcionamiento Modo normal (doble conversión) Este es el modo de funcionamiento estándar, personalizado en fábrica. Este modo ofrece dos posibilidades de funcionamiento. 1 - La red AC normal está disponible: El indicador está encendido. Las aplicaciones conectadas están protegidas por el SAI. NIVEL DE CARGA 4 kW / 5 kVA En modo Normal, la tecla "scroll down"... -
Page 183: Funcionamiento Con Batería
3. Utilización 3.4 Funcionamiento con batería Las aplicaciones conectadas siguen siendo alimentadas por el SAI cuando la red AC Normal no está disponible. La energía suministrada proviene de la batería. Cambio a batería El indicador está encendido. El indicador está encendido. La alarma acústica emite un bip cada 10 segundos. -
Page 184: Parada Del Sai
3. Utilización 3.6 Parada del SAI 1 - Pulsar la tecla durante más de 3 segundos. Las aplicaciones conectadas dejan de ser protegidas por el SAI y son alimentadas por la red AC Bypass. Si el SAI está en modo convertidor de frecuencia, las aplicaciones conectadas dejan de ser alimentadas. -
Page 185: Mantenimiento
Utilizar la tecla de función "scroll up" o "scroll down" para apagar la alarma acústica. Anomalías que no requieren la intervención del servicio posventa EATON: Indicación Significación Corrección... -
Page 186: Reemplazo Del Módulo De Potencia
4. Mantenimiento 4.2 Reemplazo del módulo de potencia Esta operación puede efectuarse sin interrumpir la alimentación de las aplicaciones conectadas. Desconexión del módulo de potencia Interrumpir el SAI, pulsando la tecla durante más de 3 segundos. Comprobar que el SAI funcione en modo Bypass: el indicador debe estar encendido (si no lo está, no cambiar el conmutador manual de Bypass y llamar el servicio posventa). -
Page 187: Conexión Del Módulo De Potencia
4. Mantenimiento Conexión del módulo de potencia Fijar la caja de entradas/salida en la parte trasera del SAI con los 3 tornillos previstos. Volver a conectar los cables de la batería en el módulo de potencia. Colocar el(los) interruptor(es) de batería en posición "I". -
Page 188: Centro De Formación
4. Mantenimiento 4.4 Centro de formación Para controlar la operación correcta de su aparato EATON y efectuar intervenciones básicas, ponemos a su disposición un programa completo de formaciones técnicas en inglés y francés. For further information, please visit our website: www.eaton.com... -
Page 189: Anexos
5. Anexos 5.1 Características técnicas Características eléctricas Modos de funcionamiento red I/T e industrial Mode industriel Mode réseau I/T Surcharge avec Même fonctionnement que le mode réseau Les applications raccordées sont réseau AC Bypass en I/T, mais pas de retour en mode Normal si transférées sur le réseau AC Bypass. - Page 190 5. Anexos Curvas Tiempo/Corriente para el interrutor automático de entrada del SAI t (s) I / In 1,25 Curvas Tiempo/Corriente para los fusibles de entrada y salida del SAI t (s) t (s) I (A) Fusible de entrada de Fusible de entrada de EX RT 11: 30 A EX RT 5: 25 A EX RT 7: 25 A...
- Page 191 5. Anexos Características de entrada/salida del SAI Fuente Tensión Frecuencia Red AC Normal 320 a 465 voltios AC 40 a 70 Hz Red AC Bypass 187 a 264 voltios AC* 48 a 52 Hz** Salida de las aplicaciones* 230 Volts AC (autres valeurs Selección automática 50/60 Hz (o possibles : 200/208/220/240/250 V).
-
Page 192: Características Térmicas
5. Anexos Módulo EX RT CLA Tensión de alimentación: 160-280 voltios AC, Frecuencia de alimentación: 40-70 Hz, Corriente de recarga: 6 A CC, Tiempo de recarga para recobrar el 90% de la autonomía nominal después de una descarga de potencia nominal del SAI: Configuración Configuración... - Page 193 EX RT 5 3:1 EX RT 7 3:1 EX RT 11 3:1 Installatie- en gebruiker- shandleiding...
- Page 194 Als het apparaat wordt geïnstalleerd in een overspanningsomgeving van categorie III of IV, moet een extra overspanningsbeveiliging stroomopwaarts worden voorzien. Ontdek het productprogramma van EATON en de opties van de EX RT reeks door onze website www. eaton.com te bezoeken of contact op te nemen met uw EATON dealer.
- Page 195 Inhoudsopgave Beschrijving .................... 5 Standaardopstellingen Tower-opstelling ....................... 5 Rack-opstelling ......................5 ......................6 Achterpanelen Power module EX RT 5/7/11 ..................6 Batterijmodule EX RT EXB 7/11 ................6 ................7 Display en instrumentenpaneel ........................7 Opties Sets voor rackmontage .................... 7 Transformator voor galvanische isolatie of aanpassing aan aardingsschema’s ..
- Page 196 Inhoudsopgave Gebruik .................... 26 Eerste ingebruikname Specifieke programmering van de UPS ..............26 Specifieke programmering via het instrumentenpaneel ......... 26 Specifieke programmering via externe software ............ 27 ..................27 tartprocedure van de UPS ......................28 Bedrijfsmodes Normale mode (dubbele omzetting) ..............28 Eco-mode ........................
-
Page 197: Beschrijving
1. Beschrijving 1.1 Standaardopstellingen Tower-opstelling Afmetingen in mm (H x B x D) EX RT 5 EX RT 7 444 x 131 x 635 EX RT 11 EX RT EXB 7 EX RT EXB 11 Gewicht in kg EX RT 5 22,5 EX RT 7 EX RT 11... -
Page 198: Achterpanelen
1. Beschrijving 1.2 Achterpanelen Power module EX RT 5/7/11 Ruimte voor communicatiekaart. COM-poort via relais. Aansluiting voor noodstopcontact op afstand (REPO). Aansluiten van automatische detectie van batterijmodule(s). RS232-COM-poort. Aansluiten van vermogenskabels tussen batterijmodules onderling en de UPS. Handmatige bypass-schakelaar. Uitgangscontactblok voor de aangesloten apparatuur. Schakelaar van ingang normale AC-circuit. -
Page 199: Display En Instrumentenpaneel
1. Beschrijving 1.3 Display en instrumentenpaneel LED apparatuur beveiligd. LED werking op batterij. E X 1 1 R T 3:1 LED werking op bypass. LED foutmelding. Alfanumerieke display. Uit-knop van de UPS. LOAD LEVEL Functieknoppen (informatie 4 kW / 5 kVA bekijken omhoog/omlaag). -
Page 200: Transformator Voor Galvanische Isolatie Of Aanpassing Aan Aardingsschema's
1. Beschrijving Transformator voor galvanische isolatie of aanpassing aan aardingsschema’s (ref. 68003) Deze module is noodzakelijk hetzij om stroomafwaarts van de UPS een nulleiderstelsel te verkrijgen dat verschilt van het nulleiderstelsel stroomopwaarts, hetzij om een hogere beschikbaarheid van de energievoorziening te bewerkstelligen met een gescheiden net. Voorbeeld van een EX RT transformator die stroomopwaarts van de EX RT is geplaatst voor galvanische isolatie Batterijmodule (EX RT EXB) - Page 201 1. Beschrijving Extra batterijmodules voor max. 60 minuten extra autonomie (bij maximumvermogen) EX RT biedt een standaard autonomie van 5-9 minuten bij nominaal vermogen. Voor meer autonomie is het mogelijk extra EX RT EXB 7/11 modules aan te sluiten. Extra batterijmodules voor EX RT 5, EX RT 7 of EX RT 11 EX RT 5/7 + EX RT EXB 7 RT EX RT EXB 7...
-
Page 202: Batterijmodule Met Noodstop (Repo)
1. Beschrijving Montagesysteem voor montage van batterijmodules op een wagen (ref. 68005) Dankzij dit systeem kunnen bij een UPS met grote autonomie tot 8 modules op één wagen worden gestapeld (kogelscharnierwieltjes Transformator en remmen, waterpaspoten, module aarbevingbestendige zijpanelen, montageplaatjes voor onderlinge Power module bevestiging van de modules en schroevenset bijgeleverd). -
Page 203: Installeren
2. Installeren 2.1 Uitpakken en inhoud controleren Power module Batterijmodule Steunpoten. Verlengstukken voor steunpoten. RS232-communicatiekabel. Batterijkabel. Installatie- en gebruikershandleidingen. Kabel voor batterijdetectie. Telescopische rails voor montage in Afneembare input/output-box met 11 kabeldoppen. 19"-rack (optioneel; standaard bij Netkaart (optioneel; standaard bij Network Pack Network Pack uitvoering). -
Page 204: Tower-Opstelling
2. Installeren 2.2 Tower-opstelling Gebruik de montagemal voor de steunpoten die bij de batterijmodule geleverd wordt. Volg stappen 1 t/m 4 om de steunpoten in verticale stand te plaatsen. Houd aan de achterkant van de UPS altijd 150 mm ruimte vrij. Tussen de twee paar voetjes moet 450 mm afstand zitten. -
Page 205: Rack-Opstelling
2. Installeren 2.3 Rack-opstelling Het wordt aanbevolen de batterijmodule eerst te monteren en vervolgens de power module erboven te plaatsen. Horizontaal of verticaal plaatsen van logo en instrumentenpaneel Rackmontage van batterijmodule (optionele rails vereist, ref. 68006) De batterijmodule is erg zwaar. Om de montage te vergemakkelijken wordt aanbevolen om de batterij- elementen uit de module te verwijderen zoals aangegeven in onderstaand schema: 34007724NL/AD - Page 13... - Page 206 (optionele rails vereist, ref. 68001) Volg stappen 1 t/m 4 om de module op de rails te plaatsen. Rails en montageset worden geleverd door EATON. Opmerking bij stap 1: de bevestigingshaken aan de voorzijde kunnen worden bijgesteld. Page 14 - 34007724NL/AD...
- Page 207 2. Installeren Bevestigingssysteem achterzijde (geleverd bij rails-set, ref. 68001 en 68002) Dit systeem moet worden gebruikt als het rack compleet met de modules getransporteerd wordt. Bevestigingssysteem van de afneembare input/output-box (geleverd bij de rails-set van de power module (ref. 68001) Dit systeem houdt de input/output-box aan de achterzijde van het rack bevestigd tijdens het verwijderen van de module, zodat de energievoorziening naar de aangesloten apparatuur niet onderbroken wordt.
-
Page 208: Aansluiten Van De Rs232-Com-Poort
EX RT biedt drie communicatiemodes die tegelijkertijd gebruikt kunnen worden: De COM-poort biedt een RS232-aansluiting die gebruik maakt van het EATON SHUT-protocol dat compatibel is met de software voor bewaking en beveiliging op de Solution Pac cd-rom. De COM-poort met relais wordt gebruikt voor het signaleren van basisinformatie of voor de beveiliging van IT-systemen zoals IBM iSeries (hoofdzakelijk AS400) en dergelijke. -
Page 209: Noodstop
2. Installeren Noodstop De noodstop moet overeenkomstig de geldende normen geïnstalleerd worden. Om de hele installatie en de EX RT door middel van een noodstop in één keer van de spanning af te schakelen is het noodzakelijk: - Een houdknop te gebruiken (het NO of NC contact moet langer dan één seconde aanhouden om in aanmerking te worden genomen), - De EX RT EXB EPO batterijmodule(s) te gebruiken. -
Page 210: Installatieopties Afhankelijk Van Aardingsschema (Slt)
2. Installeren 2.5 Installatieopties afhankelijk van Aardingsschema EX RT moet worden gevoed door een drie fasen aansluiting met nulleider. UPS met gemeenschappelijke ingangen voor normale AC- en AC-bypass-circuits Laagspanningsschakelpaneel AC Bypass AC Normaal Beveiligde apparatuur Wijziging in aardingsschema tussen stroomopwaarts en stroomafwaarts of galvanische isolatie vereist Laagspanningsschakelpaneel AC Bypass Beveiligde... -
Page 211: Ups Met Gescheiden Ingangen Voor Normale Ac- En Ac-Bypass-Circuits Afkomstig Van Verschillende Bronnen
2. Installeren UPS met gescheiden ingangen voor normale AC- en AC-bypass-circuits afkomstig van verschillende bronnen AC Bypass Laagspannings- schakelpaneel 1 Beveiligde apparatuur Laagspannings- AC Normaal schakelpaneel 2 AC Bypass Laagspannings- schakelpaneel 1 Beveiligde apparatuur Laagspannings- AC Normaal schakelpaneel 2 Wijziging in aardingsschema tussen stroomopwaarts en stroomafwaarts of galvanische isolatie vereist AC Bypass Laagspannings- schakelpaneel 1... -
Page 212: Aanbevolen Beveiligingsorganen En Kabeldiameters
2. Installeren 2.6 Aanbevolen beveiligingsorganen en kabeldiameters Aanbevolen stroomopwaartse beveiliging UPS met gescheiden ingangen Nominaal UPS met gemeenschappelijke Stroomopwaartse vermogen Stroomopwaartse schakelaar Stroomopwaartse schakelaar AC Bypass van de UPS AC Normaal / AC Bypass schakelaar AC Normaal 5 kVA D-karakteristiek - 40 A C-karakteristiek - 32 A D-karakteristiek - 40 A 7 kVA... -
Page 213: Aansluiten Van Ingangs- En Uitgangsvermogenskabels
2. Installeren 2.7 Aansluiten van ingangs- en uitgangsvermogenskabels Deze aansluitingen moeten door gekwalificeerd personeel worden uitgevoerd. Voordat met het aansluiten begonnen wordt moet gecontroleerd worden of de batterijschakelaar "0"-stand staat en of de stroomopwaartse schakelaars van het normale AC- en het AC-bypass-circuit op "0" staan. -
Page 214: Aansluiten Van Een Ups Met Gescheiden Ingangen Voor Normale Ac- En Ac-Bypass-Circuits
2. Installeren Aansluiten van een UPS met gescheiden ingangen voor normale AC- en AC-bypass-circuits 1 - Verwijder de beschermkap van de contactblokken (bevestigd met 5 schroeven), O ut pu 2 - Verwijder de brugschakeling tussen de contactblokken L2 en L1, ss In pu By pa ie r In pu... -
Page 215: Aansluiten Van De Frequentieomzetter
2. Installeren Aansluiten van de frequentieomzetter 1 - Verwijder de beschermkap van de contactblokken (bevestigd met 5 schroeven), 2 - Verwijder de brugschakeling tussen O ut pu L2 en L1, ss In pu By pa ie r In pu 3 - Voer de kabel van het normale R ec tif AC-circuit door de pakkingbus, 4 - Sluit de 5 draden aan op het... -
Page 216: Aansluiten Van De Batterijkabels
2. Installeren Aansluiten van de batterijkabels 1 - Controleer of de batterijschakelaar op "0"-stand staat, 2 - Sluit de batterijkabel aan op de connector van de power en batterijmodules, 3 - Sluit de batterijdetectiekabel op de connectoren van de power en batterijmodules, Aansluiten van de galvanische isolatietransformator INGANG... -
Page 217: Aansluiten Van De Lange Autonomie Lader (Cla-Module)
2. Installeren Aansluiten van de lange autonomie lader (CLA-module) BATTERY AC INPUT Naar batterij Naar netaansluiting Sluit de (bij de CLA geleverde) batterijkabel aan tussen de power module en de CLA-module. Sluit de (bij de CLA geleverde) kabel aan tussen de power module en de CLA-module. Aansluiten van de batterij: - Doorsnede van de kabel (niet bijgeleverd): 10 mm², harde of soepele kabel (maximaal 13 mm²... -
Page 218: Gebruik
De specifieke programmeermode is toegankelijk via de toetsen van het instrumentenpaneel of via de Personal Solution Pac software voor Windows op de Solution-Pac cd-rom van EATON. Specifieke programmering via het instrumentenpaneel Druk langer dan 3 seconden tegelijkertijd op de... -
Page 219: Specifieke Programmering Via Externe Software
Actief Niet actief Bij "niet actief", vervalt de batterij tegen vergaande EATON garantie. ontlading Druk op de QUIT-toets aan het einde van de specifieke programmering. Deze parameters kunnen alleen gewijzigd worden als de UPS uitgeschakeld is. Specifieke programmering via externe software Doe de Solution-Pac cd-rom in de cd-rom drive van uw computer. -
Page 220: Bedrijfsmodes
3. Gebruik 3.3 Bedrijfsmodes Normale mode (dubbele omzetting) Dit is de standaard bedrijfsmode, met specifieke fabrieksprogrammering. In deze mode zijn twee werkingsfuncties mogelijk. 1 - Het normale AC-circuit is beschikbaar: brandt. De aangesloten apparatuur wordt beveiligd door de UPS. LOAD LEVEL 4 kW / 5 kVA In normale mode kan de op de UPS gemeten informatie worden afgelezen met behulp van de "scroll down"... -
Page 221: Werking Op Batterij
3. Gebruik 3.4 Werking op batterij De aangesloten apparatuur blijft energie krijgen van de UPS als het normale AC-circuit niet meer beschikbaar is. De geleverde energie komt van de batterij. Overschakelen op batterij brandt. brandt. Het geluidsalarm laat om de 10 seconden een biep horen. De aangesloten apparatuur wordt via de batterij van energie voorzien. -
Page 222: Uitschakelen Van De Ups
3. Gebruik 3.6 Uitschakelen van de UPS 1 - Druk langer dan 3 seconden op de toets De aangesloten apparatuur wordt niet meer beveiligd door de UPS. De apparatuur wordt van energie voorzien door het AC-bypass-circuit. Als de UPS in frequentieomzetter-mode werkt, wordt LOAD LEVEL de aangesloten apparatuur niet meer van energie 4 kW / 5 kVA... -
Page 223: Onderhoud
4.1 Storingen Als LED brandt, signaleert dit een storing in de werking of een alarm. Gebruik de "scroll up" en "scroll down" toetsen om het geluidsalarm af te zetten. Storingen die geen interventie van de EATON servicedienst vereisen: Indicatie Betekenis Correctie Aansluitfout normale AC-circuit. -
Page 224: Vervangen Van De Power Module
4. Onderhoud 4.2 Vervangen van de power module Dit kan worden uitgevoerd zonder de energievoorziening naar de aangesloten apparatuur te onderbreken. Loskoppelen van de power module Schakel de UPS uit door de toets langer dan 3 seconden in te drukken. Controleer of de UPS in bypass-mode werkt : LED moet branden (als de LED niet brandt mag de handmatige bypass-... -
Page 225: Opnieuw Aansluiten Van De Power Module
4. Onderhoud Opnieuw aansluiten van de power module Bevestig de input/output-box aan de achterkant van de UPS met behulp van de 3 daarvoor bestemde schroeven. Sluit de batterijkabels weer op de power module aan. Zet de batterijschakelaar(s) op "I"-stand. Zet de schakelaar van het normale AC-circuit op "I"-stand. -
Page 226: Opleidingscentra
4. Onderhoud 4.4 Opleidingscentra Voor een optimaal gebruik van uw EATON apparaat en om zelf een aantal problemen te kunnen oplossen, hebben wij een compleet programma technische opleidingen in het Engels en Frans ontwikkeld. For further information, please visit our website: www.eaton.com... -
Page 227: Bijlagen
5. Bijlagen 5.1 Technische specificaties Elektrische specificaties Bedrijfsmodes I/T-netwerk en industrie Industrie mode I/T-netwerk mod Overbelasting met Dezelfde werking als bij I/T. De aangesloten apparatuur wordt AC-bypass-circuit omgeschakeld naar het AC-bypass- binnen tolerantie. circuit. Terug naar normale mode bij verdwijnen van de overbelasting. Overbelasting met De aangesloten apparatuur wordt De UPS schakelt uit en er wordt... - Page 228 5. Bijlagen Tijd/stroom-curven voor de ingangsschakelaar van de UPS t (s) I / In 1,25 Tijd/stroom-curven voor de primaire en uitgangszekeringen van de UPS t (s) t (s) I (A) Primaire zekering van Primaire zekering van EX RT 11: 30 A EX RT 5: 25 A EX RT 7: 25 A I (A)
- Page 229 5. Bijlagen Input/output-specificaties van de UPS Bron Spanning Frequentie Normaal AC-circuit 320 tot 465 Volt AC 40 tot 70 Hz AC-bypass-circuit 187 tot 264 Volt AC* 48 tot 52 Hz** Uitgang naar beveiligde 230 Volt AC (andere mogelijke Automatische selectie van 50/60 apparatuur waarden: 200/208/220/240/250 V).
-
Page 230: Thermische Specificaties
5. Bijlagen EX RT CLA module Voedingsspanning: 160-280 V AC, Voedingsfrequentie: 40-70 V Hz, Laadstroom: 6 A DC, Laadtijd noodzakelijk voor laden tot 90% van de nominale autonomie na ontlading bij nominaal vermogen van de UPS: Programmering Programmering Programmering 2 uur autonomie 4 uur autonomie 8 uur autonomie EX RT 5... - Page 231 3400772400/AD...
- Page 232 3400772400-AD...
Need help?
Do you have a question about the EX RT 5 3:1 and is the answer not in the manual?
Questions and answers