Table of Contents
Advertisement
Advertisement
Table of Contents

Related Manuals for Philco PF 1602-5


Summary of Contents for Philco PF 1602-5
- Page 1 UPRIGHT FREEZER USER’S MANUAL PF 1602-5...
- Page 2 Dear customer, Thank you for buying a PHILCO brand product. So that your appliance serves you well, please read all the instructions in this user's manual.
-
Page 3: Table Of Contents
CONTENTS PART 1: BEFORE PUTTING INTO OPERATION ....................2 PART 2: DESCRIPTION OF THE APPLIANCE ....................8 PART 3: INSTALLATION ............................ 9 • Transport and unpacking ................................9 • Operating conditions ..................................9 • Installation location ..................................10 • Levelling the appliance ................................10 •... -
Page 4: Part 1: Before Putting Into Operation
PART 1: BEFORE PUTTING INTO OPERATION This appliance is in accordance with the following EU guidelines: 2006/95/EC and 2004/108/EC and 2009/125/EC and EC.643/2009 and 2002/96/EC Safety and warning information For your safety and correct usage, before installing and fi rst using the appliance, read this user manual carefully, including its hints and warnings. - Page 5 • If this appliance, featuring a magnetic door seals, is to replace an older appliance having a spring lock (latch) on the door or lid, be sure to make the spring lock unusable before you discard the old appliance. This will prevent it from becoming a death trap for a child. General safety •...
- Page 6 Refrigerant The refrigerant isobutene (R600a) is contained within the refrigerant circuit of the appliance, a natural gas with a high level of environmental compatibility, which is nevertheless fl ammable. During transportation and installation of the appliance, ensure that none of the components of the refrigerant circuit becomes damaged.
- Page 7 Caution: risk of fi re If the refrigerant circuit should be damaged: - Avoid opening fl ames and sources of ignition. - Thoroughly ventilate the room in which the appliance is situated. It is dangerous to alter the specifi cations or modify this product in any way.
- Page 8 Daily use • Do not store fl ammable gass or liquids in the appliance, There is a risk of an explosion. • Do not operate any electrical appliances in the appliance (e.g. electric ice cream makers, mixers etc.). • When unplugging always pull the plug from the mains socket, do not pull on the cable.
- Page 9 Care and cleaning • Before maintenance, switch off the appliance and disconnect the mains plug from the mains socket. • Do not clean the appliance with metal objects, steam cleaner, ethereal oils, organic solvents or abrasive cleansers. • Do not use sharp objects to remove frost from the appliance. Use a plastic scraper.
-
Page 10: Part 2: Description Of The Appliance
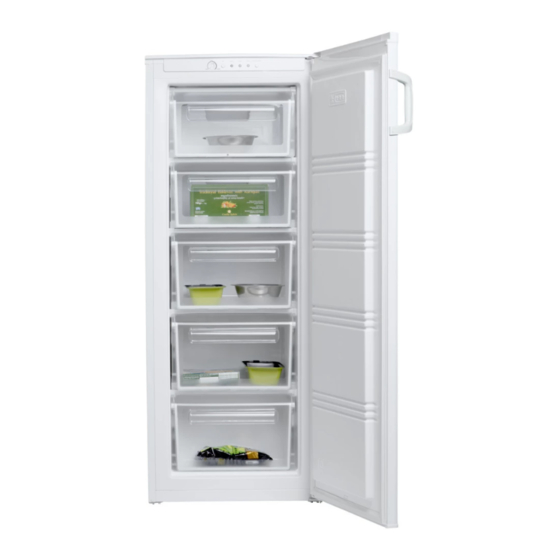
PART 2: DESCRIPTION OF THE APPLIANCE Description of the appliance Control panel Upper drawer Drawers Ice tray (inside) Lower drawer Adjustable feet Door Control panel Temperature control Disable the sound signal High temperature indicator Power On indicator Super freeze indicator Super freeze button NOTE: Due to unceasing modifi cation of our products your refrigerator may be slightly diff erent from this... -
Page 11: Part 3: Installation
PART 3: INSTALLATION Transport and unpacking If the appliance is transported in a horizontal position the oil from the compressor may leak into the cooling circuit. For this reason, allow the appliance to rest in a vertical position for 12 hours before turning it on, so that the oil fl ows back into the compressor. -
Page 12: Installation Location
Installation location Ventilation of appliance Alt is necessary to have good ventilation around the freezer to allow for the dissipation of heat, high effi ciency, and low power consumption. For this reason, suffi ciently cleared space should be available around the freezer. It is advisable for there to be 75mm separating the back of the freezer to the wall at least 100mm of space on its two sides, a height of over 100mm from its top and a clear space in front to allow the doors to open 160°. -
Page 13: Cleaning Before Use
Whenever you want to move the appliance, remember to turn the feet back up so that the appliance can roll freely. Reinstall the appliance when relocating. CAUTION! The rollers, which are not castors, should be only used for forward or backward movement. Moving the refrigerator sideways may damage your fl oor and the rollers. - Page 14 Stand the freezer, use a fl at bladed screw driver to remove the 4 screw covers at the rear of the freezer lid. Unscrew and lift the lid from the rear and remove it, then lift the upper door and place it on a padded surface to prevent it scratched.
- Page 15 Unscrew and remove the bottom hinge pin, turn the bracket over and replace it. Refi t the bracket fi tting the bottom hinge pin. Replace both adjustable feet. Transfer the lower door to the property position. Secure the door's level, make the bottom hinge pin into the lower hole of the door, then tight the bolts. Replace the lid by fi tting the upper hinge core into the upper door's hole, securing it with the 4 screws.
- Page 16 When you reverse the door, Please do: Move the accessory B from the upper cover of the upper door and fi t the accessory A that is a small detachable part from a small bag. After you reverse the door, please do this: Move the handle from the left side of upper door to the right side.
-
Page 17: Part 4: Controls
PART 4: CONTROLS The control panel that controls the temperature inside the freezer compartment is located inside the freezer. SUPER FREEZE (Button) If you need the temperature inside the freezer to drop quickly, please press this button and indicator of super will be on. -
Page 18: Hints For Freezing
Accessories (depending on the model) Shelves The shelves are suitable for storing food. To remove the shelf: lift up at the front and pull out. To put the shelf back: simply push in as far as it will go. Freezer Drawer The drawer is suitable for storing frozen food. -
Page 19: Part 5: Cleaning And Maintenance
PART 5: CLEANING AND MAINTENANCE For hygienic reasons the appliance (including exterior and interior accessories) should be cleaned regularly at least every two months. CAUTION! The appliance must not be connected to the mains during cleaning. Danger of electrical shock! Before cleaning switch the appliance off and remove the plug from the mains socket. - Page 20 Door seals cleaning Take care to keep door seals clean. Sticky food and drinks can cause seals to stick to the cabinet and tear when you open the door. Wash seal with a mild detergent and warm water. Rinse and dry it thoroughly after cleaning.
-
Page 21: Part 6: Troubleshooting
PART 6: TROUBLESHOOTING If you experience a problem with your appliance or are concerned that the appliance is not functioning correctly, you can cany out some easy checks before calling for service, please see below. You can carry out some easy checks according to this section before calling for service. WARNING! Do not try to repair the appliance yourself. - Page 22 Problem Possible cause & Solution A layer of frost occurs Check that the air outlets are not blocked by food and ensure food is placed In the compartment within the appliance to allow suffi cient ventilation. Ensure that door is fully closed.
-
Page 23: Part 7: Information Sheet
PART 7: INFORMATION SHEET INFORMATION SHEET: Philco Philco brand: Brand Philco Product number PF 1602-5 Type of appliance 3) Energy effi ciency class (A... low electricity consumption to G high electricity consumption) Electricity consumption per 365 days 1) kWh Total available volume: l... - Page 24 INSTRUCTIONS AND INFORMATION REGARDING THE DISPOSAL OF USED PACKAGING MATERIALS Dispose of packaging material at a public waste disposal site. DISPOSAL OF USED ELECTRICAL AND ELECTRONIC APPLIANCES The meaning of the symbol on the product, its accessory or packaging indicates that this product shall not be treated as household waste.
Need help?
Do you have a question about the PF 1602-5 and is the answer not in the manual?
Questions and answers