Table of Contents
Advertisement
Quick Links
Download this manual
See also:
User Manual
Advertisement
Table of Contents

Related Manuals for Wincor Nixdorf BA72R


Summary of Contents for Wincor Nixdorf BA72R
- Page 1 BA72R 12.1" TFT LCD Monitor User Manual...
- Page 2 Wincor Nixdorf Pte Ltd 2, Kallang Sector Singapore 349277 Fax: (65) 6747 1577 http://www.wincor-nixdorf.com...
- Page 3 BA72R BA72R 12.1" TFT LCD Monitor User Manual Edition Mar 2004...
- Page 4 BEETLE® is a registered trademark of Wincor Nixdorf GmbH Copyright Wincor Nixdorf Pte Ltd, 2004 The reproduction, transmission or use of this document or its contents is not permitted without express authority. Offenders will be liable for damages. All rights, including rights created by patent grant or registration of a utility model or design, are reserved.
-
Page 5: Table Of Contents
AINTENANCE ......................9 ARRANTY ......................9 ECYCLING INTRODUCTION....................11 ..................12 DVANTAGES AT A LANCE ............12 NPACKING AND CHECKING THE ELIVERY BA72R COMPONENTS ..................13 ....................13 CREEN ODULE ....................14 OWER DAPTER ......................14 ABLES ) ..............15 APACITIVE OUCH... - Page 6 ................. 22 DJUSTABLE CREEN NGLE ............... 23 RGONOMIC ERMINAL ORKPLACE INSTALLATION ....................24 ................24 ONNECTING THE CABLE )..............25 ONNECTING THE OUCH CABLE OPTION ....................26 ABLE ROUTING ..................27 OFTWARE NSTALLATION (OSD) ................. 28 CREEN ISPLAY Description of Error Messages................ 33 TECHNICAL DATA ....................
-
Page 7: Manufacturer's Declaration And Approval
Manufacturer's Certificate and Notes Manufacturer’s Declaration and Approval General Authorization This device fulfills the requirements of Electromagnetic Compatibility (EEC) standards, 89/336/EEC and 73/23/EEC "Low Voltage Directive". Therefore, you will find the CE mark on the device or packaging. FCC-Class A Declaration This equipment has been tested and found to comply with the limits for a Class A digital device, pursuant to part 15 of the FCC Rules. -
Page 8: Tested Safety
UL- symbol. User Information Wincor Nixdorf (WN) does not accept responsibility for radio and TV interference and faults that care caused by unauthorized changes that have been made to the devices. Furthermore, cables or other devices that have not been approved by WN may not be connected to the device. -
Page 9: Safety Instructions
In case of emergencies (e.g. damaged housing, liquid or foreign objects getting into the device), the device should be switched off immediately, the mains plug of the BEETLE or PC should be removed, and the Wincor Nixdorf customer service should be contacted. -
Page 10: Power Cord Selection
Manufacturer's Certificate and Notes Safety Instructions Power Cord Selection The power cord for this unit has to select according to the country of destination. It must be used to prevent electric shock. Use the following guidelines necessary to replace the original cord set. -
Page 11: Outside Of The United States And Canada
Manufacturer's Certificate and Notes Safety Instructions Use a parallel blade, grounding type attachment plug rated 15 A, 125 V. Use a tandem blade, grounding type attachment plug rated 15 A, 250 V. Outside of the United States and Canada Use a cord set consisting of a minimum AWG according to Table A and a grounding type attachment plug rated 15 A, 250 V. -
Page 12: For The United Kingdom
Manufacturer's Certificate and Notes Safety Instructions For the United Kingdom Should the plug on the flexible cord not be of the type for your socket outlets, do not use an adapter but remove the plug from the cord and discard. Carefully prepare the end of the supply cord and fit a suitable plug. -
Page 13: Instructions For Maintenance
Please observe the maintenance and cleaning instructions for each of the BA72R components. These instructions can be found in their respective chapters. - Page 14 Manufacturer's Certificate and Notes Instructions for Maintenance The BA72R is manufactured without the use of CFCs and CCHS and is produced mainly from reusable components and materials. The processed plastics can, for the most part, be recycled. Even the precious metals can be recovered, thus saving energy and costly raw materials.
-
Page 15: Introduction
The BA72R is a new addition to our range of flat-panel display. This display features a standard analog RGB interface allowing connection to PC's CRT output. There is no need to add a digital graphics adapter. Using the BA72R provides you with a terminal-orientated, ergonomic and customer-friendly cashier’s workplace. -
Page 16: Advantages At A Glance
Controllers and data cables, necessary for operation, can be ordered separately. If damage has occurred during shipping or if the package contents do not match the delivery note, promptly inform your Wincor Nixdorf sales outlet. Transport the device only in its original packaging (to protect it against impact and shock). -
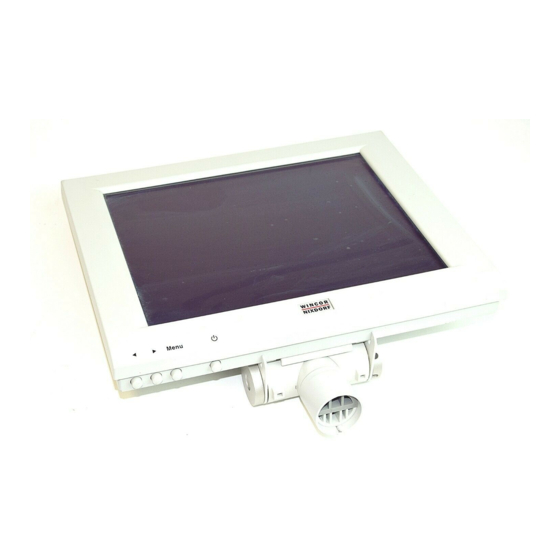
Page 17: Ba72R Components
BA72R Components Screen Module The screen module represents the main unit of the BA72R. It comprises of a TFT- LCD colour screen, the auto-scaling display Controller and an inverter that generates the voltage for backlighting the screen. As an option the screens are available with Touch Screen. -
Page 18: Power Adapter
Installation and Securing the Screen Power Adapter The BA72R is comes with an external AC-DC Power Adapter. The 35W Power Adapter has an auto-ranging AC inlet accepting input voltage from 100 to 240VAC. Cables Standard VGA cable, 1.8m Touch Cable, 1.8m (option) -
Page 19: Capacitive Touch Screen (Option)
Installation and Securing the Screen Capacitive Touch Screen (Option) General The TFT Touch Screen works according to the principle of a change in analog capacitance. It has a glass screen with a transparent, thin-film overlay on the surface. This is fully sealed and protected by a further layer of clear glass. Electrodes on the edges of the screen provide a uniform low-voltage field. -
Page 20: Touch Screen And Sleep Mode
Installation and Securing the Screen The programming interface of the screen is identical to the mouse interface. Touch Screen and Sleep Mode Using the Touch Screen with a BEETLE Pentium CPU, an entry via touch during sleep mode may lead to a faulty input. During sleep mode nothing can be read from the LCD flat screen. -
Page 21: How To Operate
Installation and Securing the Screen How to Operate The Touch Screen responds to the slightest contact, therefore you do not have to apply much pressure when working with the screen. This not only saves time, but is also kind to your joints! Touching the touch glass has the same effect as clicking the left mouse button. -
Page 22: Resistive Touch Screen (Option)
Installation and Securing the Screen Resistive Touch Screen (Option) General The resistive TFT Touch Screen is constructed of a hard-coated polyester top sheet that is overlaid on a conductively coated glass layer. Voltage is applied to the top sheet. As the user touches the screen, the top sheet compresses into contact with the glass layer, and current flows to the four corners in proportion to the distance from the edge. -
Page 23: Construction Of The Resistive Touch Screen
Installation and Securing the Screen Construction of the resistive Touch screen How to Operate Touching the touch screen has the same effect as clicking the left mouse button. You only need to apply a little pressure with the fingertip. In this resistive process not only fingertip contact is recognized. -
Page 24: Installing The Ba72R (Table Top Version)
Installation and Securing the Screen into Place The screens can be installed either with or without attached operating elements, as a table-top terminal or on a tubular stand. Installing the BA72R (Table Top version) Remove the footed stand and screen element from the cardboard packaging. -
Page 25: Securing The Screens (Tubular Stand Version)
Installation and Securing the Screen Now fasten the screw on the footed stand into place again using the crosstip screw- driver. Ensure that the screw is in the correct position. Ensure that the screw is in the correct position. Securing the screens (Tubular Stand Version) The system has been designed for securing into place on a tubular stand, with a tube with 35.2 ±... -
Page 26: Adjustable Screen Angle
Installation and Securing the Screen Adjustable Screen Angle The BA72R is fitted with a joint on the rear. You can optimize the angle of the screen depending on the viewing and lighting conditions. Use a screwdriver to set the twisting force of the BA72R on the adjusting nut. -
Page 27: Ergonomic Terminal Workplace
Installation and Securing the Screen Ergonomic Terminal Workplace Please observe the following when setting up your terminal workplace: Avoid direct glaring and reflective glaring. Install the device with a viewing direction that parallel to the windows. Avoid reflective glaring caused by electric light sources. -
Page 28: Installation
Locate the VGA connector a back panel of the computer and connect one end of the cable connector. Secure tightening the thumb-screw. Connect the other end of the VGA cable to the similar VGA connector on BA72R. VGA connector Touch Connector DC Input... -
Page 29: Connecting The Touch Cable (Option)
COM port, you can install an AT-COM board or a PCICOM board. Connect the 9- pin DSUB of the touch cable to the selected COM port of the Beetle system. Secure it by tightening the 2 screws on the DSUB connector. Connect the mini-DIN connector of the touch cable to the BA72R. -
Page 30: Cable Routing
Installation Cable routing The cable cover is located in the base plate. Lift the cable cover. Pull the cable cover forward in the direction of the arrow, and then remove it from the guide rail. PULL Insert the cable of the keyboard. The VGA / touch cables will be carried in a curve from the small cover of the screen module to the cable cover. -
Page 31: Software Installation
Then you can allocate the resources and set the corresponding jumper configuration on the COM board. Though the BA72R generally offers good display performance, the types and quality of the display adapter used in the host system can affect the display quality. -
Page 32: On-Screen Display (Osd)
Installation On-Screen Display (OSD) Located on the bottom left side of the BA72R are a set of 4 buttons. Menu Left Right Menu/Select Power Pressing the “Menu” button will activate the OSD. The OSD menu is as shown in figure below. - Page 33 Installation There are several ways to exit the OSD menu: Select the green happy face and hit the SELECT key (saves changes and exits), Select the red sad face and hit the SELECT key (discards changes and exits), Hold down the SELECT key (saves changes and exits), Wait for the OSD to time-out (saves changes and exits).
- Page 34 Installation ACTORY RESET These functions are to set the colour, Image or OSD to the factory default values. OURCE SELECTION This parameter is for selection of VGA signal source. This is not supported in the BA72R. RIGHTNESS ADJUSTMENT...
- Page 35 Installation OLOUR ADJUSTMENT OSITION ADJUSTMENT...
- Page 36 / unlock the OSD menu. PEAKER VOLUME The BA72R is equipped with a buzzer. In the BA72R with touch installed, the buzzer provide an audible feedback to the user. There 2 selections possible.
-
Page 37: Description Of Error Messages
Installation Description of Error Messages The LCD monitor will display this message when VGA signal is not present. For example when the VGA cable is not connected or when the PC is power off. This message will be displayed when an unsupported video mode is selected. -
Page 38: Technical Data
Installation Technical Data Models The BA72R family of display is available in a several configurations. BA72R /X where /X: Blank – with protective glass (no touch) /n – without touch and protective glass /cTouch - with Capacitive touch /rTouch - with Resistive touch... -
Page 39: Operating Conditions
Installation Operating Conditions The following operating conditions are valid for a BA72R that is fitted with all the available modules (LCD flat screen, touch screen): Climate class IEC 721 3/3 Class 3K3 Operating Temperature C to +40 5% - 85% Humidity Absolute humidity 1g/m³... -
Page 40: Display Specification
Installation Display Specification LCD Panel 12.1” diagonal Size Display Area 246 (W) x 184.5 (H) Pixel Pitch 0.3075 x 0.3075 Screen Resolution 800 (H) x 600 (V) pixels Type TFT active matrix 18 bits Synchronization Horizontal 30 ~ 55 Vertical 56 ~ 75 Colour Colour depth... - Page 41 Installation Interface connectors Video Signal RGB Analog 15-DSUB (male) Touch (optional) RS232 Mini-DIN 6-position Power Input DC Jack, 2.5 mm Input 12VDC, 3A (max) Consumption 36W (max) Dimensions Display w/o stand 315 x 248 x 53 (W x H x D) Display with stand 315 x 292 x 200 (W x H x D)
-
Page 42: Display Mode
Installation Display Mode Display Mode Horizontal Vertical Pixel Sync Frequency Frequency Clock Polarity (KHz) (Hz) (MHz) (H/V) IBM, 720 x 400 31.469 70.087 28.322 VESA, 640 x 480 31.469 59.940 25.175 VESA, 640 x 480 37.500 75.000 31.500 VESA, 640 x 480 37.861 72.809 31.500... -
Page 43: Inverter (High-Voltage Generator)
Installation Inverter (High-Voltage Generator) ARNING Inside the display unit, the high voltage needed for backlighting the LCD display is generated by the inverter ! Before opening the device, make sure, that the device is disconnected from the main power supply. Opening of the device only by authorized personnel! -
Page 44: Interface Definition
Installation Interface Definition VGA interface Signal GREEN BLUE GND (Red) GND (Green) GND (Blue) DDC +5V Supply (fused) GND (Sync) HYSNC VSYNC... -
Page 45: Touch Interface
Installation Touch Interface Signal (Reference to Touch Controller) Chassis GND RXD (in) TXD (out) - Page 46 Published by Wincor Nixdorf Pte Ltd 2, Kallang Sector Singapore 349277 Order No.: 01750078998- rev 04 Printed in Singapore...