Advertisement
gormp9manual.qxp
12/16/08
3:25 PM
Page 1
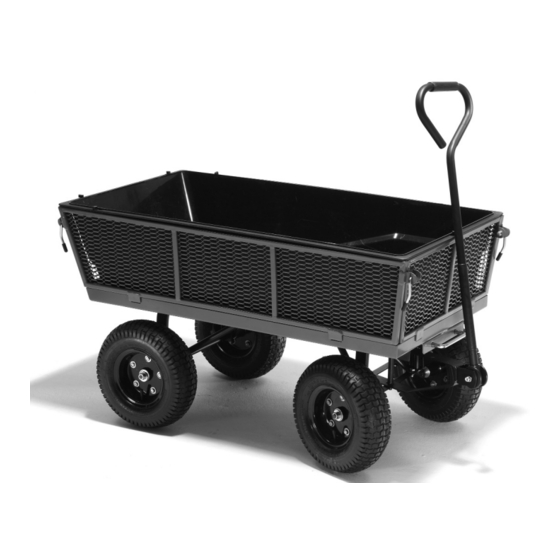
MULTI-USE DUMP CART
Owner's Manual
Model GORMP-9
• Important Safety Instructions
• Assembly Instructions
• Parts and Hardware Identification
CAUTION:
Read, understand and follow ALL instructions before using this product.
For product inquiries:
Tricam
7677 Equitable Drive
Eden Prairie, MN 55344
1-800-867-6763
www.gorillacarts.net
U.S. Patent #'s 6,851,756 and 7,390,065 Other U.S. and Foreign Patents Pending
12/08
Advertisement
Table of Contents

Related Manuals for Gorilla Carts GORMP-9


Summary of Contents for Gorilla Carts GORMP-9
- Page 1 12/16/08 3:25 PM Page 1 MULTI-USE DUMP CART Owner’s Manual Model GORMP-9 • Important Safety Instructions • Assembly Instructions • Parts and Hardware Identification CAUTION: Read, understand and follow ALL instructions before using this product. For product inquiries: Tricam...
- Page 2 gormp9manual.qxp 12/16/08 3:25 PM Page 3 Exploded Drawing for Assembly Parts List A.Bed Frame (1) B. Poly Liner / Cover (1) C. Front Panel (1) D. Left Panel (1) E. Right Panel (1) F. Back Panel (1) G.Front Axle Assembly (1) H.Rear Axle Assembly (1) I.
- Page 3 gormp9manual.qxp 12/16/08 3:25 PM Page 5 Important Safety Instructions 1. READ ALL INSTRUCTIONS BEFORE USE. If you do not understand these instructions, need clarification or further explanation, please call our customer service department for assistance at 1-800-867-6763. 2. Do not load the cart with more than 1,200 lb (544 kg). Do not use the dumping feature of the cart with a load of more than 500 lb (226 kg).
- Page 4 gormp9manual.qxp 12/16/08 3:25 PM Page 7 Step 3 Attach the front struts (2) to the bed frame using M8x20 carriage bolts (2), M8 flat washers (2) and M8 lock nuts. Hand tighten. Step 4 Next attach the front struts (2) to the front axle assembly using M8x20 hex head bolts (2), M8 flat washers (2), and M8 lock nuts (2).
- Page 5 gormp9manual.qxp 12/16/08 3:25 PM Page 9 Step 7 Attach the wheels to the cart by first placing the wheel spacers (4) onto the front and rear axles. Step 8 Place the wheels onto each axle (valve stems facing out) using the M12 flat washers (4) and M12 lock nuts (4).
- Page 6 gormp9manual.qxp 12/16/08 3:25 PM Page 11 Step 10 Insert the plastic tray by lining up the slots on the rim of the tray with the turn locks on the top edges of the side panels. Lock the tray in place by twisting the turn locks 90 degrees.
Need help?
Do you have a question about the GORMP-9 and is the answer not in the manual?
Questions and answers