Advertisement
gormp12manual.pdf
1
10/14/11
5:30 PM
C
M
Y
CM
MY
CY
CMY
K
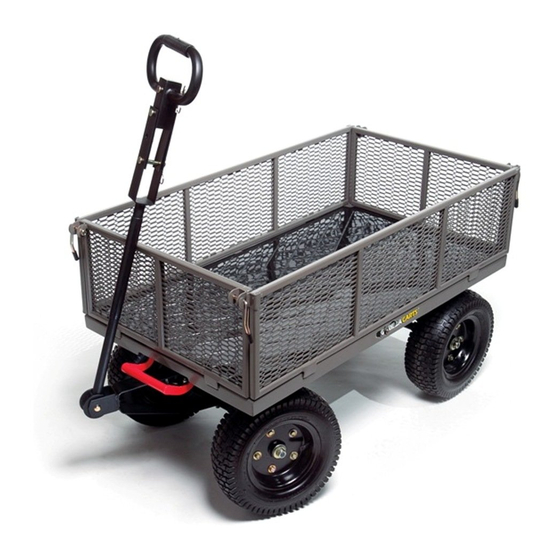
Multi-Use Dump Cart
Owner's Manual
Model GORMP-12
• Important Safety Instructions
• Assembly Instructions
• Parts and Hardware Identification
CAUTION:
Read, understand and follow ALL instructions before using this product.
Questions, problems, missing parts? Before returning to your retailer, visit us online at
www.tricam.com and complete the replacement parts submission form or call our customer service
department at 1-800-867-6763, 9 a.m. - 4 p.m., CST, Monday - Friday.
For product inquiries:
Tricam
7677 Equitable Drive
Eden Prairie, MN 55344
1-800-867-6763
www.tricam.com
U.S. Patent #s 6,851,756, 7,210,697, 7,390,065,
7,441,792, 7,818,865 & 7,887,141
Canada Patent # 2,503,869
Other U.S. and Foreign Patents Pending
10/11
Advertisement
Table of Contents

Related Manuals for Gorilla Carts GORMP-12


Summary of Contents for Gorilla Carts GORMP-12
- Page 1 Multi-Use Dump Cart Owner’s Manual U.S. Patent #s 6,851,756, 7,210,697, 7,390,065, 7,441,792, 7,818,865 & 7,887,141 Canada Patent # 2,503,869 Model GORMP-12 Other U.S. and Foreign Patents Pending • Important Safety Instructions • Assembly Instructions • Parts and Hardware Identification CAUTION: Read, understand and follow ALL instructions before using this product.
-
Page 3: Hardware List
Exploded Drawing for Assembly Parts List A. Bed Frame (1) B. Dump Lock (1) C. Front Axle Assembly (1) D. Front Struts (2) E. Rear Axle Assembly (1) F. Rear Struts (2) G. Wheels (4) H. Handle (1) I. Bed Liner (1) J. -
Page 4: Important Safety Instructions
Important Safety Instructions 1. READ ALL INSTRUCTIONS CAREFULLY BEFORE USE. If you do not understand these instructions, need clarification or further explanation, please visit us online at w w w w w w . . t t r r i i c c a a m m . . c c o o m m or call our toll free answer line for assistance at 1 1 - - 8 8 0 0 0 0 - - 8 8 6 6 7 7 - - 6 6 7 7 6 6 3 3 Monday through Friday 9 a.m. - Page 5 Step 3 A) Unlock the front frame using the dump lock and place the rear axle assembly under the frame to prop it up for easier access. B) Attach the front axle assembly to the bed frame using M8x20 carriage bolts (4), M8 washers (4), and M8 lock nuts (4).
- Page 6 Step 5 Attach the front struts (2) to the bed frame using M8x20 carriage bolts (2), M8 washers (2), and M8 lock nuts (2). Slide the M8x20 carriage bolt through the bed frame first and then through the struts. Hand tighten. D D o o n n o o t t f f u u l l l l y y t t i i g g h h t t e e n n b b o o l l t t s s a a t t t t h h i i s s t t i i m m e e . . Step 6 Next attach the front struts (2) to the underside of the front axle assembly using...
- Page 7 Step 8 Slide the rear struts onto the rear axle assembly and attach the angled part of the strut to the bed frame using M8x20 carriage bolts (2), M8 washers (2), and M8 lock nuts (2). Tighten all hardware securely in Steps 7 and 8.
- Page 8 Step 11 Attach the handle to the yoke using M8x60 carriage bolt (1), M8 washer (1), and M8 lock nut (1). Tighten securely. Step 12 Insert the liner onto the bed frame. Please reference the stamp "THIS SIDE UP" to ensure proper placement. Step 13 Attach the mesh panels to all sides of the bed frame.
- Page 9 Using the swivel handle 1. Remove clips and cotter pins. 2. Rotate the handle and insert cotter pin. Secure by attaching the clip. 3. The second cotter pin is used to attach the handle to the trailer hitch, as shown. Using the Dumping Feature To operate the dumping feature, pull the dumping release handle upward to release...
-
Page 10: Replacement Parts List
DO NOT EXCEED MAXIMUM OVERALL LOAD CAPACITY 1,200 LBS CAUTION (544 KG) OR THE MAXIMUM DUMPING LOAD CAPACITY OF 500 LBS (226 KG) WEIGHT RATING IS BASED ON AN EVENLY DISTRIBUTED LOAD. Replacement Parts List For replacement parts, please visit us online at w w w w w w . . t t r r i i c c a a m m . . c c o o m m to complete the replacement parts submission form or call our customer service department at 1 1 - - 8 8 0 0 0 0 - - 8 8 6 6 7 7 - - 6 6 7 7 6 6 3 3 , 9 a.m.
Need help?
Do you have a question about the GORMP-12 and is the answer not in the manual?
Questions and answers