Advertisement
Table of Contents
- 1 Table of Contents
- 2 Introduction
- 3 Quick Switch Overview
- 4 Figure 1: SW24-GBM Front Panel
- 5 Figure 2: Rear Panel of the SW24-GBM
- 6 Preparing to Install the Switch
- 7 Installation
- 8 Configuration
- 9 Configuring the Switch Using the Web Interface
- 10 Figure 3: Local Area Connection Properties
- 11 Figure 4: TCP/IP Properties
- 12 To Reset the IP Address of the Switch Using the Supplied Console Cable
- 13 Figure 5: Console Connection in Terminal Window
- 14 Troubleshooting & Support
- Download this manual
Advertisement
Table of Contents

Related Manuals for Pakedge SW24-GBM


Summary of Contents for Pakedge SW24-GBM
- Page 1 SW24-GBM Enterprise-Class, 24-Port Fully Managed Switch Quick Installation Guide – Version 1.1...
-
Page 2: Table Of Contents
Troubleshooting & Support ..................................11 Table of Figures Figure 1: SW24-GBM Front Panel ................................3 Figure 2: Rear Panel of the SW24-GBM ..............................4 Figure 3: Local Area Connection Properties ............................. 6 Figure 4: TCP/IP Properties ..................................7 Figure 5: Console Connection in Terminal Window ..........................10... -
Page 3: Introduction
1. INTRODUCTION This guide has been written to allow you to get up and running quickly with the SW24-GBM Pakedge switch with a few assumptions in mind: a. You have a working knowledge of networking hardware configuration b. You have a working knowledge of PC operations QUICK SWITCH OVERVIEW The SW24-GBM includes 24 10/100/1000 ports. -
Page 4: Figure 1: Sw24-Gbm Front Panel
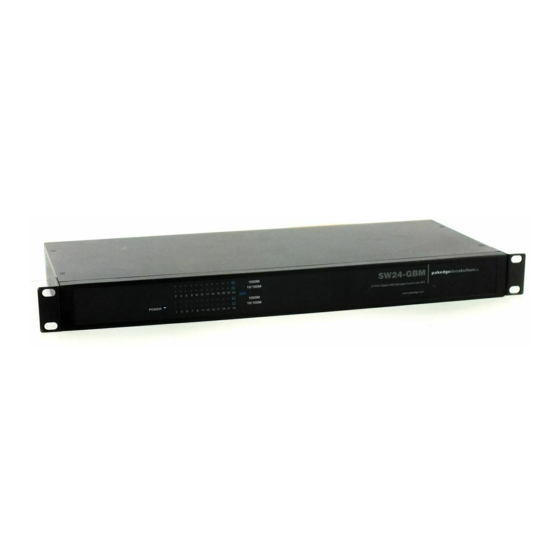
The Front Panel of the SW24-GBM (shown in Figure 1) has several LEDs, displaying the status of the switch ports. Figure 1: SW24-GBM Front Panel Label Function Description Power indicator light When lit, indicates that unit has power. 10/100M Link and Activity Indicator of each port Indicator lights when Ethernet link is normal. -
Page 5: Figure 2: Rear Panel Of The Sw24-Gbm
Please ground as needed. CONSOLE Implement Switch Local management. 24 10/100/1000M Ports Implement 10/100/1000M Ethernet signal transformation. 2 SFP Ports Implement 10/100/1000M Ethernet signal transformation. Table 3: Description of the Rear Panel of the SW24-GBM from left to right SW24-GBM QUICK INSTALLATION GUIDE... -
Page 6: Preparing To Install The Switch
PREPARING TO INSTALL THE SWITCH Installing the SW24-GBM is similar to installing any other Ethernet Switch. If you have installed an Ethernet switch before, the process is very similar. Tools Required: • PC or Laptop with Ethernet Interface and a web browser (an integrated DB-9 port or USB to Serial adapter may be necessary if you would like to use the console interface) •... -
Page 7: Configuration
CONFIGURATION There are two ways to complete the initial configuration of the SW24-GBM switch – either by using the standard IP address and a web browser or the console cable and a terminal emulation program such as PuTTY or HyperTerminal. -
Page 8: Figure 4: Tcp/Ip Properties
2. Select Internet Protocol (TCP/IP) and click Properties. The Internet Protocol (TCP/IP) dialog appears where you can configure the TCP/IP settings of your PC. Figure 4: TCP/IP Properties SW24-GBM QUICK INSTALLATION GUIDE... - Page 9 6. Enter the switch’s default IP address: 192.168.1.201 into the Address Bar and press <ENTER>. 7. The default password is blank. Simply click “Apply” to be logged into the web administration portal. 8. In the web administration portal, you will be able to configure, update and reset the SW24-GBM. Figure 5:...
-
Page 10: To Reset The Ip Address Of The Switch Using The Supplied Console Cable
Table 4 shows the necessary settings that must be set in the terminal communications software in order to make a successful connection. Baud Rate 9600 Character Size Table 4: Parity Code None Default Serial Port Settings for Stop Bits Console Connection Flow Control None SW24-GBM QUICK INSTALLATION GUIDE... -
Page 11: Figure 5: Console Connection In Terminal Window
4. Once the terminal screen pops up you will see a screen similar to the one in Figure 5. Once this screen appears, hit enter (there is no password). 5. Type: IP Setup 192.168.1.201 255.255.255.0 192.168.1.99<ENTER> 6. Your switch should now be accessible from the network. Figure 5: Console Connection in Terminal Window SW24-GBM QUICK INSTALLATION GUIDE... -
Page 12: Troubleshooting & Support
TROUBLE SHOOTING & SUPPORT If you are unable to get the SW24-GBM switch functional using these steps, you can refer to the full manual on our website or contact the Technical Support team for help. CONTACT INFORMATION: Website: www.pakedge.com Email: support@pakedge.com...
Need help?
Do you have a question about the SW24-GBM and is the answer not in the manual?
Questions and answers