Table of Contents
Advertisement
Quick Links
Advertisement
Table of Contents

Related Manuals for Philco PEI 9703


Summary of Contents for Philco PEI 9703
-
Page 1: Range Hood
RANGE HOOD USER'S MANUAL PEI 9703 PEI 9704... - Page 2 Dear customer, Thank you for buying a PHILCO brand product. So that your appliance serves you well, please read all the instructions in this user's manual.
-
Page 3: Table Of Contents
CONTENTS PART 1: IMPORTANT SAFETY INSTRUCTIONS ....................2 PART 2: DESCRIPTION OF THE APPLIANCE ....................4 PART 3: INSTALLATION ............................ 5 Unpacking ........................................5 Dimensions of the appliance ................................5 Placement ........................................6 Assembly and installation of the appliance ...........................6 Carbon fi lter......................................12 Ventilation ....................................... -
Page 4: Part 1: Important Safety Instructions
PART 1: IMPORTANT SAFETY INSTRUCTIONS Recommendation: Carefully read these instructions before installing and operating this range hood. Write down the serial number found on the rating label of the range hood in the space below. It is essential that you store this user's manual in a safe place so that you can use it in the future. If you intend to sell the appliance, give it to another owner, or if you move, always make sure that the user's manual is attached to the appliance, so that the new owner can also learn about the operation of the appliance and the relevant warnings. - Page 5 If a chimney is connected to the exhaust of the range hood, use pipes with a diameter of 150 or 120 mm. The pipe connection should be as short as possible. Keep packaging materials out of children's reach. They could suff er injury or suff ocation. ...
-
Page 6: Part 2: Description Of The Appliance
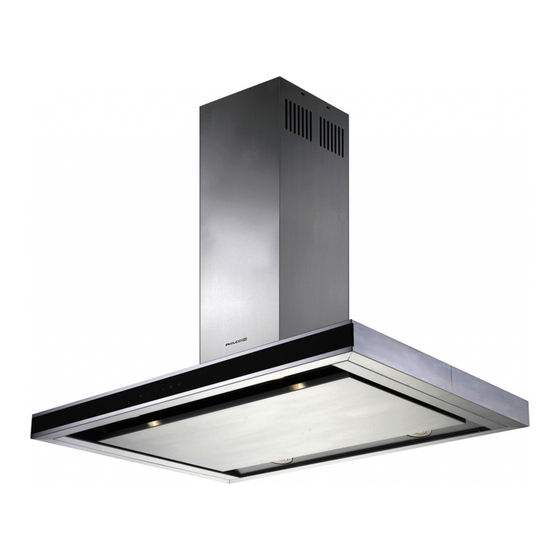
PART 2: DESCRIPTION OF THE APPLIANCE PEI 9703 Outer chimney Inner chimney Tempered glass Lighting Aluminium fi lter Control panel PEI 9704 Outer chimney Inner chimney Lighting Aluminium fi lter Control panel Remote control (Optional accessory) POW E R (B ) (C ) A. -
Page 7: Part 3: Installation
IMPORTANT: Ensure that children do not play with the packaging material. Dimensions of the appliance PEI 9703 PEI 9704 Supplied accessories (depending on the model) A non-return exhaust fl ap must be installed into the air outlet of the range hood (unless one is already factory installed). -
Page 8: Placement
Placement Min.65 cm Min.75 cm Install the range hood at a height of at least 65 cm above an electric cooktop or at a height of 75 cm above a gas cooktop. Assembly and installation of the appliance Before assembling and installing the appliance carefully read these instructions and adhere to them. NOTE: Dowels, screws and the hanging plate are supplied together with the range hood. - Page 9 Do not attach this range hood to a wall or cabinet furniture by tiling, plastering and do not glue it on using silicone glue. The appliance is designed to only be installed on a wall / ceiling. We recommend that always two people perform the installation of the appliance. If your range hood is designed to be mounted to the ceiling, adhere to the following instructions.
- Page 10 Connection of the front angle Connection of the rear angle sections – left to right direction sections – right to left direction Place for connecting Front part of F R O N the angle sections the motor unit 3) Installing the chimney to the motor unit Insert the inner chimney into the outer chimney.
- Page 11 Use screws (3.5 x 9.5) to connect the ends of the angle sections to the corners of the hanging plate. Place for connecting to the hanging plate 5) Installation of the aluminium exhaust tube Attach one end of the aluminium tube to the range hood fl ange and the other end to the air outlet. Check that both ends are fi rmly attached and secured in place.
- Page 12 7) Removing the separation plate To remove the separation plate hold the plate in the appropriate points on the left and right and pull downwards. 8) Connecting the control unit to the motor unit Align the hanging hooks on the control unit with the appropriate holes for the hanging hooks on the motor unit and join together using screws (3.5 x 9.5) Hanging hook Hole for the hanging hooks on the motor unit...
- Page 13 During installation perform the connection, as shown in the illustration below, to activate the use of the control panel. To connect, fi rst bend the tabs outwards. They will connect after the connection is made. EN - 11 Copyright © 2012, Fast ČR, a. s. 04/2012...
-
Page 14: Carbon Fi Lter
Carbon fi lter If you are using the range hood without an air exhaust, it is necessary to use a carbon fi lter. The carbon fi lter is not included. Contact your vendor or an authorised service centre to purchase this fi lter. ... -
Page 15: Part 4: Operation
PART 4: OPERATION Remove the protective foil from the control panel. Models with digital controls – 3 speeds Exhaust power selection This range hood is equipped with 3 levels of exhaust power. Select the power level based on the use of the stove and the amount steam that the pots emit. -
Page 16: Models With An Lcd Display - 5 Speeds
NOTE: Use the range hood together with the stove. This will ensure the correct air exhaust. We recommend to leave the range hood running a few minutes longer than the stove to ensure that all odours are extracted. Lighting The range hood is equipped with lighting. Press the button with the light symbol to turn on the lights. Press the button again to turn the lights off . -
Page 17: Operating Tips
Additional functions Additional functions may be set only when the motor and the lights are off . Setting the backlight brightness – Press and hold the button – after about 5 seconds the blue colour intensity in percent will appear (e.g. b00). Press the button –... -
Page 18: Part 5: Maintenance And Cleaning
PART 5: MAINTENANCE AND CLEANING WARNING! Before cleaning, regular or other maintenance, installation or removal, check that the appliance is turned off and disconnected from the power socket or that the respective circuit breaker is turned off . Changing a light bulb ... -
Page 19: Cleaning
Cleaning Aluminium fi lters capture dust and fat from the extracted air. It is necessary to regularly wash these fi lters, ideally once a month, depending on the level of use. Wash the fi lters in water with dishwashing detergent, or you may place the fi lters in a dishwasher and wash them using a gentle program (max. - Page 20 WARNING! For cleaning do not use petrol, benzene, thinners or any other solvents, coarse cleaning agents, steel wool or any sponges with steel wool. WARNING! You may put the aluminium fi lters in a dishwasher. The colour of the aluminium fi lters may change after several washes.
-
Page 21: Part 6: Before You Call The Service Centre
PART 6: BEFORE YOU CALL THE SERVICE CENTRE If the appliance is not working as it should check the following recommendations for resolving the most common problems. If the problem persists or it is not included in the table below, turn off the appliance and disconnect it from the power socket and contact an authorised service centre. -
Page 22: Part 7: Technical Specifications
PART 7: TECHNICAL SPECIFICATIONS NOTE: All the here mentioned data is subject to change. EN - 20 Copyright © 2012, Fast ČR, a. s. 04/2012... - Page 23 EN - 21 Copyright © 2012, Fast ČR, a. s. 04/2012...
- Page 24 INSTRUCTIONS AND INFORMATION REGARDING THE DISPOSAL OF USED PACKAGING MATERIALS Dispose of packaging material at a public waste disposal site. DISPOSAL OF USED ELECTRICAL AND ELECTRONIC APPLIANCES The meaning of the symbol on the product, its accessory or packaging indicates that this product shall not be treated as household waste.
Need help?
Do you have a question about the PEI 9703 and is the answer not in the manual?
Questions and answers