Table of Contents
Advertisement
Quick Links
Advertisement
Table of Contents

Related Manuals for Philco PEI 62 Cube


Summary of Contents for Philco PEI 62 Cube
- Page 1 RANGE HOOD OWNER’S MANUAL PEI 62 Cube...
- Page 2 Dear customer, Thank you for buying a PHILCO brand product. So that your appliance serves you well, please read all the instructions in this user’s manual. Copyright © 2018, Fast ČR, a. s. Revision 08/2018...
-
Page 3: Table Of Contents
CONTENTS PART 1: IMPORTANT SAFETY INSTRUCTIONS ....................2 Cautions ......................................... 2 Lamp ........................................4 PART 2: DESCRIPTION OF THE APPLIANCE .....................5 PART 3: INSTALLATION .............................6 Use ........................................... 6 Electrical connection ..................................7 Mounting ......................................7 Installation Step ....................................8 PART 4: OPERATION ............................11 4 speeds LCD Touch control .................................11 PART 5: MAINTENANCE AND CLEANING .......................12 PART 6: BEFORE YOU CALL THE SERVICE CENTRE ..................13... -
Page 4: Part 1: Important Safety Instructions
PART 1: IMPORTANT SAFETY INSTRUCTIONS Closely follow the instructions set out in this manual. All responsibility, for any eventual inconveniences, damages or fires caused by not complying with the instructions in this manual, is declined. The hood is conceived for the suction of cooking fumes and steam and is destined only for domestic use. It is important to conserve this booklet for consultation at any moment. - Page 5 This must be completed in accordance with the maintenance instructions provided in this manual. Failure to follow the instructions provided in this user guide regarding the cleaning of the hood and filters will lead to the risk of fires. The flaming of foods beneath the hood itself is severely prohibited. The use of exposed flames is detrimental to the filters and may cause a fire risk, and must therefore be avoided in all circumstances.
-
Page 6: Lamp
Lamp The available lamps and the correspondence ILCOS D codes and lamp pictures: Use type lamp (or use in alternative type lamp) DSR-1.5-S-68 (ILCOS D code in according to standard IEC61231). - Self-ballasted fl uorescent refl ector lamp – Integral induction type ballast - Max wattage: 1.5 W - Voltage range: 12 V - Dimensions: Stainless Steel Surface Unit: mm We recommend that you contact the authorized PHILCO service center to replace the LED lighting. EN - 4 Copyright © 2018, Fast ČR, a. s. Revision 08/2018... -
Page 7: Part 2: Description Of The Appliance
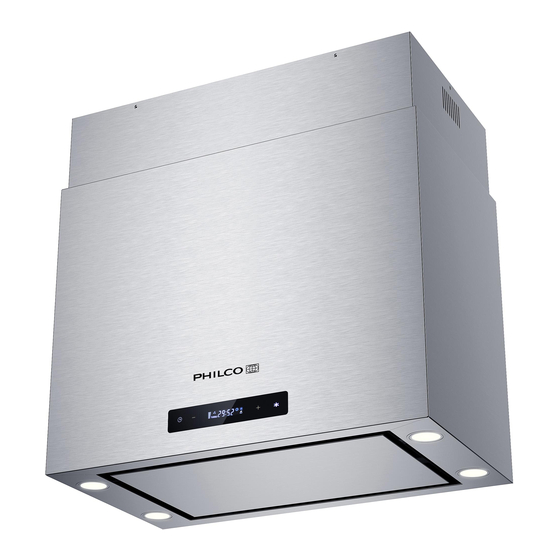
PART 2: DESCRIPTION OF THE APPLIANCE 1. Chimney 2. Casing 3. Touch Control Panel 4. LED Lamp 5. Grease filter 6. Motor EN - 5 Copyright © 2018, Fast ČR, a. s. Revision 08/2018... -
Page 8: Part 3: Installation
PART 3: INSTALLATION The hood is designed to be used either for exhausting or filter version. Ducting version In this case the fumes are conveyed outside of the building by means of a special pipe connected with the connection ring located on top of the hood. Attention! The exhausting pipe is supplied. -
Page 9: Electrical Connection
Electrical connection The mains power supply must correspond to the rating indicated on the plate situated inside the hood. If provided with a plug connect the hood to a socket in compliance with current regulations and positioned in an accessible area, after installation. If it not fitted with a plug (direct mains connection) or if the plug is not located in an accessible area, after installation, apply a double pole switch in accordance with standards which assures the complete disconnection of the mains under conditions relating to over-current category III, in accordance with installation instructions. -
Page 10: Installation Step
Installation Step • The cooker hood should be installed so that there is a space of 650-750cm from the centre of the mesh grease filters to the hob. It is the manufacturer of the hob who determines the clearance required and the clearance quoted by the hob manufacturer must be followed. In the absence of any instructions supplied with a gas hob the minimum distance between the hob and the hood must be at least 760mm. • Double check the tape on the vent has been removed. - Page 11 • Loosen the eight screw which fixing on angle bar, and adjust the height of the need to install, and lock the screw again. 8 x M5 *12 screws 8 x M5 *12 nut IMPORTANT: The angle bars must have an overlap of AT LEAST 100 mm. IMPORTANT: The metal washers should be added in this step.( Washers 0.8*5.2*10) M5*12 8* screws M5 8* nut • According to the hole location in hanging panel to fix the explosion screw on the ceiling, and put up the cooker hood and lock it with the explosion screw on the ceiling. 8 x M6*60 screws IMPORTANT: Make sure all screws are tightly.
- Page 12 • When you choose the ducting version, place the exhausting pipe (Ø150-Ø153mm, supplied) on the hood. The head Ø153mm would connect to the hood. If you need to use the Ø120-Ø123mm pipe, you can place the adapter(not supplied) firstly. When you choose the fi lter version, no need the exhausting pipe. • Put up the cooker hood and lock it with the explosion screw on the ceiling. IMPORTANT: This stage of the installation process MUST be completed by two people. • Fix the upper chimney cover up to the hanging plate with 3pcs screws (removed previously). IMPORTANT: The screws MUST be securely tightened. For safety reasons, use only the same size of fixing or mounting screws that are recommended in this instruction manual.
-
Page 13: Part 4: Operation
PART 4: OPERATION 4 speeds LCD Touch control After plug in power, will into Stand By mode automatic. Timer button Time setting: Keep pressing it when the machine is in stand by mode, it would start the time setting. After pressing, the hour display would be flashing, you could press “ “ or “ “ to do the setting. Press “... -
Page 14: Part 5: Maintenance And Cleaning
PART 5: MAINTENANCE AND CLEANING Regarding the replacement of the bulb, cleaning and maintenance of the appliance, please refer to below paragraphs of this manual. Attention! Before cleaning, switch the unit off and pull out the plug. I. Regular Cleaning Use a soft cloth moistened with hand-warm mild soap water or household cleaning detergent. Never use metal pads, chemical, abrasive material or a stiff brush to clean the unit. -
Page 15: Part 6: Before You Call The Service Centre
PART 6: BEFORE YOU CALL THE SERVICE CENTRE If the appliance is not working as it should check the following recommendations for resolving the most common problems. If the problem persists or it is not included in the table below, turn off the appliance and disconnect it from the power socket and contact an authorised service centre. - Page 16 Technical drawings PEI 62 Cube EN - 14 Copyright © 2018, Fast ČR, a. s. Revision 08/2018...
- Page 17 INSTRUCTIONS AND INFORMATION REGARDING THE DISPOSAL OF USED PACKAGING MATERIALS Dispose of packaging material at a public waste disposal site. DISPOSAL OF USED ELECTRICAL AND ELECTRONIC APPLIANCES The meaning of the symbol on the product, its accessory or packaging indicates that this product shall not be treated as household waste. Please, dispose of this product at your applicable collection point for the recycling of electrical &...
- Page 18 Manufacturer/Importer: Fast ČR, a.s. Praha 10, Černokostelecká 2111 CZ-10000; CZECH REPUBLIC is a registered trademark used under license from EN - 16 Electrolux Home Products., Inc. Copyright © 2018, Fast ČR, a. s. Revision 08/2018...
Need help?
Do you have a question about the PEI 62 Cube and is the answer not in the manual?
Questions and answers