Advertisement
Available languages
Available languages
Advertisement
Chapters

Related Manuals for Breitling COCKPIT B50


Summary of Contents for Breitling COCKPIT B50
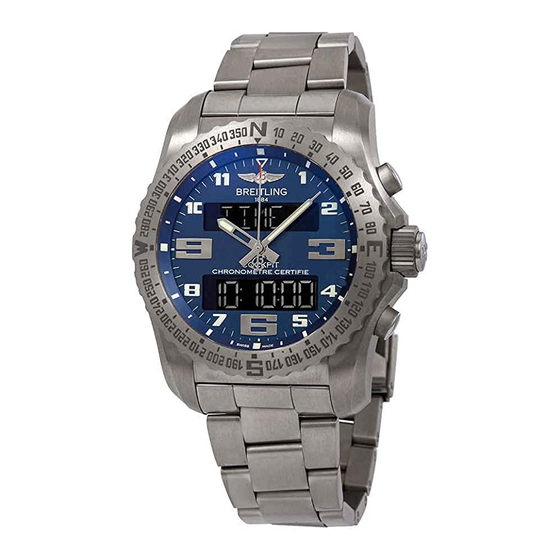
- Page 1 C O C K P I T B 5 0...
- Page 2 COCKPIT B50...
- Page 4 FRANÇAIS 5-59 ENGLISH 61-115 DEUTSCH 117-171 ITALIANO 173-227...
-
Page 6: Table Of Contents
Table des maTiÈres 1. Généralités a) Heure de référence et fuseaux horaires b) Fonctions c) Interfaces utilisateur d) Réglage de l’intensité lumineuse e) Parcage des aiguilles f) Blocage d’une fonction 2. batterie rechargeable et gestion de l’énergie a) Batterie rechargeable b) Gestion de l’énergie c) Recharge de l’accumulateur 3. - Page 7 lUMIErE CoUrT MoyEN loNG DISplAy DISp oN DISpoFF MoDE NUIT SIGNAl AlArME BUZZEr VIBrEUr lES 2 ToNE poUS poUS+hr poUS+Ch MoDE pIloTE SporT lANGUE ENGlISh FrANCE DEUTSCh ESpANol 8. affichage de la date ( DATE 9. alarmes-réveils ( a) Réglage ( SET Al b) Utilisation 10.
- Page 8 12. Chronographe «temps de vol» ( ChrFlGT a) Chronométrage d’un «temps bloc» b) Relecture des «temps blocs» c) Effacement d’un ou plusieurs blocs 13. Countdown countup clock ( CDCUClK a) Réglage ( SETCDCU b) Utilisation 14. alarme du countup ( AlCU a) Réglage ( SETAlCU...
-
Page 9: Généralités
à l’ancienne appellation GMT (pour «Temps Moyen de Greenwich»). L’heure UTC doit être introduite manuellement. Elle peut être trouvée sur le site www.breitling.com. L’heure locale TIME et le second fuseau horaire TIME 2 sont réglés en fonction du décalage par rapport au fuseau UTC (par pas de 1 heure et/ou de 15 minutes). - Page 10 4. laP Tmr: chronographe «tours» pour le décompte des temps au tour – voir chapitre 11. 5. CHrFlGT: chronographe «temps de vol» permettant de chronométrer des «temps blocs» en mémorisant l’heure de départ et l’heure d’arrivée, ainsi que la date du vol et sa durée – voir chapitre 12. 6.
-
Page 11: C) Interfaces Utilisateur
c) interfaces utilisateur La montre possède 3 aiguilles centrales (heures H, minutes M et secondes SEC ou trotteuse) ainsi que 2 affichages digitaux: écran supérieur à 12 h (composé de 7 digits alphanumériques ) et écran inférieur à 6 h (6 digits ███████... -
Page 12: D) Réglage De L'intensité Lumineuse
courte ou longue (env. 2 secondes). Si aucune action n’est associée aux poussoirs, l’inscription apparaît sur l’écran supérieur. : indique que la montre est en cours de calcul. ATTENTE (overflow) indique que la limite d’un compteur a été dépassée. d) réglage de l’intensité lumineuse Une pression longue sur la couronne permet d’entrer en mode réglage de l’inten sité... -
Page 13: F) Blocage D'une Fonction
Les aiguilles sont automatiquement parquées lorsque la couronne est tirée en mode SETTING f) blocage d’une fonction Si l’on désire maintenir affichée une fonction spécifique, il est possible de le faire en désactivant la rotation de la couronne en position neutre. Pour ce faire, il faut effectuer une triple pression sur la couronne. - Page 14 typiques d’autonomie en fonction de l’utilisation de l’éclairage. On constate que l’autonomie de la montre peut dépasser deux mois en cas d’utilisation très faible de la lumière ou se limiter à une dizaine de jours lors d’une utilisation intensive. Réglage d’intensité Graphique 1: autonomie typique en jours pour 10 minutes d’utilisation de la lumière et 10 secondes par jour d’alarme (vibreur et buzzer) en fonction du niveau de réglage de la lumière.
- Page 15 intensité 1 intensité 2 intensité 3 intensité 4 Utilisation journalière de la lumière (minutes) Graphique 2: autonomie typique en jours en fonction de l’utilisation de la lumière en minutes par jour (pour les quatre réglages d’intensité).
-
Page 16: B) Gestion De L'énergie
b) Gestion de l’énergie La montre est équipée d’un système de gestion de l’énergie intelligent permettant d’optimiser son autonomie. L’objectif ultime est d’éviter de devoir la régler à nouveau après un «arrêt». En fonction de l’état de charge de l’accumulateur, la montre informe l’utilisateur du besoin de recharge;... -
Page 17: C) Recharge De L'accumulateur
Un changement d’accumulateur ne sera nécessaire qu’après environ 300 recharges complètes, soit plus de 10 ans d’utilisation. Il ne pourra être effectué que par un centre de service agréé Breitling. c) recharge de l’accumulateur Après l’achat, il est recommandé de procéder à une recharge complète de l’accumulateur avant toute manipulation. - Page 18 Figure 1 Une fois la recharge terminée, l’écran supérieur affi che et la montre émet BAT 100% un fl ash lumineux. Une recharge complète dure environ 2 heures.
- Page 19 Dès que la montre est déconnectée du câble-chargeur ( apparaît sur l’écran UNplUG supérieur), trois cas peuvent se présenter: 1. La montre fonctionnait normalement et il n’y a rien à faire. 2. La montre était en veille ou pas totalement déchargée: il n’y a, en principe, rien à...
-
Page 20: Initialisation De La Montre
3. iniTialisaTiOn de la mOnTre Lors d’une première utilisation, ou à la suite d’une recharge, la montre guide l’utilisateur au travers de la séquence suivante: 1. Tirer la couronne en position 2 ( ) afin d’activer le mode réglages TIrEr TIGE 2. -
Page 21: Mise À L'heure De La Base De Temps De La Montre ( Utc )
• Tourner la couronne pour ajuster les minutes et confirmer par pression sur P2; les secondes clignotent (affichage sur l’écran supérieur). SECoNDE • Tourner la couronne pour ajuster les secondes et confirmer par pression sur P2 • Repousser la couronne en position neutre 1. On peut trouver l’heure UTC sur le site www.breitling.com. -
Page 22: Réglage De La Date
N.B.: en mode réglage ( ), une pression sur P1 fait redémarrer le comptage SET UTC des secondes à partir de 0. Le comptage des secondes n’est stoppé que lorsque la seconde est modifiée manuellement; dans ce cas, il redémarre dès la sortie du réglage (remise de la couronne en position neutre 1). -
Page 23: Réglage Du Fuseau Principal ( Time )
• Choisir le standard d’affichage de la semaine ( ) par rotation de NUMEro SEMAINE la couronne et confirmer par pression sur P2: : la première semaine contient le premier jeudi de l’année et le premier jour de la semaine est le lundi. : la première semaine contient le 1 janvier et le premier jour de la semaine est le lundi. - Page 24 de l’heure; si la date était affichée, apparaît sur l’écran supérieur et SETDATE le processus de réglage démarre par le réglage de la date. Dans le second cas, presser sur P2 jusqu’à faire clignoter les heures ( xx). UTC +/- •...
-
Page 25: Configuration De La Montre ( Setting )
En mode , une pression longue sur P2 permet de choisir entre le format TIME d’affichage sur 12 heures (indication ) ou 24 heures. Le changement se fait automatiquement aussi pour le fuseau TIME 2 et pour les deux alarmes. 7. - Page 26 : choix du type d’alarme – sonore, vibrante ou les deux. SIGNAl AlArME : confirmations sonores liées aux poussoirs, avec ou sans top horaire ou ToNE signal pour les heures pleines du chronométrage. : possibilité de désactiver les fonctions MoDE ChrFlGT CDCUClK AlCU...
-
Page 27: B) Tilt ( On Ou Off )
• S’il y a incohérence, tourner la couronne pour mettre l’aiguille des secondes à 12 h ( ž ) et confirmer par une pression sur P2. • Effectuer le réglage pour l’aiguille des minutes ( ž ), puis pour l’aiguille des heures ( žxx, où... - Page 28 • Tirer la couronne en position 2 (les aiguilles des heures et des minutes se parquent). • Choisir par rotation de la couronne. lUMIErE • Presser sur P1 pour activer le réglage et tourner la couronne pour choisir CoUrT (2 secondes), (4 secondes) ou (6 secondes);...
- Page 29 MoDE NUIT • Sélectionner la fonction par rotation de la couronne SETTING • Tirer la couronne en position 2 (les aiguilles des heures et des minutes se parquent) • Choisir par rotation de la couronne MoDE NUIT • Presser sur P1 pour activer le réglage •...
- Page 30 • Confirmer le réglage en pressant sur P1 et/ou en repoussant la couronne en position neutre 1. ToNE poUS poUS+hr poUS+Ch • Sélectionner la fonction par rotation de la couronne SETTING • Tirer la couronne en position 2 (les aiguilles des heures et des minutes se parquent) •...
- Page 31 MoDE pIloTE SporT • Sélectionner la fonction par rotation de la couronne SETTING • Tirer la couronne en position 2 (les aiguilles des heures et des minutes se parquent) • Choisir par rotation de la couronne MoDE • Presser sur P1 pour activer le réglage •...
- Page 32 • Tourner la couronne pour choisir la langue • Confirmer le réglage en pressant sur P1 et/ou en repoussant la couronne en position neutre 1. N.B.: ne pas oublier de repousser la couronne, une fois les réglages terminés. En cas d’oubli, l’affichage sur l’écran supérieur indiquera et un bip retentira prESSEr TIGE...
- Page 33 Une pression longue sur P1 permet de revenir directement à l’affichage standard de l’heure ( TIME 9. alarmes-réVeils ( La montre possède deux alarmes journalières basées sur l’heure locale TIME configurables en heures, minutes et jour de la semaine. a) réglage ( SET Al •...
- Page 34 fait passer le réglage au jour suivant (exemple d’affichage sur l’écran supérieur d’une alarme réglée sur les cinq jours ouvrés: lMMJV__ N.B.: une pression sur P1 réactive les sept jours de l’alarme en cours ( ToUS • Repousser la couronne en position neutre 1. A la sortie du réglage, l’alarme réglée est automatiquement activée, donc mise à...
- Page 35 L’alarme retentit durant 20 secondes, avec un rappel de 10 secondes après 2 minutes. L’écran supérieur affiche en clignotant le nom de l’alarme active: . Celle-ci peut être désactivée par pression sur l’un des deux poussoirs ou sur la couronne. 10.
- Page 36 b) mesure d’un temps avec temps intermédiaire(s) • Une pression sur P1 fait démarrer le chronographe. L’écran supérieur affiche les 1/100 de seconde, l’écran inférieur les heures, les minutes et les secondes jusqu’à 99 heures, 59 minutes et 59 secondes. •...
- Page 37 c) Flyback A tout moment, une pression longue sur P1 permet de faire redémarrer un chrono- métrage à partir de 0 (lors du relâchement du poussoir): c’est la fonction FLYBACK. L’aiguille des secondes se positionne directement sur la seconde active du chrono- métrage.
- Page 38 f) introduction de la distance pour le tachymètre Pour permettre au tachymètre d’effectuer un calcul de vitesse correct, il faut introduire la distance correspondant au temps chronométré. Ce réglage s’effectue de la manière suivante: • En mode (stoppé sans affichage de la vitesse), tirer la couronne en Chr ADD position 2;...
- Page 39 • Confirmer par pression sur P2; le premier digit de la valeur de distance clignote. • Choisir les unités, les dizaines et finalement les centaines pour la distance par rotation de la couronne, en confirmant à chaque fois par pression sur P2. •...
- Page 40 Lorsqu’on sélectionne la fonction , l’aiguille des secondes se positionne lAp TMr automatiquement sur 0 et devient l’aiguille du chronographe. A chaque nouveau chronométrage, l’aiguille redémarre à zéro et se positionne directement sur la seconde en cours. Elle reprend sa fonction normale dès que l’on quitte le mode chronographe «tours».
- Page 41 • Puis, par pressions successives sur P2, s’affichent les temps des autres tours sur l’écran inférieur (avec indication du tour affiché sur l’écran supérieur: xx). Après 10 secondes, l’affichage revient sur le dernier tour. • Une pression longue sur P2 permet d’effacer tous les temps ( rESET Si l’on oublie un chronométrage en marche, lorsque le temps total atteint 99 heures, 59 minutes et 59 secondes, le comptage est arrêté.
- Page 42 12. CHrOnOGraPHe «TemPs de VOl» ( ChrFlGT La fonction (chrono flight) permet de chronométrer une durée de vol ChrFlGT en heures, minutes et secondes («temps bloc»), avec mémorisation de la date d’atterrissage ainsi que des heures de décollage et d’atterrissage. Il est possible de sauvegarder 20 vols et d’effacer individuellement chaque vol.
- Page 43 N.B.: les paramètres de vol sont établis par rapport à l’heure locale TIME. N.B.: il n’est possible de mesurer qu’un seul «temps bloc» à la fois. N.B.: si le chronométrage de vol reste en marche plus de 99 heures et 59 minutes, il est automatiquement arrêté...
- Page 44 c) effacement d’un ou plusieurs blocs • Pour effacer le bloc actif, exercer une pression longue sur P2 alors que la couronne est en position neutre 1 ( rESET • Pour effacer tous les blocs en une seule fois, procéder comme suit: –...
- Page 45 • Tirer la couronne en position 2 (l’écran supérieur affiche SETCDCU • Choisir par rotation de la couronne countdown ( ) ou countup ( C-DoWN C-Up • Confirmer par pression sur P2 • Régler le nombre de jours ( ), les heures ( ), les minutes ( ) et les JoUr...
- Page 46 Si le countup ( ) est resté en marche au-delà du temps maximum de 99 jours, CU rUN 23 heures, 59 minutes et 59 secondes, le compteur est arrêté et l’écran supérieur affiche CU oVF 14. alarme dU COUnTUP ( AlCU Cette fonction permet de générer une alarme synchronisée sur le temps absolu du countup;...
- Page 47 L’alarme sonne durant 20 secondes, avec un rappel de 10 secondes après 2 minutes. L’écran supérieur affiche en clignotant (en alternance avec les xxJoUr(S) AlCU différent de 0). L’alarme peut être stoppée par pression sur l’un des deux poussoirs ou sur la couronne. 15.
- Page 48 Durant les 3 dernières minutes, la trotteuse décompte les secondes et un bip est émis chaque seconde durant les 10 dernières secondes. A 0, une alarme est lancée pendant 20 secondes, avec un rappel de 10 secondes après 1 minute. L’écran supérieur affiche ž...
- Page 49 b) Fonction SWAp La fonction permet d’inverser les deux fuseaux horaires TIME et TIME 2 SWAp sur l’affichage digital et sur les aiguilles, avec prise en compte d’un éventuel changement de date. Cet «échange» s’effectue par simple pression sur P1 lorsque l’on est en mode TIME 2 Cette fonction s’avère très utile et pratique, notamment pour les voyageurs passant...
- Page 50 procéder à une recharge dès que la charge est inférieure à 10-15%. Lorsque la batterie a atteint cette valeur, la trotteuse avance par sauts de 4 secondes. a) mode « » DEEp SlEEp Le mode (veille profonde) permet de déconnecter la batterie des circuits DEEp SlEEp électroniques de la montre et de préserver ainsi ses performances (capacité).
- Page 51 18. lisTe des mOTs de l’inTerFaCe UTilisaTeUr la liste ci-dessous explique l’ensemble des textes pouvant apparaître au niveau de l’interface utilisateur sur l’écran supérieur. affichage des fuseaux en mode 24 heures ž mettre l’aiguille à xx selon l’indication sur l’affichage digital (synchronisation) Al1 AM alarme 1 activée en mode AM Al1 oFF...
- Page 52 BAT100% batterie totalement rechargée BATTEry mode batterie BEST XX meilleur tour (en mode LAP) BloCKXX numéro du bloc BUZZEr alarme sonore BXX ADD bloc xx arrêté BXX lDG temps d’atterrissage du bloc xx BXX oVF bloc xx au-delà du temps limite BXX rUN bloc xx en cours BXXDATE...
- Page 53 dimanche DISp oN display tout le temps allumé DISp oFF display tout le temps éteint DIST distance parcourue pour le calcul de la vitesse FlyBACK fonction flyback du chronographe format de semaine selon ISO ISo-2 format de semaine selon ISO modifié JJ/MM format de date jour/mois JoUr XX...
- Page 54 NUMEro SEMAINE choix de la norme utilisée pour indiquer le numéro de la semaine désactivé activé overflow (dépassement de la capacité) p2 poUr EFFACEr en mode réglage du CHRFLGT, presser sur P2 pour effacer tous les blocs pIloTE mode pilote (toutes les fonctions) affichage des fuseaux en mode 12 heures post meridiem poUS bip sur poussoir...
- Page 55 SplIT temps intermédiaire SporT mode sport (désactivation de certaines fonctions) STop XX arrêt du tour xx SWAp inversion des fuseaux TIME et TIME 2 SyNChro synchronisation des aiguilles T2 AM second fuseau en mode AM T2 pM second fuseau en mode PM TIlT capteur d’angle TIME...
- Page 56 écart de marche quotidien limité à ±0,07 seconde, soit une précision annuelle de ±25 secondes. L’écart de marche du calibre SuperQuartz™ équipant votre Breitling surpasse largement ces exigences, en atteignant ±15 secondes par an. Le terme de «chronomètre» ne doit pas être confondu avec celui de «chrono - graphe», qui est une montre compliquée dotée d’un mécanisme additionnel...
- Page 57 lUneTTe rOse des VenTs Cette lunette, en indiquant les points cardinaux et les caps, remplit plusieurs fonctions de navigation. 1. Mémoire de cap Cette fonction offre la possibilité au pilote de «mémoriser» le cap à suivre en plaçant celui-ci en face de l’index situé à 12h. 2.
- Page 58 Votre chronomètre Breitling est un instrument sophistiqué fonctionnant en permanence et sous les contraintes les plus diverses. Dans un volume très restreint, une multitude de composants contribuent à en assurer toutes les fonctions. Leur action mécanique engendre une usure inéluctable, que l’entretien, par un renouvellement de la lubrification ainsi que par le remplacement des composants usagés, permet de maîtriser.
- Page 59 Plongée sous-marine COnseils UTiles Les bracelets Breitling en cuir véritable sont manufacturés avec les matériaux les plus raffinés et constituent un produit de haute qualité. Comme tous les objets en peau naturelle (souliers, gants, etc.), leur durée de vie varie sensiblement en fonction des conditions du porter.
- Page 60 Les boîtiers et bracelets métalliques Breitling sont conçus à partir des meil leurs alliages et garantissent robustesse et confort au porter. Un nettoyage régulier par rinçage et brossage à...
- Page 62 contents 1. General remarks a) Reference time and timezones b) Functions c) User interfaces d) Light intensity setting e) “Parking” the hands f) Blocking a function 2. Rechargeable battery and power management a) Rechargeable battery b) Power management c) Battery charging 3.
- Page 63 lIGhT ShorT MEDIUM loNG DISplAy DISp oN DISpoFF NIGhT MoDE AlArM SIGNAl BUZZEr VIBrATE BoTh ToNE pUSh pUSh+hr pUSh+Ch MoDE pIloT SporT lANG ENGlISh FrENCh GErMAN SpANISh 8. Date display ( DATE 9. Alarms ( a) Setting ( SET Al b) Use 10.
- Page 64 12. “Flight time” chronograph ( ChrFlGT a) Recording a “block time” b) Rereading “block times” c) Erasing one or more blocks 13. countdown countup clock ( CDCUClK a) Setting ( SETCDCU b) Use 14. countup alarm ( AlCU a) Setting ( SETAlCU b) Use 15.
-
Page 65: General Remarks
UTC timezone (standing for Coordinated Universal Time), which corresponds to the former GMT (Greenwich Mean Time) designation. UTC time must be introduced manually. This can be found on the www.breitling.com website. The local time (TIME) and the second timezone (TIME 2) are adjusted according to the time difference with the UTC timezone (in one hour and/or 15-minute increments). - Page 66 4. LAP tMR: “lap” counter chronograph to calculate lap times – see chapter 11. 5. cHRFLGt: “flight time” chronograph which allows time periods to be measured by memorizing the start and finish times, as well as the date and duration of the flight –...
-
Page 67: C) User Interfaces
c) User interfaces The watch has 3 central hands (hours H, minutes M and seconds SEC) as well as 2 digital displays: upper screen at 12 o’clock (consisting of 7 alphanumeric digits ) and lower screen at 6 o’clock (6 digits ███████... -
Page 68: D) Light Intensity Setting
must give a short or long (about 2 seconds) press. If no action is associated with the pushpieces, will appear in the upper screen. : indicates that the watch is in the process of calculating. WAIT (overflow) indicates that a counter limit has been exceeded. d) Light intensity setting A long press on the crown activates the light intensity setting mode. -
Page 69: F) Blocking A Function
f) Blocking a function Should you wish to keep a specific function displayed, this can be done by deactivating the crown rotating function in neutral position. In order to do this, push the crown three times. The word will appear in the screen at loCKED 12 o’clock for around 2 seconds. -
Page 70: B) Power Management
b) Power management The watch is equipped with an intelligent power management system serving to optimize its autonomy. The ultimate aim is to avoid having to re-adjust it Intensity control Graph 1: Typical autonomy in number of days for 10 minutes use of the light and 10 seconds per day of alarm (vibrate function and buzzer) according to the light intensity setting. - Page 71 Intensity 1 Intensity 2 Intensity 3 Intensity 4 Daily light use (minutes) Graph 2: Typical autonomy in days according to the use of light in minutes per day (for the four intensity settings).
- Page 72 once again after a “stop”. Depending on the status of the battery charge, the watch will inform the user of the need to charge. Parallel to this it will deactivate high-consumption functions little by little as the battery is used up. The sequence includes three successive levels: 1.
-
Page 73: C) Battery Charging
BATTEry A battery change will only be required after around 300 complete charges, or after more than 10 years of use. This may only be done by an authorized Breitling service center. c) Battery charging After purchasing, we recommend completely charging the battery prior to any handling. - Page 74 Figure 1 Once the battery is fully charged, the upper screen will display and the BAT 100% watch will give off a luminous fl ash. A full recharge takes around 2 hours.
- Page 75 Once the watch is disconnected from the charger cable ( appears in the UNplUG upper screen), three things may happen: 1. The watch will function as usual and no action is required. 2. The watch was in sleep mode or not completely flat: in principle, nothing needs to be done, but for safety’s sake, the initialization procedure should be conducted in order to confirm the different states (see chapter 3).
-
Page 76: Initializing The Watch
3. InItIALIzInG tHe wAtcH When used for the first time, or after having been charged, the watch guides the user though the following sequence: 1. Pull the crown into position 2 ( ) in order to activate the settings pUll CroWN function. -
Page 77: Adjusting The Time Base Of The Watch ( Utc )
( appears on the upper screen). SECoND • Turn the crown to adjust the seconds and confirm by pressing P2. • Press the crown back into neutral position 1. UTC time can be found on www.breitling.com. -
Page 78: Setting The Date
N.B.: When in setting mode ( ), pressing P1 will restart the seconds counter SET UTC from 0. The seconds counter will only stop when the seconds are changed manually. In this case, it restarts when exiting setting (putting the crown back to neutral position 1). -
Page 79: Setting The Main Zone ( Time )
• Select the week display ( ) by turning the crown and confirm by WEEK NUMBEr pressing P2: : the first week includes the first Thursday of the year and the first day of the week is Monday. : The first week includes January 1 and the first day of the week is ISo-2 Monday. - Page 80 If the date was displayed, appears on the upper screen and the setting SETDATE process will start with adjusting the date. In the second case, press on P2 until the hours begin to flash ( xx). UTC +/- • By turning the crown, adjust the time in relation to difference with UTC, from UTC-12 UTC+14 •...
-
Page 81: Configuring The Watch ( Setting )
7. conFIGURInG tHe wAtcH ( SETTING In the mode, the following adjustments can be made (all these settings are SETTING memorized by the watch and therefore available even in the event of the battery being completely flat): : synchronization of the analog display with the digital display. SyNChro : lighting goes on automatically (and possibly the LCD) depending on the TIlT... - Page 82 : choosing the type of alarm – buzzer, vibrating or both. AlArM SIGNAl : audible confirmations connected to pushpieces, with or without hourly ToNE time signal or signal for full timekeeping hours. : option of disabling the following functions: MoDE ChrFlGT CDCUClK AlCU...
-
Page 83: B) Tilt ( On Or Off )
• If there is an inconsistency, turn the crown to position the seconds hand at 12 o’clock ( ž ) and confirm by pressing P2. hAND • Set the minute hand ( ž ), and then the hour hand ( žxx, where xx is hAND hAND... - Page 84 • Pull the crown into position 2 (the hour and minute hands will “park”). • Select by turning the crown. lIGhT • Press P1 to activate the setting and turn the crown to select (2 seconds), ShorT (4 seconds) or (6 seconds);...
- Page 85 NIGhT MoDE • Select the function by turning the crown SETTING • Pull the crown into position 2 (the hand and minute hands will “park”). • Select by turning the crown NIGhT MoDE • Press P1 to activate the setting •...
- Page 86 • Confirm the setting by pressing P1 and/or pressing the crown back to neutral position 1. ToNE pUSh pUSh+hr pUSh+Ch • Select the function by turning the crown. SETTING • Pull the crown into position 2 (the hand and minute hands will “park”). •...
- Page 87 MoDE pIloT SporT • Select the function by turning the crown. SETTING • Pull the crown into position 2 (the hand and minute hands will “park”). • Select by turning the crown. MoDE • Press P1 to activate the setting. •...
- Page 88 • Turn the crown to select the language. • Confirm the setting by pressing P1 and/or pressing the crown back to neutral position 1. N.B.: Do not forget to press the crown back once the setting is complete. If for- gotten, the display on the upper screen will indicate and a beep will pUSh CroWN...
- Page 89 A long press on P1 will take you back to the standard hour display ( TIME 9. ALARMs ( The watch has two daily alarms based on local , which can be configured in TIME hours, minutes and the day of the week. a) setting ( SET Al •...
- Page 90 the setting moving to the following day (example of the display on the upper screen of an alarm set on all five working week days: MTWTF__ N.B.: Pressing P1 reactivates the seven days of the current alarm ( AllDAyS • Press the crown back to neutral position 1. Upon exiting setting, the alarm set is automatically activated, and is thus in ON mode ( or, if the 12 hour (AM/ PM) display was selected,...
- Page 91 The alarm sounds for 20 seconds, with a 10-second reminder after 2 minutes. The upper screen displays the name of the active alarm by flashing: . This can be deactivated by pressing one of the two pushpieces or on the crown. 10.
- Page 92 b) Measuring a period with intermediate/split times(s) • Pressing P1 starts the chronograph. The upper screen displays the 1/100 of a second, the lower screen the hours, minutes and seconds up to 99 hours, 59 minutes and 59 seconds. • Pressing P2 will display the intermediate time. The upper screen displays SplIT alternating the 1/100 of a second;...
- Page 93 c) Flyback At any time, a long press on P1 will restart timing from 0 (when the pushpiece is released): this is the FLYBACK function. The seconds hand positions itself directly on the active timing second. d) tachometer When the chronograph has been stopped after a measured time, a short press on P2 will display the average speed corresponding to the time measured –...
- Page 94 f) Introducing the distance for the tachometer To enable the tachometer to calculate the speed correctly, the distance corresponding to the time recorded must be introduced. This setting is done as follows: • With mode stopped without displaying the speed, pull the crown into Chr ADD position 2;...
- Page 95 • Confirm by pressing P2; the first digit of the distance value will flash. • Select the units, the tens and then the hundreds for the distance by turning the crown, confirming each time by pressing P2. • Press the crown back to neutral position 1. g) synchronizing the seconds hand If the seconds hand does not position itself exactly on 0 in mode, proceed...
- Page 96 When the function is selected, the seconds hand positions itself automa- lAp TMr tically on 0 and becomes the chronograph hand. With each new recording, the hand goes back to zero and positions itself directly above the second in progress. It returns to its usual function when the lap timer chronograph function is exited.
- Page 97 • Next, successive presses on P2, will display the time of the other laps on the lower screen (indicating the lap displayed on the upper screen: xx). After 10 seconds, the display returns to the last lap. • A long press on P2 will erase all the times ( rESET If one forgets to turn the timing off, when the total time reaches 99 hours, 59 minutes and 59 seconds, timing ceases.
- Page 98 12. “FLIGHt tIMe” cHRonoGRAPH ( ChrFlGT (chrono flight) function gives the possibility of recording the length ChrFlGT of a flight in hours, minutes and seconds (“block time”), memorizing the landing date as well as the take-off and landing times. 20 flights can be saved and erased individually.
- Page 99 N.B.: the flight parameters are established in relation to the local time TIME. N.B.: Only one “time block” can be measured at once. N.B.: if the flight recording remains in use for more than 99 hours and 59 minutes, it will stop automatically and the upper screen will display (for overflow).
- Page 100 c) erasing one or more blocks • To erase the active block, press on P2 for a long time when the crown in is neutral position 1 ( rESET • To erase all the blocks at once, proceed as follows: –...
- Page 101 • By turning the crown, select countdown ( ) or countup ( C-DoWN C-Up • Confirm by pressing P2. • Adjust the number of days ( ), hours ( ), minutes ( ) and seconds hoUr MINUTE ) of the countdown or countup by turning the crown, and confirming it SECoND each time by pressing P2.
- Page 102 If the countup ( ) remains on for more than 99 days, 23 hours, 59 minutes and CU rUN 59 seconds, the counter stops and the upper screen displays CU oVF 14. coUntUP ALARM ( AlCU This function makes it possible to generate an alarm synchronized with the abso- lute time of the countup.
- Page 103 The alarm sounds for 20 seconds, with a 10 second reminder after 2 minutes. The upper screen displays by flashing (alternately with the if different from xxDAy(S) AlCU 0). The alarm can be stopped by pressing one of the two pushpieces or the crown. 15.
- Page 104 During the last 3 minutes, the seconds hand counts the seconds and a beep is emitted every second for the final 10 seconds. At 0, an alarm sounds for 20 seconds, with a 10-second reminder after 1 minute. The upper screen flashes ž...
- Page 105 FUnctIon SWAp function allows the two timezones TIME and TIME 2 to be inversed on the SWAp digital display and hands, taking a possible date change into consideration. This “exchange” is done by simply pressing P1 when in mode. TIME 2 This is a very useful, practical function, especially for travelers going from one timezone to another, as it means one always has easy access to the local time as indicated by the hands.
- Page 106 charge is less than 10-15%. When the battery reaches this level, the seconds hand advances in 4-second increments. a) “ ” mode DEEp SlEEp mode allows the battery to be disconnected from the watch’s electronic DEEp SlEEp circuits and thus to preserve its performance (capacity). This function is useful if the watch is not used over a relatively long period.
- Page 107 18. LIst oF woRDs In UseR InteRFAce the list below explains all the texts that may appear in the upper screen through the user interface. zone display in 24 hour mode Al1 AM alarm 1 activated in AM mode Al1 oFF alarm 1 deactivated Al1 oN alarm 1 activated...
- Page 108 BATTEry battery mode BEST XX best lap (in LAP mode) BloCKXX block number BoTh buzzer and vibrate for the alarms BUZZEr audible alarm BXX ADD block xx stopped BXX lDG block xx landing time BXX oVF block xx overflow BXX rUN block xx running BXXDATE block date xx...
- Page 109 DD/MM date format day/month DISp oN display always on DISp oFF display always off DIST distance covered for speed calculation EMpTy memory empty FlyBACK chronograph flyback function ž hAND set hand to xx according to the indication in the digital display (synchronization) week format according to ISO ISo-2 week format according to ISO modified...
- Page 110 overflow (exceeded capacity) p2 To ErASE in CHRFLGT setting mode, press on P2 to erase all blocks pIloT pilot mode (all functions) display zones in 12 hour post meridiem mode pUSh beep signal on pushpiece pUSh+Ch beep signal on pushpiece and “start time now” pUSh+hr beep signal on pushpiece and time signal pUSh CroWN...
- Page 111 SporT sport mode (deactivation of certain functions) STop XX stop lap xx SWAp inversion of TIME and TIME 2 zones SyNChro synchronization of hands T2 AM second zone in AM mode T2 pM second zone in PM mode Thursday TIlT angle sensor TIME main timezone...
- Page 112 ±0.07 seconds, corresponding to an annual precision of ±25 seconds. The variation in rate of the SuperQuartz™ caliber fitted in your Breitling watch far and above exceeds these demands, achieving a rate of ±15 seconds a year.
- Page 113 BezeL coMPAss scALe By indicating the four points of the compass and the courses, this bezel fulfils several navigational functions. 1. Course memory This function enables the pilot to “memorize” the course to be followed by placing the latter opposite the hour-marker at 12 o’clock. 2.
- Page 114 Like any precision measurement instrument, your watch must be regularly maintained in order to function at its highest level of potential: the frequency of this operation varies according to actual use. Breitling or your authorized retailer will be happy to handle the procedure.
- Page 115 In particular, water, cosmetics and perspiration accelerate the aging process. A metal or synthetic Breitling bracelet/strap is thus better suited to activities involving frequent contact with water or humidity.
- Page 116 Breitling metal cases and bracelets are made from the finest alloys and guarantee sturdiness and wearer comfort. Regular cleaning by rinsing and brushing in clear water will keep your watch shiny. This operation is strongly recommended after each immersion in salty or chlorinated water. For watches fitted with a leather strap, proceed in the same manner, while avoiding getting the strap wet.
- Page 118 InhaltsverzeIchnIs 1. allgemeines a) Referenzzeit und Zeitzonen b) Funktionen c) Benutzer-Interface d) Einstellung der Leuchtintensität e) Parkstellung der Zeiger f) Blockieren einer Funktion 2. akku und Powermanagement a) Akku (aufladbare Batterie) b) Powermanagement c) Aufladen des Akku 3. Initialisierung der Uhr 4.
- Page 119 oder lIChT KUrZ MITTEl lANG oder DISplAy DISp oN DISpoFF oder NAChT MoDUS oder AlArM SIGNAl BUZZEr VIBrIEr BEIDE oder ToNE DrUCKEr DrU+STD DrU+Chr oder MoDUS pIloT SporT oder SprAChE ENGlISh FrANCE DEUTSCh ESpANol 8. Datumsanzeige ( DATUM 9. alarmwecker ( a) Einstellung ( SET Al b) Anwendung...
- Page 120 12. «Flugzeiten»-chronograf ( ChrFlGT a) Messen einer «Blockzeit» b) Abrufen von «Blockzeiten» c) Löschen von einer oder mehreren «Blockzeiten» 13. countdown countup clock ( CDCUClK a) Einstellung ( SETCDCU b) Anwendung 14. countup-alarm ( AlCU a) Einstellung ( SETAlCU b) Anwendung 15.
-
Page 121: Allgemeines
(Coordinated Universal Time) ausrichten, die der ehemaligen Bezeichnung GMT (Greenwich Mean Time) entspricht. Die UTC-Zeit muss manuell eingegeben werden. Sie ist auf der Website www.breitling.com aufgeschaltet. Die Einstellung der Lokalzeit TIME und der zweiten Zeitzone TIME 2 erfolgt in Stunden- und/ oder 15-Minuten-Schritten unter Einbezug der Abweichung der UTC-Zeitzone. -
Page 122: C) Benutzer-Interface
5. chrFlGt: «Flugzeiten»-Chronograf, der «Blockzeiten» misst, indem er die Start- und Landezeiten sowie das Datum und die Flugdauer speichert (s. Kapitel 12). 6. cDcUclK (countDown countUp clocK): Rückwärtszähler mit «Langzeit»- Chronograf oder MET (Mission Elapsed Time) (s. Kapitel 13). 7. alcU: Alarm Missionschronograf (s. Kapitel 14). 8. - Page 123 Die verschiedenen Funktionen lassen sich durch Drehen der Krone wählen. Die Krone verfügt über zwei stabile Axial-Raststellungen: – neutrale Position 1 (für Funktionenwechsel) – gezogene Position 2 (für Einstellungen) – sowie über eine Position 0 (dient als Drücker, beispielsweise um die Beleuchtung der Displays zu aktivieren.
-
Page 124: D) Einstellung Der Leuchtintensität
: zeigt an, dass die Uhr Berechnungen vornimmt. WArTEN (overflow) zeigt das Überschreiten des Zählerlimits an. d) einstellung der leuchtintensität Um den Modus Einstellung der Leuchtintensität zu öffnen, lange auf die Krone drücken. Die Regulierung erfolgt durch Drehen der Krone: Auf dem oberen Display erscheint , danach x (wobei x für Stufen 1 bis 4 steht) wählen. -
Page 125: F) Blockieren Einer Funktion
f) Blockieren einer Funktion Um eine angezeigte spezifische Funktion beizubehalten, durch dreifaches Drücken auf die Krone die Rotation der Krone in neutraler Position desaktivieren. Das Display bei 12 h zeigt während ca. 2 Sekunden an. Um die so blockierte loCKED Funktion aufzuheben, erneut dreimal auf die Krone drücken (auf dem Display bei 12 h erscheint die Anzeige ). - Page 126 Beleuchtungsnutzung über zwei Monate hinausreicht, während sie sich bei einer intensiven Beleuchtungsnutzung auf rund 10 Tage beschränkt. Einstellung der Beleuchtungsintensität Grafik 1: Typische Autonomie in Tagen für 10 Minuten Beleuchtung und täglich 10 Sekunden Alarm (Vibrationsfunktion und Buzzer) im Vergleich zur Beleuchtungsintensität.
- Page 127 Intensität 1 Intensität 2 Intensität 3 Intensität 4 Tägliche Nutzung der Beleuchtung (Minuten) Grafik 2: Typische Autonomie in Tagen im Vergleich zur Nutzung der Beleuchtung in Minuten pro Tag (für die vier Beleuchtungsstufen).
- Page 128 b) Powermanagement Die Uhr ist mit einem intelligenten Powermanagement-System ausgerüstet, das die Autonomie optimiert und verhindert, dass die Uhr nach einem Stillstand wieder eingestellt werden muss. Je nach Akkustand weisen verschiedene Anhaltspunkte auf die Entladung hin. Gleichzeitig werden grosse Energieverbraucher nach und nach desaktiviert.
-
Page 129: C) Aufladen Des Akku
Ein Auswechseln des Akkus ist nach ungefähr 300 vollständigen Aufladungen erforderlich, das bedeutet nach über 10 Jahren Benutzung. Der Einbau eines neuen Akkus ist ausschliesslich akkreditierten Breitling Servicezentren vorbehalten. c) aufladen des akkus Nach den Kauf der Uhr sollte der Akku vor jeder Manipulation vollständig aufgeladen werden. - Page 130 Abbildung 1 Ist der Akku aufgeladen, erscheint auf dem oberen Display die Anzeige BAT100% und die Uhr blinkt. Ein vollständiger Ladevorgang dauert ungefähr 2 Stunden.
- Page 131 Sobald die Uhr nicht mehr am Ladekabel angeschlossen ist (auf oberem Display erscheint ), können drei Fälle vorkommen: UNplUG 1. Die Uhr funktionierte normal und es gibt nichts zu tun. 2. Die Uhr war im Standby oder nicht vollständig entladen: Im Prinzip gibt es nichts zu tun, doch aus Sicherheitsgründen sollten die verschiedenen Einstellungen mit dem Initialisierungsverfahren bestätigt werden (s.
-
Page 132: Initialisierung Der Uhr
3. InItIalIsIerUnG Der Uhr Vor der ersten Benutzung oder nach einer Entladung die Uhr wie folgt einstellen: 1. Die Krone in Position 2 ziehen ( ) um den Modus Einstellung zu KroNE ZIEhEN aktivieren. 2. Die Stunden-, Minuten- und Sekundenzeiger synchron auf die Digitalanzeige ausrichten ( ) (s. -
Page 133: A) Einstellung ( Set Utc )
Es versteht sich von selbst, dass ein Wechsel von der Sommer- auf die Winterzeit oder umgekehrt in den Modi und/oder zu erfolgen hat und nicht bei TIME TIME 2 -Zeitzone. 4. eInstellUnG Der BasIszeIt Der Uhr ( UTC-Zeit dient als Basis für die Hauptzeit der Uhr. Nur in diesem Modus kann die Minute der Basiszeit in 1-Minuten-Schritten eingestellt werden. -
Page 134: Einstellung Des Datums
Die UTC-Zeit ist auf der Website www.breitling.com aufgeschaltet. PS: Durch Drücken auf P1 im Modus Einstellung ( ) startet die SET UTC Sekundenzählung bei 0. Sie lässt sich nur durch manuelles Modifizieren der Sekunde stoppen; in diesem Fall startet die Sekundenzählung nach Beenden der Einstellung neu (Krone wieder in der neutralen Position 1). -
Page 135: Einstellung Der Hauptzeitzone
• Durch Drehen der Krone die Standardanzeige der Woche ( WoChE NUMMEr einstellen und durch Drücken auf P2 bestätigen. : Die erste Woche enthält den ersten Donnerstag des Jahres, und Montag ist der erste Wochentag. : Die erste Woche enthält den 1. Januar, und Montag ist der erste Wochentag. - Page 136 ren Display und der Einstellvorgang beginnt mit der Einstellung des SETDATE Datums. Im zweiten Fall auf P2 drücken, bis die Stunden ( xx) blinken. UTC +/- • Durch Drehen der Krone die Stunde unter Einbezug der Abweichung von einstellen. UTC-12 UTC+14 •...
-
Page 137: Konfiguration Der Uhr ( Setting )
Durch ein langes Drücken auf P2 im Modus lassen sich die Stundenformate – TIME 12-Stunden-Anzeige ( ) oder 24-Stunden-Anzeige – wählen. Die gewünschte Anzeigeart wird von der Zonenzeit TIME 2 und den beiden Alarmen automatisch übernommen. 7. KOnFIGUratIOn Der Uhr ( SETTING Im Modus können folgende Einstellungen vorgenommen werden (sämt-... - Page 138 : Wahl der Alarmart – akustisch, vibrierend oder beide. AlArM SIGNAl : Akustische Bestätigungen in Verbindung mit den Drückern, mit oder ohne ToNE Zeitzeichen, oder Signal bei vollen Stunden der Zeitmessung. : Desaktivierung der Funktionen MoDUS ChrFlGT CDCUClK AlCU SprAChE: Wahl der Sprache des Benutzer-Interface. Anmerkung: Wird der Modus durch Ziehen der Krone in Position 2 aktiviert, SETTING...
-
Page 139: B) Tilt ( On Oder Off )
• Bei Inkohärenz durch Drehen der Krone den Sekundenzeiger auf 12 h stellen ž ) und durch Drücken auf P2 bestätigen. ZEIG • Den Minutenzeiger einstellen ( ž ), dann den Stundenzeiger ( žxx, ZEIG ZEIG wobei xx die digitale Stunde auf dem unteren Display ist), durch Drücken auf P1 bestätigen. - Page 140 • Die Krone in Position 2 ziehen (Stunden- und Minutenzeiger in Parkstellung). • Durch Drehen der Krone wählen. lIChT • Auf P1 drücken, um die Einstellung zu aktivieren. Durch Drehen der Krone (2 Sekunden), (4 Sekunden) oder (6 Sekunden) wählen; die KUrZ MITTEl lANG...
- Page 141 oder NAChT MoDUS • Durch Drehen der Krone die Funktion wählen. SETTING • Die Krone in Position 2 ziehen (Stunden- und Minutenzeiger in Parkstellung). • Durch Drehen der Krone wählen. NAChT MoDUS • Auf P1 drücken, um die Einstellung zu aktivieren. •...
- Page 142 oder ToNE DrUCKEr DrU+STD DrU+Chr • Durch Drehen der Krone die Funktion wählen. SETTING • Die Krone in Position 2 ziehen (Stunden- und Minutenzeiger in Parkstellung). • Durch Drehen der Krone wählen. ToNE • Auf P1 drücken, um die Einstellung zu aktivieren. •...
- Page 143 oder MoDUS pIloT SporT • Durch Drehen der Krone die Funktion wählen. SETTING • Die Krone in Position 2 ziehen (Stunden- und Minutenzeiger in Parkstellung). • Durch Drehen der Krone wählen. MoDUS • Auf P1 drücken, um die Einstellung zu aktivieren. •...
- Page 144 • Durch Drücken auf P1 und/oder Zurückstossen der Krone in die neutrale Position 1 die Einstellung bestätigen. PS: Nicht vergessen, die Krone nach abgeschlossener Einstellung zurückzustossen, sonst zeigt das obere Display an, und ein Piepton ertönt alle KroNE DrUCKEN 30 Sekunden. 8.
- Page 145 9. alarM-WecKer ( Die Uhr verfügt über zwei auf der Lokalzeit basierende Tagesalarme, die TIME hinsichtlich Stunden, Minuten und Wochentag konfigurierbar sind. a) einstellung ( SET Al • Durch Drehen der Krone die Funktion x wählen. • Durch Drücken auf P2 den gewünschten Alarm wählen ( oder •...
- Page 146 PS: Ein Drücken auf P1 aktiviert die sieben eingestellten Alarmtage neu ( AllE • Die Krone in die neutrale Position 1 zurückstossen. Nach abgeschlossener Einstellung ist der eingestellte Alarm automatisch aktiviert, also auf ON ( oder, bei einer 12-Stunden-Anzeige (AM/PM), bzw.
- Page 147 Der Alarm ertönt während 20 Sekunden mit einer Wiederholung von 10 Sekunden nach 2 Minuten. Auf dem oberen Display blinkt die Bezeichnung des aktiven Alarms: oder . Durch Drücken auf einen der zwei Drücker oder auf die Krone kann der Alarm desaktiviert werden. 10.
- Page 148 b) zeitmessung mit zwischenzeit(en) • Ein Drücken auf P1 startet den Chronografen. Das obere Display zeigt die 1/100-Sekunden an, das untere Display die Stunden, Minuten und Sekunden bis zu 99 Stunden, 59 Minuten und 59 Sekunden. • Ein Drücken auf P2 ermöglicht es, die Zwischenzeit anzuzeigen. Auf dem oberen Display erscheinen abwechslungsweise und die 1/100-Sekunden;...
- Page 149 c) Flyback Durch ein langes Drücken auf P1 kann eine neue Zeitmessung ab 0 gestartet werden (nach Loslassen des Drückers). Das ist die Funktion FLYBACK. Der Sekundenzeiger positioniert sich direkt auf der aktiven Sekunde der Zeitmessung. d) tachometer Ist der Chronograf nach einer Zeitmessung gestoppt worden, ermöglicht es ein kurzes Drücken auf P2, die Durchschnittsgeschwindigkeit in Bezug auf die gemes- sene Zeit anzuzeigen –...
- Page 150 f) eingabe der Distanz für den tachometer Damit der Tachometer die Geschwindigkeit richtig berechnen kann, muss die auf die gemessene Zeit ausgerichtete Distanz eingegeben werden. Für diese Einstellung wie folgt vorgehen: • Im Modus (gestoppt ohne Geschwindigkeitsanzeige) die Krone in Chr ADD Position 2 ziehen;...
- Page 151 • Durch Drücken auf P2 bestätigen; das erste Digit des Distanzwerts blinkt. • Durch Drehen der Krone die Einheiten, die Zehner und schliesslich die Hunderter für die Distanz wählen. Jeden Schritt durch Drücken auf P2 bestätigen. • Die Krone in die neutrale Position 1 zurückstossen. g) synchronisierung des sekundenzeigers Positioniert sich der Sekundenzeiger im Modus nicht genau auf 0, wie...
- Page 152 In der Funktion stellt sich der Sekundenzeiger automatisch auf 0 und wird lAp TMr zum Chronografenzeiger. Bei jeder neuen Messung startet der Zeiger bei 0 und positioniert sich direkt auf der laufenden Sekunde. Nach Schliessen des Modus «Runden»-Chronograf nimmt der Zeiger wieder seine normale Funktion ein. a) zeitmessung mehrerer runden ( •...
- Page 153 • Durch aufeinanderfolgendes Drücken auf P2 erscheinen auf dem unteren Display die Zeiten der anderen Runden (mit angezeigter Runde auf oberem Display: xx). Nach 10 Sekunden wechselt die Anzeige wieder auf die letzte Runde. • Durch langes Drücken auf P2 lassen sich sämtliche Zeiten löschen ( rESET Wird eine laufende Zeitmessung vergessen und die Gesamtzeit erreicht 99 Stunden, 59 Minuten und 59 Sekunden, stoppt die Messung.
- Page 154 12. «FlUGzeIten»-chrOnOGraF ( ChrFlGT Mit der Funktion (chrono flight) lassen sich die Flugdauer in Stunden, ChrFlGT Minuten und Sekunden messen («Blockzeit») und das Datum der Landung sowie die Start- und Landezeiten speichern. Es können 20 Flüge gespeichert und jeder Flug einzeln gelöscht werden. a) Messung einer «Blockzeit»...
- Page 155 PS: Die Flugparameter sind auf die Lokalzeit TIME ausgerichtet. PS: Es kann nur eine «Blockzeit» auf einmal gemessen werden. PS: Läuft die Flugzeitenmessung über 99 Stunden und 59 Minuten hinaus, wird sie automatisch gestoppt und das obere Display zeigt (für overflow) an. Bxx oVF b) abrufen von «Blockzeiten»...
- Page 156 c) löschen eines oder mehrerer Blocks • Um einen aktiven Block zu löschen, lang auf P2 drücken, während sich die Krone in der neutralen Position 1 ( ) befindet. rESET • Um alle Blocks auf einmal zu löschen, wie folgt vorgehen: –...
- Page 157 • Die Krone in Position 2 ziehen (oberes Display zeigt an). SETCDCU • Durch Drehen der Krone Countdown ( ) oder Countup ( ) wählen. C-DoWN C-Up • Durch Drücken auf P2 bestätigen. • Durch Drehen der Krone die Anzahl Tage ( ), Stunden ( ), Minuten STUNDE...
- Page 158 Bleibt der Countup ( ) über die Höchstmarke von 99 Tagen, 23 Stunden, CU rUN 59 Minuten und 59 Sekunden in Betrieb, hält der Zähler an, und das obere Display zeigt CU oVF 14. alarM Des cOUntUP ( AlCU Mit dieser Funktion kann ein auf die absolute Zeit des Countup synchronisierter Alarm generiert werden;...
- Page 159 Der Alarm läutet während 20 Sekunden mit einer Wiederholung von 10 Sekunden nach 2 Minuten. Das obere Display zeigt blinkend an (abwechslungsweise mit AlCU , wenn er nicht auf 0 steht). Durch Betätigung einer der beiden Drücker xxTAG(S) oder der Krone kann der Alarm gestoppt werden. 15.
- Page 160 Während den letzten 3 Minuten zählt der Sekundenzeiger die Sekunden und während der letzten 10 Sekunden ertönt bei jeder Sekunde ein Piepton. Bei 0 läutet während 20 Sekunden ein Alarm mit einer Wiederholung von 10 Sekunden nach 1 Minute. Das obere Display zeigt blinkend ž...
- Page 161 b) Funktion SWAp Mit der Funktion lassen sich die beiden Zonenzeiten TIME und TIME 2 (digitale SWAp Anzeige und Zeigeranzeige) unter Einbezug eines möglichen Datumswechsels untereinander austauschen. Dieser «Austausch» erfolgt durch einfaches Drücken auf P1 im Modus TIME 2 Diese Funktion erweist sich als sehr nützlich und praktisch insbesondere für Reisende, die von einer Zeitzone in eine andere wechseln, denn sie ermöglicht eine pro- blemlose Zeigeranzeige der Lokalzeit.
- Page 162 sollte der Akku geladen werden. Hat der Akku diesen Wert erreicht, bewegt sich der Sekundenzeiger alle 4 Sekunden in 4-Sekunden-Schritten. a) Modus « » DEEp SlEEp Im Modus (Tiefschlaf) kann der Akku vom elektronischen Schaltkreis DEEp SlEEp der Uhr getrennt werden, um so leistungsfähiger zu bleiben. Diese Funktion ist notwendig und ratsam, falls die Uhr während einer relativ langen Zeit nicht benutzt wird.
- Page 163 18. WÖrterlIste FÜr BenUtzer-InterFace Die unten stehende liste erklärt die Wörter und abkürzungen auf dem oberen Display für das Benutzer-Interface. Zeitzonenanzeige im 24-Stunden-Modus Al1 AM Alarm 1 aktiviert im Modus AM Al1 oFF Alarm 1 desaktiviert Al1 oN Alarm 1 aktiviert Al1 pM Alarm 1 aktiviert im Modus PM Al1TEST...
- Page 164 BAT100% Akku vollständig aufgeladen BATTEry Modus Akku (Batterie) BEIDE Ton + Vibration für beide Alarme BEST XX Beste Runde (im Modus LAP) BloCKXX Blocknummer BUZZEr Akustischer Alarm BXX ADD Block xx gestoppt BXX lDG Landezeit des Blocks xx BXX oVF Block xx Zeitlimit überschritten BXX rUN Block xx läuft...
- Page 165 DISpoFF Display ohne Beleuchtung DIST Zurückgelegte Distanz für Berechnung der Geschwindigkeit Donnerstag DrUCKEr Piepton auf Drücker DrU+Chr Piepton auf Drücker und Topchrono DrU+STD Piepton auf Drücker und Zeitzeichen FlYBACK Funktion Flyback des Chronografen GESChW Geschwindigkeits-anzeige im Modus CHR ADD Wochenformat nach ISO-Norm ISo-2 Wochenformat nach ISO-Norm modifiziert KroNE DrUCKEN...
- Page 166 MoDUS Wahl zwischen Modus Pilot oder Sport NAChT MoDUS Modus Nacht (desaktiviert TILT, schaltet Licht zwischen Mitternacht und 6 h auf tiefste Stufe) Keine Funktion Desaktiviert Aktiviert Overflow (Leistungslimit überschritten) p2 loSChEN Im Modus Einstellung CHRFLGT auf P2 drücken, um alle Blocks zu löschen pIloT Modus Pilot (alle Funktionen) Zeitzonenanzeige im 12-Stunden-Modus PM (post meridiem)
- Page 167 SprAChE Sprache für Interface STop XX Stopp der Runde xx SWAp Austauschen der Zeitzonen TIME und TIME 2 SyNChro Synchronisation der Zeiger T2 AM Zweite Zeitzone im Modus AM T2 pM Zweite Zeitzone im Modus PM TIlT Winkelsensor TAG XX Tag xx TIME Erste Zeitzone...
- Page 168 ±0,07 Sekunden pro Tag, was einer jährlichen Präzi sion von ±25 Sekunden gleichkommt. Da die Gangabweichung des SuperQuartz™-Kalibers Ihrer Breitling nur ±15 Sekunden pro Jahr beträgt, sind die Präzi sionsvorschriften hochgradig erfüllt. Chronometer sind nicht mit Chronografen zu verwechseln. Bei Letzterem handelt es sich um eine komplexe Uhr, deren Zusatzmechanismus die Dauer von Zeitabschnitten misst.
- Page 169 WInDrOsenlÜnette Die auf der Lünette eingeprägten Himmelsrichtungen und Grade erfüllen folgende Navigationsfunktionen: 1. Kurs-Memo Diese Funktion bietet dem Piloten die Möglichkeit, den Kurs zu «memorisieren», indem er den entsprechenden Grad auf der Lünette bei 12 Uhr positioniert. 2. Gegenkurs-Anzeige Auf der gegenüberliegenden Seite des Zifferblatts zeigt die Windrosenlünette somit die Rückflugrichtung an.
- Page 170 Dichtungen beschädigen. Deshalb ist die Wasserdichtheitsgarantie zeitlich begrenzt. Bei intensivem Gebrauch im Wasser sollte die Wasserdichtheit jedes Jahr kontrolliert werden oder spätestens alle zwei Jahre. Dieser Test dauert nur einige Minuten und kann von jedem offiziellen Breitling Wartungszentrum oder Konzessionär durchgeführt werden (www.breitling.com).
- Page 171 Wasserski, sprünge ins Wasser, schnorcheln tiefseetauchen nÜtzlIche tIPPs Breitling Armbänder aus echtem Leder sind aus feinsten Materialien gefertigt und stellen ein qualitativ hochstehendes Produkt dar. Wie alle Artikel aus Naturleder (Schuhe, Handschuhe usw.) hängt ihre Lebensdauer von der Beanspruchung ab.
- Page 172 Schützen Sie Ihren Zeitmesser vor Stössen und Schlägen mit harten Gegenständen, und setzen Sie ihn weder chemischen Produkten noch Verdünnern, gefährlichen Gasen oder Magnetfeldern aus. Ihr Breitling Chronometer ist so konzipiert, dass er in einem Temperaturbereich von 0 bis 50°C einwandfrei funktioniert.
- Page 174 INDICE 1. Avvertenza generale a) Ora di riferimento e fusi orari b) Funzioni c) Interfacce utente d) Regolazione dell’intensità luminosa e) Parcheggio delle lancette f) Blocco di una funzione 2. Batteria ricaricabile e gestione dell’energia a) Batteria ricaricabile b) Gestione dell’energia c) Ricarica della batteria 3.
- Page 175 oppure lIGhT ShorT MEDIUM loNG oppure DISplAy DISp oN DISpoFF oppure NIGhT MoDE oppure AlArM SIGNAl BUZZEr VIBrATE BoTh oppure ToNE pUSh pUSh+hr pUSh+Ch oppure MoDE pIloT SporT oppure lANG ENGlISh FrANCE DEUTSCh ESpANol 8. Indicazione della data ( DATE 9.
- Page 176 12. Cronografo «tempo di volo» ( ChrFlGT a) Cronometraggio di un «tempo bloc» b) Rilettura dei «tempi bloc» c) Cancellazione di uno o più bloc 13. Countdown countup clock ( CDCUClK a) Regolazione ( SETCDCU b) Uso 14. Allarme del countup ( AlCU a) Regolazione ( SETAlCU...
- Page 177 Greenwich»). L’ora UTC dev’essere inserita manualmente. La si può trovare sul sito www.breitling.com. L’ora locale TIME e il secondo fuso orario TIME 2 sono regolati in base allo scarto esistente rispetto al fuso UTC (mediante scatti di 1 ora e/o di 15 minuti).
- Page 178 4. LAP TMR: cronografo «giri» per il conteggio dei tempi per giro – vedi capi- tolo 11. 5. CHRFLGT: cronografo «tempo di volo», permette di cronometrare «tempi bloc» memorizzando l’ora di partenza e l’ora di arrivo, oltre che la data del volo e la sua durata –...
- Page 179 c) Interfacce utente L’orologio possiede 3 lancette centrali (ore H, minuti M e secondi SEC o trotteuse) e 2 schermi digitali: schermo superiore all’altezza delle 12h (composto da 7 digit alfanumerici ) e schermo inferiore all’altezza delle 6h (6 digit ███████...
- Page 180 pressione breve o lunga (circa 2 secondi). Se nessuna azione è associata ai pulsanti, sullo schermo superiore compare la scritta WAIT indica che l’orologio sta calcolando. (overflow) indica che il limite di un contatore è stato superato. d) Regolazione dell’intensità luminosa Una pressione lunga sulla corona permette di attivare la funzione che regola l’in- tensità...
- Page 181 Le lancette sono parcheggiate automaticamente quando la corona è tirata in modalità SETTING f) Blocco di una funzione Se si desidera conservare l’indicazione di una specifica funzione è possibile farlo disattivando la rotazione della corona in posizione neutra. Occorre premere tre volte sulla corona: lo schermo indica all’altezza delle 12h per la durata di 2 loCKED...
- Page 182 dell’uso che si fa dell’illuminazione. È facile constatare che l’autonomia dell’orolo- gio può superare i due mesi in caso di uso assai limitato della luce, oppure limitarsi a una decina di giorni in caso di uso intensivo. Regolazione dell’intensità Grafico 1: autonomia tipica espressa in giorni per 10 minuti di uso della luce e per 10 secondi al giorno di uso dell’allarme (vibrazione e buzzer) a seconda del livello di regolazione della luce.
- Page 183 Intensità 1 Intensità 2 Intensità 3 Intensità 4 Uso quotidiano della luce Grafico 2: autonomia tipica espressa in giorni a seconda dell’uso della luce in minuti al giorno (per le quattro regolazioni d’intensità).
- Page 184 b) Gestione dell’energia L’orologio è dotato di un sistema intelligente di gestione dell’energia che permette di ottimizzare la sua autonomia. L’obiettivo ultimo è di evitare di dover regolare nuovamente l’orologio dopo un «arresto». A seconda dello stato di carica della batteria, l’orologio informa l’utente sulla necessità...
- Page 185 Dopo circa 300 ricariche complete, ossia dopo oltre 10 anni di utilizzo, occorrerà sostituire la batteria. L’operazione potrà essere effettuata solo da un centro di servizio Breitling autorizzato. c) Ricarica della batteria Dopo l’acquisto si raccomanda di effettuare una ricarica completa della batteria prima di compiere qualsiasi operazione.
- Page 186 Figura 1 Terminata la ricarica, lo schermo superiore indica e l’orologio emette un BAT100% fl ash luminoso. Una ricarica completa richiede circa 2 ore.
- Page 187 Quando l’orologio è scollegato dal cavo-caricatore (sullo schermo superiore com- pare ), possono presentarsi tre casi: UNplUG 1. L’orologio funzionava normalmente e non occorre fare niente. 2. L’orologio era in stato di veglia o non completamente scarico: in linea di prin- cipio non occorre fare niente, ma per precauzione è...
- Page 188 3. INIZIALIZZAZIONE DELL’OROLOGIO Quando lo si usa per la prima volta, o dopo una ricarica, l’orologio guida l’utente attraverso la seguente procedura: 1. Tirare la corona in posizione 2 ( ) per attivare la modalità regolazioni. pUll CroWN 2. Sincronizzare ( ) le lancette delle ore, dei minuti e dei secondi in base SyNChro all’indicazione digitale (vedi capitolo 7.a).
- Page 189 È evidente che in caso di un cambiamento dell’ora estiva/invernale, o inversamente, è il fuso che occorre modificare, e non il fuso TIME TIME 2 4. REGOLAZIONE DELL’ORA DELLA BASE DI TEMPO DELL’OROLOGIO ( L’ora UTC costituisce la base di tempo principale dell’orologio. Il minuto della base di tempo può...
- Page 190 Si può trovare l’ora UTC sul sito www.breitling.com N.B. Nella modalità regolazione ( ) una pressione su P1 riavvia il conteggio SET UTC dei secondi partendo da 0. Il conteggio dei secondi si blocca solo quando il secondo viene modificato manualmente. In questo caso il conteggio riparte all’uscita dalla regolazione (riporto della corona in posizione neutra 1).
- Page 191 • Scegliere il numero della settimana ( ) ruotando la corona e confer- WEEK NUMBEr mare premendo su P2: : la prima settimana contiene il primo giovedì dell’anno e il primo giorno della settimana è il lunedì. : la prima settimana contiene il 1° gennaio e il primo giorno della settimana è...
- Page 192 zione dell’ora. Se era indicata la data, sullo schermo superiore compare SETDATE e il processo di regolazione parte dalla regolazione della data. Nel secondo caso, premere su P2 fino a far lampeggiare le ore ( xx). UTC +/- • Ruotare la corona e regolare l’ora secondo lo scarto rispetto a , da UTC-12 UTC+14...
- Page 193 Nella modalità una pressione lunga su P2 permette di scegliere tra il formato TIME 12 ore (indicazione ) oppure 24 ore. Il cambiamento avviene automatica- mente anche per il fuso e per i due allarmi. TIME 2 7. CONFIGURAZIONE DELL’OROLOGIO ( SETTING Nella modalità...
- Page 194 AlArM SIGNAl: scelta del tipo d’allarme – sonoro, vibrante o entrambi. : conferme sonore collegate con i pulsanti, con o senza segnale orario o ToNE segnale per le ore piene del cronometraggio. MoDE: possibilità di disattivare le funzioni ChrFlGT, CDCUClK e AlCU : scelta della lingua dell’interfaccia utente.
- Page 195 • Se c’è incoerenza, ruotare la corona per portare la lancetta dei secondi sulle 12h ž ) e confermare con una pressione su P2. hAND • Effettuare la regolazione per la lancetta dei minuti ( ž ), poi per la hAND lancetta delle ore ( žxx, dove xx è...
- Page 196 • Tirare la corona in posizione 2 (le lancette delle ore e dei minuti si parcheggiano). • Scegliere ruotando la corona. lIGhT • Premere su P1 per attivare la regolazione e ruotare la corona per scegliere ShorT (2 secondi), (4 secondi) oppure (6 secondi).
- Page 197 NIGhT MoDE (oN oppure oFF) • Selezionare la funzione ruotando la corona. SETTING • Tirare la corona in posizione 2 (le lancette delle ore e dei minuti si parcheg- giano). • Scegliere ruotando la corona. NIGhT MoDE • Premere su P1 per attivare la regolazione. •...
- Page 198 • Confermare la regolazione premendo su P1 e/o risospingendo la corona in posi- zione neutra 1. ToNE (oFF, pUSh, pUSh+hr oppure pUSh+Ch) • Selezionare la funzione ruotando la corona. SETTING • Tirare la corona in posizione 2 (le lancette delle ore e dei minuti si parcheggiano). •...
- Page 199 oppure MoDE pIloT SporT • Selezionare ruotando la corona. SETTING • Tirare la corona in posizione 2 (le lancette delle ore e dei minuti si parcheggiano). • Scegliere ruotando la corona. MoDE • Premere su P1 per attivare la regolazione. •...
- Page 200 • Confermare la regolazione premendo su P1 e/o risospingendo la corona in posizione neutra 1. N.B. Non dimenticare di risospingere la corona una volta concluse le regolazioni. In caso di dimenticanza l’indicazione sullo schermo superiore segnalerà pUSh CroWN un bip suonerà ogni 30 secondi. 8.
- Page 201 9. ALLARMI-SVEGLIE ( L’orologio possiede due allarmi giornalieri basati sull’ora locale , configurabili TIME in ore, minuti e giorno della settimana. a) Regolazione ( SET Al • Selezionare la funzione x ruotando la corona. • Scegliere l’allarme da regolare premendo su P2 ( oppure •...
- Page 202 N.B. Una pressione su P1 riattiva i sette giorni dell’allarme in corso ( AllDAyS • Risospingere la corona in posizione neutra 1. Uscendo dalla regolazione l’allarme regolato viene attivato automaticamente, e quindi posto in condizione ON ( oppure, se è stata selezionata l’indicazione su 12 ore (AM/PM), rispettivamente N.B.
- Page 203 L’allarme suona per 20 secondi, con un richiamo di 10 secondi dopo 2 minuti. Lo schermo superiore indica lampeggiando il nome dell’allarme attivo: oppure . Quest’ultimo può essere disattivato premendo uno dei due pulsanti o la corona. 10. CRONOGRAFO CON TEMPI INTERMEDI E TACHIMETRO ( Chr ADD Quando si seleziona la funzione la lancetta dei secondi si colloca auto-...
- Page 204 b) Misura di un tempo con tempi intermedi • Una pressione su P1 avvia il cronografo. Lo schermo superiore indica i centesimi di secondo, lo schermo inferiore le ore, i minuti e i secondi fino a 99 ore, 59 minuti e 59 secondi. •...
- Page 205 c) Flyback In ogni momento una pressione lunga su P1 permette di riavviare un cronometrag- gio a partire da 0 (quando si libera il pulsante): è la funzione FLYBACK. La lancetta dei secondi si colloca direttamente sul secondo attivo del cronometraggio. d) Tachimetro Quando il cronografo è...
- Page 206 f) Inserimento della distanza per il tachimetro Per consentire al tachimetro di effettuare un calcolo corretto della velocità occorre inserire la distanza corrispondente al tempo cronometrato. Tale regolazione si effettua come segue: • In modalità (bloccata senza indicazione della velocità) tirare la corona Chr ADD in posizione 2: lo schermo superiore indica , poi tre digit (per la distanza),...
- Page 207 • Confermare premendo su P2: il primo digit del valore di distanza lampeggia. • Scegliere le unità, le decine e infine le centinaia per la distanza ruotando la corona, e confermare ogni volta premendo su P2. • Risospingere la corona in posizione neutra 1. g) Sincronizzazione della lancetta dei secondi Se la lancetta dei secondi non si colloca esattamente sullo 0 in modalità...
- Page 208 Quando si seleziona la funzione la lancetta dei secondi si colloca automa- lAp TMr ticamente sullo 0 e diventa la lancetta cronografica. A ogni nuovo cronometraggio la lancetta riparte da zero e si colloca direttamente sul secondo in corso. Riprende la sua funzione normale non appena si abbandona la modalità...
- Page 209 • Poi, mediante pressioni successive su P2 si indicano sullo schermo inferiore i tempi degli altri giri (con indicazione del giro che compare sullo schermo supe- riore: xx). Dopo 10 secondi l’indicazione ritorna sull’ultimo giro. • Una pressione lunga su P2 permette di cancellare tutti i tempi ( rESET Se si dimentica che è...
- Page 210 12. CRONOGRAFO «TEMPO DI VOLO» ( ChrFlGT La funzione (chrono flight) permette di cronometrare la durata di un volo ChrFlGT in ore, minuti e secondi («tempo bloc»), con memorizzazione della data d’atterrag- gio oltre che delle ore di decollo e d’atterraggio. È possibile salvaguardare 20 voli e cancellare individualmente ogni volo.
- Page 211 N.B. I parametri di volo sono stabiliti in base all’ora locale TIME. N.B. Non è possibile misurare un solo «tempo bloc» per volta. N.B. Se il cronometraggio di volo resta in funzione per oltre 99 ore e 59 minuti si ferma automaticamente, e lo schermo superiore indica (overflow).
- Page 212 c) Cancellazione di uno o più bloc • Per cancellare il bloc attivo occorre premere a lungo su P2 con la corona in posizione neutra 1 ( rESET • Per cancellare tutti i bloc in una volta sola procedere come segue: –...
- Page 213 • Tirare la corona in posizione 2 (lo schermo superiore indica SETCDCU • Ruotando la corona, scegliere countdown ( ) oppure countup ( C-DoWN C-Up • Confermare premendo su P2. • Regolare il numero dei giorni ( ), le ore ( ), i minuti ( ) e i secondi hoUr...
- Page 214 Se il countup ( ) è rimasto in funzione oltre il tempo massimo di 99 giorni, CU rUN 23 ore, 59 minuti e 59 secondi, il contatore si ferma e lo schermo superiore indica CU oVF 14. ALLARME DEL COUNTUP ( AlCU Questa funzione permette di generare un allarme sincronizzato con il tempo asso- luto del countup.
- Page 215 L’allarme suona per 20 secondi con un richiamo di 10 secondi dopo 2 minuti. Lo schermo superiore indica lampeggiando (in alternanza con i se diverso xxDAy(S) AlCU da 0). L’allarme può essere bloccato premendo su uno dei due pulsanti o sulla corona. 15.
- Page 216 Durante gli ultimi 3 minuti la trotteuse conteggia i secondi e un bip viene emesso ogni secondo durante gli ultimi 10 secondi. Allo 0 viene lanciato un allarme per la durata di 20 secondi, con un richiamo di 10 secondi dopo 1 minuto. Lo schermo superiore indica ž...
- Page 217 b) Funzione SWAp La funzione permette di scambiare i due fusi orari TIME e TIME 2 sull’indicazione SWAp digitale e sulle lancette, tenendo conto di un eventuale cambio di data. Questo «scambio» si effettua con una semplice pressione su P1 quando si è in modalità TIME 2 Questa funzione è...
- Page 218 di effettuare una ricarica quando la carica è inferiore al 10-15%. Quando la batteria raggiunge questo valore, la trotteuse procede per scatti di 4 secondi. » a) Modalità « DEEp SlEEp La modalità (veglia profonda) permette di disconnettere la batteria dai DEEp SlEEp circuiti elettronici dell’orologio e di preservare così...
- Page 219 18. ELENCO DEI TERMINI DELL’INTERFACCIA UTENTE L’elenco seguente traduce le diciture che possono comparire sull’interfaccia utente sullo schermo superiore. indicazione dei fusi in modalità 24 ore Al1 AM allarme 1 attivato in modalità AM Al1 oFF allarme 1 disattivato Al1 oN allarme 1 attivato Al1 pM allarme 1 attivato in modalità...
- Page 220 BATTEry modalità batteria BEST XX miglior giro (in modalità LAP) BloCKXX numero del bloc BoTh suoneria + vibratore per gli allarmi BUZZEr allarme sonoro BXX ADD bloc xx fermato BXX lDG tempo d’atterraggio del bloc xx BXX oVF bloc xx oltre il tempo limite BXX rUN bloc xx in corso BXXDATE...
- Page 221 DD/MM format della data giorno/mese DISp oN display acceso per tutto il tempo DISp oFF display spento per tutto il tempo DIST distanza percorsa per il calcolo della velocità EMpTy memoria vuota FlyBACK funzione flyback del cronografo ž hAND portare la lancetta su xx in base all’indicazione digitale (sincronizzazione) format della settimana secondo ISO ISo-2 format della settimana secondo ISO modificato...
- Page 222 attivato overflow (superamento della capacità) p2 To ErASE in modalità regolazione del CHRFLGT, premere su P2 per cancellare tutti i bloc pIloT modalità pilota (tutte le funzioni) indicazione dei fusi in modalità 12 ore pomeridiane pUSh bip sul pulsante pUSh+Ch bip sul pulsante e segnale orario chrono pUSh+hr bip sul pulsante e segnale orario...
- Page 223 SporT modalità sport (disattivazione di certe funzioni) STop XX arresto del giro xx SWAp inversione dei fusi TIME e TIME 2 SyNChro sincronizzazione delle lancette T2 AM secondo fuso in modalità AM T2 pM secondo fuso in modalità PM giovedì TIlT captatore di angolo TIME...
- Page 224 ±0.07 secondi al giorno, pari a una precisione annua di ±25 secondi. Lo scarto di marcia del calibro SuperQuartz™ di cui è dotato il Suo Breitling è di soli ±15 secondi all’anno, nettamente al di sotto dei limiti imposti dal COSC.
- Page 225 LUNETTA CON ROSA DEI VENTI Questa lunetta, che indica i punti cardinali e le rotte, compie svariate funzioni utili alla navigazione aerea. 1. Memoria della rotta Questa funzione permette al pilota di «memorizzare» la rotta da seguire portandola in corrispondenza dell’indice situato all’altezza delle ore 12. 2.
- Page 226 Come ogni strumento di misura di precisione, per funzionare al meglio delle sue possibilità il Suo orologio dev’essere sottoposto a una manutenzione regolare, la cui periodicità varia secondo l’uso che ne viene fatto. Breitling o il Suo concessionario autorizzato si incaricheranno volentieri di questo compito.
- Page 227 Immersione subacquea CONSIGLI UTILI I cinturini Breitling sono di vera pelle e sono fabbricati con materiali sceltissimi. Essi rappresentano perciò un prodotto d’elevata qualità. Come tutti gli oggetti di vera pelle (scarpe, guanti ecc.), la loro durata dipende dall’uso che se na fa. L’acqua, i cosmetici e il sudore accelerano l’invecchiamento della pelle.
- Page 228 Le casse e i bracciali di metallo Breitling sono ricavati dalle migliori leghe, e garantiscono robustezza e comfort al polso. Una pulitura regolare, sciacquando e spazzolando l’orologio in acqua dolce, permette di mantenerne la brillantezza. Si raccomanda vivamente di procedere a questa operazione dopo ogni immersione dell’orologio in acqua salata o clorata.
- Page 229 F/E/D/I...
- Page 230 I N S T R U M E N T S F O R P R O F E S S I O N A L S...
Need help?
Do you have a question about the COCKPIT B50 and is the answer not in the manual?
Questions and answers