
Related Manuals for VDO Cyclecomputing X2


Summary of Contents for VDO Cyclecomputing X2
- Page 1 Bedienungsanleitung GB Instruction Manual Manuel d‘ Installation et d‘ Utilisation Manuale d‘ Installazione e Funzionamento...
-
Page 2: Table Of Contents
Kabel und Sensor 7. Fehlerbehebung 8. Technische Spezifikationen 1 Unterleg Gummi 1 Speichenmagnet Kabelbinder für Sensor (Clip-Magnet) zur Montage der Halterung „>>> P02“ Verweise am Anfang eines Kapitels und des Sensors verweisen auf das entsprechende Bild im Picturebook! VDO CYCLECOMPUTING www.vdocyclecomputing.com... -
Page 3: Display
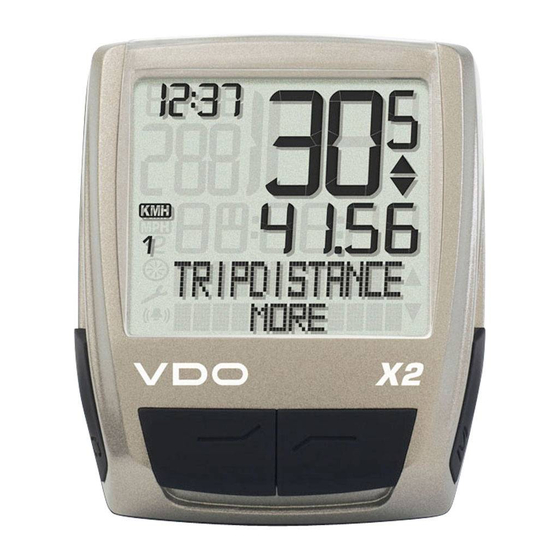
Der Computer kann sowohl KMH als auch MPH Zeile) wird angezeigt, anzeigen. Strecken werden entsprechend in Kilo- ob es weitere Informati- meter oder Meilen angezeigt. Der Indikator zeigt onen gibt „MEHR“ die gewählte Messeinheit an. ob es eine weitere Auswahlmöglichkeit gibt „AUSWAHL“ VDO CYCLECOMPUTING www.vdocyclecomputing.com... -
Page 4: Bedienung
AUSWAHL zeigt, dass es zum Hauptmenu NAVIGATOR Innerhalb der Einstell-Modi Innerhalb der Einstell-Modi Gesamtfahrzeit Rad 2 bis max. 999:59 HHH:MM ein Untermenu gibt. Das Untermenu öffnen Sie mit abwärts blättern. aufwärts blättern. Eine Ziffer verringern. Eine Ziffer erhöhen. VDO CYCLECOMPUTING www.vdocyclecomputing.com... -
Page 5: Installation
Schrauben wieder festdrehen. step 2 Computer nach rechts auf 12-Uhr-Position dre- step 2 Speichenmagnet um eine Außen-Speiche hen „twist“ und in das Haltesystem einrasten „click“. legen. Der silberne Magnetkern zeigt dabei zum ACHTUNG: Schrauben nicht überdrehen. Sensor. VDO CYCLECOMPUTING www.vdocyclecomputing.com... -
Page 6: Grundeinstellungen
28 x 1 ⅜ 2205 86,8 Damit Ihr VDO Computer korrekt messen kann, 30-622 2149 84,6 müssen Sie die Radgröße (Radabrollumfang) Ihres 32-622 2174 85,6 Rades einstellen. Hier gibt es 2 Möglichkeiten: 37-622 2205 86,8 40-622 2224 87,6 VDO CYCLECOMPUTING www.vdocyclecomputing.com... -
Page 7: Einstellen Über Radumfang
Werten step 1 Ventil des Vorderrades genau senkrecht abweichen. zum Boden ausrichten. MASSEINHEIT/KMH. Bestätigen step 2 Diese Stelle am Boden mit einem Strich oder zum Wechsel (z.B. Kreide) markieren. zu MPH. VDO CYCLECOMPUTING www.vdocyclecomputing.com... -
Page 8: Einstellen Uhr
– 3 Sekun- den kommen Sie zurück zum Funktions-Modus). RAD 1 (mit stellen Sie um KM ZÄHLER/RAD 1 (mit auf RAD 2). Bestätigen mit kommen Sie zur Einstellung für RAD 2). Bestätigen mit RAD 1/AUSWAHL OK? Bestätigen mit VDO CYCLECOMPUTING www.vdocyclecomputing.com... -
Page 9: Service-Intervall-Anzeige
NAVIGATOR/AUSWAHL. kommen Sie zurück zum Funk- Das Display bestätigt: RADSERVICE/SET FERTIG. Bestätigen mit tions-Modus). Automatische Rückkehr zu EINSTELLMENU/ AUSWAHL. NAVIGATOR/VORWÄRTS oder RÜCKWÄRTS wählen mit NAVIGATOR/EINSTELLEN. Bestätigen mit wechseln zu NAVIGATOR/RESET. zu RADSERVICE/ Bestätigen mit EINSTELLEN. Bestätigen mit VDO CYCLECOMPUTING www.vdocyclecomputing.com... -
Page 10: Sleep-Modus
Modellwechsel die Im Zuge der Weiterentwicklung behalten wir uns TOTAL ZEIT: Gesamt-Fahrzeit, Fahrzeit Rad 1, DATEN RESET/AUSWAHL. Produktion des reklamierten Modells eingestellt technische Änderungen vor. Fahrzeit Rad 2 Bestätigen mit wurde. NAVIGATOR: alle Werte des zweiten Tages- streckenzählers VDO CYCLECOMPUTING www.vdocyclecomputing.com... -
Page 11: Fehlerbehebung
Radumfang ist nicht korrekt Radumfang einstellen eingestellt oder steht auf Null Anzeige wird schwach Batterie leer Batterie prüfen, evtl. ersetzen Anzeige wird schwach Temperaturen unter 5° machen Bei normalen Temperaturen die Anzeige träge arbeitet die Anzeige wieder normal VDO CYCLECOMPUTING www.vdocyclecomputing.com... - Page 12 1 rubber pad 1 spoke magnet cable ties for sensor (clip magnet) for fitting the holder „>>> P02“ links at the beginning of a chapter and sensor are related to the respective picture in the picture book! VDO CYCLECOMPUTING www.vdocyclecomputing.com...
-
Page 13: Display
The computer can display both KHM and MPH. second line (menu line) Distances are shown in kilometres or miles shows, accordingly.The indicator shows the selected whether there is more measurement unit information „MORE“ whether there is another selection option „SELECT“ VDO CYCLECOMPUTING www.vdocyclecomputing.com... -
Page 14: Operation
RIDE TIME. You open the submenu with Scroll downwards within In setting mode: In the submenu you will find. the setting modes. Scroll upwards within Decrease a digit. the setting modes. Increase a digit. VDO CYCLECOMPUTING www.vdocyclecomputing.com... -
Page 15: Installation
The silver middle of the magnet points Step 2 Twist computer to the right to 12 o‘clock posi- towards the sensor. Attention: Do not over tighten screws. tion and click into the holder system. VDO CYCLECOMPUTING www.vdocyclecomputing.com... -
Page 16: Basic Settings
You must set the wheel size (wheel roll circum- 30-622 2149 84,6 ference) of your bike so that your VDO computer 32-622 2174 85,6 can measure correctly. There are 2 ways of 37-622 2205 86,8 doing this: 40-622 2224 87,6 VDO CYCLECOMPUTING www.vdocyclecomputing.com... -
Page 17: Setting Using Wheel Circumference
SET. Confirm with step 1 Precisely align valve on the front wheel vertically to the ground. MEASUREMENT/KMH. Step 2 Mark this spot on the ground with a line Confirm with (e.g. chalk). change to MPH. VDO CYCLECOMPUTING www.vdocyclecomputing.com... -
Page 18: Setting The Clock
(pressing for 3 seconds gets (use to go to setting for bike 2). Confirm with you back to function mode). BIKE 2). Confirm with ODO BIKE 1 ...SET DISTANCE/ CONTINUE. BIKE 1 /SELECT OK? Confirm with VDO CYCLECOMPUTING www.vdocyclecomputing.com... -
Page 19: Service Interval Display
The display confirms: BIKE SERVICE/SET DONE. NAVIGATOR/SET Automatic return to SETTINGS/SELECT. Select NAVIGATOR/FORWARD or Using switch to NAVIGATOR/BACKWARD using NAVIGATOR/RESET. . Confirm with Confirm with Using go to BIKE SERVICE/ SET. Confirm with VDO CYCLECOMPUTING www.vdocyclecomputing.com... -
Page 20: Sleep Mode
DATA RESET/ production due to a change of model. We reserve the right to make technical changes in ride time bike 2. SELECT. Confirm with the course of further development. NAVIGATOR: all values from the second distance counter. VDO CYCLECOMPUTING www.vdocyclecomputing.com... -
Page 21: Troubleshooting
199.5 km/h correctly set or is at zero Display becomes weak Battery dead Check battery, replace if nec. Display becomes weak Temperatures under 5° make At normal temperatures the the display sluggish display will work normally again VDO CYCLECOMPUTING www.vdocyclecomputing.com... - Page 22 1 aimant pour rayon ligatures de câbles pour capteur (aimant à clipser) pour le montage du support, du capteur et du câble „>>> P02“ au début d’un chapitre renvoie à la photo concernée dans le livret de photos ! VDO CYCLECOMPUTING www.vdocyclecomputing.com...
-
Page 23: Ecran
MPH. Les distances s’affichent alors en kilomètres née. La seconde ligne ou en milles. L’indicateur indique l’unité de mesu- (ligne de menu) indique re sélectionnée. « PLUS » si d’autres informations sont disponibles. « CHOIX » si une autre possibilité de sélection existe. VDO CYCLECOMPUTING www.vdocyclecomputing.com... -
Page 24: Utilisation
Diminuer un chiffre. Avancer dans les modes PLUS indique qu’un sous-menu existe pour le menu tours au moyen d’un journal des tours ou d’un de réglage. principal CHRONO JOUR. Le sous-menu peut être Roadbook. Augmenter un chiffre. VDO CYCLECOMPUTING www.vdocyclecomputing.com... -
Page 25: Installation
90° selon que le compteur doit être monté sur le tourné à « 10 heures ». Etape 3 Pour retirer le compteur, le tourner vers la guidon ou le cadre. A cette fin, desserrer les vis du gauche (sans pousser, ni tirer). VDO CYCLECOMPUTING www.vdocyclecomputing.com... -
Page 26: Réglages De Base
Pour que les mesures de votre compteur VDO 32-622 2174 85,6 soient correctes, vous devez tout d‘abord régler 37-622 2205 86,8 la taille de la roue (circonférence de la roue). 40-622 2224 87,6 Vous avez 2 possibilités : VDO CYCLECOMPUTING www.vdocyclecomputing.com... -
Page 27: Réglage Au Moyen De La Circonférence De La Roue
à la verticale par rapport au sol. votre roue. DIMENSION / KMH Etape 2 Marquer ce point au sol en y traçant Confirmer avec Mesure de la circonférence de la roue : un trait (par ex. à la craie). pour passer à MPH. VDO CYCLECOMPUTING www.vdocyclecomputing.com... -
Page 28: Régler L'heure
DISTANCE KM / KM VELO 1 réglage (enfoncer la touche (utiliser les touches secondes pour revenir au mode pour passer au réglage pour VELO 1 (utiliser les touches de fonctionnement). VELO 2). Confirmer avec pour choisir le VELO 2). Confirmer avec VDO CYCLECOMPUTING www.vdocyclecomputing.com... -
Page 29: Affichage Des Intervalles De Service
NAVIGATOR / REGLAGE COMPT AVANT ou COMPT ARRIER Utiliser les touches pour Touches pour accéder à ay moyen des touches passer à NAVIGATOR / REVISER VELO / REGLAGE. Confirmer avec MISE A ZERO. Confirmer avec Confirmer avec VDO CYCLECOMPUTING www.vdocyclecomputing.com... -
Page 30: Mode « Veille
CHRONO TOTAL : durée totale, durée VELO 1, à M.A.0 DONNEE / CHOIX. sant l‘objet de la réclamation a été stoppée par un durée VELO 2 Confirmer avec changement de modèle. NAVIGATOR : toutes les valeurs du second VDO CYCLECOMPUTING www.vdocyclecomputing.com... - Page 31 Affichage faible La pile est déchargée. Contrôler la pile et, éventuelle- ment, la remplacer. Affichage faible Les températures inférieures L’affichage est à nouveau à 5°C rendent l’affichage lent. normal lorsque les températu- res remontent. VDO CYCLECOMPUTING www.vdocyclecomputing.com...
- Page 32 1 base in gomma 1 magnete per raggi fascette per cavi „>>> P02“ LINKS all’inizio di un capitolo si per sensore (magnete a clip) per il montaggio riferiscono all’immagine retrospettiva sul del supporto libro delle immagini! sensore e cavo VDO CYCLECOMPUTING www.vdocyclecomputing.com...
- Page 33 MPH. I percorsi vengono indicati in chilo- mostra le seguenti voci: metri o in miglia. “DI PIU’” se vi sono L’indicatore mostra l’unità di misura selezionata. ulteriori informazioni. “SELEZIONA” se vi è un’altra possibilità di scelta. VDO CYCLECOMPUTING www.vdocyclecomputing.com...
- Page 34 Scorrere le funzioni verso l’alto. Tempo corsa totale bici 2 fino massimo TOR vi è un sottomenu. Per aprire il sottomenu In modalità impostazione: 999:59 HHH:MM. premere il tasto Acorrere verso l’alto in modalità impostazione . Aumentare una cifra.. VDO CYCLECOMPUTING www.vdocyclecomputing.com...
- Page 35 (non spingere o estrarre con eccessiva forza). A questo punto svitare le viti nel supporto, estrar- Aiuti per ricordare: re la base ed inserirla ruotata di 90°, infine serrare nuovamente le viti. Dentro (avvitare) verso destra, Svitare verso sinistra VDO CYCLECOMPUTING www.vdocyclecomputing.com...
- Page 36 Per consentire al vostro computer VDO di esegui- 30-622 2149 84,6 re una corretta misurazione dovete impostare la 32-622 2174 85,6 misura della vostra ruota (circonferenza di rotola- 37-622 2205 86,8 mento della ruota). Vi sono 2 alternative: 40-622 2224 87,6 VDO CYCLECOMPUTING www.vdocyclecomputing.com...
- Page 37 Misurazione della circonferenza step 2 Tracciare sul pavimento un segno in default. I valori così misurati di velocità, percorso di rotolamento della ruota: questo punto (ad es. con gessetto). ecc. possono differire sensibilmente dai valori effettivi. VDO CYCLECOMPUTING www.vdocyclecomputing.com...
- Page 38 IMPOSTAZ. Confermare con oni (premendo per 3 secondi ritornate in modalità funzioni). CONTA KM/DIST BICI 1 (con ntrate nell’impostazione per la BICI 1 (con impostate su BICI 2). Confermare con BICI 2)Confermare con BICI 1/SELEZION OK? Confermare con VDO CYCLECOMPUTING www.vdocyclecomputing.com...
- Page 39 Il display conferma: MANUT. BICI/IMPOST OK. Confermare con ritornate in modalità funzioni). Ritorno automatico in IMPOSTAZIONI/SELEZIONA. NAVIGATOR/AVANTI o NAVIGA- NAVIGATOR/IMPOSTAZ TOR/INDIETRO. Selezionare cambiare in . Confermare con NAVIGATOR/CANCELLA. in MANUT. BICI/ Confermare con IMPOSTAZ. Confermare con Domanda di sicurezza: NAVIGATOR/CANCELLA? Confermare con VDO CYCLECOMPUTING www.vdocyclecomputing.com...
- Page 40 TOTAL CORSA: totale tempo corsa, tempo corsa in CANCEL DATI/ Per tutti i reclami e i casi di garanzia vi preghia- bici 1, tempo corsa bici 2 SELEZIONA. Confermare con NAVIGATOR: tutti i valori del contatore del percorso giornaliero VDO CYCLECOMPUTING www.vdocyclecomputing.com...
- Page 41 La visualizzazione è debole Batteria scarica Controllare, eventualmente sostituire la batteria La visualizzazione è debole Le temperature inferiori a 5° In normali condizioni di tem- ritardano la visualizzazione peratura la visualizzazione si normalizza. 80 X2 VDO CYCLECOMPUTING VDO CYCLECOMPUTING www.vdocyclecomputing.com...
- Page 42 Dieses Produkt darf ter les conditions de leur contrat de vente. Ce pro- unitamente ad altri rifiuti commerciali. nicht zusammen mit anderem Gewerbemüll ent- duit ne doit pas être éliminé avec les autres déchets commerciaux. sorgt werden. VDO CYCLECOMPUTING www.vdocyclecomputing.com...
- Page 43 www.cyclecomputing.com...
Need help?
Do you have a question about the X2 and is the answer not in the manual?
Questions and answers