Table of Contents
Advertisement
Advertisement
Table of Contents

Related Manuals for Nuvo P3100


Summary of Contents for Nuvo P3100
- Page 1 Wireless Audio System Product Guide...
-
Page 2: Table Of Contents
1.4 Installing the P3100 Zone Player ................................Page 7 1.5 Connecting the Speakers to the P100 and P200 Zone Players ......................... Page 8 1.6 Connecting the Speakers to the P3100 Zone Player ..........................Page 8 2. Setting Up a System from the iOS or Android App 2.1 New Wireless System Setup .................................. -
Page 3: Introduction
Introduction Welcome to the exciting world of the NuVo Wireless Audio System. Now your favorite music, in any room you want it, anytime you want it, is as close as the touch of a button on the NuVo Controller or any of your Apple or Android Wi-Fi enabled portable devices. True high fidelity music, from your own personal library or streaming from the Internet, is more affordable and accessible than you ever imagined. -
Page 4: P100 Zone Player Back Panel Features
1. Ethernet: This RJ45 port allows for a wired connection directly to the GW100 Gateway or directly to the network router. 2. USB: Any USB compatible hard drive can share music content with the NuVo Wireless Audio System through this port. -
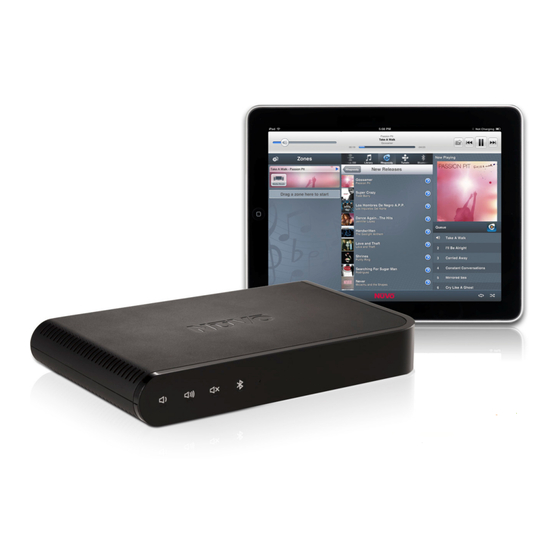
Page 5: P3100 Back Panel Features
P3100 Zone Player Back Panel Features 1. Ethernet: The P3100 is designed to connect directly to the network LAN. The second port enables multiple P3100s to share the same network connection within one system. 2. Speaker: This modular connection provides a maximum 40 watt stereo amplified signal to the connected speakers. Each zone represents an independent output. -
Page 6: Hardwiring The Players Directly To The Network
Fig. 1 Fig. 2 Make sure that the installation’s router is connected to the network modem (this is generally supplied by the Internet Service Provider, ISP) with a single CAT5 network cable. The Gateway has five Ethernet ports and acts as a standard Ethernet switch. Simply connect the included cable, or any Ethernet cable with a standard RJ45 modular plug, into one of the five ports on the back of the Gateway and connect the other end into an available port on the back of the installation’s router, as shown in fig. -
Page 7: Installing The P3100 Zone Player
Ethernet cable. Either of the two Ethernet ports will communicate when connected, as shown in fig. 5. The second port is used for daisy chaining multi- ple P3100 units for more audio zones, as shown in fig. 6. Note that the P3100 is not a wireless device and does not use the Gateway for communication. -
Page 8: Connecting The Speakers To The P100 And P200 Zone Players
The P3100 zone player has three separate zone “euro” style speaker connectors. The speaker wire is terminated into this modular plug and then inserted into the appropriate zone output on the back panel of the P3100, as shown in fig. 9. It is only necessary to strip about 1/8 inch of the insulation from the inner conductor for these plugs. -
Page 9: Setting Up A System From The Ios Or Android App
2.1 New Wireless System Setup Download the app to your device from the iTunes App Store or the Google Play Marketplace. Make sure your device is connected to the same network as the NuVo Wireless Audio System. Open the app and select “Setup a new system” from the initial screen, as shown in fig. 10. “Join my existing system” is used to connect a new iOS or Android device to an existing system. - Page 10 13. Each player is assigned a network ID as well as a NuVo System ID. This process is com- pleted by pressing the Volume UP and Mute buttons on the front panel of the P100 and P200 players simultaneously, or press the Zone Setup button located on the back panel of the P3100 player, as shown in fig.
- Page 11 Fig. 15 While the connection is being made, the front panel LED will flash. The app will indicate when the connection is complete and the LED will be solid white. Touch “Next” to proceed, as shown in fig. 15. Fig. 16 Choose a zone icon for the player.
-
Page 12: Adding Zones To An Existing System
2.2 Adding Zones to an Existing System Once a system is set up, adding additional P100, P200, or P3100 zone players is easily done. Fig. 19 To do this, go to the “Settings” button at the bottom of the Dashboard, which is the section of the app defined by the zone icons, as shown in fig. -
Page 13: Adding Additional Gateways To An Existing System
Gateway. This can be done by plugging the new Gateway(s) into the first Gateway, into the installation’s router, or a switch from the router. When a new Gateway is added to the system, go to the Settings menu and select “Add a NuVo Component”, as shown in fig. 21. The Controller will recognize that a new Gateway has been added and the next step is to touch “Add Gateway(s)”, as shown in fig. -
Page 14: Using The Ios And Android Control App
3. Using the iOS and Android Control App The iOS and Android apps offer complete system control wirelessly from any Wi-Fi enabled phone or tablet. The iOS version is available for free download from the iTunes App Store and the Android version is available from Google Play. Both versions offer the same look and control options. The iPad version is nicely optimized for a view of the com- plete system operation on one screen. -
Page 15: Bluetooth® Playback
3.3 Bluetooth® Playback An important feature of the P200 zone player is the ability to stream music content from any Bluetooth enabled device. To take advantage of Bluetooth streaming, make sure that your device’s Bluetooth is turned on. This is done within the device’s settings. When in range of a P200, that zone will appear in the device’s Bluetooth menu. -
Page 16: The Settings Menu
When a line in device is connected to a zone, select “Line In” from the app, as shown in fig. 35. The device will appear in the “Line In” menu and be available for selection from all the zones, as shown in fig. 36. A “Rename utility is available by touching the arrow button next to “Line Input”, this allows a specific name to be given to it in the app, as shown in figs. - Page 17 When this setting is changed, the P100 or P200 will go offline momentarily causing the front panel LED to flash red. When the LED returns to solid white, the zone is back on the network and ready to resume normal operation. This wireless band selection only applies to the P100 and P200 wireless players. This feature will not be active if you are using the P3100.
-
Page 18: Gateways
4.2 Gateways The Gateway selection allows you to view and change important settings to the Gateway(s) operation. When “Gateways” is selected, as shown in fig. 49, the app will show the Gateways present in the system, as shown in fig. 50. The Gateway page will show “Name”, “Serial Number”, and “Wireless”, as shown in fig. 51. Fig. -
Page 19: Add A Nuvo Component
4.4 Add a NuVo Component See section 2.2, Adding Zones to an Existing System. 4.5 Music Library Existing personal music is easily shared with the entire system by plugging a USB hard drive into the USB port on the back panel of any of the zone players, as shown in fig. 57. -
Page 20: Music Services
4.6 Music Services When “Music Services” is selected, as shown in fig. 61, the active streaming music services on the system will be displayed, as shown in fig. 62. It also provides a button for adding new services. Most services require an online subscription account. The associated user name and password for the account must be added in this selection for the service to be active on the system. -
Page 21: International
“Software Update” will show any software updates that may be available, and allow for easy updates, as shown in figs. 66 and 67. Typically any updates will pop up on the app. An important advantage for the user is that the update is already downloaded in the background and once “install” is selected all the zones in the system will automati- cally be updated. -
Page 22: Help
4.10 Help The “Help” button, as shown in fig. 73, has links to contact NuVo directly or reference information on the system’s components, as shown in fig. 74. Fig. 73 Fig. 74 5. The Music Share Software The Music Share Software allows music content from either shared network locations or libraries contained on personal computers to be streamed from any zone in the sys- tem. - Page 23 Click on the “Add new” button at the top of the window. The music share choices will open in the next window, as shown in fig. 76. “My Music” folder is the default location for Windows Media Player libraries. If your music is stored on a Mac computer, or your preferred music library software is in iTunes, then select “iTunes media folder”.
-
Page 24: Troubleshooting
6. Troubleshooting 6.1 Front Panel LEDs An important indicator of each zone’s operation is the LED light on the front panel of the zone players. The color and either solid or flashing state of the LED provides a visual reference for the player’s state of operation. Refer to the chart for an explanation of the functions and LED status. 6.2 Not Connected A common indicator for lack of communication with the system is the app’s “Not Connected”... -
Page 25: Restoring Defaults
On any managed switch, speed and duplex must be set on the ports being used by the NuVo Wireless Audio System to auto negotiate. This is the way in which the zones com- municate. The common mistake would be to set the ports to gigabit communication which will cause a communication mismatch with the zones. -
Page 26: Specifications
Unit Weight (kg) 0.90 Controller Unit Weight (pounds) 1.98 FCC, IC, CE-EMC, C-Tick Power Supply NuVo reserves the right to change specifications without notice. Safety cULus, GS Mark, CE-LVD FCC, IC, CE-EMC, C-Tick Environmental Compliance Europe RoHS P100 Wireless Player... - Page 27 120W (60W x 2) Two channels driven 20 Hz – 20 KHz @ 0.5% distortion Rated Distortion (1/2 Power) 0.20% NuVo reserves the right to change specifications without notice. Speaker Impedance 4 – 8 ohms Frequency Response (20 - 20kHz) +/-0.5 dB...
- Page 28 Speaker Impedance 6 – 8 ohms Unit Weight (kg) 3.50 Frequency Response (20 - 20kHz) +/-0.5 dB Unit Weight (pounds) 7.72 Damping Factor Signal-to-Noise Ratio, rated output 92 dB A – weighted NuVo reserves the right to change specifications without notice.
- Page 29 NuVo Technologies, LLC, 3015 Kustom Dr., Hebron, KY 41048 www.nuvotechnologies.com (866) 796-4904 NWAS 1248...
Need help?
Do you have a question about the P3100 and is the answer not in the manual?
Questions and answers