ABB M22311 series Manual
4.3" video hands-free indoor
station
Hide thumbs
Also See for M22311 series:
- User manual (40 pages) ,
- Product manual (32 pages) ,
- User manual (43 pages)
Table of Contents
Advertisement
Quick Links
Download this manual
See also:
User Manual
Advertisement
Table of Contents

Related Manuals for ABB M22311 series


Summary of Contents for ABB M22311 series
- Page 1 VER:1.0 │ │ 22.04.2015 ABB-Welcome Pos : 2 /Di nA4 - Anleitung en Online/Inhalt/KN X/D oorEntr y/83220- AP- xxx/Titelbl att - 83220-AP- xxx - ABB @ 19\mod_1323249806476_15.doc x @ 111084 @ @ 1 M22311-. M22313-. 4.3" Video hands-free indoor station...
-
Page 2: Table Of Contents
Pos : 4 /Busch-J aeger (Neus truktur)/M odul-Str uktur/Online-Dokumentation/Inhal ts verz eic hnis (--> Für alle D okumente <--)/Inhalts verz eichnis @ 19\mod_1320649044386_15.doc x @ 109653 @ @ 1 Safety ......................4 Intended use ....................4 Environment ....................4 ABB devices ................. 5 Operations ..................... 6 Standard operations ..............6 4.1.1 Control elements ................ - Page 3 ABB-Welcome General installation instructions ..........43 Mounting ..................45 === Ende der Liste für T extmar ke TOC === — 3 —...
-
Page 4: Safety
Pos : 9 /Di nA4 - Anleitung en Online/Inhalt/KN X/D oorEntr y/83220- AP- xxx/Besti mmungsg emaess er Gebrauch - 83220-AP- xxx- 500 @ 20\mod_1324561168699_15.doc x @ 112728 @ @ 1 The M2231x-x is an integral part of the ABB Welcome door communication system and operates exclusively with components from this system. -
Page 5: Abb Devices
ABB devices Pos : 13 /Busc h-J aeg er (Neustr uktur)/Modul- Struktur /Online-Dokumentati on/U mwel t (--> Für alle D okumente <--)/Hinweis e/Hi nweis - U mwelt - ABB El ektr ogeräte @ 19\mod_1323162745839_15.doc x @ 110867 @ @ 1 All packaging materials and devices from ABB bear the markings and test seals for proper disposal. -
Page 6: Operations
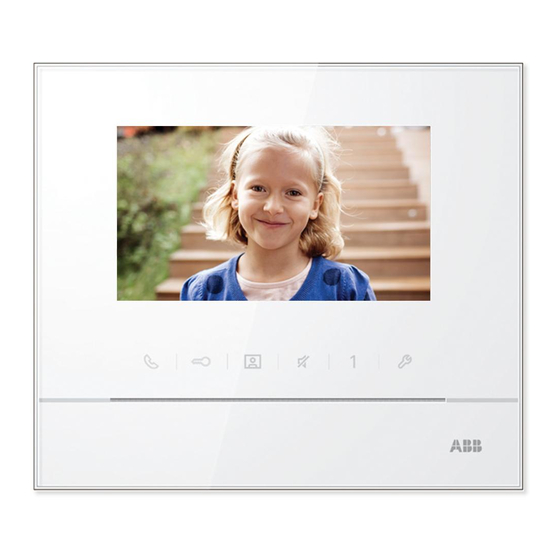
ABB-Welcome Operations Pos : 18 /DinA4 - Anl eitungen Onli ne/Ueberschriften/1./Bedi enung @ 18\mod_1302613924165_15.doc x @ 103365 @ 1 @ 1 Operations Pos : 19 /DinA4 - Anl eitungen Onli ne/Ueberschriften/2./Nor maler Betrieb @ 18\mod_1302768820965_15.doc x @ 103540 @ 2 @ 1 Standard operations Pos : 20 /DinA4 - Anl eitungen Onli ne/Ueberschriften/3./Bedi enel emente @ 20\mod_1323260220559_15.doc x @ 111647 @ 3 @ 1... - Page 7 ABB-Welcome Operations Functions 4.3" Color display Comunication button 2A When a call is coming, press this button to activate the communication within 30 seconds and press it again to end the call. 2B In standby mode, press this button to enter the communication menu.
- Page 8 ABB-Welcome Operations 5B In standby mode, hold the button to mute ringtone of all indoor stations in the apartment. 5C When a call is coming, press this button to reject the call. 5D During the conversation, press this button to mute microphone.
-
Page 9: Control Actions
ABB-Welcome Operations Pos : 26 /DinA4 - Anl eitungen Onli ne/Ueberschriften/2./Bedi enaktionen @ 20\mod_1323262294281_15.doc x @ 111911 @ 2 @ 1 Control actions Pos : 27 /DinA4 - Anl eitungen Onli ne/Ueberschriften/3./Sprec h- und Videover bindung @ 20\mod_1323262368700_15.doc x @ 111927 @ 3 @ 1 4.2.1... - Page 10 ABB-Welcome Operations If the function "release 2nd-lock" or "control switch actuator" is assigned to The programmable button, press this button to activate the function. Press this button to enable or disable the full-screen function. Hold this button to enter the brightness and volume setttings menu.
-
Page 11: Display & Volume Settings During Calling
ABB-Welcome Operations Pos : 30 /DinA4 - Anl eitungen Onli ne/Ueberschriften/3./Tuer oeffnen @ 20\mod_1323263277453_15.doc x @ 111935 @ 3 @ 1 4.2.2 Display & volume settings during calling Pos : 31 /DinA4 - Anl eitungen Onli ne/Inhalt/KN X/D oor Entr y/83220-AP- xxx/T uer oeffnen - 83220- AP- xxx @ 20\mod_1323267958479_15.doc x @ 112109 @ @ 1... -
Page 12: Communication Menu
ABB-Welcome Operations Pos : 33 /DinA4 - Anl eitungen Onli ne/Ueberschriften/3./Stumm s chalten @ 20\mod_1323263607142_15.doc x @ 111951 @ 3 @ 1 Pos : 66 /Busc h-J aeg er (Neustr uktur)/Modul- Struktur /Online-Dokumentati on/Steuermodul e - Onli ne-D okumentation (--> F ür all e D okumente <--)/++++++++++++ Seitenumbruc h ++++++++++++ @ 9\mod_1268898668093_0.doc x @ 52149 @ @ 1 4.2.3... - Page 13 ABB-Welcome Operations After chosing a list, press button√ to make the call. 4.2.3.3 Call to guard unit CALL GUARD UNIT Call Guard Unit Fig. 5: Call to guard unit — 13 —...
- Page 14 ABB-Welcome Operations 4.2.3.4 Broadcast BROADCAST Long-pressing “√“ button to broadcast Fig. 6: Broadcast call — 14 —...
- Page 15 ABB-Welcome Operations 4.2.3.5 Switch actuator SWITCH ACTUATOR Actuator 1 (001) Fig. 7: Switch actuator Set the actuator list in the “system settings-switch actuator“ menu first. After chosing a list, press button √ to enable the lock or light which is connected with the switch actuator.
-
Page 16: Settings
ABB-Welcome Operations Settings 4.3.1 Overview Press button to enter the system settings menu. The following functions are available: Functions Intercom settings -Set intercom lists among different apartments or within the same apartment Switch actuator -Set the actuator list in this menu... -
Page 17: Intercom Call Settings
ABB-Welcome Operations calls, Language -Set the local language Information Reset factory default Pos : 27 /DinA4 - Anl eitungen Onli ne/Ueberschriften/3./Sprec h- und Videover bindung @ 20\mod_1323262368700_15.doc x @ 111927 @ 3 @ 1 4.3.2 Intercom call settings Intercom 1... - Page 18 ABB-Welcome Operations Add a new intercom list . In total, up to 32 intercom lists can be added. Existing intercom list: Press button √ to modify the settings. means an external intercom from different apartments. *For establishing an external intercom, each apartment must have a master indoor station.
- Page 19 ABB-Welcome Operations -an external intercom means a call from different apartments -an internal intercom means a call within the same apartment Enter to change the target address, from 001 to 250. *If the call type is the internal intercom, there is no need to set the target address.
-
Page 20: Switch Actuator Settings
ABB-Welcome Operations 4.3.3 Switch actuator settings SWITCH ACTUATOR Actuator 1 (001) Add New Add a new list SWITCH ACTUATOR Target Address Rename light Save Cancel Fig. 10: Switch actuator settings Functions — 20 —... -
Page 21: Program Button Settings
ABB-Welcome Operations Existing switch actuator list: Press button √ to modify the settings. Add a new actuator list:Totally, up to 10 switch actuator lists can be added. Enter to change target address with “+” or “-” button from 001 to 199. -
Page 22: Call Forward Settings
ABB-Welcome Operations to the program button. 4.3.5 Call forward settings — 22 —... - Page 23 ABB-Welcome Operations CALL FORWARD Call Forward √ Call Type Indoor Target Address Save Cancel Fig. 12: Call forward settings Functions Enable/disable the call forward function. Enter to choose a call type, including indoor or guard unit. Enter to change the target address if the call type is an indoor station.
-
Page 24: Auto Unlock Settings
ABB-Welcome Operations 4.3.6 Auto unlock settings AUTO UNLOCK √ Auto Unlock √ Time 1 Time 2 : : : : Fig. 13: Auto unlock settings Functions Enable/disable the auto unlock function. Enable/disable the auto unlock during Time 1. Set starting time and ending time for Time 1 Enable/disable auto unlock during Time 2. - Page 25 ABB-Welcome Operations — 25 —...
-
Page 26: Os Password Settings
ABB-Welcome Operations 4.3.7 OS password settings SET OS PASSWORD √ Enable Password 123456 Enter Password (6-8 digits) Fig. 14: OS password settings Functions Enable/disable the password functions Enter the password as you wish in 6~8 digits. *only available with the keypad. -
Page 27: Ringtone Settings
ABB-Welcome Operations 4.3.8 Ringtone settings RING TONE Ring Tone 1 Default Outdoor Ring Tone 2 Other Outdoors Ring Tone 3 Doorbell Ring Tone 4 Others Fig. 15: Ringtone Functions Select the bell sound for the default outdoor station. Select the bell sound for other outdoor stations. -
Page 28: Volume Settings
ABB-Welcome Operations 4.3.9 Volume settings VOLUME Volume 3 Ringtone Volume √ Touchbutton Tone Fig. 16: Volume settings Functions Set the volume of bell sound. Enable/disable the feedback tone which sounds when the touch button is pressed. — 28 —... -
Page 29: Date And Time Settings
ABB-Welcome Operations 4.3.10 Date and time settings DATE AND TIME 2013 Date(YYYY-MM-DD) : Time Summer Time √ Fig. 17: Date and time settings Functions Set the date. Set the time. Enable/disable the summer time function. — 29 —... -
Page 30: Door Entry System Settings
ABB-Welcome Operations 4.3.11 Door entry system settings DOOR ENTRY SYSTEM Auto Full Screen √ √ Auto-snapshots √ Door Status Check √ Missed Call Fig. 18: Door entry system settings Functions Enable/disable the auto full screen function. Enable/disable the auto-snapshot function. -
Page 31: Blacklist Settings
ABB-Welcome Operations 4.3.12 Blacklist settings BLACKLIST Blacklist 1 (001) Add New BLACKLIST Target Address Save Cancel Fig. 19: Blacklist settings — 31 —... - Page 32 ABB-Welcome Operations Functions Existing blacklist: Press button √ to modify the settings. Add new blacklists: In total, up to 32 black lists can be added. Enter to change the target address with “+” or “-” button from 001 to 250.
-
Page 33: History Review
ABB-Welcome Operations 4.3.13 History review HISTORY 1/63 2013-03-21 Outdoor - 1 ● 16:45 ● 2013-03-21 Outdoor - 1 ● 2013-03-21 Outdoor - 1 Outdoor -1 Fig. 20: History review Functions Up to 100 events can be recorded in the history menu. - Page 34 ABB-Welcome Operations function, the icon is not displayed.. -Date, time and type of the event are recorded together with the snapshot. - Directions: means dialing calls means receiving calls means missed calls Press this button to view details of this event.
-
Page 35: Language Settings
ABB-Welcome Operations 4.3.14 Language settings LANGUAGE English Française Italiano Español Português Fig. 21: Language settings 4.3.15 Information — 35 —... -
Page 36: Reseting Factory Default
ABB-Welcome Operations INFORMATION Flash Version: V0.11_130723 MCU Version: V0.11_130722 M/S: Master Indoor St. Add.: Default Outdoor: Fig. 22: Information of the indoor station (scanning the QR code to get the detailed instruction of the indoor station) 4.3.16 Reseting factory default... - Page 37 ABB-Welcome Operations RESET FACTORY DEFAULT Are you sure to reset? Reset All Settings √ Clear All Data × Cancel Fig. 23: Reseting factory default Functions Reset all settings: Reset the device and restore all default configurations. The operation does not delete the programmed data and history, such as intercom lists and switch actuator lists.
-
Page 38: Cleaning
ABB-Welcome Operations Pos : 67 /DinA4 - Anl eitungen Onli ne/Ueberschriften/2./Rei nigung @ 19\mod_1310733980533_15.doc x @ 107853 @ 2 @ 1 Cleaning Pos : 68 /DinA4 - Anl eitungen Onli ne/Inhalt/KN X/D oor Entr y/Rei nigung/Rei nigung Touc hscreenmonitor @ 19\mod_1310734108978_15.doc x @ 107862 @ @ 1 Caution Risk of damage to the screen surface. -
Page 39: Adjusting The Device
ABB-Welcome Operations Pos : 70 /DinA4 - Anl eitungen Onli ne/Ueberschriften/2./Geraeteei nstellungen @ 18\mod_1302768847744_15.doc x @ 103548 @ 2 @ 1 Adjusting the device Pos : 71 /DinA4 - Anl eitungen Onli ne/Ueberschriften/3./Absc hlus s widerstand @ 19\mod_1321958079906_15.doc x @ 110083 @ 3 @ 1 Pos : 72 /DinA4 - Anl eitungen Onli ne/Inhalt/KN X/D oor Entr y/Bedienung/Absc hl uss widerstand setzen 83220-AP- xxx @ 19\mod_1310723392369_15.doc x @ 107841 @ @ 1... - Page 40 ABB-Welcome Operations Only one indoor station in each apartment must be set as "Master" (Switch should be set as 'M/S on'). All additional indoor stations in the same apartment must be set as "Slave" (Switch should be set as 'M/S off').
-
Page 41: Technical Data
ABB-Welcome Technical data Pos : 76 /DinA4 - Anl eitungen Onli ne/Ueberschriften/1./Tec hnisc he D aten @ 18\mod_1302615863001_15.doc x @ 103416 @ 1 @ 1 Technical data Pos : 77 /DinA4 - Anl eitungen Onli ne/Inhalt/KN X/D oor Entr y/83220-AP- xxx/T ec hnische D aten - 83220-AP- xxx @ 18\mod_1303212854559_15.doc x @ 103705 @ @ 1... -
Page 42: Mounting / Installation
ABB-Welcome Mounting / Installation Pos : 79 /Busc h-J aeg er (Neustr uktur)/Modul- Struktur /Online-Dokumentati on/Übersc hriften (--> Für alle D okumente <--)/1. Ebene/M - O/Montage / Installation @ 18\mod_1302613966111_15.doc x @ 103373 @ 1 @ 1 Mounting / Installation Pos : 80 /Busc h-J aeg er (Neustr uktur)/Modul- Struktur /Online-Dokumentati on/Sic herheit (-->... - Page 43 ABB-Welcome Mounting / Installation Electric voltage! Install the device only if you have the necessary electrical engineering knowledge and experience. • Incorrect installation endangers your life and that of the user of the electrical system. • Incorrect installation can cause serious damage to property, e.g.
- Page 44 ABB-Welcome Mounting / Installation • When looping, never install the incoming and outgoing bus inside the same cable. • Never install the internal and external bus inside the same cable. Pos : 83 /Busc h-J aeg er (Neustr uktur)/Modul- Struktur /Online-Dokumentati on/Steuermodul e - Onli ne-D okumentation (--> F ür all e D okumente <--)/++++++++++++ Seitenumbruc h ++++++++++++ @ 9\mod_1268898668093_0.doc x @ 52149 @ @ 1...
- Page 45 ABB-Welcome Mounting / Installation Pos : 84 /Busc h-J aeg er (Neustr uktur)/Modul- Struktur /Online-Dokumentati on/Übersc hriften (--> Für alle D okumente <--)/2. Ebene/M - O/Montage @ 18\mod_1302615960458_15.doc x @ 103424 @ 2 @ 1 Mounting Pos : 85.1 /DinA4 - Anl eitungen Onli ne/Inhalt/KN X/DoorEntr y/83220-AP- xxx/M ontag e - M odul e/Montage - Montagedose -- 83220-AP- xxx @ 19\mod_1323250406848_15.doc x @ 111098 @ @ 1...
- Page 46 ABB-Welcome Mounting / Installation Installation dimension The bottom of the device has screw holes for fastening on the wall according to the above dimension instructions. In addition, the bottom of the device can be fixed to the existing flush -mounted box.
- Page 47 ABB-Welcome Mounting / Installation Wiring Fix the bottom of the device and connect it in accordance with the graphics. The insulated section of the cable end must not be longer than 10mm. Settings Set addresses of the preferred outdoor stations and the address of the indoor station on the jumper (see chapter "...
- Page 48 ABB-Welcome Mounting / Installation Surface-mounted Mounted on the wall Fix the bottom of the device to the wall. Latch the upper part of the device onto its bottom part: place the upper side of the device on the lock-in lugs and then press the bottom side onto the bottom part of the device until it is caught by the clamp.
- Page 49 ABB-Welcome Mounting / Installation Latch the upper part of the device onto its bottom part : place the upper side of the device on the lock-in lugs and then press the bottom side onto the bottom part of the device until it is caught by the clamp.
- Page 50 ABB-Welcome Mounting / Installation To carry out flush-mounted installation, dismantle the frame first. Mounted with back cover Fix the back cover inside the wall directly. Latch the upper part of the device onto its bottom part : place the upper side of the device on the lock-in lugs and then press the bottom side onto the bottom part of the device until it is caught by the clamp.
- Page 51 ABB-Welcome Mounting / Installation Replacing the front cover The installation of the indoor station is now complete. Pos : 94 /Busc h-J aeg er (Neustr uktur)/Modul- Struktur /Online-Dokumentati on/Steuermodul e - Onli ne-D okumentation (--> F ür all e D okumente <--)/++++++++++++ Seitenumbruc h ++++++++++++ @ 9\mod_1268898668093_0.doc x @ 52149 @ @ 1...
- Page 52 We reserve the right to at all times make technical changes as well as changes in the contents of this document without prior notice. The detailed specifications agreed to at the time of ordering apply to all orders. ABB accepts no responsibility for possible errors or incompleteness in this document.
Need help?
Do you have a question about the M22311 series and is the answer not in the manual?
Questions and answers