Table of Contents
Advertisement
Quick Links
Advertisement
Table of Contents

Related Manuals for ABB M22001 series


Summary of Contents for ABB M22001 series
- Page 1 VER:1.0 │ │ 22.04.2015 ABB-Welcome Pos : 2 /Di nA4 - Anleitung en Online/Inhalt/KN X/D oorEntr y/83220- AP- xxx/Titelbl att - 83220-AP- xxx - ABB @ 19\mod_1323249806476_15.doc x @ 111084 @ @ 1 M22001-. M22002-. M22003-. Audio handset indoor station...
-
Page 2: Table Of Contents
Pos : 4 /Busch-J aeger (Neus truktur)/M odul-Str uktur/Online-Dokumentation/Inhal ts verz eic hnis (--> Für alle D okumente <--)/Inhalts verz eichnis @ 19\mod_1320649044386_15.doc x @ 109653 @ @ 1 Safety ......................3 Intended use ....................3 Environment ....................3 ABB devices ................. 4 Operations ..................... 5 Standard operations ..............5 4.1.1 Control elements ................ -
Page 3: Safety
The device contains valuable raw materials which can be recycled. Therefore, dispose of the device at the appropriate collectin g depot. Pos : 12 /DinA4 - Anl eitungen Onli ne/Ueberschriften/2./ABB Geraete @ 19\mod_1323162843832_15.doc x @ 110875 @ 2 @ 1 — 3 —... -
Page 4: Abb Devices
ABB devices Pos : 13 /Busc h-J aeg er (Neustr uktur)/Modul- Struktur /Online-Dokumentati on/U mwel t (--> Für alle D okumente <--)/Hinweis e/Hi nweis - U mwelt - ABB El ektr ogeräte @ 19\mod_1323162745839_15.doc x @ 110867 @ @ 1 All packaging materials and devices from ABB bear the markings and test seals for proper disposal. -
Page 5: Operations
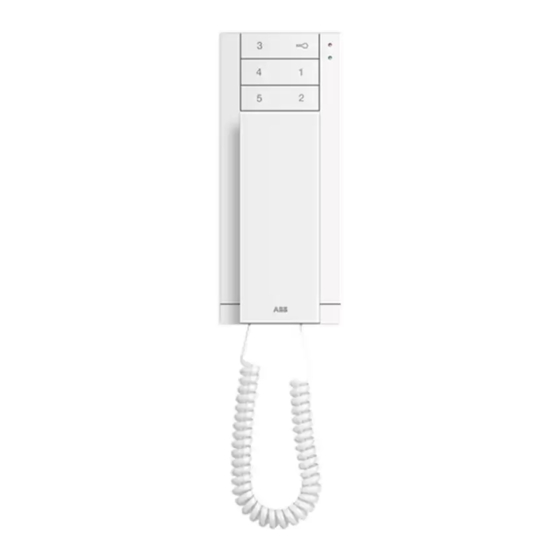
ABB-Welcome Operations Pos : 18 /DinA4 - Anl eitungen Onli ne/Ueberschriften/1./Bedi enung @ 18\mod_1302613924165_15.doc x @ 103365 @ 1 @ 1 Operations Pos : 19 /DinA4 - Anl eitungen Onli ne/Ueberschriften/2./Nor maler Betrieb @ 18\mod_1302768820965_15.doc x @ 103540 @ 2 @ 1 Standard operations Pos : 20 /DinA4 - Anl eitungen Onli ne/Ueberschriften/3./Bedi enel emente @ 20\mod_1323260220559_15.doc x @ 111647 @ 3 @ 1... - Page 6 ABB-Welcome Operations Function Handset When a call is coming, pick up the handset to activate communication within 30 seconds and hang up the handset to end the call. Unlock button 2A Press this button to open the door at any time.
-
Page 7: Settings
ABB-Welcome Operations Settings 4.2.1 Ringtone type settings Pos : 21 /DinA4 - Anl eitungen Onli ne/Inhalt/KN X/D oor Entr y/83220-AP- xxx/Bedi enelemente - 83220- AP- xxx @ 18\mod_1303212853605_15.doc x @ 103673 @ @ 1 Hold " " for about 3 seconds to enter the system setting mode (with blue LED &... - Page 8 ABB-Welcome Operations Function list Function code Blue LED flashing No function Always on Control switch actuator Flash once Intercom call in the same apartment Flash twice Intercom call among different Flash 3 time apartments Call guard unit Flash 4 time...
-
Page 9: Adjusting The Device
ABB-Welcome Operations During settings, if the value set is beyond the wanted number, press , both tens digit and units digit will go back to the default value 0. Exit the programming mode Hold this programmable button for 3 seconds until the blue LED & red LED flash once simultaneously. - Page 10 ABB-Welcome Operations be set as 'M/S on'). All additional indoor stations in the same apartment must be set as "Slave" (Jumper should be set as 'M/S off'). Terminal resistor In video installations or mixed audio and video installations, the Jumper must be set as 'RC on' on the last device of the line.
-
Page 11: Technical Data
ABB-Welcome Technical data Pos : 76 /DinA4 - Anl eitungen Onli ne/Ueberschriften/1./Tec hnisc he D aten @ 18\mod_1302615863001_15.doc x @ 103416 @ 1 @ 1 Technical data Pos : 77 /DinA4 - Anl eitungen Onli ne/Inhalt/KN X/D oor Entr y/83220-AP- xxx/T ec hnische D aten - 83220-AP- xxx @ 18\mod_1303212854559_15.doc x @ 103705 @ @ 1... -
Page 12: Mounting / Installation
ABB-Welcome Mounting / Installation Pos : 79 /Busc h-J aeg er (Neustr ukt ur)/Modul- Struktur /Online-Dokumentati on/Übersc hriften (--> Für alle D okumente <--)/1. Ebene/M - O/Montage / Installation @ 18\mod_1302613966111_15.doc x @ 103373 @ 1 @ 1 Mounting / Installation Pos : 80 /Busc h-J aeg er (Neustr uktur)/Modul- Struktur /Online-Dokumentati on/Sic herheit (-->... -
Page 13: General Installation Instructions
ABB-Welcome Mounting / Installation • Use suitable personal protective clothing. • Use only suitable tools and measuring devices. • Check the type supply network (TN system, IT system, TT system) to secure the following power supply conditions (classic connection to ground, protective earthing, necessary additional measures, etc.). -
Page 14: Mounting
ABB-Welcome Mounting / Installation Pos : 84 /Busc h-J aeg er (Neustr uktur)/Modul- Struktur /Online-Dokumentati on/Übersc hriften (--> Für alle D okumente <--)/2. Ebene/M - O/Montage @ 18\mod_1302615960458_15.doc x @ 103424 @ 2 @ 1 Mounting Pos : 85.1 /DinA4 - Anl eitungen Onli ne/Inhalt/KN X/DoorEntr y/83220-AP- xxx/M ontag e - M odul e/Montage - Montagedose -- 83220-AP- xxx @ 19\mod_1323250406848_15.doc x @ 111098 @ @ 1... - Page 15 ABB-Welcome Mounting / Installation Installation dimensions for slotted screw holes The bottom of the device has screw holes for fastening on the wall according to the above dimension instructions. In addition, the bottom of the device can be fixed to the existing flush -mounted box.
- Page 16 ABB-Welcome Mounting / Installation Settings Set addresses for the preferred outdoor stations and the address for the indoor station on the jumper (see chapter “ ”). Adjusting the device Mounted on the wall Fix the bottom of the device to the wall.
- Page 17 ABB-Welcome Mounting / Installation Fix the bottom of the device to the existing flush-mounted box. Latch the upper part of the device onto its bottom part: place the upper side of the device on the lock-in lugs and then press the bottom side onto the bottom part of the device until it is caught by the clamp.
- Page 18 We reserve the right to at all times make technical changes as well as changes in the contents of this document without prior notice. The detailed specifications agreed to at the time of ordering apply to all orders. ABB accepts no responsibility for possible errors or incompleteness in this document.
Need help?
Do you have a question about the M22001 series and is the answer not in the manual?
Questions and answers