Table of Contents
Advertisement
Advertisement
Table of Contents

Related Manuals for Dogtra 1900S


Summary of Contents for Dogtra 1900S
- Page 1 Owner’s Manual...
- Page 2 By Dogtra Remote Controlled Dog Training Collars Owner's Manual Please read this manual thoroughly before operating the Dogtra 1900S training collar.
- Page 3 Proper e-collar use Dogtra e-collars are intended for the sole purpose of human use or use on other animals. Dogtra Company does not assume any liability for the improper use of a Dogtra e-collar. Aggressive dogs Dogtra highly recommends consulting a dog training professional when using an e-collar to correct dogs that are aggressive towards other dogs or people.
- Page 4 Training Methods E-collars can be used with many different methods. If you have any concerns in the training methods provided by Dogtra, consult with a dog training professional.
-
Page 5: Table Of Contents
6. The LED Indicator .......... 7. Charging the Battery ........8. The Handheld Transmitter LCD ......9. How to Attach the Belt Clip on the 1900S ....10. How to Use the Test Light ........ General Training Tips ..........Maintenance ............ -
Page 6: At A Glance
Test light Gear bag Manual Optional accessories Field auto charger 10-volt car outlet. European charger Dogtra’s European chargers are designed for use with a 230V AC electrical outlet. To purchase accessories, please visit www.dogtra.com or call customer service at 1-888-811-9111. -
Page 7: Main Features Of The 1900S
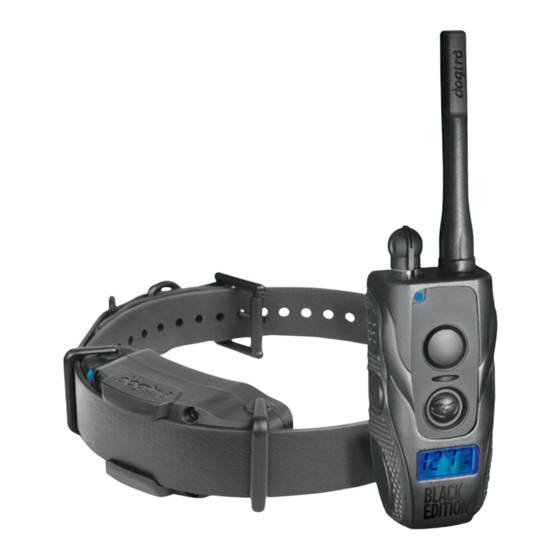
Main Features of the 1900S Checkered grips on the handheld transmitter Enhanced Contact Points Fully waterproof LCD screen Belt clip 2-hour rapid charge batteries... - Page 8 Overview Antenna Rheostat intensity dial Indicator light (LED window) Pager button button switch Constant button Belt clip screen Battery charging receptacle & rubber plug Transmitter...
- Page 9 Overview Antenna Rheostat intensity dial Indicator light (LED window) 1 st -dog toggle 1 st -dog switch Constant Pager (gray (gray button) button) switch 2 nd -dog 2 nd -dog Pager Constant (orange (orange button) button) Belt clip screen Battery charging receptacle &...
- Page 10 Collar strap Contact points Battery charging Indicator light receptacle & (LED window) rubber plug switch Receiver/Collar...
-
Page 11: Understanding Your Training System
Understanding your training system 1. How to turn the 1900S on/off To turn the handheld transmitter on, hold down the button on the right side of the transmitter until the LCD screen illuminates. To turn the transmitter off, hold down the same button on the right side of the transmitter until the LCD screen shuts off. -
Page 12: How The Transmitter Buttons Work
2. How the transmitter buttons work 1900S The transmitter for the 1900S single dog unit has four buttons (one on the face of the transmitter, two on the left side and one on the right side). button Pager button Constant... - Page 13 Transmitter Power ON/OFF on the right side of the transmitter until the LCD screen button on the right side of the transmitter. When the LCD 1902S switch on the transmitter (two on the face of the transmitter, two on the left side, and one on the right side.). toggle switch -dog (gray button)
- Page 14 When either the orange or gray stimulation button is pressed pulse of electrical stimulation. When you press either the orange or gray stimulation emits a continuous stimulation as long as the button is pushed, for up to 12 seconds to the corresponding collar. If the button is not released after 12 seconds, the stimulation will automatically turn off as a safety feature.
-
Page 15: Collar Fitting
3. Collar fitting or two snugly in between the contact points and your dog’s box is either side of the dog’s windpipe. on the dog’s neck. When this happens, the contact points... -
Page 16: How To Find The Right Stimulation
4. How to find the right stimulation The 1900S comes with the rheostat dial on the transmitter. The rheostat intensity dial controls the stimulation level, with level 0 being the lowest level and level 127 being the highest. The level of stimulation best suited for your dog depends on your dog’s temperament and threshold for stimulation. -
Page 17: The Led Indicator
6. The LED indicator receiver is on and ready for use. The LED indicator will blink on both the transmitter and the receiver when the transmitter buttons are pressed. The LED indicator color indicates the battery life level. Green = Fully charged Amber = Medium If the unit is used while the LED indicator is red, it will shut down automatically. -
Page 18: Charging The Battery
Battery Charging Procedure NOTE : The unit has a partial charge when it leaves the Dogtra facility, upon receipt of the collar, be sure to give it 1. Attach the charging cables to both the transmitter and receiver(s), as shown on page 17. -
Page 19: The Handheld Transmitter Lcd
(when you disconnect restart the unit). 4. After charging, cover the battery charging receptacles collar. NOTE : accessories for your Dogtra e-collars. When a charger is not in use, disconnect it from the power source. 8. The handheld transmitter LCD... - Page 20 Turn the LCD backlight on and off with a short press of The LCD screen indicates the stimulation level (0-127). The LCD battery life indicator shows 3 bars at full charge, 2 bars at medium charge and 1 bar when it needs to be charge for your receiver, observe the LED indicator on the Green = full charge Amber = medium charge...
-
Page 21: How To Attach The Belt Clip On The 1900S
9. How to attach the belt clip on the 1900S To attach the included belt clip to the transmitter, follow the instructions below. 1. Align the belt clip to the grooves on the back of the transmitter. Philips head screws. -
Page 22: How To Use The Test Light
10. How to use the test light the contact points as shown in the diagram. stimulation button is pressed on the transmitter. The light will stay lit as long as the Constant button is pressed on the transmitter, up to 12 seconds. 3. -
Page 23: General Training Tips
Getting started with your 1900S Your dog must know some very basic obedience commands before beginning training with the 1900S. A dog learns by these commands, the trainer can introduce distractions and different locations to strengthen them. Throw in the correct amount of positive and negative reinforcement and you should end up with a well-mannered dog. - Page 24 By using only enough stimulation to get your point across, you will have a more controllable environment and a dog that is under less stress. Animals (and humans) perform better in a less stressful environment. For more training information, please visit our website at www.dogtra.com.
-
Page 25: Maintenance
Damaged or broken casing may affect the and clean out any dirt or debris. Storage maintenance The 1900S should be fully charged before storing for extended periods. While in storage, the unit should be given units in room temperature. Do not keep the units exposed to extreme climates. -
Page 26: Troubleshooting Guide
- The contact points may be too short for your dog’s thick or long coat. To place an order for longer contact points, please contact Dogtra or a Dogtra dealer. If you are already using longer contact points, you may need to trim the hair on the dog’s neck, so that both contact points are... - Page 27 If your dog was in salt-water, be sure to rinse the receiver and charging port with clean water. - For Dogtra units over two years old from the purchase date, the batteries may need to be replaced. You can replace them yourself by contacting Dogtra for a replacement battery.
-
Page 28: Warranty And Repair Information
Dogtra will estimate the age of the unit by the serial number. Serial number estimates can differ from the actual purchase date. A serial number estimate is the only method of determining an approximate date of purchase without product registration or a proof of purchase. - Page 29 The removal of serial numbers from any Dogtra products will void the warranty. Dogtra reserves the right to retain and discard any parts or accessories that have been found damaged upon replacement and repair.
- Page 30 Dogtra Company 22912 Lockness Avenue, Torrance, CA 90501 U.S.A. Tel. 310.534.0101 Fax. 310.534.9111 Toll Free. 1.888.811.9111 Website. www.dogtra.com Copyright © 2015 Dogtra Company All rights reserved. (3)
Need help?
Do you have a question about the 1900S and is the answer not in the manual?
Questions and answers