
Subscribe to Our Youtube Channel
Related Manuals for Dogtra 1900S HANDSFREE


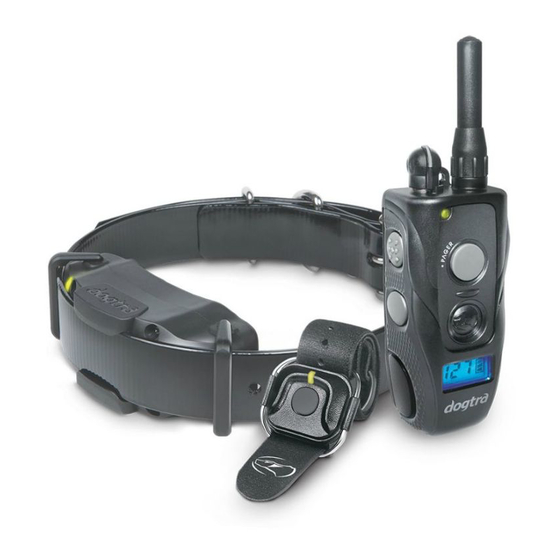
Summary of Contents for Dogtra 1900S HANDSFREE
- Page 1 1900S HANDSFREE 1-DOG SYSTEM ONLY Owner's Manual Please read this manual thoroughly before operating the 1900S HANDSFREE training collar.
- Page 2 Consult your physician or Dogtra product or other property. medical device maker before using your medical device with a Dogtra product. If you think that your Dogtra PRODUCT SAFETY product is interfering with your pacemaker, defibrillator, Training Methods or other medical device, stop using the Dogtra product.
-
Page 3: Table Of Contents
MAXIMIZING THE DISTANCE ......LED INDICATOR ............Optional Accessories CHARGING THE BATTERY ........Auto Charger Dogtra's auto chargers are designed for use with a HANDHELD TRANSMITTER LCD ......10 volt car outlet. ATTACHING THE BELT CLIP ........European Charger USING THE TEST LIGHT ......... -
Page 4: Main Features
• A three bar battery life indicator and LED colored Battery Charging indicator to show the remaining battery life Receptacle & Rubber Plug • Enhanced contact points • For dogs as small as 35 pounds 1900S HANDSFREE Transmitter... -
Page 5: Understanding Your Training System
UNDERSTANDING YOUR TRAINING SYSTEM Collar Strap 1. Turning the 1900S HANDSFREE On/Off Contact Points To turn the handheld transmitter on, hold down the button on the right side of the transmitter until the LCD screen illuminates. To turn the transmitter off, hold down... -
Page 6: Transmitter Button Function
2. Transmitter Button Function On/Off Button The on/off button is located on the right side of the The 1900S HANDSFREE unit has four buttons on the transmitter. handheld transmitter (one on the face of the transmitter, two on the left side, and one on the right side). - Page 7 Range Fastening the Handsfree Remote Controller Strap Depending on where the handheld transmitter is placed, The Handsfree Remote Controller strap can be fastened your body can act as a barrier between the Handsfree to your fingers, wrist, palm, or around a gun stock. Follow Remote Controller and the transmitter.
- Page 8 Changing the Handsfree Remote Controller Stimulation Handsfree Mode Remote Controller The default setting for the Handsfree Remote Controller Button button is the Constant stimulation. Nick To change the setting to the Pager or Nick stimulation (or Constant back to Constant stimulation) proceed with the following steps: 1.
-
Page 9: Collar Fitting
If the collar is too loose, the contact will not be consistent and cause the corrections to be inconsistent. Dogtra uses surgical stainless steel contact points and anti-microbial plastic to protect the dog’s skin. -
Page 10: Finding The Right Stimulation
5. Finding the Right Stimulation 6. Maximizing the Distance The 1900S HANDSFREE has a Rheostat Dial on the The 1900S HANDSFREE collar has a 3/4-mile range. top of the transmitter (0 is the lowest and 127 is the Depending on the way you use your transmitter, the highest). -
Page 11: Led Indicator
The range on the 1900S Handsfree Remote Controller 7. LED Indicator is reduced when the handheld transmitter's antenna The LED indicator flashes every 5 seconds when the is covered or in contact with your body. Refer to the receiver is on and ready for use. The LED indicator will following carrying methods for optimal range. -
Page 12: Charging The Battery
Note 2: The unit has a partial charge when it leaves the Dogtra facility. Upon receipt of the collar, be sure to give • The indicator light on the transmitter or receiver comes it a full 2-hour initial charge before the first use. When a on momentarily, but will not stay on when the Constant charger is not in use, disconnect it from the power source. -
Page 13: Handheld Transmitter Lcd
9. Handheld Transmitter LCD 2. Plug the charger into a 120 volt wall outlet or, if using the auto charger, plug into a cigarette lighter only for lithium polymer batteries (use a 230 volt European charger for Europe). All indicator lights should glow red when properly plugged in and the unit will automatically shut off during the charging process. -
Page 14: Attaching The Belt Clip
Care for LCD Transmitters in Cold Temperature 10. Attaching the Belt Clip In cold temperatures (10°F or below), the Liquid Crystal Display (LCD) on your transmitter may be dim or slow to respond. Wait until the display becomes visible before selecting any training level. -
Page 15: Using The Test Light
11. Using the Test Light the Constant button is pressed for 12 seconds or longer. 6. Turn the Rheostat Dial on the transmitter clockwise and then counterclockwise. The test light should glow brighter with higher levels of stimulation and dimmer with lower levels. -
Page 16: General Training Tips
Your dog must know some basic obedience commands when the dog does not comply with your commands at before beginning training with the 1900S HANDSFREE. home or in the field. Keep your initial training sessions A dog learns by first being shown a command, followed short and positive as dogs have a short attention span. -
Page 17: Maintenance
MAINTENANCE FCC WARNING Basic Maintenance The 1900S HANDSFREE complies with part 15 of the Be sure the rubber charging cap is securely in place when FCC Rules. Operation is subject to the following two the collar is in use. After each training session, carefully... -
Page 18: Troubleshooting Guide
– The battery may be low, so check the LED light for battery life. – If the above does not resolve your issues, contact Dogtra customer service at info@dogtra.com or 3. The transmitter has no range or stimulation is less (888)-811-9111. -
Page 19: Warranty And Repair Information
WARRANTY AND units or provide refunds for products purchased from us after 30 days from the date of purchase. Dogtra DOES NOT cover the cost of shipping REPAIR INFORMATION outside of the Continental United States. Issues of replacement and refunds on units purchased less than 30 days from an authorized dealer must be addressed to the dealer directly. - Page 20 Send repair units to : Dogtra Company / Repairs 22912 Lockness Avenue, Torrance, CA 90501 U.S.A. The diagrams and representations in the manual may differ slightly from the actual product depending on the model type.
Need help?
Do you have a question about the 1900S HANDSFREE and is the answer not in the manual?
Questions and answers