Koden CVS-FX1 Basic Operation Manual
Color echo sounder
Hide thumbs
Also See for CVS-FX1:
- Basic operation manual (138 pages) ,
- Menu manual (81 pages) ,
- Installation manual (49 pages)
Table of Contents
Advertisement
Quick Links
Download this manual
See also:
Installation Manual
Advertisement
Table of Contents

Related Manuals for Koden CVS-FX1


Summary of Contents for Koden CVS-FX1
-
Page 2: Declaration Of Conformity
Declaration of Conformity (As referred to in Annex IV 2. of Directive 2004/108/EC) Declares under his sole responsibility that the produced Echo Sounder manufactured by Koden Electronics Co., Ltd. 5278 Uenohara Uenohara-Shi Yamanashi-Ken 409-0112, Japan Telephone +81 554 20 5860... - Page 3 No part of this publication may be reproduced, transmitted, translated in any form by any means without the written permission of Koden Electronics Co., Ltd. The technical descriptions contained in this publication are subject to change without notice. Koden assumes no responsibility for any errors, incidentals or consequential damages caused by misinterpretation of the descriptions contained in this publication.
- Page 4 Koden is not liable for any damages caused by earthquake, lightning, wind and flood damage and fire for which Koden is not responsible, and actions by third parties, other accidents, customer’s unintended error/abuse and the use under other abnormal conditions.
- Page 5 When the inside is to be checked, ensure to switch off the power and to discharge the residual voltage for safety. An engineer authorized by Koden shall carry out the inspection and maintenance works.
- Page 6 In case of failure, please Warning contact Koden’s dealers or Koden. In case of smoking or firing, switch off the power in the boat and of this equipment. It may lead to firing, electric shock or damages.
-
Page 7: Table Of Contents
CVS-FX1 Contents Contents Document Revision History .......................i Important Notice ........................ii For Your Safe Operation ......................iii Contents ...........................v Introduction ..........................vii Chapter 1 Preparation ....................1-1 1.1 To use keys........................1-1 1.2 Power On/Off ........................1-3 1.2.1 Power On..........................1-3 1.2.2... - Page 8 Contents CVS-FX1 3.1.1 To use [CM] key for switching screen modes ..............3-2 3.1.2 To use [CM] keys as one touch switch to the memorized setting to the fishing positions.. 3-6 3.1.3 Use [CM] keys as screen mode switching and one touch switch of setting: ....3-10 Chapter 4 Useful operation ..................
- Page 9 Introduction Introduction CVS-FX1 is an LCD color echo sounder that can display images in 4 optional frequencies. This unit equipped with the latest digital process can accurately display circumstances in the water under all conditions, with a good match with the high brilliance 12.1 inch LCD.
-
Page 10: Chapter 1 Preparation
CVS-FX1 Chapter 1 Preparation Chapter 1 Preparation 1.1 To use keys Key board of CVS-FX1 15 16 Key Name Description [BRILL Press: Power on. Adjusts brilliance of the screen and panel. Long-press: Power off. [SHIFT/ M OFF] Press: Switches ON/OFF of Shift... - Page 11 Chapter 1 Preparation CVS-FX1 [←│←/NAV] Press: Changes the image scroll speed. Long-press: Displays the navigation screen. [EVENT] Press: Outputs the present position or the event cursor position in TLL sentences. Store image. Starts homing. Long-press: Displays the images of CCD camera.
-
Page 12: Power On/Off
Caution: If an error occurs during the memory check, LEDs on the operation panel blink to indicate possible failure of the unit. In this case, please contact a dealer of Koden or Koden. 1.2.2 Power Off Keep pressing the [BRILL ] key for 3 seconds to power off. -
Page 13: Selection Of Language To Be Displayed
Chapter 1 Preparation CVS-FX1 1.3 Selection of language to be displayed When the power is switched on for the first time after installation, the following [Language] screen is displayed. Select a language using [▲] key or [▼] key of To decide the language, press [MENU] key Caution: There are the other languages than English and Japanese for selection.. -
Page 14: Open/Close The Menu
CVS-FX1 Chapter 1 Preparation 1.4 To use Menu CVS-FX1 has two kinds of menu, [MENU] and [SUBMENU]. The operation of the both menus is basically the same. 1.4.1 Open/Close the Menu To display the menu, press the [MENU] key List of menu items and message boxes of operation guide and function guide are displayed... -
Page 15: Operation Of The Menu
Chapter 1 Preparation CVS-FX1 1.4.2 Operation of the Menu Press [▲] key or [▼] key of to select a menu item while Menu is displayed. List of the setting items changes to the corresponding contents with the selected menu item. - Page 16 CVS-FX1 Chapter 1 Preparation Press [ ] key of . ., and the setting box appears with the corresponding selection items. Press [▲] key or [▼] key of , to change the setting. Press [ ] key of or [SUBMENU] key .
-
Page 17: Open/Close Of Submenu
Chapter 1 Preparation CVS-FX1 1.4.3 Open/Close of Submenu To display the Submenu, press the [SUBMENU] key List of Submenu items, operation guide box and function guide box are displayed as shown below: Name of the selected menu Cursor Menu column Setting item column... -
Page 18: Operation Of Submenu
CVS-FX1 Chapter 1 Preparation 1.4.4 Operation of SUBMENU Press [▲] key or [▼] key of to select a menu item during SUBMENU is displayed. List of the setting items changes to the corresponding contents with the selected Submenu item. Menu column Setting item column... - Page 19 Chapter 1 Preparation CVS-FX1 Then, press [ ] key of , and the setting box appears with the corresponding selection items. Press [▲] key or [▼] key of to change the setting. To return the cursor to the set item column, press [ ] key of or [SUBMENU] key .
-
Page 20: To Read Echo Sounder's Screen
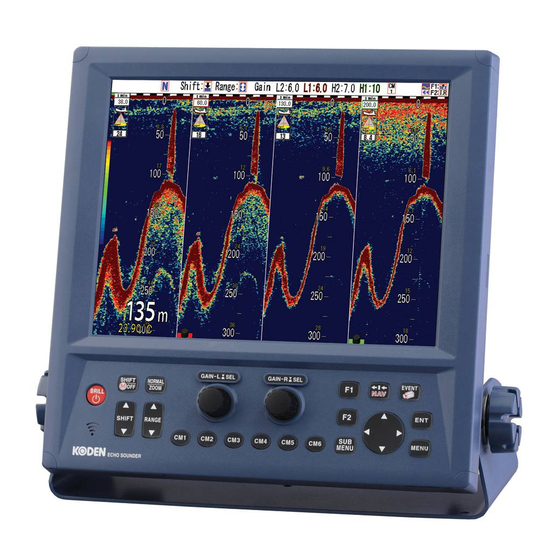
CVS-FX1 Chapter 1 Preparation 1.5 To read echo sounder’s screen A screen of echo sounder consists of the header display in a gray color stripe at upper portion and the image display part of the echo sounder. The header display indicates setting status of various functions by icons for easier understanding. - Page 21 Chapter 1 Preparation CVS-FX1 Gain (TD) L2: Gain value of low frequency 2 L1: Gain value of low frequency 1 H2: Gain value of high frequency 2 H1: Gain value of high frequency 1 CM icons CM1 on display CM2 on display...
- Page 22 CVS-FX1 Chapter 1 Preparation Display portion of echo sounder images Name Description Time marker indicates the image scroll speed. White/Black and Green/Black switch at every 5 minutes. : White/Black indicates 10 seconds. : Green/Black indicates 10 seconds. : White/Black indicates 1 minute.
-
Page 23: Adjustment Of Brilliance For Comfortable Viewing
Chapter 1 Preparation CVS-FX1 1.6 Adjustment of brilliance for comfortable viewing 1.6.1 Adjustment of LCD brilliance The brilliance of screen can be adjusted with [LCD Brill]. Each time [BRILL ] key is pressed, [LCD Brill] and [Panel Brill] are switched over. -
Page 24: Adjustment Of Panel Brilliance
CVS-FX1 Chapter 1 Preparation 1.6.2 Adjustment of panel brilliance The brilliance of display panel can be adjusted at [Panel Brill] Each time [BRILL ] key is pressed, [LCD Brill] and [Panel Brill] are switched over. When [BRILL ] key is pressed, the [Panel Brill] box is displayed. -
Page 25: Chapter 2 Basic Operation
Selection of changing method of gain 2.1.1 Display of 1-frequency/displays of 2-frequency and more CVS-FX1 can switch ON/OFF the display of 4-frequency images individually. To select Standard Echo Display: 1. Press [CM] key used ([CM] key lit red) When CM1 is lit red, press [CM1] key 2. - Page 26 Chapter 2 Basic operation CVS-FX1 4. Press [ENT] key 5. Moving the cursor with , select [Normal], [Mix] or [OFF] in the Standard Echo Display items of high frequency 2, and press [ENT] key When [Normal] is selected, normal images are displayed on high frequency 2 screen.
-
Page 27: Setting Frequency To Match The Transducer To Be Used
2.1.2 Setting frequency to match the transducer to be used On CVS-FX1, the frequencies used for 4 screens can be set in a range of 24 to 240 kHz. The range of selectable frequency depends on the transducers connected. At the time of the initial usage In the case the other transducer than TDM-052 is with CVS-FX1 for the first time after purchase, it is necessary to adjust setting of the transducer. - Page 28 Chapter 2 Basic operation CVS-FX1 6. Increase or decrease the value with [▲] and [▼] key of to set frequency. [▲] key: The numeric value increases. [▼] key: The numeric value decreases. When the key is kept pressed, the value automatically shifts to the upper digit.
- Page 29 Setting up of frequency: Relation between a transceiver and display screen For CVS-FX1, there are two types of transceiver for high frequency and low frequency, and each transceiver has two channels of channel 1 and channel 2. High frequency 1 is the channel 1 for high frequency.
-
Page 30: Displaying Of Zoom Images
Chapter 2 Basic operation CVS-FX1 2.1.3 Displaying of zoom images To display zoom images: 1. Press the [CM] key used (Lights red [CM] key). When CM1 is lit red, press the [CM1] key 2. The CM menu is displayed. 3. Moving the cursor with , select [OFF], [Bottom], [B.D.(Bottom Discrimination)],... - Page 31 CVS-FX1 Chapter 2 Basic operation Types of zoomed images 1. Bottom Normal images Zoom range Bottom images Sea bottom is fixed at 10% bottom of the screen, and the image above is displayed in the specified zoom range. As the image on sea bottom is magnified, this is an effective zooming mode to identify fish schools, etc.
- Page 32 Chapter 2 Basic operation CVS-FX1 2. Bottom discrimination Normal images Zoom range Bottom discrimination Sea bottom is fixed at 30% bottom of the screen, and the image of bottom is displayed in the specified zoom range. As the sea bottom image is magnified, this is an effective zoom mode to judge the sea bottom condition.
- Page 33 CVS-FX1 Chapter 2 Basic operation 3. Zoom Normal Zoom range images Zoom part Specifying a shift position, the images under the position is displayed in the specified zoom range. As the zoomed image at the specified positions is displayed, this is an effective zooming mode for the case when image at particular depth is required for fishing of alfonsino, etc.
- Page 34 Chapter 2 Basic operation CVS-FX1 4. Bottom zoom Bottom zoom Normal images Mixed images above bottom in a specified zoom range are displayed onto the normal image. This is an effective mode to identify fish schools, etc. near sea bottom with watching the geomorphic changes of sea bottom.
- Page 35 CVS-FX1 Chapter 2 Basic operation 5. Bottom follow zoom Normal images Zoom range Bottom follow zoom In a specified zoom range, the sea bottom is displayed by automatic shift to be displayed within a range between 30 % and 90 % from the top of images This is an effective zooming mode to determine the geomorphic changes of sea bottom.
- Page 36 Chapter 2 Basic operation CVS-FX1 To change the range of zoomed images When the icon to show the mode of [Range] and [Shift] keys is in header display , the range of the zoomed images can be changed. 1. When the icon of header display part is , press [NORMAL/ZOOM] key 2.
- Page 37 CVS-FX1 Chapter 2 Basic operation Screen Width of Zoom Image: The screen width of zoomed images can be changed to 3 steps of [Wide], [Medium] and [Narrow] depending on preference. <Examples of Width of Zoom Image (in the case of Bottom)>...
- Page 38 Chapter 2 Basic operation CVS-FX1 4. [Disp. Setup 1] of Menu is displayed. With [▲] or [▼] keys of , point the cursor to [Width of Zoom Image]. 5. Press [ ] key of 6. [Width of Zoom Image] is displayed. With [▲] or [▼] keys of...
-
Page 39: Display Of Mixed Images
CVS-FX1 Chapter 2 Basic operation 2.1.4 Display of mixed images Mixed images are combination of high and low frequency images by signal processing. The main purpose is to identify small fish, such as whitebait, from other fish school. There are 5 types for mixing methods and they are switchable in application. - Page 40 Chapter 2 Basic operation CVS-FX1 To display mixed images: 1. Press [CM] key used (Lights red). When CM1 is lit red, press it 2. CM menu is displayed. 3. Moving cursor with , point the cursor to [Mix] of high frequency 2 or Low frequency 1 of Standard Echo Display items.
- Page 41 CVS-FX1 Chapter 2 Basic operation To change the type of mixed image: 1. Press [MENU] key 2. The menu is displayed. Move the cursor to [Disp. Setup1] with [▲] or [▼] keys of 3. Press [ ] key of 4. [Disp. Setup1] of the menu is displayed. Move the cursor to [Mix] with [▲] and [▼] keys...
- Page 42 Chapter 2 Basic operation CVS-FX1 5. Press [ ] key of 6. [Mix] of the menu is displayed. Move the cursor to the desired mix type with [▲] and [▼] keys of to select. 7. Pressing [MENU] key , the menu disappears and the selected mix mode is set.
-
Page 43: Selection Of Pulse Length
CVS-FX1 Chapter 2 Basic operation 2.1.5 Selection of pulse length Pulse length can be switched to 4 steps: of Short, Medium, Long and Fixed. This change of pulse length causes changes in resolution of images from the echo sounder and the signal to be displayed changes. Shorter pulse length increases resolution, but its power decreases. - Page 44 Chapter 2 Basic operation CVS-FX1 4. Press [ENT] key 5. Repeat the procedures 3 and 4 above for pulse length of high frequency 2, low frequency 1 and low frequency 2 6. Press [CM1] key to close CM menu ([CM] key lit red).
- Page 45 CVS-FX1 Chapter 2 Basic operation 4. [Manual Set] of menu is displayed. Move the cursor at [Pulse Length HF1] with [▲] or [▼] keys of 5. Press [ ] of 6. [Pulse Length HF1] of the menu is displayed. Move the cursor with [▲] or [▼] keys , and select one of [Short], [Medium] or [Long].
-
Page 46: Selection Of Frequency Bandwidth
Chapter 2 Basic operation CVS-FX1 2.1.6 Selection of frequency bandwidth Frequency bandwidth can be switched to 4 steps: Narrow, Medium, Wide and Fixed. The change of frequency bandwidth results in change of the resolution of echo sounder and change of signals in the displayed images. If the frequency bandwidth is wide, the resolution becomes high. - Page 47 CVS-FX1 Chapter 2 Basic operation 4. Press [ENT] key 5. Repeat the procedures 3 and 4 for frequency bandwidth of high frequency 2, low frequency 1 and low frequency 2 6. Press [CM1] key to close CM menu ([CM] key lights red).
- Page 48 Chapter 2 Basic operation CVS-FX1 4. [Manual Set] of the menu is displayed. Move the cursor to [Bandwidth HF 1] with [▲] or [▼] keys of 5. Press [ ] of 6. [Bandwidth HF 1] of menu is displayed, Move the cursor with [▲] or [▼] keys of and select [Narrow], [1], [2], [3], [4] or [Wide].
-
Page 49: Selection Of Gain Changing Method
Chapter 2 Basic operation 2.1.7 Selection of gain changing method CVS-FX1 can display images up to 4 frequencies and gain can be adjusted for each images. Adjustment of gain is individually done with two gain knobs after selecting of a screen to adjust. -
Page 50: Adjustment Of Echo Sounder
Chapter 2 Basic operation CVS-FX1 2.2 Adjustment of echo sounder To use echo sounder, it is necessary to adjust depth range (Range) and gain depending on the circumstances. The main adjustment items are as follows: Switching Range mode ... - Page 51 CVS-FX1 Chapter 2 Basic operation When [Auto Range] is set, [Auto Range] is displayed in the header showing Range Mode. When [Manual] is set, display of the header showing the Range Mode disappears. When [Auto Shift] is set, [Auto Shift] is displayed in the header showing Range Mode.
-
Page 52: Switching Of Normal/Zoom For Range And Shift Operation
Chapter 2 Basic operation CVS-FX1 2.2.2 Switching of Normal/Zoom for range and shift operation The range key has two functions of “to change range of normal image” and “to change range of zoomed image”, and the shift key has two functions of “to change shift of normal image”... -
Page 53: Manual Change Of A Range For Normal Image
CVS-FX1 Chapter 2 Basic operation 2.2.3 Manual change of a range for normal image When Range mode is Manual, the range can be changed manually. In manual range, each time range key is pressed range changes among the 8 ranges registered. - Page 54 Chapter 2 Basic operation CVS-FX1 Switching the range operation to “Change with [All Screens Same]” or to “Change with [Scr. Individual]: 1. Press [MENU] key 2. The menu is displayed. Move the cursor to [Range Setup] with [▲] or [▼] keys of 3.
- Page 55 CVS-FX1 Chapter 2 Basic operation 6. [Range Operation] of menu is displayed. Moving the cursor with [▲] or [▼] keys of select [All Screens Same] or [Scr. Individual]. 7. When [MENU] key is pressed, the menu disappears and the setup of range operation is complete.
- Page 56 Chapter 2 Basic operation CVS-FX1 To register ranges: 1. Press [MENU] key 2. The menu is displayed. Move the cursor to [Range Setup] with [▲] or [▼] keys of 3. Press [ ] of 4. [Range Setup] of the menu is displayed. Move the cursor to [Range1] with [▲] or [▼] keys 5.
- Page 57 CVS-FX1 Chapter 2 Basic operation 6. [Range1] of the menu is displayed. Set range by increasing or decreasing numeric value with [▲] or [▼] keys of ・ The numeric value increases with [▲] key. ・ The numeric value decreases with [▼] key.
- Page 58 Chapter 2 Basic operation CVS-FX1 T o change ranges: 1. When the header display is , range of normal images can be changed. If the header display is , press [NORMAL/ZOOM] key to turn to 2. When [▲] of [RANGE] key is pressed, the No.
- Page 59 CVS-FX1 Chapter 2 Basic operation To switch the operation screen for individual range: 1. At the left bottom corner of each screen, nothing is shown, or [Gain knob icon] of (red) or (green) is displayed. The range operation can be performed on the screen where [Gain knob icon] (red) is displayed.
-
Page 60: Manual Change Of Shift Positions Of Normal Images
Chapter 2 Basic operation CVS-FX1 2.2.4 Manual change of shift positions of normal images When Range Mode is set at manual, shift can be changed manually. In the manual shift, there are two ways: one is to change shift positions of 4-frequency images with [All Screens Same] and another is to change images per frequency with [Scr. - Page 61 CVS-FX1 Chapter 2 Basic operation To switch shift operation into “Changes with [All Screens Same] “or “Change with [Scr. Individual]”: 1. Press [MENU] key 2. The menu is displayed. Move the cursor to [Shift Setup] with [▲] or [▼] keys of 3.
- Page 62 Chapter 2 Basic operation CVS-FX1 6. [Shift Operation] of the menu is displayed. Move the cursor with [▲] or [▼] keys of and select [All Screens Same] or [Scr. Individual]. 7. Press [MENU] key , and the menu disappears and the setup of shift operation is complete.
- Page 63 CVS-FX1 Chapter 2 Basic operation To s witch over the shift operation type: 1. Press [MENU] key 2. The menu is displayed. Move the cursor to [Shift Setup] with [▲] or [▼] keys of 3. Press [ ] of 4. [Shift Setup] of the menu is displayed. Move the cursor to [Shift Type] with [▲] or [▼] keys 5.
- Page 64 Chapter 2 Basic operation CVS-FX1 6. [Shift Type] of the menu is displayed. Move the cursor with [▲] or [▼] keys of and to select one of [Numerical Value], [Range Dependant], [Preset Value] or [Range Ratio]. 7. Press [MENU] key , and the menu disappears and the setup of shift type is complete.
- Page 65 CVS-FX1 Chapter 2 Basic operation 3. Preset Value Total 8 shifts preset from [Main Menu], [Shift Setup], [Shift Preset1] to [Shift Preset8] can be switched each time shift key is pressed. When [▲] of [Shift] key is pressed, the shift changes to the registered range with one number smaller.
- Page 66 Chapter 2 Basic operation CVS-FX1 4. [Range Setup] of the menu is displayed. Move the cursor to [Shift Preset1] with [▲] or [▼] keys of 5. Press [ ] key of 6. [Shift Preset1] of the menu is displayed. Set the range by increasing/decreasing of the numeric values with [▲] or [▼] keys of...
- Page 67 CVS-FX1 Chapter 2 Basic operation To change shift: 1. When the header display is , shift of normal images can change. When the header display is , press [NORMAL/ZOOM] key to turn to 2. When [▲] of [Shift] key is pressed, it shifts to shallow direction.
- Page 68 Chapter 2 Basic operation CVS-FX1 To switch ON/OFF of shift: 1. Each time [SHIFT/M OFF] key is pressed , the shift is switched on or off. The icon showing the shift conditions in header display changes: Shift at [All Screens Same] : ON Shift : [OFF] Shift at [Scr.
- Page 69 CVS-FX1 Chapter 2 Basic operation 2. To turn [Gain knob icon] to (red), press [GAIN-L/SEL] for the left screen and [GAIN-R/SEL] for the right screen until [Gain knob icon] turns (red). 3. When [Shift] key is pressed, [Gain knob icon] turns to (red) shift.
-
Page 70: Adjustment Of Image Gain
In the synchronized gain, the gain of all screens change keeping the gain difference between screens. On CVS-FX1, the gain of all screens including images in the past changes by operation of the gain knobs. Also, it can be switched to a mode in which only the gain of the current image changes, to watch changes by the gain operation. - Page 71 CVS-FX1 Chapter 2 Basic operation 3. Press [ENT] key 4. Press [CM1] key (lights red [CM] key) to close CM menu. For adjustment of gain per screen (individually): In the case of single frequency screen: Regardless of frequency, operate with [GAIN-R/SEL]...
- Page 72 Chapter 2 Basic operation CVS-FX1 When [GAIN-L/SEL] or [GAIN-R/SEL] are turned to right, the gain increases, and when turned to left, the gain decreases. In the case of 3-frequency screen: Regardless of frequency, the gain at left side screen is operated with [GAIN-L/SEL]...
- Page 73 CVS-FX1 Chapter 2 Basic operation In the case of 4-frequency screen: Regardless of frequency, the gain of two left screens (Low frequency 2/Low frequency 1) is operated with [GAIN-L/SEL] and the gain of two right screens (High frequency 2/...
- Page 74 Chapter 2 Basic operation CVS-FX1 To adjust the gain: The gain can be adjusted on the screens on which [Gain knob icon] of (red) or (green) is displayed at the lower left. When gain knob is not displayed on the lower left of the screen of which the gain is intended...
- Page 75 CVS-FX1 Chapter 2 Basic operation For gain adjustment of all screens at the same time (synchronized): 1. At CM1, press [CM1] key (Lights red [CM] key). 2. CM menu is displayed. Move the cursor to [Synchronized] of the Gain item with Gain item 3.
- Page 76 Chapter 2 Basic operation CVS-FX1 For gain adjustment of all screens at same time (synchronized): 1. If [GAIN-L/SEL] or [GAIN-R/SEL] is turned, the [Synchronized Gain] box is displayed. This [Synchronized Gain] box indicates amount of change in ± value commonly given to the gain individually set per each screen.
- Page 77 CVS-FX1 Chapter 2 Basic operation Types of gain change: There are two types of gain change when gain adjustment is done with a gain knob. One is that the gain of all screens including images in the past is changed and the other is that only the gain of the current mages is changed.
- Page 78 Chapter 2 Basic operation CVS-FX1 4. [System] of the SUBMENU is displayed. Move the cursor to [Gain Type] with [▲] or [▼] keys of 5. Press [ ] key of 6. [Gain Type] of the SUBMENU is displayed. Move the cursor to [Retractive Gain] or [Current Image] with [▲] or [▼] keys of...
-
Page 79: Adjustment Of Tvg
CVS-FX1 Chapter 2 Basic operation 2.2.6 Adjustment of TVG The reflected signals of echo sounder have less sensitivity due to attenuation, as depth is deeper. This means that the same fish schools at shallower positions are displayed stronger and those at deeper positions are displayed weaker. - Page 80 Chapter 2 Basic operation CVS-FX1 4. [TVG] of the menu is displayed. Move the cursor to [TVG Type] with [▲] or [▼] keys 5. Press [ ] of 6. [TVG Type] of the menu is displayed. Move the cursor and select [Manual] or [Optimized] with [▲] or [▼] keys of...
- Page 81 CVS-FX1 Chapter 2 Basic operation To use of optimized TVG: Optimized TVG corrects the reflected signal from shallower than the [Depth] where color is produced with maximum level. This is done by having room for gain adjustment, in reference to the diffusional attenuation and absorption attenuation of ultrasonic sound.
- Page 82 Chapter 2 Basic operation CVS-FX1 To adjust TVG Adjust in main menu: 1. Press [MENU] key 2. The menu is displayed. Move the cursor to [TVG] with [▲] or [▼] keys of 3. Press [ ] key of 4. [TVG] of the menu is displayed. Move the cursor to [TVG Adjust HF1] with [▲] or [▼] keys 5.
- Page 83 CVS-FX1 Chapter 2 Basic operation 6. [TVG Adjust HF1] of the menu is displayed. Set [TVG Adjust HF1] by increasing and decreasing the numeric value with [▲] or [▼] keys of With [▲] key, the value increases. With [▼] key, the value decreases.
- Page 84 Chapter 2 Basic operation CVS-FX1 5. Adjust the numeric value with [▲] or [▼] keys of to set [TVG Adjust HF1]. With [▲] key, the value increases. With [▼] key, the value decreases. 6. Press [SUBMENU] key or [MENU] key , and [TVG Adjust XXX] box disappears.
- Page 85 CVS-FX1 Chapter 2 Basic operation To manually adjust TVG in main menu: 1. Press [MENU] key 2. The main menu is displayed. Move the cursor to [TVG] with [▲] or [▼] keys of 3. Press of [ ] key of 4.
- Page 86 Chapter 2 Basic operation CVS-FX1 6. [TVG Strength HF1] of the menu is displayed. Increase or decrease the numeric value with [▲] or [▼] keys of to set [TVG Strength HF1]. With [▲] key, the value increases. With [▼] key, the value decreases.
- Page 87 CVS-FX1 Chapter 2 Basic operation To manually adjust TVG with [F1]/[F2] keys: 1. At first, assign [MENU] key or [F2] key with [TVG]. As for the setting method of [F1]/[F2] keys, see “4.2.2 Assign intended operation to function keys ([F1]/[F2])”, p 4 - 2.
- Page 88 Chapter 2 Basic operation CVS-FX1 7. In the case of [TVG Depth HF1], set [TVG Depth HF1] by increasing or decreasing the numeric value with [▲] or [▼] keys of With [▲] key, the value increases. With [▼] key, the value decreases 8.
- Page 89 The reflected signals of echo sounder have less sensitivity due to attenuation, as depth is deeper. In the TVG correction for CVS-FX1, a reference point of depth for correction is to be determined. This reference point is [TVG Depth]. Reflected signals from a shallower depth than this reference point are corrected to have the same sensitivity as that of the reference point.
- Page 90 Chapter 2 Basic operation CVS-FX1 Adjustment of TVG Depth of manual Adjustment of TVG Adjust (start point) of manual TVG [TVG Depth] is the reference point of depth [TVG Adjust] adjusts excessive for correction. The deeper the setup correction by TVG against shallow signals,...
-
Page 91: Changing Of The Image Scroll Speed
CVS-FX1 Chapter 2 Basic operation 2.3 Changing of the image scroll speed The image scroll speed can be changed at 10 steps of [Speed 1], [Stop], [Speed 2], • • • [Speed 9]. The larger the speed number is, the slower the image scroll speed becomes. - Page 92 Chapter 2 Basic operation CVS-FX1 To stop image scroll: 1. While [Image Speed] adjustment box is displayed, move the cursor to [Stop] with [▲ ] key When the cursor is at [Speed 2 (1/1)], press [Image speed] key , and the cursor moves to [Stop].
-
Page 93: Finding Out Depth Of Targets In Images (Vrm Operation)
CVS-FX1 Chapter 2 Basic operation 2.4 Finding out depth of targets in images (VRM operation) VRM (Variable Range Marker) is a mobile marker to measure the depth of targets such as fish schools, and indicates lines and depth values of the lines. -
Page 94: Changing Of Vrm Follow Interval
Chapter 2 Basic operation CVS-FX1 <Example of display of VRM whole screen (Screen individual range)> VRM 1 line VRM 2 lines 2.4.1 Changing of VRM follow interval Under the first VRM, another VRM with interval can be displayed. This VRM follows the movement of the first VRM keeping the interval, and this is intended to use as a guidance of depth for casting a net. - Page 95 CVS-FX1 Chapter 2 Basic operation 4. The menu [Disp. setup 2] is displayed. Move the cursor to [VRM Interval] with [▲] or [▼] keys of 5. Press [ ] key of 6. The menu [VRM Interval] is displayed. Set an interval by increasing or decreasing a numeric value with [▲] or [▼] keys of...
-
Page 96: Operation Of Vrm In Active Screen
Chapter 2 Basic operation CVS-FX1 2.4.2 Operation of VRM in Active Screen To switch VRM display to Active Screen: 1. Press [MENU] key 2. The menu is displayed. Move the cursor to [Disp. Setup 2] with [▲] or [▼] keys of 3. - Page 97 CVS-FX1 Chapter 2 Basic operation 6. The menu [VRM Image] is displayed. Move the cursor with [▲] or [▼] keys of , and select [Active Screen] and [All Screens]. 7. Press [MENU] key , and the menu disappears and the selected VRM image is set.
-
Page 98: Operation Of Vrm On All Screens
Chapter 2 Basic operation CVS-FX1 2.4.3 Operation of VRM on all Screens To switch over VRM Image to All Screens: 1. Press [MENU] key 2. The menu is displayed. Move the cursor to [Disp. Setup2] with [▲] or [▼] keys of 3. - Page 99 CVS-FX1 Chapter 2 Basic operation 6. The menu [VRM Image] is displayed. Select [Active Screen] [All Screens] by moving the cursor with [▲] or [▼] keys of 7. Press [MENU] key , and the menu disappears and the selected VRM Image is set.
-
Page 100: Reduction Of Noise On Images
2. Blur due to micro animate beings such as plankton 3. Noise caused by electric signal synchronized with transceiver CVS-FX1 is equipped with functions to weaken the effect by each cause. 2.5.1 To reject interference Interference is generated by the reception of signals transmitted by other echo sounders. - Page 101 CVS-FX1 Chapter 2 Basic operation To avoid the reception of interfacial wave by shifting your own frequency: 1. Press the CM key used (lights red [CM] key). Press the [CM1] key when CM1 is lit red. 2. CM menu is displayed.
- Page 102 Chapter 2 Basic operation CVS-FX1 To setup [IR] (Interference Rejection) function and to eliminate interference wave: There are 3 steps of setting: [OFF], [Low] and [High] for interference rejection function. If interference does not disappear at the set of [Low], then the set change the setting to [High].
- Page 103 CVS-FX1 Chapter 2 Basic operation 6. The menu [IR] is displayed. Select [Low] with [▲] or [▼] of 7. By viewing images, confirm that interference has disappeared. 8. If not, select [High] with [▲] or [▼] keys of 9. Press [MENU] key , and the menu disappears.
-
Page 104: To Erase The Weak Response From Dust And Plankton, Etc
Chapter 2 Basic operation CVS-FX1 2.5.2 To erase the weak response from dust and plankton, etc. To erase the weak response from dust and microbes such as plankton in seawater, there are following 4 methods: 1. Setting TVG 2. Shortening pulse length and narrowing frequency bandwidth 3. - Page 105 CVS-FX1 Chapter 2 Basic operation To set [Color Erase]: 1. Press [MENU] key 2. The menu is displayed. Move the cursor to [Echo Adjust] with [▲] or [▼] of 3. Press [ ] key of 4. The menu [Echo Adjust] is displayed. Move the cursor to [Color Erase] with [▲] or [▼] keys 5.
- Page 106 Chapter 2 Basic operation CVS-FX1 6. The menu of [Color Erase] is displayed. Adjust [%] with [▲] or [▼] keys of With [▲] key, [%] increases (Bluish color first disappears first). With [▼] key, [%] decreases (Disappeared color comes out).
- Page 107 CVS-FX1 Chapter 2 Basic operation When [Noise Reduction] is effective: When the response from dust and plankton is to be diminished regardless of water depth and color, [Noise Reduction] is effective. For [Noise Reduction] function, by narrowing the dynamic range and reducing tone graduation of colors, the color of weak response level becomes less visible.
- Page 108 Chapter 2 Basic operation CVS-FX1 To set [Noise Reduction]: 1. Press [MENU] key 2. The menu is displayed. Move the cursor to [Echo Adjust] with [▲] or [▼] keys of 3. Press [ ] key of 4. The menu [Echo Adjust] is displayed. Move the cursor to [Noise Reduction] with [▲] or [▼] keys of 5.
- Page 109 CVS-FX1 Chapter 2 Basic operation 6. The menu [Noise Reduction] is displayed. Adjust the value with [▲] or [▼] keys of With [▲] key, the value increases. With [▼] key, the value decreases. The bigger the value becomes, the more effective Noise Reduction becomes.
-
Page 110: To Reduce Noise
Chapter 2 Basic operation CVS-FX1 2.5.3 To reduce noise CVS-FX1 is equipped with the [Noise Reduction] function. For [Noise Reduction] function, by narrowing the dynamic range and reducing tone graduation of colors, the color of weak response level becomes less visible. - Page 111 CVS-FX1 Chapter 2 Basic operation 6. The menu [Noise Reduction] is displayed. Adjust the numeric value with [▲] or [▼] keys With [▲] key, the value increases. With [▼] key, the value decreases. The bigger the value becomes, the more effective Noise Reduction becomes.
-
Page 112: Chapter 3 To Make The Best Of [Cm] Keys
For example, it is possible to switch the setting for seine fishing to the setting of squid fishing with one touch of a key button. CVS-FX1 is equipped with six [CM] keys, so can be used as if six units of echo sounders were used at a time. -
Page 113: To Use [Cm] Key For Switching Screen Modes
Chapter 3 To make the best of [CM] keys CVS-FX1 3.1.1 To use [CM] key for switching screen modes CVS-FX1 is not equipped with the switching knobs or dedicated keys for screen modes like conventional echo sounders. Instead, 6 types of screen modes* can be memorized with 6 keys of CM1 to CM6. - Page 114 CVS-FX1 Chapter 3 To make the best of [CM] keys To set [CM] key to [Screen mode switching]: 1. Press [SUBMENU] key 2. The SUBMENU is displayed. Move the cursor to [System] with [▲] or [▼] keys of 3. Press [ ] of 4.
- Page 115 Chapter 3 To make the best of [CM] keys CVS-FX1 5. Press [ ] of 6. The SUBMENU [CM Key Usage] is displayed. Move the cursor to [Screen Mode] with [▲] or [▼] keys of 7. Press [MENU] key , the SUBMENU disappears and CM key is set at [Screen Mode Switching].
- Page 116 CVS-FX1 Chapter 3 To make the best of [CM] keys 6. For selection of Standard Echo Display of high frequency 2, low frequency 1 and low frequency 2, repeat the procedures 4 and 5. 7. Select Zoom Display. Move the cursor with to select [OFF], [Bottom], [B.D.], [Zoom],...
-
Page 117: To Use [Cm] Keys As One Touch Switch To The Memorized Setting To The Fishing Positions
Chapter 3 To make the best of [CM] keys CVS-FX1 3.1.2 To use [CM] keys as one touch switch to the memorized setting to the fishing positions When one of the CM1 to CM6 keys (CM key lit green) is pressed, screen mode, range, shift, gain, MENU set items and SUBMENU set items are switched over to the preset setting in the key (light color turns red). - Page 118 CVS-FX1 Chapter 3 To make the best of [CM] keys To set [CM] key to [One touch switch of setting] : 1. Press [SUBMENU] key 2. The SUBMENU is displayed. Move the cursor to [System] with [▲] or [▼] of 3.
- Page 119 Chapter 3 To make the best of [CM] keys CVS-FX1 5. Press [ ] of 6. The SUBMENU [CM Key Usage] is displayed. Move the cursor to [CM] with [▲] or [▼] 7. Press [MENU] key , and the SUBMENU disappears and the CM key is set to [Setup one touch switching].
- Page 120 CVS-FX1 Chapter 3 To make the best of [CM] keys 2. Then, keep pressing the key [CM2] until a guide of [Save setting to CM2.] is indicated. [CM2] key blinks in red and green. 3. Move the cursor to [Yes] with [▲] or [▼] of 4.
-
Page 121: Use [Cm] Keys As Screen Mode Switching And One Touch Switch Of Setting:
Chapter 3 To make the best of [CM] keys CVS-FX1 3.1.3 Use [CM] keys as screen mode switching and one touch switch of setting: This is to use [CM] key as screen mode switching normally, and to change to one touch switch of setting when fishing method changes. - Page 122 CVS-FX1 Chapter 3 To make the best of [CM] keys To use [CM] keys normally as [Screen mode switching]: 1. Press the [CM] key that is set as normal in use. In the case of CM1, press [CM1] 2. Change [CM] key to [Screen mode switching] by referring to “To set [CM] key to [Screen mode switching]”, p 3-3.
-
Page 123: Chapter 4 Useful Operation
CVS-FX1 Chapter 4 Useful operation Chapter 4 Useful operation 4.1 Temporary change of images for better view In the images of echo sounders, normally such various information is overlaid as image title, water depth, water temperature, boat speed, color bar scale, alarm range bar, enlargement range bar. -
Page 124: Assign Intended Operation To Function Keys ([F1]/[F2])
Chapter 4 Useful operation CVS-FX1 4.2.2 Assign intended operation to function keys ([F1]/[F2]) The functions can be assigned to [F1]/[F2]: Icon Function Shift Digit Input IR (Interference Rejection) Color Erase Noise Reduction Background Color TVG Adjust White Line A Scope... -
Page 125: Switching Of Range Mode
CVS-FX1 Chapter 4 Useful operation 4.3 Switching of range mode There are 3 types of range modes: [Auto Range], [Manual] and [Auto Shift]. [Auto Range] is the mode to switch the depth range automatically to display sea bottom always on the display screen. -
Page 126: Setting Of Auto Range
Chapter 4 Useful operation CVS-FX1 4.3.2 Setting of auto range [Auto Range] is the function to switch depth range automatically to display sea bottom always on the displayed screen. When sea bottom falls outside of the display screen, it turns to the sea bottom search mode with deeper range after a specific number of transmission (depending on the ranges, more frequent at shallower range and less frequent at deeper range). - Page 127 CVS-FX1 Chapter 4 Useful operation Function to specify the maximum search range so as to reduce deterioration of cycle period: To set [Sounding Limit] at sea bottom search mode: 1. Press [MENU] key 2. The menu is displayed. Move the cursor to [BTM Search] with [▲] or [▼] keys of 3.
- Page 128 Chapter 4 Useful operation CVS-FX1 With [ ] key, the value moves to larger digit. With [ ] key, the value moves to smaller digit. With [▲] key, the value increases. With [▼] key, the value decreases. 7. Press [MENU] key , and the menu disappears.
- Page 129 CVS-FX1 Chapter 4 Useful operation 3. Press [ENT] key . Range Mode is set at [Auto Shift]. When [Auto Shift] is set, [Auto Shift] is displayed in the header display showing Range Mode. Caution: During the operation of auto shift, [Shift] key is disabled. In addition, the shift operation is set to [All Screen Same], and the [Scr.
-
Page 130: To Use Event Key
Chapter 4 Useful operation CVS-FX1 4.4 To use event key [Event] key can be switched over among 3 functions: [Store Position] to register waypoints and to output the position information externally as TLL data, [Store Image] to store fish images as image files on screen, and [Homing] to assist return to the positions where events have been registered. -
Page 131: Starting Up Homing
CVS-FX1 Chapter 4 Useful operation 4.4.3 Starting up Homing To enable [Homing], it is necessary to input latitude/longitude data such as GGA, RMC and GLL of NMEA0183. 1. When [Event] key is pressed, the position information input from outside is registered as waypoints, and the waypoint navigation starts taking the position information as waypoints. -
Page 132: Selection Of Event Key Function
Chapter 4 Useful operation CVS-FX1 4.4.4 Selection of event key function To select function of [Event] key: 1. Press [SUBMENU] key 2. The SUBMENU is displayed. Move the cursor to [System] with [▲] or [▼] keys of 3. Press [ ] of 4. - Page 133 CVS-FX1 Chapter 4 Useful operation 5. Press [ ] of 6. The SUBMENU [Event Key Usage] is displayed. Select a function to be set with [▲] or [▼] 7. When [MENU] key is pressed, the SUBMENU is closed and the selected function is set on the [Event] key.
-
Page 134: Shortcut To Range Registration Menu
Chapter 4 Useful operation CVS-FX1 4.5 Shortcut to range registration menu When the registered range in use is to be changed, there is a shortcut function to change the registered range directly with one touch operation not by menu operation. -
Page 135: To Move The Position Of Menu
CVS-FX1 Chapter 4 Useful operation 4.6 To move the position of menu The MENU or SUBMENU is displayed half transparent at the upper left of the screen, overlaid on echo images. There is a function to move the menu position, to see the echo images blocked by the display of MENU or SUBMENU. -
Page 136: Chapter 5 Index
CVS-FX1 Chapter 5 Index Chapter 5 Index Cycle period........4-4, 4-5, 4-6 A Scope ............4-2 Absorption attenuation .......2-57 Depth range .......... 4-3, 4-4 Adjustment of gain........2-25 Diffusional attenuation ....... 2-57 Alarm range bar........1-13, 4-1 Dust........... 2-80, 2-83 All Screens Same ....2-31, 2-38, 4-4, 4-7 Dynamic range........ - Page 137 Chapter 5 Index CVS-FX1 Gain knob ............ 1-2 Manual shift..........2-36 Gain knob icon........... 1-13 Manual TVG ........2-55, 2-60 GGA ............4-8, 4-9 Maximum search range ....4-4, 4-5, 4-6 GLL ............4-8, 4-9 Memory check..........1-3 Guide Window ......1-5, 1-8, 4-13 MENU........
- Page 138 CVS-FX1 Chapter 5 Index Range key ............4-3 Store Image ..........4-8 Range Mode ......1-11, 2-26, 4-3 Store Position..........4-8 Range of zoomed image ......2-12 SUBMENU ..........1-8, 3-6 Range Ratio..........2-41 Switch setting..........3-1 Range registration menu ......4-12 Synchronized gain ......2-25, 2-51 Range Setup..........4-12...
Need help?
Do you have a question about the CVS-FX1 and is the answer not in the manual?
Questions and answers