
Related Manuals for GRAUPNER POLARON EX-1400


Summary of Contents for GRAUPNER POLARON EX-1400
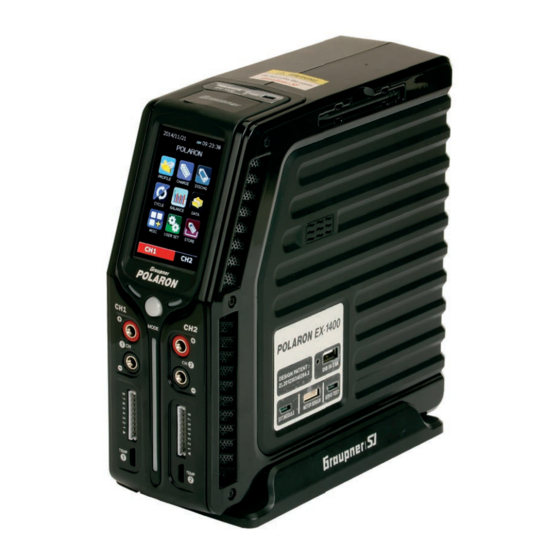
- Page 1 INNOVATION & TECHNOLOGY OPERATING INSTRUCTION POLARON EX-1400 2 Channel Charger Order Nr. S2018 GRAUPNER/SJ GmbH • Henriettenstr.96, D-73230 KIRCHHEIM/TECK GERMANY...
-
Page 2: Table Of Contents
Capacity and use time ........7 Disposal of waste batteries ......7 Environmental information ....... 8 General operating information ......8 Declaration of Graupner|SJ GmbH ....10 Intended use ........... 11 Care and maintenance ........11 Package content ..........12 technical specifications ...... -
Page 3: Introduction
INNOVATION & TECHNOLOGIE Introduction Thank you for choosing a Graupner Polaron charger. This charger is extremely powerful and can be used by both beginners and experts. Please read this manual carefully to get the best results with your charger and charge your bat- teries safely. -
Page 4: Symbols Explanation
Symbols explanation ATTENTION! This symbol highlights the nearby and following instructions, which must be ob- served by the user! Any disregard these warnings can affect the safe operation and the safety of the operator. This symbol WITHOUT specific heading highlights the nearby and following notes and tips, which should be strictly observed by the user! A breach of these notes and tips can result in damages of any kind. -
Page 5: Safety Instructions
INNOVATION & TECHNOLOGIE Safety instructions ATTENTION! • Damage caused by failure to comply with these instructions will invalidate the warranty / guarantee. For further damages we do not assume any liability! • We do not assume any liability for damage to property or personal injury caused by improper use or non-observance of safety instructions! •... -
Page 6: Notes On Batteries Handling
○ Batteries and / or cells that are not expressly approved by the manufacturer for the charging currents occurring during charging with this charger. ○ Already fully charged or hot, or not completely empty cells or batteries. ○ Batteries or cells with integrated charging or disconnecting device. ○... -
Page 7: Capacity And Use Time
However, current sources should be reviewed at least every 6 months on their capacity, and re- place them if there is a significant loss of capacity. Use only genuine Graupner batteries! Disposal of waste batteries Every consumer is legally obliged under the German battery ordinance to return all used and exhausted dry and rechargeable batteries. -
Page 8: Environmental Information
DANGER! Damaged batteries need a special packaging for shipping because they are very toxic!!!!! Environmental information DISPOSAL INSTRUCTION This symbol on the product, user manual or packaging indicates that this product must not be disposed of with other household waste at the end of its life. It must be handed over to the applicable collection point for the recycling of electrical and electronic equip- ment. - Page 9 INNOVATION & TECHNOLOGIE The charge socket is not suitable for this use. • The charger sets the required charging current only as long as the technical possibilities of the charger are not exceeded! Should it be provided a charging current that the charger technically cannot afford, the value will be automatically reduced to the maximum possible value.
-
Page 10: Declaration Of Graupner|Sj Gmbh
If there are defects in material or workmanship for one of acquired object sold by us or by our dealer in the Federal Republic of Germany (§ 13 BGB) we, Graupner/SJ GmbH, Kirchheim/Teck provide in following circumstances the removal of defects for this item. -
Page 11: Intended Use
By using advanced semiconductor technology and a powerful microprocessor with superior charging characteristics, simple operation and optimum reliability are achieved. With the Graupner Polaron EX-1400 it is possible to charge all model batteries such as: Nickel Cadmium (Ni-Cd), Nickel-Metal Hydride (Ni-MH), Lithium Polymer (LiPo), Lithium Ion (Lilo), Lithi- um Iron (LiFe), Lead-Gel and Lead-acid (Pb). -
Page 12: Package Content
Package content The set includes: • Graupner Polaron EX-1400 Charger • 2x EH to XH 8S Adapter boards and 8S cable • USB cable (USB-A to mini-B-USB 5poles) • 1 Input cable • 2 Temperature sensors • 2 charge cables •... -
Page 13: Technical Specifications
USB charging port B-Type, 5 V and max. 2.5A Output Power Balancer port Graupner / EH, 1 ... 8 LiPo / Lilo / LiFe cells Temperature sensor 10 ... 80 ° C / 50 ... 176 ° F Charge distribution by default 50% / 50% Ni-Cd &... -
Page 14: Operating Elements
Disconnect the docked Polaron power supply 12 V DC 25 A, Order Nr. S2012, from the charger Polaron EX-1400 before you connect the charger to any other external power source. Other- wise, the power supply load on the charger docking connection plugs will be added unnecessa- rily to the external power source. -
Page 15: Commissioning
Connection for servo test function, see page 37 Commissioning Connect the Graupner Polaron EX-1400 charger through the supplied cable to terminals on your car battery with 12 or 24 V or alternatively to a suitable power supply with an output voltage of 12 ... -
Page 16: Basic Operations
After switching on the device and the passage of the Start Ads, it will appear PROFILE CHARGE DISCHARGE on the display of Graupner Polaron EX-1400 the main screen of the device as shown on the left. Among other things on the top of the screen it displays the CYCLE... -
Page 17: Control Buttons
INNOVATION & TECHNOLOGIE Control buttons Press this button to confi rm the current setting and disables the active set- ESC button ting page. In addition, press this button to return to the previous page and changed data is stored. Press this button to change if necessary one page down or reduce setting DEC button values in the selected fi elds. -
Page 18: Menu Charge
Input of an individual battery name Tap the top box while continuously until an input keyboard for entering a battery name appears. 11:12:13 Battery NAME Field Description BATTERY NAME „BATTERY NAME“ field of the battery name abc / 123 / ABC switch between the character tables Spc (Space) Tap this button to insert a space... -
Page 19: Adjustable Parameters
INNOVATION & TECHNOLOGIE Adjustable Parameters • NiCd, NiMH batteries Parameter Short description The default value, inherited from the “Profiles” menu to 1C, can be adapt- Current ed within the “Maximum capacity” of the charge port rate and the charger features, see display 2 of the menu “Settings” on page 43, in the range of 0.1 to a maximum of 30 A. - Page 20 • Lead batteries Parameter Short description Voltage Maximum cell voltage at constant charge (CV) The default value, inherited from the „Profiles“ menu to 1C, can be adapt- Current ed within the „Maximum capacity“ of the charge port rate and the charger features, see display 2 of the menu „Settings“...
-
Page 21: Charge Modes Of Different Battery Types
INNOVATION & TECHNOLOGIE Charge modes of different battery types • AUTO NiCd / NiMH: Automatic charge mode, which automatically determines the charge current based on the internal resistance of the battery determined by the charger. To recognize the „Delta Peak“, the charger checks the charging voltage in minutes rhythm. Choosing a discharge mode is NOT possible. - Page 22 NiCd and NiMH batteries charging process starts as described below by way CH AR GE 06:12:34 of example for a lithium battery after about 5 seconds. 13 LiPo 03s 2200 For lithium batteries and PB after few seconds the battery test, it is carried out Charge Mode CC/CV a review of the number of cells of the connected battery.
- Page 23 INNOVATION & TECHNOLOGIE 1 Charge mode CH A R G E 06:14:44 2 Actual charge time 13 LiPo 03s 2200 CC/CV 00:01:56 Battery temperature (Only with sensor) 4 Charged capacity 0.0°C 5 Actual charge voltage 11.678 2.20 6 Actual charge current 11.97Vin 33.3mΩ...
-
Page 24: Menu Discharge
After proper completion of the charge process the charger emits audible sig- CH AR GE 07:03:57 nals and the display shows corresponding informations. 13 LiPo 03s 2200 So tap the window and afterwards, if necessary, the STOP or ESC key to re- 00:51:23 CC/CV verse to basic display. -
Page 25: Discharge Modes
NiCd / NiMH / LiIo / LiPo / LiFe / Pb: The battery is then discharged under the maximum discharge capacity of the polaron EX-1400 of 60 W with the given discharge current, then the charger discharges the battery without any interruption for 3 minutes after the start and determi- nes internal resistance. - Page 26 After the expiration of the aforementioned 5 seconds within which you should DISCHG 01:24:06 have at least made the choice of a particular discharge mode as well as the NiCd Auto Mode input of a delayed start, it starts an automatic battery test. Charge Mode NONE If no battery is connected, or an improper battery is detected, after completion...
- Page 27 INNOVATION & TECHNOLOGIE After the lapse of the aforementioned 5 seconds or if necessary, after a manu- DISCHG 01:26:08 al start, discharge process is begun. Otherwise, an error message is shown. 13 LiPo 03s 2200 Note: NORMAL 00:01:56 Tap the image to go directly to the „data display“, see page 35. 0.0°C 11.678 2.20...
-
Page 28: Menu Cycle
If it is touched the STOP button at the bottom of the display during the actual DISCHG 02:26:55 discharge process, it appears the display on the left. Tapping “Yes“ will cancel 13 LiPo 03s 2200 the further running in the background discharge. Tapping “No“, the window NORMAL 00:02:43 hides again, and takes the discharge operation run unaffectedly. - Page 29 INNOVATION & TECHNOLOGIE C Auto Discharge current acquired from the menu “DISCHARGE”. The discharge can therefore be adjusted as necessary only in the menu “DISCHARGE”. Once the settings are matching with your wishes, go to ... Start of cycle … Tap the ENTER button on the bottom right of the display brings on the sec- CYCLE 09:02:23 ond display page of the „CYCLE“...
- Page 30 After the expiration of the aforementioned 5 seconds within which you should CYCLE 09:02:37 have at least made the choice of a particular cycle mode as well as the input of NiCd Auto Mode a delayed start, it starts an automatic battery test. Charge Mode AUTO If no battery is connected, or an improper battery is detected, after completion...
- Page 31 INNOVATION & TECHNOLOGIE After the lapse of the aforementioned 5 seconds or if necessary, after a manu- CYCLE 09:02:59 al start, cycle process is begun. Otherwise, an error message is shown. 13 LiPo 03s 2200 Note: 00:01:56 CC/CV Tap the image to go directly to the „data display“, see page 35. 0.0°C 11.678 2.20...
- Page 32 Increase or decrease now by using the INC / DEC buttons to select the current CYCLE 09:03:26 value, such as 1.80 A. If necessary, you can also specify a value that strongly 13 LiPo 03s 2200 deviate from the current value by touching one of the six option buttons. 00:02:23 CC/CV fi eld closes the window and takes the selected value into the...
-
Page 33: Menu Balance
INNOVATION & TECHNOLOGIE Menu BALANCE The data concerning your batteries stored in menu “PROFILE” can be added in the menu “CHARGE” or “DISCHARGE” with the corresponding charge or discharge parameters. In this menu, you can see the actual parameters as electrical data of your LiFe, LiIo and LiPo bat- teries and if desired also balance them. - Page 34 After pressing the ENTER button at the bottom right in one of the displays of the “BALANCE” menu the Graupner polaron EX-1400 charger starts to check respective cell charge of the lithium battery connected to the balancer output and then to balance: The labeling of the display changes to “Balance”...
-
Page 35: Menu Data
INNOVATION & TECHNOLOGIE Once the bars are at the same height both in the icon on the top left and in the Balance 01:39:45 graphic, the process is complete. 4.116v 4.116v 0.000v After completion of the balance program, tap the STOP field at the bottom of the display. - Page 36 After the activation of the cycle number by tapping with a finger or with the pen DATA 05:17:28 laced in the side of the charger… CYCLE DATA Cycle No. Charge Discharge 00 :00:0 0 00:00:00 0.000Vp 0.000Va 0mAh 0mAh 0.0mΩ 0.0mΩ...
-
Page 37: Menu Tools
INNOVATION & TECHNOLOGIE Menu TOOLS In this menu “Tools“ you can enter by pressing the respective icons in a Servo Test, Engine Test, ESC Brushless Control + T and a Tire Warmer menu: To prevent sparking when connecting the terminals of CH1 and CH2 are covered with one capacitor, that is why the charging voltage in the line “output“... -
Page 38: Submenu "Motor
Turn afterwards continuously by hand the shaft of the motor for about 5 sec- S E RVO 06:49:16 onds. Once the sensor is detected and is fine too, appears OK on the left of 1500 1100 1900 the screen instead of the four points. Now you can check the functionality of your controller / motor combination as needed using the servo test function. - Page 39 INNOVATION & TECHNOLOGIE 1 After tap the minutes and / or seconds field to select the period of break-in MOTOR 02:19:54 process (Setting range: 0 m / s 0 ... 300 m / 59 s, default is 5 m / s 0) BREAK-IN 2 After tap the voltage field line to select the operating voltage value supplied Time...
-
Page 40: Submenu "Heating
Submenu “HEATING“ In this sub-menu „HEATING“ you can choose a control program for battery WA R ME R 09:40:12 warmer pockets or alternatively a program for the control of tire warmers, by tapping the appropriate icon, in both parts of the program the charger handles 1. -
Page 41: Submenu "E.s.c
Submenu “E.S.C“ In this submenu “ESC” (Electronic Speed Controller) can be programmed electronic motor control- lers with three poles telemetry connector, analogue to the Graupner HoTT telemetry items. NOTE: • Once it is recalled the submenu “ESC” in a charge channel, the current on the other charge channel process is interrupted. - Page 42 “DATA VIEW” of the “EXT MODULE “ appears on the display of the Graupner polaron EX-1400: Control Function E.S.C. 04:41:14 Moves the cursor “>“ at the beginning of a line of data pages [ESC] DATA VIEW <> step upward or increase a value in an active value field Curr: 0.0Max 0.0A...
-
Page 43: Menu Settings
INNOVATION & TECHNOLOGIE Menu SETTINGS In this menu, you have the opportunity not only to update the date and time, but also to customize the default settings of the charger. Please note in this context that the parameter values of this first display “USER SETUP” act on a specific channel, and therefore CH1 and CH2 must be set separately, while the parameters of the displays 2 to 4 act on specific devices. -
Page 44: Menu Storage
3. Display “Date & time“ This screen is used to set the date and time *, and possibly two alarms. USER SET 05:21:50 After tapping the value to change, this can be changed with the INC / DEC but- Date & Time tons located at the bottom of the display. -
Page 45: Factory Settings
3. BLC Port Test Smart BMS *POLARON* Display “1. Factory reset“ Tapping the “1. Factory reset “ button, as shown above, launches a reset of the Graupner polaron EX-1400 charger. ATTENTION! ***Factory data*** The factory reset starts after pressing the button WITHOUT... -
Page 46: Display "3. Resource Update
After recalling up this display, you can transfer, if required, the image and sound files from the PC to the memory of the charger. The necessary files and RESOURCE UPDATE update instructions can be found on the website www.graupner.de on the prod- <Image & Sound> uct page under Download. -
Page 47: Firmware Update
INNOVATION & TECHNOLOGIE Firmware update Firmware updates for your Graupner polaron EX-1400 charger can be made through the built mi- ni-USB port at the top of the charger from a PC or laptop with Windows XP, Vista, 7 or 8 OS. -
Page 48: Alert Messages
Alert messages The Graupner polaron EX-1400 charger can display different alert messages. When a message appears, it can be closed by pressing the button. After that you will be back on the previously opened page and you will be able to fix the cause of the error:... - Page 49 INNOVATION & TECHNOLOGIE Connection Selected cells and cells connected to the ◄ The cell count does not match the number of cells identified balancing port are at the balancer port. different! Pls check and restart! Low Output-Volt Output voltage is higher ◄...
- Page 50 Bat. Temp Too High Battery temp is too high ◄ The battery temperature is higher than the set maximum tem- to be operated! perature. Internal Temp. ◄ The charger is overheated! Wait until it cools again! If the Internal temp is too high! Contact Service error message is displayed permanently, please contact the if this message...
-
Page 51: Troubleshooting
INNOVATION & TECHNOLOGIE Motor stop ◄ The motor was stopped because the other output is in use. Other port is in use! Please check your parameters. Calibration Calibration data or internal circuit ◄ Errors in calibration or in the circuits of the device. If the error might have been message appears repeatedly, please contact the service. - Page 53 INNOVATION & TECHNOLOGIE...
-
Page 54: Declaration Of Conformity
Declaration of conformity EU-Konformitätserklärung EU-Declaration of Conformity Hiermit bestätigen wir, dass das nachfolgend bezeichnete Gerät den angegebenen Richtlinien entspricht. Artikelbezeichnung: Ladegerät Polaron EX-1400 Article description: Artikelnummer: S2018 Article number: Firmenanschrift: Graupner|SJ GmbH Company adress: Henriettenstrasse 96 D-73230 Kirchheim/Teck Einschlägige EU-Richtlinien / Governing EU-directives / Directives CE concernées : ... -
Page 55: Warranty
Monaten warrantied for months garantie de mois Graupner Zentralservice Die Fa. Graupner/SJ GmbH, Henriettenstrasse 96, 73230 Kirchheim/Teck gewährt ab dem Kaufdatum auf dieses Postanschrift: Graupner/SJ GmbH Produkt eine Garantie von 24 Monaten. Die Garantie gilt Service nur für die bereits beim Kauf des Produktes vorhande- Henriettenstrasse 96 nen Material- oder Funktionsmängel. - Page 56 The current version can be errors, omissions and typographical errors. found in the web site www.graupner.de on the Graupner/SJ GmbH reserves the right to chan- related product page. ge the described hardware, software, and / or design features at any time without prior notice.
Need help?
Do you have a question about the POLARON EX-1400 and is the answer not in the manual?
Questions and answers