ELECRAFT KXPA100 Owner's Manual
100-watt
Hide thumbs
Also See for KXPA100:
- Assembly manual (27 pages) ,
- Manual (3 pages) ,
- Owner's manual (13 pages)

Subscribe to Our Youtube Channel
Related Manuals for ELECRAFT KXPA100


Summary of Contents for ELECRAFT KXPA100
- Page 1 KXPA100 LECRAFT 100-W MPLIFIER ’ WNER ANUAL Revision A6, February 23, 2016 E740199 Copyright © 2016, Elecraft, Inc. All Rights Reserved...
-
Page 2: Table Of Contents
Rear Panel Attenuator Switch .............................. 21 Operation with a KX3 Transceiver using the KX3 to KXPA100 Adapter Cable ..............22 Initial Settings Using the KX3 to KXPA100 Cable ..................22 Amplifier Operation Using the KX3 to KXPA100 Cable ................22 ... - Page 3 Appendix A: ALC Adjustment ........................... 44 Adjusting the KXPA ALC ..............................44 Removing and Replacing the KXPA100 Bottom Cover ......................45 Appendix B: KX3 Power Output Display Calibration ..................52 What You Will Need ................................52 ...
-
Page 4: Introduction
But there are times when higher power is needed to get the job done, and this is where the KXPA100 comes in. Whether you're using it with a KX3 or other low-power rig, this versatile, 100-W amplifier can automatically and silently boost your signal to overcome difficult band conditions. - Page 5 Key to Symbols, Abbreviations and Text Styles Important supplemental information – read carefully Operating tip Light Emitting Diode Liquid Crystal Display Antenna Tuning Unit Tap switch function (hold switch for less than 1/2 second to activate) T U N E AN T Hold switch function (hold switch for 1/2 sec.
-
Page 6: In The Box
KXPA100 with the optional KXAT100 antenna tuning unit. Carrying Handle The KXPA100 has a strap handle on one side for ease in carrying the unit. When setting the unit down, place it on its four feet with the handle on the side... -
Page 7: Fused Dc Power Cable
Fused DC Power Cable Connects the KXPA100 to your dc power supply. Both leads are fused with 25A fuses supplied (see Preparing the DC Power Cable, page 10) Key Line Cable Male to male RCA-type connector cable used for connecting the PA Key line to the driving transceiver in Basic... -
Page 8: Ft-817 Interface Cable
KXPA100 to KX3 Power Cable FT-817 Interface Cable This cable allows closer integration of the KXPA100 with a Yaesu FT-817 transceiver or any transceiver using the FT-817 control interface. See Amplifier Connections using the FT-817 Interface Cable on page 14 and Operation with a Yaesu FT-817 Using the Optional FT-817 Interface Cable on page 25. -
Page 9: Getting Started
1. With an Elecraft KX3 transceiver connected using the optional KX3 to KXPA100 Adapter Cable (KXPACBL). This provides the best integration of the system, allowing you to control the KXPA100 amplifier and the KXAT100 ATU from the KX3. You do not need to access KXPA100 in normal operation. -
Page 10: Installation
Be sure the location allows you to access both the front and rear panels of the amplifier. If you connect the amplifier using the KX3 to KXPA100 Adapter Cable as described on page 11, you won’t need access to the front panel in normal operation but being able to see the indicators may be useful for troubleshooting if something is not working properly. -
Page 11: Preparing The Dc Power Cable
Anderson PowerPole® connector goes to the negative (-) supply terminal. To avoid confusion where the fuses are attached, the negative lead is covered with a length of black tubing near the end. Your KXPA100 will not turn on if the dc leads are not connected to your supply with the correct polarity. -
Page 12: Connections To The Amplifier
If you are connecting the amplifier to your KX3 using the optional KX3 to KXPA100 Adapter Cable, connect the amplifier as described below under Amplifier Connections using the KX3 to KXPA100 Adapter Cable. - Page 13 Figure 3. Connecting the Amplifier to a KX3 Using the Optional Adapter Cable.
- Page 14 Male) connector leading to a 100 watt dummy load or antenna. A direct connection to an antenna wire may be used here instead if it presents a low enough SWR or your KXPA100 is equipped with the optional KXAT100 ATU (antenna tuner).There will be only one connector if you do not have the optional KXAT100 ATU.
-
Page 15: Amplifier Connections Using The Ft-817 Interface Cable
Elecraft KX3 and the KX3-KXPA100 Adapter cable, turn to Amplifier Connections using the KX3 to KXPA100 Adapter Cable on page 11. If you are using the KXPA100 with any other transceiver or a KX3 without the adapter cable turn to Basic Operation with any Transceiver on page 28. - Page 16 Male) connector leading to a 100 watt dummy load or antenna. A direct connection to an antenna wire may be used here instead if it presents a low enough SWR or your KXPA100 is equipped with the optional KXAT100 ATU (antenna tuner). There will be only one connector if you do not have the optional KXAT100 ATU.
-
Page 17: Amplifier Connections For Basic Operation
Otherwise you will need to provide a means for manually grounding this line. If the line is not grounded, RF from the transceiver is passed through without being amplified. See the notes on the following page for a description of each connection. Figure 5. KXPA100 Connections to Any Transceiver for Basic Operation... - Page 18 Male) connector leading to a 100 watt dummy load or antenna. A direct connection to an antenna wire may be used here instead if it presents a low enough SWR or your KXPA100 is equipped with the optional KXAT100 ATU (antenna tuner). There will be only one connector if you do not have the optional KXAT100 ATU.
-
Page 19: Connections To An External Amplifier
The Elecraft KX3 can accept up to 30 Vdc on the PA Key line and sink up to 100 mA when in transmit. The KXPA100 PA Key limits depend upon the serial number: ... -
Page 20: Operation
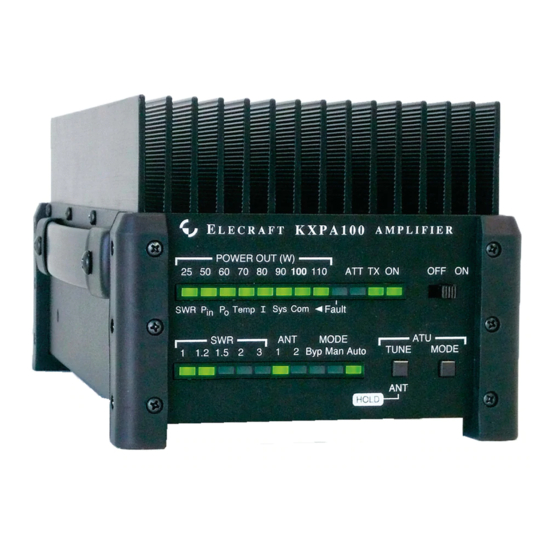
The location and function of each control and LED indicator are described below. Operating instructions for the amplifier when used with the KX3 and optional KX3 to KXPA100 Adapter Cable are on page 22. Operating instructions for using the amplifier with a Yaesu FT-817 and the optional FT-817 interface cable are on page 25. - Page 21 Power Switch: Controls dc power to the KXPA100 amplifier and (if equipped) the KXAT100 ATU. Amplifier Status Indicators. Normal operation: indicates the power being delivered by the amplifier. The display employs a slow POWER OUT (W) decay to make seeing actual peak power easier, especially when transmitting SSB speech. After a peak, the reading drops every few milliseconds until the display is dark (if there is no more rf present).
-
Page 22: Rear Panel Attenuator Switch
Rear Panel Attenuator Switch In addition to the front panel controls and indicators, there is a switch on the rear panel (see 3 dB ATTEN Figure 8). This switch manually controls an attenuator at the amplifier input that reduces the drive power by half. -
Page 23: Operation With A Kx3 Transceiver Using The Kx3 To Kxpa100 Adapter Cable
This provides the most efficient integration of the KX3 transceiver, the KXPA100 amplifier and the KXAT100 Antenna Tuning Unit (ATU). Normally you will not need to touch the KXPA100 amplifier. All operation takes place at the KX3 front panel similar to operating the KX3 by itself. -
Page 24: Atu Operation Using The Kx3 To Kxpa100 Cable
ATU Operation Using the KX3 to KXPA100 Cable If the KXPA100 is equipped with the optional KXAT100 ATU, it is controlled from the KX3 using the same controls normally used to control the KX3’s internal ATU. The KX3’s internal ATU was automatically bypassed when you switched the KX3 menu to in the Initial Settings, above. - Page 25 25/SWR POWER OUT (W) tuning operation is taking place. The SWR is displayed on the KX3 LCD and on the KXPA100 front panel LEDs. The ATU automatically stores the tuning solution in memory. If you are unhappy with the SWR displayed after a tune operation, tap again within five seconds.
-
Page 26: Operation With A Yaesu Ft-817 Using The Optional Ft-817 Interface Cable
(see page 35). Operation with a Yaesu FT-817 Using the Optional FT-817 Interface Cable The following instructions assume that your FT-817 transceiver is connected to the KXPA100 amplifier using the FT-817 Interface Cable as shown in Figure 4 on page 14. -
Page 27: Atu Operation With The Ft-817 Interface Cable
Power Control: Set the FT-817 for 5 watts output for maximum output from the KXPA100. The ALC system will control the amplifier power output to provide maximum power on each band. The POWER light to indicate the power output from the amplifier. These LEDs light in from left to OUT (W) LEDs right as a bar of light. - Page 28 ATU by performing a tune operation on frequencies across each band. That will store the tuning solution so the KXPA100 will be ready without retuning when you return to that frequency. The number of frequencies you will need to perform a tune operation on so the SWR is acceptably low on all frequencies depends upon the band and your antenna.
-
Page 29: Basic Operation With Any Transceiver
The following instructions assume that your transceiver is connected to the KXPA100 amplifier as shown in Figure 5 on page 16. If you are using a KX3 with the KX3 to KXPA100 Adapter Cable connected as shown in Figure 3 on page 12, refer to Operation with the KX3 using the KX3 to KXPA100 Adapter Cable on page 22. -
Page 30: Atu Basic Operation
KXPA100 but will raise the level of harmonics in the output. To avoid this, either turn the turn the KXPA100 power off or enable the amplifier using the key line. Note that turning the KXPA100 off will also turn off the ATU (if installed) and limit you to using only the ANT1 output. - Page 31 ATU by performing a tune operation on frequencies across each band. That will store the tuning solution so the KXPA100 will be ready without retuning when you return to that frequency. The number of frequencies you will need to perform a tune operation on so the SWR is acceptably low on all frequencies depends upon the band and your antenna.
-
Page 32: Faults
LED lighting along with one of the LED’s to the left, shown in Figure 7 Fault on page 19). If the KXPA100 is being used with an Elecraft KX3 transceiver connected with the KX3 to KXPA100 Adapter Cable, the fault condition will be displayed on the KX3 LCD as well. -
Page 33: Utility Program
2. Download the new file from the Elecraft web site manually and place it in a local folder, then click on to locate the folder on your computer. This is the way to access the latest Beta firmware Browse…... -
Page 34: Forcing A Firmware Load
PC or the KXPA100 hardware. Switch the KXPA100 off. If you are using the KXPA100 in Basic mode, you can do this with the front panel switch. If you are using the KXPA100 with a KX3 connected by the KX3-KXPA100 OFF/ ON Adapter cable, you will need to switch the KX3 off. -
Page 35: Faults Reported By The Kxpa Utility
KXPA100 is in the position. When the 3 dB ATTEN KXPA100 is used in basic operation, the attenuator will switch in automatically when the RF drive from the transceiver exceeds 8 watts (see Faults on page 30). Faults Reported by the KXPA Utility Faults occur to protect the amplifier and ATU if a dangerous, abnormal condition occurs. -
Page 36: Antenna Tuner
KXPA100. If the KXPA100 is on when you run the KX3 Utility program to upload new KX3 firmware, you will see the KXPA100 switch off as the KX3 responds to the firmware upload. It will remain off until the upload is complete and then turn itself on again. -
Page 37: Specifications
KXAT100 Antenna Tuning Unit (ATU) Autotune Power 1.5 Watts, minimum. The KXPA100 amplifier is bypassed during a tuning operation so only the drive power from the transceiver is used for tuning. SWR as high as 10:1 at 100 watts; SWR as high as 20:1 at 10 watts. - Page 38 Figure 9. Overall Dimensions.
-
Page 39: Theory Of Operation
SWR Bridge. When the amplifier is used with a KX3 connected via the KX3 to KXPA100 Adapter Cable, the RF input is routed directly to the RF output at low power settings when the amplifier is not needed. -
Page 40: Kxat100 Antenna Tuning Unit (Atu)
KXAT100 Antenna Tuning Unit (ATU) Figure 11 is a simplified block diagram of the ATU. Figure 11. KXAT100 Antenna Tuning Unit Simplified Block Diagram. The function of the ATU is to convert the impedance seen at the antenna connector to a 50 ohm non-reactive load for the amplifier or driving transceiver as measured by the standing wave ratio (SWR) bridge at the amplifier TR switch output. - Page 41 Since retuning is normally required over a narrower frequency range on the lower frequencies to maintain a low SWR, the lower frequencies have narrower segments assigned as follows: Below 3 MHz the segments are 10 kHz wide. From 3 MHz through 26 MHz the segments are 20 kHz wide. ...
-
Page 42: Control Connector Signals
Control Connector Signals The primary use of the Control connector is to connect the KXPA100 to the transceiver driving it. Schematics for an interface cable for the KX3 transceiver is shown on page 42 and for an FT817 interface cable is shown on page 43. -
Page 43: Cable Schematics
The adapter cable provides efficient integration of the KX3 transceiver, the KXPA100 amplifier and the KXAT100 Antenna Tuning Unit (ATU). It is available from Elecraft as part of an adapter cable set (see KX3 to KXPA100 Adapter Cable Set (KXPACBL) on page 6). -
Page 44: Serial Interface Cable
RS232 port on their computers. If you chose the KXUSB cable when you ordered your KXPA100, you can purchase the KXSER cable from Elecraft or make one yourself. Figure 14 is a schematic diagram of the cable. A kit of parts to fabricate a 6-foot (1.8 meter) serial interface cable is available from Elecraft; Order W1SERKT. -
Page 45: Appendix A: Alc Adjustment
There is no advantage or benefit from performing this procedure for those transceivers. Check your KXPA100 amplifier to see if there is a hole cover on the side just below the handle (see Figure 16). If so, pry the hole cover off. A small screwdriver adjust potentiometer will be visible just inside the hole. That is the ALC adjustment. -
Page 46: Removing And Replacing The Kxpa100 Bottom Cover
Turn the ALC potentiometer counter-clockwise 10 turns. That ensures it is at its minimum setting. Set your transceiver for the normal drive level you plan to use with the KXPA100. In any case, the output must be less than 8 watts. With a Yaesu FT-817 set the output for 5 watts. - Page 47 Disconnect all cables from your KXPA100 and place it upside down, resting on the heat sink fins, on your work table. All of the screws that you will remove are identical and interchangeable. Take care to save all of them and the other hardware you remove to reassemble the amplifier.
- Page 48 Remove the four screws from each side of the bottom U-cover as shown in Figure 19 and lift it straight up off of the KXPA100. Figure 19. Removing the Bottom Cover...
- Page 49 After removing the bottom U-cover, be sure you have not dislodged any of the TMP connectors on the cables leading to the rear panel connectors as shown below. As part of the ALC adjustment procedure, you will need to attach cables to the rear panel. Be sure the TMP connectors are not dislodged in the process. ...
- Page 50 Figure 21. Rear Panel RF Cable Connections with No ATU. The ALC adjustment potentiometer is shown in Figure 22. Set the potentiometer as described in Adjusting the KXPA ALC on page 44. Figure 22. ALC Adjustment Potentiometer Location.
- Page 51 Figure 23. Tuck the cables to the SO-239 connectors in the space between the circuit board and the cover as needed. A KXPA100 rear panel with the third connector for the ATU is shown.
- Page 52 Figure 17 on page 46). Set the KXPA100 on its feet. Never operate it for more than a few seconds with the fins resting against a surface that will impede the flow of cooling air (see Positioning the Amplifier on page 9)
-
Page 53: Appendix B: Kx3 Power Output Display Calibration
Elecraft lab-standard KX3 transceiver. This alignment is performed separately on each band and is generally accurate. However, if you want to calibrate your KX3 to your KXPA100, you may do so as follows. This procedure will store drive levels in your KX3 that will over-ride the factory levels in your KXPA100. -
Page 54: Viewing The Results Of The Calibration
” and the drive level will change to show the value stored in the ALC AX.X KXPA100. The process is per-band, so you need to repeat the procedure for each band you wish to return to the factory calibration level. -
Page 55: Customer Service And Support
Elecraft at the time of original order, are not covered by this warranty. If the Elecraft product is being bought indirectly for a third party, the third party's name and address must be provided to Elecraft at time of order to insure warranty coverage.
Need help?
Do you have a question about the KXPA100 and is the answer not in the manual?
Questions and answers