ELECRAFT KPA1500 Owner's Manual
1500-watt
Hide thumbs
Also See for KPA1500:
- Owner's manual (36 pages) ,
- Owner's manual (49 pages) ,
- Application note (4 pages)

Subscribe to Our Youtube Channel
Related Manuals for ELECRAFT KPA1500


Summary of Contents for ELECRAFT KPA1500
- Page 1 KPA1500 LECRAFT 1500-W MPLIFIER ’ WNER ANUAL Revision B1, February 12, 2019 E740301 Copyright © 2018, Elecraft, Inc. All Rights Reserved...
-
Page 2: Introduction
TR is completely noise-free thanks to the use of PIN- diode switching. The KPA1500 comes with a built-in Automatic Antenna Tuner (ATU) that can handle a load SWR up to 3:1 at the full 1500 watt output in any mode. -
Page 3: Table Of Contents
In the Box ..............................7 Specifications ............................8 Customer Service and Support ....................... 10 Installation .............................. 11 Positioning the KPA1500 RF Deck and Power Supply ..................13 Cabling – Power Supply ............................ 13 Cabling – RF Deck ............................13 Operation ..............................18 RF Deck Front Panel Controls .......................... - Page 4 Icom Transceiver Interfacing ..........................44 Icom Remote Tuner Control Socket to KPA1500 TUNE Jack ................46 Elecraft KX3, KX2 and Non-Elecraft Rigs to KPA1500 XCVR SERIAL Port ..........47 Kenwood Transceiver to KPA1500 XCVR SERIAL Port ................49 Yaesu Transceivers to KPA1500 AUX Port ...................... 49 Flex Transceivers...............................
- Page 5 Before opening the KPA1500 RF Deck or Power Supply enclosures: 1. Turn off the KPA1500 by tapping the RF Deck front panel ON switch. 2. Turn off the power supply breaker switch (on the rear panel). Disconnect the two Power Supply cables at the RF Deck rear panel before opening the RF Deck enclosure.
-
Page 6: Fcc-Mandated Part 15 Notice For The Computer Interface Ports
Connect the equipment to an outlet on a different circuit from that to which the receiver is connected. • Consult the dealer or an experienced radio/TV technician for help. Regarding the computer interface: Changes or modifications not expressly approved by Elecraft could void the user’s authority to operate the equipment. Note for European Users For private households: This symbol means that used electrical and electronic equipment (WEEE) should not be mixed with general household waste. -
Page 7: In The Box
E770017 Phono-Phono Key Line Cable E100416 USB A-B Cable E980299 Owner’s Manual E740301 Optional Item Elecraft Part Number KPAK3AUX Cable kit for K3 or K3 KPAK3AUX Enhanced Mode cable for Flex, Icom, visit www.elecraft.com for details Kenwood, and Yaesu transceivers... -
Page 8: Specifications
Specifications The following performance specifications are guaranteed only within the Amateur bands. Frequency Range All Amateur bands from 1.8 to 29.7 MHz and 50 to 54.2 MHz Supply Voltage and 200 to 250 VAC, 50/60 Hz up to 20A Current RF Deck Weight 22 lbs. - Page 9 Range and Power 750 W into 12 Ω to 200 Ω (4:1 SWR) Limits 1500 W into 16 Ω to 150 Ω (3:1 SWR) 3 — 30 MHz 750 W into 5 Ω to 500 Ω (10:1 SWR) 1500 W into 16 Ω to 150 Ω (3:1 SWR) 30 —...
-
Page 10: Customer Service And Support
Elecraft products transferred by the purchaser to a third party, either by sale, gift, or other method, who is not disclosed to Elecraft at the time of original order, are not covered by this warranty. If the Elecraft product is being bought indirectly for a third party, the third party’s name and address must be provided at time of order to ensure... -
Page 11: Installation
Connecting the KPA1500 RF Deck and Power Supply. • Cabling the KPA1500 RF Deck to your other station equipment. The KPA1500 RF Deck rear panel is shown in Figure 1. The connectors and controls are described following the figure. Figure 1. KPA1500 RF Deck Rear Panel. - Page 12 Selectable CI-V for Icom radios or RS232 level information for transceivers such as the K2, KX2, KX3, Flex Radio, and Kenwood transceivers. Radio type is selected in the menu. May also be used as XCVR SERIAL HOST connector, so devices that support RS-232 may use this connector for the KPA1500 serial command set (programming reference).
-
Page 13: Positioning The Kpa1500 Rf Deck And Power Supply
Supply can be operated remotely so there is no need for it to be within the operator’s reach. The power supply fans operate whenever the KPA1500 is on, so you can place the Power Supply under the operating desk or elsewhere to minimize fan noise. - Page 14 KPA1500 and the transceiver and vice versa, see Figure 4. The KPAK3AUX cable kit enables all enhanced features described under Operation, including coordinated band switching, antenna selection and ATU memory setting recall between the transceiver and the KPA1500 amplifier.
- Page 15 KPA1500 Figure 4. K3 /K3Enhanced Cabling Using KPAK3AUX Cable, Without Interrupter.
- Page 16 See Interfacing to Other Transceivers on page 43. Connecting the KPA1500 to Any HF Transceiver Connections from any HF to 6m transceiver are shown below. Elecraft does not recommend the use of ALC unless the transceiver manufacturer specifically requires it.
- Page 17 If the transmitter Key Output ( STBY ) is not a contact closure or equivalent, it must be at a level between +4 and +16 VDC during receive. KPA1500 HF to 6 m Transceiver Figure 6. Basic Cabling Diagram for Any Transceiver.
-
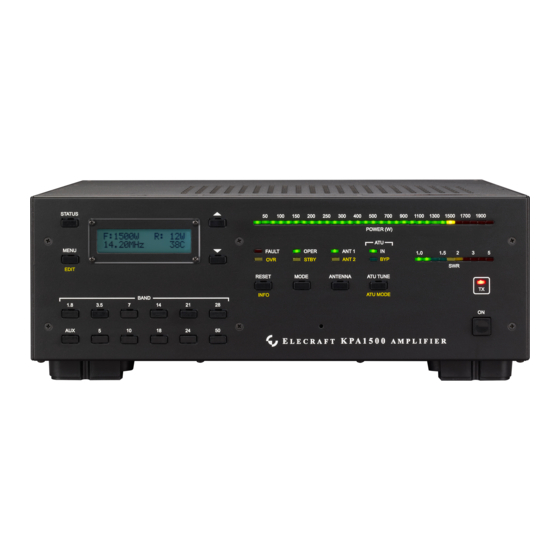
Page 18: Operation
RF Deck Front Panel Controls The front panel switches and indicators are described below. Figure 7. KPA1500 RF Deck Front Panel Controls and Indicators. Switches with a legend above and below have two functions: Tap (press briefly) to activate the function labeled above a switch. -
Page 19: Power On
Keeping the control circuitry energized allows the KPA1500 to be turned on and off remotely as well as from the front-panel switch. If you do not need to control the KPA1500 remotely and would prefer to save the small amount of power required for the control circuitry, either switch the Power Supply off using the rear panel switch or provide an external mains power switch capable of handling 20A. -
Page 20: Antenna Selection
ANTENNA ENABLE ANTENNA PREFER menu items on page 30. The menu selection applies only to the current band. The KPA1500 Utility makes it easy to configure this menu function for several bands. • If an connector is disabled on any band, tapping the... -
Page 21: Automatic Level Control (Alc)
OPER mode and another for pass-through transmitting when the KPA1500 is in STBY . The transceiver will automatically return to your preset power levels as you switch the KPA1500 between OPER STBY Automatic Level Control (ALC) Automatic Level Control (ALC) is a useful safety mechanism, but do not use ALC as the principle power control. -
Page 22: Automatic Antenna Tuner (Atu)
3. Repeat on each band. is set and saved separately on each band. ALC THRESH Automatic Antenna Tuner (ATU) The internal ATU may be used with the KPA1500 in either mode. When the KPA1500 is in STBY STBY mode, power from the driving transceiver is passed directly to the ATU. Press and hold... - Page 23 Relays in the ATU operate to switch values of inductance (L) and capacitance (C) to match the antenna impedance to a value close to 50 Ω non-reactive for the KPA1500 or for the driving transceiver when the KPA1500 is in STBY LEDs indicate how close the antenna impedance is matched to the transceiver.
-
Page 24: Initiating A Full Search Tune
• Above 38 MHz the segments are 200 kHz wide. When starting a tune operation for a frequency segment that has no tuning solution, the KPA1500 first tries settings in the nearest frequency segment with tuning data. ATU data stored after a successful Full Search Tune can be viewed using menu items ATU BYPASS SWR, ATU The KPA1500 Utility Command Tester can also be used to view ATU settings. - Page 25 ATU HiSWR AUTO RETUNE ENABLED KPA1500 will search previous tuner settings until one is found that is as good as or better than the SWR threshold. Once found, the setting is stored and the amplifier quickly resumes operation. Note the ATU will not automatically begin a full-search tune. It recalls previous or adjacent-segment tuning solutions to enable the fastest frequency changes.
- Page 26 This is the same procedure that enables frequency tracking with the KAT500 tuner. Frequency Tracking with Other Transceivers If a driving transceiver is equipped to exchange CI-V or serial data, KPA1500 frequency tracking may be possible. See “Interfacing to Other Transceivers,” on page 43.
-
Page 27: Amplifier Monitoring And Status Indicators
LED lights if a fault condition occurs and LEDs indicate whether the amplifier is in STBY OPER mode. : Indicates which antenna connector is active. When the KPA1500 is turned off, ANT 1 is ANT 1 ANT 2 always selected, even if it is disabled in firmware or no antenna is connected. - Page 28 Text appears briefly on the LCD when EL ECR AF T the amplifier is switched on. Customize ENABLED Banner this text with the KPA1500 Utility “EDIT CONFIGURATION” and select the KPA1 50 0 “Banner” tab. Forward Power, F: Forward power, efficiency, PA voltage,...
-
Page 29: Menu Items
• You may use the KPA1500 Utility program to modify several settings on multiple bands. • Some menu items, such as serial number and firmware revision, may not be edited. - Page 30 When an ALARM TONE menu item is changed, a sample tone is produced. KPA1500 provides an ALC voltage between 0 and –12V, a function of ALC THRESH output power and this per-band ALC THRESH value. See page 21 for (Per Band) more information.
- Page 31 DCHP-assigned Subnet Mask in dotted octet format. (Tech Mode Only) NET WAKE on LAN KPA1500 will turn power on when a Wake on LAN “magic packet” with the ENABLED amplifier’s MAC address is received on its LAN Ethernet connector. (Tech Mode Only) PEAK HOLD 1.2 SEC...
- Page 32 VFO information. SERIAL NUMBER — Displays the KPA1500 serial number. Not editable. The speed of the Host PC (labeled USB) connection. The KPA1500 incorporates a USB-to-Serial adapter that appears as a COM port to computer software. SERIAL SPEED HOST 230400 bps The speed range is 4800 to 230,400 bits/second.
-
Page 33: Fault Types, Conditions And Messages
Hard When the condition is corrected, tap the O PER /STBY switch Cause displayed on to return the KPA1500 to normal operation, or tap the R ESET LCD. switch to return the KPA1500 to STBY mode. Hard Faults require the operator to correct the condition and reset the amplifier. - Page 34 LCD Fault Messages and Descriptions The two-line alphanumeric LCD messages indicate fault conditions and, in most cases, actual measurements of the condition, such as RF power, voltage or SWR to further help diagnose soft or hard faults. LCD Message Fault Fault Type LPF VMON Incorrect bias voltages at the TR switch.
-
Page 35: Kpa1500 Remote Operation
KPA1500 Remote Operation The KPA1500 is capable of remote control and operation via the rear panel USB or ETHERNET port and a computer and a local area network (LAN) or wide area network (WAN). Simple “on/off control” can be accomplished via the rear panel REM jack or a connection to the AUX connector. - Page 36 The “KPA1500 Utility” Program Figure 11. KPA1500 Utility “OPERATE” Tab Screen Capture. A basic remote operating capability is built into the KPA1500 Utility “OPERATE” tab. The Utility also provides an interface for firmware updates, configuration parameter settings and firmware command communication.
-
Page 37: Kpa1500 Firmware Updates
The KPA1500 Utility may also be used to edit the amplifier’s configuration, save and restore configuration and has an “Operate” page (tab) that duplicates the front panel controls. Other main tabs are “Port,” “Firmware,” “Operate” and “Command Tester.” Some advanced amplifier configuration features cannot be performed from the front panel and require the utility, such as static IP address, port number and other items. -
Page 38: Forcing A Firmware Load
Forcing a Firmware Load If the KPA1500 becomes unresponsive, you may force a re-load of its operating firmware. Connect a computer running the KPA1500 as described above. Press and hold the front-panel... -
Page 39: Theory Of Operation
Theory of Operation Figure 13. KPA1500 Block Diagram. Switching When the KPA1500 is in mode, the transmit receive (TR) switch routes RF from the driving transceiver OPER to the power amplifier (PA) module where it is amplified by a pair of LDMOS (Laterally Diffused metal oxide semiconductor) transistors. - Page 40 RF output, reflected power (high SWR) or current is drawn by the finals. • Hard: If an unauthorized frequency is transmitted, the KPA1500 switches to until RF drive is STBY removed. This fault will automatically reset if a valid frequency is applied.
- Page 41 Although the external fan will cool the heat sink, it may delay or prevent the amplifier's fans from turning on. This is a problem because the KPA1500 fans cool both the heat sink and the interior of the amplifier.
-
Page 42: Wattmeter Calibration Procedure
Wattmeter Calibration Procedure The KPA1500 wattmeter is factory calibrated. The calibration is done per-band so you can make adjustments for individual bands without affecting the others. Elecraft recommends checking with Customer Support (support@elecraft.com) before changing Wattmeter Calibration. Wattmeter calibration affects the displayed forward power only. Changing the wattmeter adjustment does not affect any power-related fault thresholds. -
Page 43: Interfacing To Other Transceivers
3.5mm tip, ring, sleeve (TRS) jack that XCVR SERIAL provides RS232 data for transceivers such as the Elecraft K2 and some non-Elecraft transceivers. The rear panel jack may also be used for some interface functions. It is a 3.5mm TRS jack. Grounding the TUNE tip initiates a tune cycle. -
Page 44: Elecraft Kpak3Aux Interface Cable
There are three different interfacing methods for Icom transceivers: CI-V, Band Voltage System and Remote Tuner connection. The recommended method is CI-V if your Icom transceiver supports it (such as IC-7610, IC-7300). An interface cable for CI-V is available from Elecraft. - Page 45 SERIAL SPEED XCVR The KPA1500 does not send data to an Icom radio via CI-V: Control signals go only one way, from the Icom radio to the Elecraft KPA1500. The optional E980229 cable (3.5mm TRS plug on each end) can be used with Icom’s CI-V interface. This cable is included with the CBL1500IC and CBL1500IC-M cable sets.
-
Page 46: Icom Remote Tuner Control Socket To Kpa1500 Tune Jack
If the band reference voltage is far from 8V, band voltage is ignored. This band voltage scheme does not provide unique voltages for each band. KPA1500 chooses 7, 21 and 28 MHz when there is ambiguity but the KPA1500 internal frequency counter will override these voltages to select the proper band if there is a conflict. -
Page 47: Elecraft Kx3, Kx2 And Non-Elecraft Rigs To Kpa1500 Xcvr Serial Port
With this connection, the KPA1500 provides an “AH4 KEY” logic level signal to cause the Icom transceiver to generate steady RF carrier for ATU tuning. When tuning completes, the KPA1500 removes the AH4 KEY signal to un-key the Icom transceiver, putting the KPA1500 in STBY This cable implements the use of the Icom transceiver TUNE button on many of their transceivers. - Page 48 For transceivers using DE-9 connectors, use a female DE-9 connector and a shielded two-wire cable to a 3.5mm phone plug into the KPA1500 port. The KPA1500 does not support hardware handshaking. XCVR SERIAL Select a baud rate slow enough to ensure buffer overflows do not occur.
-
Page 49: Kenwood Transceiver To Kpa1500 Xcvr Serial Port
Although various models of Yaesu radios use either DIN8/262 or a MiniDIN8 connector, pin numbering and the naming convention is the same. Pins not shown have no connection for the KPA1500. See the table below. Other Yaesu radios use a MiniDIN10 or a DA15 connector. -
Page 50: Flex Transceivers
Bit 1 (Pin 3) Bit 0 (Pin 13) 160m Flex Transceivers Currently, all of the Flex 6000 series radios are supported with an Elecraft KXUSB cable. Order CBL- FLEXKEY. Initiating KPA1500 Tune via the CW Key TUNE Jack The KPA1500... -
Page 51: In Case Of Difficulty
Review text displayed in the LCD for specific fault and take FAULT LED appropriate action. Bring up the KPA1500 Utility to inspect the Fault Log. This will provide details on what the KPA1500 saw when it determined the Fault condition. -
Page 52: Appendix A - Kpa1500 Tuner Frequency Segments
Appendix A — KPA1500 Tuner Frequency Segments Information presented in this section applies to KPA1500 capability and is subject to changes. The segment center frequencies shown are not necessarily legal for transmission. Always comply with the amateur radio rules and regulations in your area. - Page 53 KPA1500 ATU Segment Center Frequencies – All Segments Center frequencies in MHz. Amateur band frequencies shown in red. 160 Meters, 1.5 to 3.0 MHz, 10 kHz Steps 1.505 1.515 1.525 1.535 1.545 1.555 1.565 1.575 1.585 1.595 1.605 1.615 1.625 1.635...
- Page 54 30 Meters, 9 to 13 MHz, 20 kHz Steps 9.010 9.030 9.050 9.070 9.090 9.110 9.130 9.150 9.170 9.190 9.210 9.230 9.250 9.270 9.290 9.310 9.330 9.350 9.370 9.390 9.410 9.430 9.450 9.470 9.490 9.510 9.530 9.550 9.570 9.590 9.610 9.630 9.650 9.670...
- Page 55 15 Meters, 19 to 23 MHz, 20 kHz Steps 19.010 19.030 19.050 19.070 19.090 19.110 19.130 19.150 19.170 19.190 19.210 19.230 19.250 19.270 19.290 19.310 19.330 19.350 19.370 19.390 19.410 19.430 19.450 19.470 19.490 19.510 19.530 19.550 19.570 19.590 19.610 19.630 19.650 19.670 19.690 19.710 19.730 19.750 19.770 19.790 19.810 19.830 19.850 19.870 19.890 19.910 19.930 19.950 19.970 19.990 20.010 20.030 20.050 20.070 20.090 20.110 20.130 20.150 20.170 20.190 20.210 20.230 20.250 20.270 20.290 20.310 20.330 20.350 20.370 20.390 20.410 20.430...
Need help?
Do you have a question about the KPA1500 and is the answer not in the manual?
Questions and answers