
Related Manuals for Yeti Cycles 575 2011


Summary of Contents for Yeti Cycles 575 2011
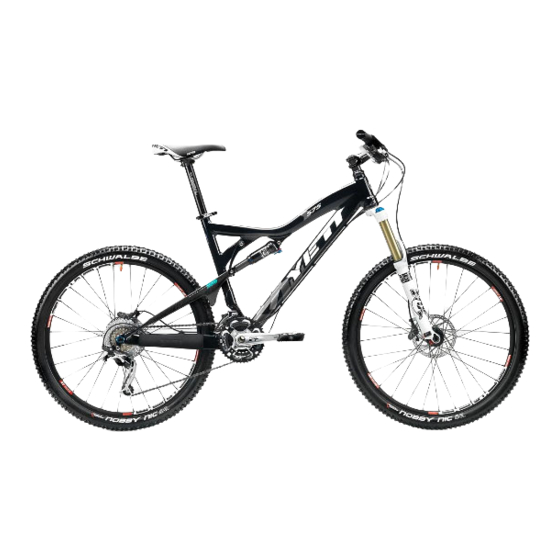
- Page 1 2011 575 OWNER’S MANUAL YETI CYCLES 600 CORPORATE CIRCLE, UNIT D GOLDEN, CO 80401 888.576.9384...
-
Page 2: Table Of Contents
Table of Contents Brand Overview Frame Features Geometry Maintenance Schedule Bike Setup Overview ū Shock Setup FOX RP23 ū Quick Start Guide ū Cable Routing Assembly Overview ū Assembly ū Chip System ū Disassembly Tips Exploded Views Part List Warranty Contact Information... -
Page 3: General Information
Overview welcOme tO the tribe Congratulations on your purchase of a new Yeti bicycle and welcome to the Yeti Tribe. We are confident your new bicycle will exceed your expectations for value, performance and ride quality. Each frameset and component has been custom specified and designed to enhance your riding experience. -
Page 4: Frame Features
Frame Features Pure tubinG Yeti pure tubing is custom butted and tapered 7005 aluminum. This makes the frame lightweight and strong without the use of gussets. Unique shape perfectly compliments the shape of the headtube for increased front-end stiffness. iscG 05’ tabs Set up and run a 1x10 drivetrain with a chainguide cleanly and effieciently. -
Page 5: Geometry
Geometry Ge Ome t r y 5 7 5 150 mm fOrk 16.0 17.5 18.5 20.5 20.5 21.8 22.8 23.8 24.8 25.6 68.0 68.0 68.0 68.0 68.0 72.8 72.8 72.8 72.8 72.8 16.9 16.9 16.9 16.9 16.9 42.4 43.5 44.5 45.6 46.4 13.3... -
Page 6: Maintenance Schedule
maintenance? Not sure how to work on your own bike? Contact your authorized Yeti dealer or visit www.parktool.com and check out the repair help section. This section contains detailed instruction on many of the service items listed in the maintenance schedule. Maintenance maintenance tOrque... -
Page 7: Bike Setup Overview
Bike Setup tOOls needed Shock pump Tape measure time 15-20 minutes yeti tiPs Inspect your shock for any visible damage. If oil is leaking or you notice any damage to the surfaces or seals, please contact the Fox Racing Shox service center for repair at 800.FOX.SHOX. Shock set-up can fluctuate greatly based on the rider. -
Page 8: Quick Start Guide
Quick Start Guide Setup-Fox RP23 air Pressure The main air spring controls the sag of the shock. quick start Guide rP23 575 For the 575 to ride properly it is important to setup the shock with the air sPrinG settinGs correct amount of sag. - Page 9 bOlt-On cable Guides 2011 Yeti frames use bolt-on cable guides for routing brake and shift housing. The guides allow for clean cable routing and thier two-piece design keeps the housing from contacting the frame and marring the finish. Cable Setup The 575 has full cable housing.
-
Page 10: Assembly
It is also important to prep all bolt threads. The instructions denote whether to use a blue Loctite compound or grease. Warning: Service on Yeti bicycles requires special knowledge and tools. Yeti Cycles recommends that all service and repairs be performed by an authorized Yeti dealer. assembly... - Page 11 thread PreP Yeti recommends prepping all bolt threads at once on your work bench with Loctite or grease. This will ensure that all bolts are used in assembly. The medium strength (blue) Loctite formula along with proper torque is ideal to keep the bolts snug. Assembly dOGbOne and shOck mOuntinG assembly Install two M4x10mm dOGbOne and shOck mOuntinG assembly Align the shock and...
-
Page 12: Chip System
Assembly Cont. Chip System mOuntinG rear trianGle Prep an M6x1x12mm male Ti bolt with remOvinG stOck chiP set Use a 2.5mm allen key to loosen the locktite and install into the 57.5 mm Ti stud. Place the 57.5 Ti stud two M4x9mm flat head bolts holding the QR insert derailleur hanger and Ti male bolt assembly over the male portion of the Fox guide pin. -
Page 13: Disassembly Tips
Chip System Cont. Dissassembly Tips installinG shimanO drOPOut kit Fit the 12MM non-drive insert rear trianGle disassembly into the groove on the inside of the non-drive side chainstay. The Loosen the pinch bolts at the top of insert should be flush with the chainstay. Next, fit the non-drive 12mm cap the seatstays. -
Page 14: Exploded Views
rebuild kits The individual components of each Yeti bike are not sold separately. All Yeti parts are sold in rebuild kits listed below. Each and every part can be obtained by purchas- ing one of the rebuild kits. Cross reference the part number you desire from the parts lists. -
Page 15: Part List
BOLT CAP SCkT HD M4 X .7 X 10 STAINLESS 300040349 BARREL INSERT M5 ROLLED THREADS W/ POSITION 300030011 BOLT CAP M5 X .8 X 12 STAINLESS 200020162 575 2011 FRONT DERRAILLEUR MOUNT kIT 300030141 CUSTOM BOLT M5 X 18MM 300030140 CUSTOM BOLT M5 X 12MM 300030138... -
Page 16: Warranty
Fork, DH-9, AS-X, 4X, Dj, SX) disclaimer Yeti Cycles will repair or replace, at its option, any frame it determines to be defective materials and / or Yeti Cycles is not responsible for any damages to you or others arising from riding, transporting or other workmanship.
Need help?
Do you have a question about the 575 2011 and is the answer not in the manual?
Questions and answers