dji PHANTOM 4 User Manual
Hide thumbs
Also See for PHANTOM 4:
- Quick start manual ,
- User manual (64 pages) ,
- Flight manual (18 pages)
Table of Contents
Advertisement
Advertisement
Table of Contents

Related Manuals for dji PHANTOM 4


Summary of Contents for dji PHANTOM 4
- Page 1 PHANTOM 4 User Manual V1.0 2016.03...
-
Page 2: Using This Manual
We recommend that you watch all tutorial videos on the official DJI website and read the Disclaimer before you fly. Prepare for your first flight by reviewing the Phantom 4 Quick Start Guide and refer to the User Manual for more details. -
Page 3: Table Of Contents
Contents Using this manual Legends Read Before the First Flight Video Tutorials Download the DJI GO app Product Profile Introduction Features Highlights Preparing the Aircraft Aircraft Diagram Remote Controller Diagram Aircraft Flight Controller Flight Mode Flight Status Indicator Return-to-Home (RTH) - Page 4 Flight Environment Requirements Flight Limits and No-Fly Zones Preflight Checklist Calibrating the Compass Auto Takeoff and Auto Landing Starting/Stopping the Motors Flight Test Appendix Specifications Firmwares Update Intelligent Flight Mode After-Sales Information FCC Compliance © 2016 DJI. All Rights Reserved.
-
Page 5: Product Profile
Product Profile This section introduces the Phantom 4 and lists the components of the aircraft and remote controller. © 2016 DJI. All Rights Reserved. -
Page 6: Introduction
Features Highlights Tapfly and ActiveTrack are two brand new commands in the DJI GO app, unique to the Phantom 4. Now with a simple tap you can fly anywhere visible on your screen or track a moving subject smoothly and easily. - Page 7 Phantom 4 User Manual Attaching the Propellers: Mount the propellers with black propeller rings to the motors with black dots. Mount the propellers with sliver propeller rings to the motors without black dots. Press the propeller down onto the mounting plate and rotate in the lock direction until it is secured in its position.
-
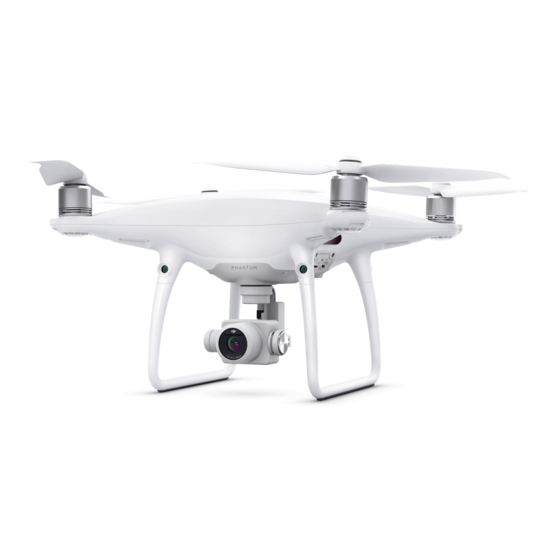
Page 8: Aircraft Diagram
Phantom 4 User Manual Aircraft Diagram [1] GPS [2] Propeller [3] Motor [4] Front LED Indicator [5] Gimbal and Camera [6] Obstacle Sensing System [7] Intelligent Flight Battery [8] Aircraft Status Indicator [9] Camera / Linking Status Indicator and Link Button... - Page 9 [15] [16] [9] Camera Settings Dial Turn the dial to adjust camera settings. (Only functions when the remote controller is [14] connected to a mobile device running the DJI [10] [13] GO app. ) [10] Intelligent Flight Pause Button [11]...
-
Page 10: Aircraft
Aircraft This section introduces the features of the Flight Controller, Vision Positioning System, and the Intelligent Flight Battery © 2016 DJI. All Rights Reserved. -
Page 11: Flight Controller
Aircraft Flight Controller The Phantom 4’s flight controller features several important upgrades, including a new flight mode. Safety modes include Failsafe and Return-to-Home. These features ensure the safe return of your aircraft if the control signal is lost. The flight controller can also save critical flight data from each flight to the on-board storage device. -
Page 12: Flight Status Indicator
Phantom 4 User Manual Flight Status Indicator The Phantom 4 has Front LEDs and Aircraft Status Indicators. The positions of these LEDs are shown in the figure below: Aircraft Status Indicator Front LED The Front LEDs show the orientation of the aircraft. The Front LEDs glow solid red when the aircraft is turned on to indicate the front (or nose) of the aircraft. -
Page 13: Return-To-Home (Rth)
The aircraft cannot avoid obstruction during the Failsafe RTH, therefore, it is important to set an suitable Failsafe altitude before each flight. Launch the DJI GO app and enter “Camera” and select “MODE > Advanced Settings > Failsafe mode” to set the Failsafe altitude. -
Page 14: Smart Rth
Use the RTH button on the remote controller (refer to “RTH button” on page 33 for more information) or tap the RTH button in the DJI GO app and follow the on-screen instructions when GPS is available to initiate Smart RTH. The aircraft will then automatically return to the last recorded Home Point. You may use the remote controller’s control sticks to control the aircraft’s position to avoid a collision during the Smart... - Page 15 Sensing System is disabled. Therefore, it is important to set 20米 an suitable Failsafe altitude before each flight. Launch the DJI GO app and enter “Camera” and select “MODE > Advanced Settings > Failsafe mode” to set the Failsafe altitude.
-
Page 16: Failsafe Rth
Phantom 4 User Manual Obstacle Avoidance During FailSafe RTH Aircraft can now sense and actively attempt to avoid obstale during FailSafe RTH, provided that the light condition is ideal for the Obstacle Sensing System. The details on how the aircraft will behave during obstacle avoid is listed below: 1. - Page 17 Phantom 4 User Manual Launch DJI GO app and tap at the bottom of the camera view, read and understand the prompt statements. OPTI OPTI Safe to Fly (GPS) Safe to Fly (GPS) MENU TapFly ActiveTrack Normal Smart Tap once on the target direction and wait for icon to appear.
-
Page 18: Activetrack
Phantom 4 User Manual After confirmed with the TapFly selection, the aircraft will fly automatically towards the area that marked by icon. Note that you can still use the control stick to control the movement of the aircraft during the flight. - Page 19 S-mode. Then follow the steps below to use ActiveTrack: 1. Take off and hover at least 9 feet (3 meters) above the ground. 3 meters Auto Hold 2. In the DJI GO app, tap to bring up the flight modes and then select. OPTI OPTI...
-
Page 20: Obstalce And Vision Positioning System
Positioning, your Phantom 4 can hover in place more precisely and fly indoors or in other environments where a GPS signal is not available. The main components of the Vision Positioning System are located on the bottom of your Phantom 4; they include [3] two ultrasonic sensors and [1] [2] four monocular sensors. ©... -
Page 21: Detection Range
DJI Assistant 2 from time to time. Follow the steps below to calibrate the camera when the DJI GO app prompt you to do so. Point the aircraft toward the screen... - Page 22 Phantom 4 User Manual Follow the steps below to use Vision Positioning: 1. Toggle the flight mode switch to P-mode. 2. Place the aircraft on a flat surface. Note that the Vision Positioning system cannot work properly on surfaces without clear pattern variations.
-
Page 23: Flight Recorder
PC through the Micro-USB port and launch the DJI GO app. Attaching and Detaching the Propellers Use only DJI approved propellers with your Phantom 4. The grey and black nuts on the propeller indicate where they should be attached and in which direction whey should spin. To attach the propellers properly, match the nut color with the motor axis color. -
Page 24: Dji Intelligent Flight Battery
ONLY use original DJI propellers for a better and safer flight experience. DJI Intelligent Flight Battery The DJI Intelligent Flight Battery has a capacity of 5350 mAh, a voltage of 15.2 V, and a smart charge/ discharge functionality. It should only be charged using an appropriate charger that has been approved by DJI. - Page 25 12 V. 9. Short Circuit Protection: Automatically cuts the power supply when a short circuit is detected. 10. Battery Cell Damage Protection: The DJI GO app displays a warning message when a damaged battery cell is detected.
- Page 26 Battery voltage should reach the appropriate level when operating environment with temperatures between -10°C and 5°C. 3. End the flight as soon as the DJI GO app displays the “Low Battery Level Warning” in low temperature environments. 4. Keep the battery indoors to warm it before flying in low temperature environments.
- Page 27 5. Air-cool the Intelligent Flight Battery after each flight. Allow its temperature to drop to room temperature before storing it for an extended period. Always turn off the battery before inserting it or removing it from the Phantom 4. Never insert or remove a battery when it is turned on.
- Page 28 Leave it on until there is less than 8% of power left, or until the battery can no longer be turned on. Launch the DJI GO app to check battery levels. Rapid : Fly the Phantom 4 outdoors until there is less than 8% of power left, or until the battery can no longer be turned on.
-
Page 29: Remote Controller
Remote Controller This section describes the features of the remote controller and includes instructions for controlling the aircraft and the camera. © 2016 DJI. All Rights Reserved. -
Page 30: Remote Controller Profile
Turning the Remote Controller On and Off The Phantom 4 remote controller is powered by a 2S rechargeable battery that has a capacity of 6000 mAh. The battery level is indicated via the Battery Level LEDs on the front panel. Follow the steps below to turn on your remote controller: 1. - Page 31 Phantom 4 User Manual Power Outlet Charger Power Button Controlling the Camera Shoot videos/pictures, view recorded images, and adjust camera settings via the Shutter Button, Camera Settings Dial, Playback Button, and Video Recording Button on the remote controller. [1] Camera Settings Dial Turn the dial to adjust camera settings such as ISO, shutter speed, and aperture without letting go of the remote controller.
- Page 32 Moving the right stick up and down changes the aircraft’s forward and backward pitch. Push the stick up to fly forward and down to fly backward. Phantom 4 will hover in place if the stick is centered. Push the stick further away from the center position for a larger pitch angle (maximum 30˚) and faster flight.
- Page 33 Phantom 4 User Manual Adjusting Controller Sticks Hold and twist the controller sticks clockwise or counter clockwise to adjust the length of the controller sticks. A proper length of controller sticks can improve the controlling accuracy. Flight Mode Switch Toggle the switch to select the desired flight mode.
-
Page 34: Remote Controller Status Led
Phantom 4 User Manual Connecting Your Mobile Device Tilt the mobile device holder to the desired position. Press the button on the side of the mobile device holder to release the clamp, and then place your mobile device into the cradle. Adjust the clamp down to secure the mobile device. -
Page 35: Linking The Remote Controller
The remote controller is linked to your aircraft before delivery. Linking is only required when using a new remote controller for the first time. Follow these steps to link a new remote controller: 1. Turn on the remote controller and connect to the mobile device. Launch the DJI GO app. 2. Turn on the Intelligent Flight Battery. -
Page 36: Remote Controller Compliance Version
Phantom 4 User Manual 4. The remote controller is ready to link. The Remote Controller Status Indicator blinks blue and a beep is emitted. RC Control Setting RC Calibration Stick Mode Searching for aircraft frequency, Default stick mode is Mode 2, changing stick modes alters the way the aircraft is controlled. -
Page 37: Camera And Gimbal
Camera and Gimbal This section provides the technical specifications of the camera and explains the gimbal’s operation modes. © 2016 DJI. All Rights Reserved. -
Page 38: Camera Profile
The on-board camera uses the 1/2.3 inch CMOS sensor to capture video (up to 4096x2160p at 24fps or 4K at up to 30 fps with the Phantom 4 and 12 megapixel stills. You may choose to record the video in either MOV or MP4 format. -
Page 39: Gimbal
Camera Operation Use the Shutter and Video Recording buttons on the remote controller to shoot the images or videos through the DJI GO app. For more information about how to use these buttons, refer to “Controlling the Camera Page 31”. - Page 40 Two gimbal operation modes are available. Switch between the different operation modes on the camera settings page of the DJI GO app. Note that your mobile device must be connected to the remote controller for changes to take effect. Refer to the table below for details: The angle between gimbal’s orientation and aircraft’s nose remains...
-
Page 41: Dji Go App
DJI GO app This section introduces the four main functions of the DJI GO app. © 2016 DJI. All Rights Reserved. -
Page 42: Camera
Use AEB shoot to get more dynanic image Enter Camera View Equipment Library Discorvery Camera The Camera page contains a live HD video feed from the Phantom 4’s camera. You can also configure various camera parameters from the Camera page. [18] OPTI Safe to Fly (GPS) [17]... - Page 43 Phantom 4 User Manual [1] Flight Mode : The text next to this icon indicates the current flight mode. Tap to configure the MC (Main Controller) Settings. These settings allow you to modify flight limits and set the gain values.
- Page 44 Phantom 4 User Manual Shutter : Tap this button to take a single photo. Press and hold this button to select single shot, triple shot or time-lapsed shooting modes. Record : Tap once to start recording video, then tap again to stop recording. You can also press the Video Recording Button on the remote controller, which has the same functionality.
-
Page 45: Library
Library Tap into library to use automatic video editor that built into the DJI GO app.. You can then select a tem- plate and a specified number of clips, which are automatically combined to create a short film that can be shared immediately to the online video host. -
Page 46: Flight
Flight This section describes safe flight practices and flight restrictions. © 2016 DJI. All Rights Reserved. -
Page 47: Flight Environment Requirements
Maximum flight altitude & Radius Limits Maximum flight altitude and radius limits may be changed in the DJI GO app. Be aware that the maximum flight altitude cannot exceed 1640 feet (500 meters). In accordance with these settings, your Phantom 4... - Page 48 No-Fly Zones All No-Fly Zones are listed on the DJI official website at http://www.dji.com/flysafe/no-fly. No-Fly Zones are divided into Airports and Restricted Areas. Airports include major airports and flying fields where manned aircraft operate at low altitudes. Restricted Areas include border lines between countries or sensitive institute.
- Page 49 The value of R varies based on the definition of the restricted areas. (3) A “warning zone” has been set around the Restricted Area. When the aircraft approaches within 0.062 miles (100 m) of this zone, a warning message will appear on the DJI GO app. 100 m 100m ©...
- Page 50 Phantom 4 User Manual GPS Signal Strong Blinking Green Aircraft Zone Restriction DJI GO app Prompt Status Indicator Warning: You are in a No-fly Motors will not start. zone. Take off prohibited. No-fly Zone If the aircraft enters the restricted area in A-mode, but is Warning: You are in a no-fly zone.
-
Page 51: Preflight Checklist
4. Gimbal is functioning normally. 5. Motors can start and are functioning normally. 6. The DJI GO app is successfully connected to the aircraft. Calibrating the Compass IMPORTANT: Always calibrate the compass in every new flight location. The compass is very sensitive to electromagnetic interference, which can produce abnormal compass data and lead to poor flight performance or flight failure. -
Page 52: Auto Takeoff And Auto Landing
2.When flying in a new location or in a location that is different from the most recent flight. 3.When the mechanical or physical structure of the Phantom 4 has been changed. 4.When severe drifting occurs in flight, i.e. Phantom 4 does not fly in straight line. Auto Takeoff and Auto Landing Auto Takeoff Use auto takeoff only if the Aircraft Status Indicators are blinking green. -
Page 53: Starting/Stopping The Motors
There are two methods to stop the motors. Method 1: When Phantom 4 has landed, push the throttle down , then conduct the same CSC that was used to start the motors, as described above . Motors will stop immediately. Release both sticks once motors stop. - Page 54 Video Suggestions and Tips 1. Go through the full pre-flight checklist before each flight. 2. Select the desired gimbal operation mode in the DJI GO app. 3. Only shoot video when flying in P-mode. 4. Always fly in good weather and avoid flying in rain or heavy wind.
-
Page 55: Faq
© 2016 DJI. All Rights Reserved. - Page 56 ActiveTrack allows an aircraft to track a moving subject without a separate GPS tracker. Simply tap on the mobile device screen inside the DJI GO app to select the subject to be tracked. The aircraft will lock on the subject and start tracking it automatically from a safe distance.
- Page 57 How many minutes of flight time can Phantom 4 achieve with the new Intelligent Flight Battery? At sea level in calm environments when flying in ATTI mode, the Phantom 4 can achieve 28 minute flight times. This will vary due to different flight patterns, weather conditions and altitudes.
- Page 58 What is the difference between Sport Mode and ATTI Mode? Though Phantom 4 can fly up to 44.7mph in both Sport Mode and ATTI Mode, Phantom 4 will use GPS/ Glonass and its Vision Positioning System to achieve precision while hovering. In ATTI Mode, GPS and Vision Positioning System will not function to aid the aircraft in terms of hovering or navigation.
-
Page 59: Appendix
Appendix © 2016 DJI. All Rights Reserved. -
Page 60: Specifications
FHD: 1920×1080 24 / 25 / 30 / 48 / 50 / 60 / 120p 1280×720 24 / 25 / 30 / 48 / 50 / 60p Max. Bitrate Of Video Storage 60 Mbps © 2016 DJI. All Rights Reserved. - Page 61 Phantom 4 User Manual Supported File Systems FAT32 ( ≤ 32 GB ); exFAT ( > 32 GB ) Photo JPEG, DNG ( RAW ) Video MP4 / MOV ( MPEG – 4 AVC / H.264 ) Supported SD Cards Micro SD, Max capacity: 64GB.
-
Page 62: Firmwares Update
Use Micro SD card to update the aircraft and Intelligent Flight Battery. Connect to the Internet, launch the DJI GO app. The DJI GO app will start checking for available firmware updates automatically. Follow the on-screen instruction to update the latest firmware for the aircraft, remote controller and intelligent flight battery. -
Page 63: After-Sales Information
Phantom 4 User Manual After-Sales Information Visit the following pages to learn more about After-sales policy and warranty information: 1. After-sales Policy: http://www.dji.com/service 2. Refund Policy: http://www.dji.com/service/refund-return 3. Paid Repair Service: http://www.dji.com/service/repair-service 4. Warranty Service: http://www.dji.com/service/warranty-service FCC Compliance FCC Compliance This device complies with part 15 of the FCC Rules. - Page 64 Phantom 4 User Manual IC RSS warning This device complies with Industry Canada licence-exempt RSS standard (s). Operation is subject to the following two conditions: (1) this device may not cause interference, and (2) this device must accept any interference, including interference that may cause undesired operation of the device.
- Page 65 DJI Support http://www.dji.com/support This content is subject to change. Download the latest version from http://www.dji.com/product/phantom-3 If you have any questions about this document, please contact DJI by sending a message to DocSupport@dji.com. © 2016 DJI. All Rights Reserved.
Need help?
Do you have a question about the PHANTOM 4 and is the answer not in the manual?
Questions and answers