Table of Contents
Advertisement
Quick Links
Advertisement
Table of Contents

Related Manuals for Electrolux EW30GS80R


Summary of Contents for Electrolux EW30GS80R
- Page 1 EN gAS SLIDE-IN RANgE Use and care gUide A00539401 rev. A (March 2015)
-
Page 2: Table Of Contents
Finding Information Table of contents Please read & save this guide Finding information .............2 Thank you for choosing Electrolux, the new Important Safety Instructions ........3-6 premium brand in home appliances. This Use & Grounding Instructions ..........7 Care Guide is part of our commitment to customer Conversion to Liquefied Petroleum Gas (or LP Gas)...7... -
Page 3: Important Safety Instructions
Important Safety Instructions Read all instructions before using this appliance. This manual contains important safety symbols and instructions. Please pay attention to these symbols and follow all instructions given. Do not attempt to install or operate your appliance until you have read the safety precautions in this manual. Definitions This is the safety alert symbol. It is used to alert you to potential personal injury hazards. - Page 4 Important Safety Instructions Ask your dealer to recommend a qualified technician • DO NOT TOUCH SURFACE BURNERS, and an authorized repair service. Know how to AREAS NEAR THESE BURNERS, OVEN HEATING ELEMENTS OR INTERIOR disconnect the electrical power to the range at the SURFACES OF THE OVEN OR WARMER circuit breaker or fuse box in case of an emergency.
- Page 5 Important Safety Instructions • Utensil Handles Should Be Turned Inward and Should Not Extend Over Adjacent Surface Burners—To reduce the risk of burns, Electronic controllers can be damaged by cold ignition of flammable materials, and spillage temperatures. When you use your appliance due to unintentional contact with the utensil. for the first time, or if it has not been used for a The handle of the utensil should be positioned long period of time, make sure that it has been...
-
Page 6: Important Safety Instructions
Important Safety Instructions IMPORTANT INSTRUCTIONS IMPORTANT INSTRUCTIONS FOR USING YOUR OVEN FOR CLEANING YOUR • Use Care When Opening Door or Warmer Oven/ RANGE Drawer —Stand to the side of the appliance when • Clean the range regularly to keep all parts opening the door of a hot oven. -
Page 7: Grounding Instructions
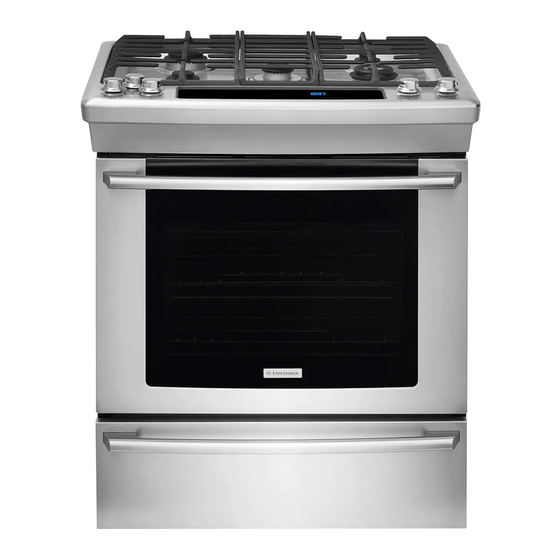
Grounding Instructions For personal safety, the cooktop must be properly Grounding grounded. For maximum safety, the power cord type wall Do not, under any must be plugged into an electrical outlet that is receptacle circumstances, cut, correctly polarized and properly grounded. remove, or bypass DO NOT Operate the cooktop using a 2-prong the grounding adapter or an extension cord. - Page 8 Features Deep Drawn Cooktop Porcelain Grates Large metal handle Touch activated glass control panel Regular Burner 9 500 BTU Glass oven door Power Burner Simmer Burner 16 000 BTU 5 000 BTU Warmer oven Oven Door Latch Oven vent Slideable Regular Oven racks Dual Flame...
-
Page 9: Features
Features Wave-Touch™ oven features & options 1. Oven light 10. Rapid preheat 2. Control lock 11. Convection convert 3. Standard cooking 12. Cleaning • Bake • Broil Minimum & maximum control settings • Perfect-Convect ™ convection bake Feature Min. temp Max. temp • Perfect-Convect ™ convection roast • Keep warm Bake 170°F / 76°C 550°F / 288°C... - Page 10 Features Wave-Touch™ control display & keys 13. Perfect-Pair™ oven key pads Minimum & maximum time settings • Upper oven • Warmer oven Feature Min. time Max. time 14. Oven display Timer 1 1 min 11 hr 59 min 15. User preferences Timer 2 1 min 11 hr 59 min The following options are available under User Clock 12 hr 1:00 hr...
-
Page 11: Getting Started
Getting Started Setting clock at power up Timers When the appliance is powered up for the first time The two timers provided with the oven control or when the electric supply to the appliance has been serve as extra reminders in the kitchen. When a interrupted, the display will flash 12:00. Before any timer reaches less than 1 hour, the display will start function of the oven can be set, CANCEL off must to count down in minutes and seconds. -
Page 12: Control Lock
Getting Started Interior Luxury-Lighting™ Locations of the burners The cooktop is equipped with different sized Your appliance includes interior oven Luxury- Lighting™ that gradually brightens and dims the burners. lights for the oven. The surface burners are located on the cooktop as follows (See Figure): key controls the interior oven lights. - a 5 000 BTU (natural gas) burner located at the right rear position;... -
Page 13: Placement Of Burner Heads And Caps, Burner
Getting Started Placement of burner heads Proper burner adjustments and caps The color of the flame is the key to proper burner adjustment. A good flame is clear, blue and hardly For the 18 000 BTU burner : visible in a well-lighted room. Each cone of flame Place the burner head over the gas orifice (Figure should be steady and sharply defined. Adjust or 2). Be careful not to damage the electrode while clean burner if flame is yellow-orange. To clean placing the burner head over the orifice. Make burner, see instructions under General Care &... -
Page 14: Home Canning
Getting Started Home Canning Flame size Be sure to read and observe all the following For most cooking, start on the highest control points when home canning with your appliance. setting and then turn to a lower one to complete Check with the United States Department of the process. Use the chart below as a guide for Agriculture (USDA) website and be sure to read determining proper flame size for various types of cooking. The size and type of utensil used and... -
Page 15: Setting Surface Controls
Setting Surface Controls Setting surface controls Your cooktop may be equipped with any combination of the following burners: Simmer Burner: best used for simmering delicate sauces, etc. Standard Burner: used for most all surface cooking Regular burner Dual burner needs. control knob control knob Large Burner: best used when bringing large quantities of liquid to temperature and when preparing larger quantities of food. Do not place plastic items such as salt and pepper Regardless of size, always select a utensil shakers, spoon holders or plastic wrappings on... -
Page 16: Setting The Warmer Oven
Setting the Warmer Oven Warmer oven operation To Operate the Warmer Oven Use the warmer oven to keep hot foods hot The purpose of the warmer oven is to keep hot such as: vegetables, gravies, meats, casseroles, cooked foods at serving temperature. Always start biscuits and rolls, pastries and heated dinner with hot food. -
Page 17: Before Setting The Oven Controls
Before Setting the Oven Controls Air circulation in the oven Oven racks If using 1 rack, place in center of oven. If using multiple racks, stagger cookware as shown. For best air circulation and baking results allow Protective liners - Do not use aluminum foil 2-4" (5-10 cm) around the cookware for proper air or any other material to line the oven bottom. -
Page 18: Removing, Replacing, And Arranging Flat Or Offset Oven
Before Setting the Oven Controls Removing, replacing, and arranging flat or offset oven 5. Be sure to grasp both upper and lower rack portions racks together when removing or handling the glide rack. The rack portions move independently and are • To arrange - Always arrange the oven racks when difficult to handle unless held together. the oven is cool (prior to operating the oven). To replace the glide rack: • To remove - Pull the oven rack straight forward until 1. -
Page 19: Setting Oven Controls
Setting Oven Controls About rapid preheat Use the rapid preheat option on single rack NOTE baking to quickly bring the upper oven to baking temperature. You may press CANCEL at any time when setting the control or during the cooking process. The rapid preheat option may be set with the following cooking features: • Bake... -
Page 20: Rapid Preheat
Setting Oven Controls About baking in oven If your recipe requires a different baking temperature than the auto-suggested (default) temperature (example below shows upper oven Use the bake feature to cook most food items that temperature set for 425°F/218°C): require normal cooking temperatures. Bake may be set with the following options: Example • Rapid preheat... -
Page 21: Bake
Setting Oven Controls Using cook time Adding a cook time when baking is beneficial when See example below to set the oven for bake, a recipe requires a specific temperature and period starting immediately with preheating to the auto- of time to cook. Following the recipe cook time suggest (default) setting of 350°F (176°C) and then helps insure the best possible results. -
Page 22: Using Cook Time With End Time
Setting Oven Controls Using cook time with end time Adding a cook time along with a specific end time See example below to set the upper oven with gives the same benefits as the cook time option preheating for bake at 375°F (176°C) for 50 in addition to controlling exactly when the cooking minutes and to automatically shut-off at 5:30: process will begin and end. -
Page 23: Setting Broil
Setting Oven Controls Broiling in oven Setting broil Use the broil feature to cook meats that require See example below to set broil for the upper oven direct exposure to radiant heat for optimum starting immediately with the auto-suggest (default) browning results. -
Page 24: Broil
Setting Oven Controls Setting broil The broil pan insert (if equipped) contains slots that allows grease from the meat to drain into the broil pan. Place prepared meat on broil pan insert and then place onto broiler pan as shown -Fig. 1-. Insert Broil pan Fig. -
Page 25: Setting Convection Bake
Setting Oven Controls About convection bake Setting convection bake Convection bake is part of the Perfect-Convect³™ The following temperature settings apply to the system. Convection bake uses a fan to circulate conv bake feature: • Auto-suggest (default) setting: 350°F/176°C the oven heat evenly and continuously. The improved heat distribution allows for even cooking • Min. bake setting : 300°F/148°C with excellent results. -
Page 26: Using Convection Convert
Setting Oven Controls Using convection convert Once START is pressed the oven display shows The conv convert option allows you to convert any PRE-HEATING. After the oven reaches the normal baking recipe using the convection bake converted set temperature, PRE-HEATING will turn feature. -
Page 27: Convection Roast
Setting Oven Controls About convection roast Setting convection roast How convection roast works See example below to set convection roast to start immediately with the auto-suggest (default) setting: Convection roast is part of the Perfect-Convect³™ system. Convection roast combines a cook cycle Example with the convection fan and element to rapidly roast meats and poultry. -
Page 28: Roasting Recommendations
Setting Oven Controls Roasting recommendations Roasting rack instructions When preparing meats for convection roasting, you Roasting rack may use the broiler pan, insert and the roasting rack supplied with your appliance. The broiler pan will catch grease spills and the insert will help prevent grease splatters. The roasting rack fits on top of the insert allowing the heated air to circulate Insert... - Page 29 Setting Oven Controls About the probe function Checking the internal temperature of your food is IMPORTANT the most effective way of insuring that your food has been properly cooked. When cooking meat • Use only the probe supplied with your such as roasts, hams or poultry you can use the appliance;...
-
Page 30: Keep Warm
Setting Oven Controls About keep warm Setting the probe See the example below to set the probe target Use the keep warm feature to keep hot foods warm. Keep warm may be set with the following temperature to 180°F/82°C when using the convection roast feature with oven set temperature options: for 325°F/162°C. -
Page 31: Slow Cook
Setting Oven Controls About slow cook Setting slow cook The slow cook feature may be used to cook foods See the example below to set a slow cook on Lo. more slowly at lower oven temperatures. The cooking results will be like that of a Slow Cooker or Example Crock-Pot. -
Page 32: Perfect Turkey
Setting Oven Controls About Perfect Turkey™ Setting Perfect Turkey™ Heated air circulates around the turkey from all See the example below to use perfect turkey at the sides, sealing in juices and flavors. Poultry cooked default setting of 325°F and the probe at the default with this feature are crispy brown on the outside setting of 180°F (82°C). -
Page 33: Defrost
Setting Oven Controls About defrost About dehydrate Use the defrost feature to thaw small portions of The dehydrate feature dries with heat from the delicate items such as cream cakes, frozen cream elements. The heat is circulated throughout the pies and cheesecake at room temperature. While oven by the convection fan. Use dehydrate to dry in the defrost mode, the convection fan will operate and/or preserve foods such as fruits, vegetables, to circulate room temperature air around the food... -
Page 34: Bread Proof
Setting Oven Controls Setting dehydrate (continued) Setting bread proof See example below to set bread proof for For best results 85°F/30°C. Example • Dry most fruits and vegetables at 140°F. Dry Step Press herbs at 100°F. • Drying times vary depending on the moisture 1. Press UPPER OVEN UPPER OVEN and sugar content of the food, the size of the pieces, the amount being dried and the humidity 2. - Page 35 Setting Oven Controls Recalling a favorite About my favorite The example below shows how to recall a favorite You may store up to 3 of your most frequently used cooking instruction. heat settings and cooking times, for the upper oven. These keys will light in the display when they Example are available for setting or recalling.
- Page 36 Setting Oven Controls Perfect Program™ multi stage Multi stage will allow you to program up to 3 stages Example for 2 stages of cooking. Each stage may be programmed with a cooking feature, set temperature and a cook time. Step Press Multi stage is ideal when you want to add a keep warm after a cooking function.
- Page 37 Setting Oven Controls Setting multi stage See the example to program a multi stage feature Example for 3 stages for a casserole. For stage 1, bake at 350°F for 1 hr. For stage 2, to brown, broil for at 500°F for 4 Step Press minutes.
-
Page 38: Sabbath Mode
Setting Oven Controls Sabbath mode Sabbath mode is available only in upper cavity. If the oven temperature is set outside of the This mode will turn off all audible tones or visual temperature range, the oven will default to the display changes normally provided by the oven nearest available temperature. -
Page 39: Setting Sabbath Mode
Setting Oven Controls Setting Sabbath mode Canceling Sabbath mode The example below shows setting the oven to The example below shows how to cancel the observe the Sabbath (and Jewish holidays). Sabbath mode. Example Example Step Press Step Press 1. Press UPPER OVEN. UPPER 1. -
Page 40: Setting Clock
Setting Your Preferences Wave-Touch™ user Setting clock display preferences The clock display mode allows you to turn the clock display on or off. key controls options for preferences. The See the example below to change the clock display display will show a digital abbreviation and a value to OFF. -
Page 41: Setting Your Preferences
Setting Your Preferences Changing between °F or °C Setting 12 or 24 hour mode The clock display mode allows you to choose Your control has the ability to display and set Fahrenheit or Celsius temperatures. The factory between 12 and 24 hour mode. The factory preset preset temperature display is Fahrenheit. -
Page 42: Mode (Aud)
Setting Your Preferences Setting 12hr energy saving Setting audio mode mode The audio control feature allows you to control the audio volume for the oven control. You may The oven control has a factory preset built-in 12 turn the audio off and later return to operating with hour energy saving feature that will shut off the all the normal audible sounds and alerts. -
Page 43: Reset (Rst)
Setting Your Preferences Adjusting oven temperature - Factory default reset User preference offset You may choose to restore your factory settings. This will erase all settings or favorites that you Your appliance has been factory calibrated and have saved. tested to ensure an accurate baking temperature. See the example below reset your control. -
Page 44: Setting Self-Clean Cycle
Setting Self-Clean Cycle Using the self-clean feature Adhere to the Following Cleaning • Remove the broiler pan and insert, all utensils Precautions: and any foil. These items can not withstand high • Allow the oven to cool before cleaning. cleaning temperatures. • Wear rubber gloves when cleaning any exterior • This model comes with lubricated porcelain parts of the oven manually. -
Page 45: Setting Self-Clean Cycle
Setting Self-Clean Cycle To set the controls for a delayed Self- Starting self-clean cycle Cleaning cycle: The example below shows setting the upper oven A self-cleaning oven cleans itself with high for a medium (3 hour) self-clean to end at 6:00 temperatures (well above cooking temperatures) o’clock: which eliminate soil completely or reduce it to a... - Page 46 Care and Cleaning Cleaning Recommendations Cleaning Recommendation Surface Type • Aluminum (trim pieces) & Use hot, soapy water and a cloth. Dry with a clean cloth. vinyl (some models) • Painted and plastic For general cleaning, use hot, soapy water and a cloth. For more difficult control knobs soils and built-up grease, apply a liquid detergent directly onto the soil. • Body parts Leave on soil for 30 to 60 minutes.
-
Page 47: Care And Cleaning
Care and Cleaning Replacing the dual left/right Special door care instructions corner oven lights IMPORTANT The interior oven lights are located at the rear of the oven cavity and are covered with a glass Most oven doors contain glass that can break. shield. -
Page 48: Oven Door Removal
Care and Cleaning Removing and replacing the oven door Oven door hinge location To prevent possible burns, do not attempt to remove the oven door until the oven has completely cooled. The door is heavy. Be careful when removing and lifting Figure 1 - Door hinge location the door. -
Page 49: Broiler Pan Cleaning Tips
Care and Cleaning Broiler pan cleaning tips Cleaning cooktop, burner grates, caps and heads To make cleaning easier, line the bottom of the broiler pan with aluminum foil. DO NOT cover the The cooktop is designed to make cleaning easier. broiler grid with foil. - Page 50 Care and Cleaning Cleaning cooktop, burner grates, caps and heads Burner heads Lift the burner cap from the burner head. The ● To avoid possible burns use care when surface burner heads are secured to the cooktop and must be cleaned in place. cleaning the cooktop.
-
Page 51: Caring For Your Porcelain Enameled Glide Racks
Care and Cleaning Caring for your porcelain enameled glide racks Handle oven racks only when they are cool. After cooking or after the self clean cycle, racks will be very hot and can cause burns. 4. Extend and return the glide rack several times IMPORTANT along the tracks to distribute the lubrication. -
Page 52: Baking Problems
Solutions to common problems Baking problems For best cooking results pre-heat the oven when baking cookies, breads, cakes, pies or pastries, etc. There is no need to preheat the oven for roasting meats or baking casseroles. The cooking times and temperatures needed to bake a product may vary slightly from your previous appliance. -
Page 53: Solutions To Common Problems
Solutions to common problems Before you call for service, review the following list. It may save you time & expense. The list includes common occurrences that are not the result of defective workmanship or materials in this appliance. Before you call Problem Solution • Electronic control has detected a fault condition. Push CANCEL pad to clear Oven control beeps and the display and stop the display from beeping. Reprogram the oven. If a fault displays an F reoccurs, record the fault number, push the CANCEL pad and contact an authorized servicer. - Page 54 Solutions to common problems Before you call Problem Solution • Meat too close to the broiler element. Reposition the rack to provide more Oven smoke clearance between the meat and the broiler. Preheat broil element for quick excessively searing operation. during broiling • Meat not properly prepared. Remove excess fat from meat. Cut remaining fatty edges to prevent curling, but do not cut into the lean. • Grid on broiler pan wrong side-up. Grease does not drain into broiler pan. Always place the grid on the broiler pan with the ribs up and the slots down to allow grease to drip into the pan.
-
Page 55: Warranty
Warranty Your appliance is covered by a one year limited warranty. For one year from your original date of purchase, Electrolux will repair or replace any parts of this appliance that prove to be defective in materials or workmanship when such appliance is installed, used, and maintained in accordance with the provided instructions. - Page 56 www.electrolux-store.com...
Need help?
Do you have a question about the EW30GS80R and is the answer not in the manual?
Questions and answers