H3C S5120-SI Series Installation Manual
Hide thumbs
Also See for S5120-SI Series:
- Command reference manual (910 pages) ,
- Configuration manual (745 pages) ,
- Operation manual (697 pages)

Related Manuals for H3C S5120-SI Series


Summary of Contents for H3C S5120-SI Series
- Page 1 H3C S5120-SI Series Ethernet Switches Installation Manual Hangzhou H3C Technologies Co., Ltd. http://www.h3c.com Manual Version: 6PW102-20090715...
- Page 2 SecPro, SecPoint, SecEngine, SecPath, Comware, Secware, Storware, NQA, VVG, V G, V G, PSPT, XGbus, N-Bus, TiGem, InnoVision and HUASAN are trademarks of Hangzhou H3C Technologies Co., Ltd. All other trademarks that may be mentioned in this manual are the property of their respective owners.
-
Page 3: About This Manual
About This Manual Organization H3C S5120-SI Series Ethernet Switches Installation Manual is organized as follows: Chapter Contents Briefly introduces the appearance, system description, as well as the 1 Product Overview features and applications of the S5120-SI series switches. Describes the requirements on installation site, the safety... - Page 4 Command Manual commands. Obtaining Documentation You can access the most up-to-date H3C product documentation on the World Wide Web at this URL: http://www.h3c.com. The following are the columns from which you can obtain different categories of product documentation: [Products & Solutions]: Provides information about products and technologies, as well as solutions.
-
Page 5: Table Of Contents
Table of Contents 1 Product Overview ............................1-1 Introduction .............................1-1 S5120-20P-SI............................1-2 Front Panel ............................1-2 Rear Panel............................1-2 Power Supply System ........................1-2 Cooling System ..........................1-2 S5120-28P-SI............................1-3 Front Panel ............................1-3 Rear Panel............................1-3 Power Supply System ........................1-3 Cooling System ..........................1-3 S5120-52P-SI............................1-4 Front Panel ............................1-4 Rear Panel............................1-4 Power Supply System ........................1-4 Cooling System ..........................1-4 Ports ................................1-4... - Page 6 Connecting an AC Power Cord.......................3-9 Verifying the Installation ........................3-10 4 Initial Power-On ............................4-1 Setting Up the Configuration Environment....................4-1 Connecting the Console Cable .......................4-1 Console Cable ..........................4-1 Connection Procedure........................4-2 Setting Terminal Parameters ........................4-2 Booting the Switch ..........................4-5 Checking Before Power-On......................4-5 Powering On the Switch ........................4-5 Changing the Boot Mode.........................4-7 5 Loading Software............................5-1 Introduction .............................5-1...
-
Page 7: Product Overview
Product Overview Introduction H3C S5120-SI Series Ethernet Switches (hereinafter referred to as the S5120-SI series) are Layer 2 Gigabit Ethernet switching products developed by Hangzhou H3C Technologies Co., Ltd. (hereinafter referred to as H3C). The S5120-SI series are intelligent manageable switches designed for network environments where high performance, high-density port distribution, and easy installation are required. -
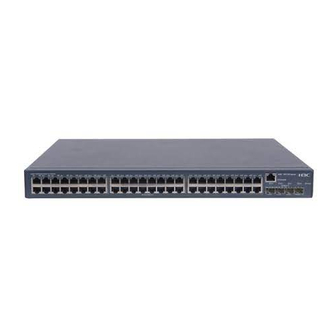
Page 8: S5120-20P-Si
(4) Console port (5) 1000Base-X SFP interface 10/100/1000Base-T autosensing Ethernet ports on the S5120-SI series are numbered in up-down and left-right order, with the first upper left one being Port 1, the first lower left one being Port 2, the second upper left one being Port 3, and so on. -
Page 9: S5120-28P-Si
S5120-28P-SI Front Panel Figure 1-3 S5120-28P-SI front panel (1) 10/100/1000Base-T auto-sensing Ethernet port (2) Port status LED (3) Power LED (Power) (4) Console port (5) 1000Base-X SFP interface Rear Panel Figure 1-4 S5120-28P-SI rear panel (1) AC receptacle (2) Grounding screw Power Supply System AC power input: Rated voltage range: 100 VAC to 240 VAC, 50 Hz or 60 Hz... -
Page 10: S5120-52P-Si
Input voltage range: 90 VAC to 264 VAC, 47 Hz or 63 Hz Cooling System The S5120-52P-SI is equipped with one fan for heat dissipation. Ports Console Port Each S5120-SI series provides one console port on the front panel. Table 1-2 describes the console port specifications. -
Page 11: 10/100/1000Base-T Ethernet Port
Transmission medium Category-5 unshielded twisted pair cable Standard IEEE 802.3i, IEEE 802.3u, IEEE 802.3ab 1000Base-X SFP Interface Each S5120-SI series provides four 1000Base-X SFP interfaces on its front panel. You can select the GE SFP transceivers described in Table 1-4. - Page 12 The types of SFP transceivers may update with time. For information about transceivers, contact H3C technical support or marketing staff. For the models and specifications of each kind of transceivers, refer to H3C Low End Series Ethernet Switches Pluggable Modules Manual.
-
Page 13: Leds
10/100/1000Base-T auto-sensing Ethernet port status LED Each port of the S5120-52P-SI has a bi-color LED indicating its status; whereas each port of other models of the S5120-SI series has two LEDs, with only one in the ON state at a time. -
Page 14: 1000Base-X Sfp Interface Status Led
Table 1-7 10/100/1000Base-T auto-sensing Ethernet port LEDs description Switch model Ethernet port status LED Meaning Solid green The port operates at a rate of 1000 Mbps Data is being transmitted or received at 1000 Fast blinking Green Mbps. The port is not up or does not operate at 1000 Mbps S5120-20P-SI Solid yellow... -
Page 15: Installation Preparations
Do not open the chassis to avoid electrical shocks when the switch is operating or just when the switch is powered off. Installation Site The S5120-SI series must be used indoors. You can mount the switch in a rack or on a workbench, but make sure: Adequate clearance is reserved at the air inlet/exhaust vents for ventilation. -
Page 16: Electromagnetic Susceptibility
Use electromagnetic shielding, for example, shielded interface cables, when necessary. Route interface cables only indoors to prevent signal ports from getting damaged by over-voltage or over-current caused by lightning strikes. Laser Safety The S5120-SI series are Class 1 laser devices. -
Page 17: Installation Tools
When an SFP module on the S5120-SI series is operating, do not stare into the optical port because the laser light emitted from the optical fiber may hurt your eyes. Installation Tools Flat-blade screwdriver Phillips screwdriver ESD-preventive wrist strap No installation tools are shipped with the S5120-SI series. -
Page 18: Installing A Switch
Installing a Switch On a mounting screw of the chassis of the H3C series switches, there is a seal labeled. You need to keep it intact before asking the agent to maintain the switch. You need to get the permission of the local agent before you can open the chassis. -
Page 19: Attaching The Mounting Brackets To A Switch
Figure 3-2 Two-holed mounting bracket (1) Screw hole used to fix the mounting bracket to the rack (with an M6 screw) (2) Screw hole used to fix the switch to the mounting bracket Figure 3-3 Four-holed mounting bracket (1) Screw hole used to fix the mounting bracket to the rack (with an M6 screw) (2) Screw hole used to fix the switch to the mounting bracket Attaching the Mounting Brackets to a Switch The installation of actual mounting brackets varies with devices. - Page 20 The mounting brackets can be attached to a switch for front, or rear mounting. You can choose a proper position according to the actual requirements. Table 3-2 shows the position support for the S5120-SI series. Table 3-2 Description of mounting position support for the S5120-SI series Model Mounting position...
-
Page 21: Mounting The Switch To A Rack
Figure 3-6 Install a four-holed mounting bracket on the chassis (front part) (1) Front panel Figure 3-7 Install a four-holed mounting bracket on the chassis (rear part) (1) Front panel Mounting the Switch to a Rack Step1 Put on an ESD-preventive wrist strap and make sure the rack is well grounded and is firm enough to hold the switch and cables. -
Page 22: Mounting The Switch On A Workbench
Figure 3-8 Mount the S5120-SI series (using two-holed mounting bracket) to a rack 前(两孔) (1) Front panel (2) Rear panel Installation of S5120-52P-SI (using four-holed mounting bracket) into a rack is similar to that of other S5120-SI series (using two-holed mounting bracket). -
Page 23: Connecting The Pgnd Cable
Ensure good ventilation and a space of 10 cm (3.94 in.) around the chassis for heat dissipation. Avoid heavy objects on the switch. Connecting the PGND Cable Correctly connecting the switch PGND cable is crucial to the lightning protection and electromagnetic susceptibility (EMS) of a switch. - Page 24 Figure 3-9 Connect the PGND cable to the grounding hole of switch (1) Rear panel of the switch (2) Grounding sign (3) Grounding hole (4) OT terminal (5) PGND cable (6) Grounding screw To attach the other end of the PGND cable to the grounding strip in the equipment room, follow these steps: Step1 Cut the PGND cable to a proper length according to the distance between the switch and the grounding strip.
-
Page 25: Where A Grounding Conductor Can Be Buried
The PGND cables supplied with the S5120-SI series do not provide OT terminals at the ends connecting the grounding strip. You need to prepare proper OT terminals by yourself. The fire main and lightning rod of a building are not suitable for grounding the switch. The PGND cable of the switch should be connected to the grounding device for the equipment room. -
Page 26: Connecting An Ac Power Cord
Otherwise, the grounding effect may not be ensured, which easily causes damage to the switch. Connecting an AC Power Cord The S5120-SI series uses an external AC power system for its power supply. Follow these steps to connect an AC power cord: Step1 Connect one end of the supplied PGND cable to the grounding screw on the rear panel of the chassis and the other end to the ground as near as possible. -
Page 27: Verifying The Installation
Make sure that the PGND cable has been properly connected before powering on the switch. Verifying the Installation Before powering on the switch, check that: There is enough space for heat dissipation around the switch, and the rack or workbench is stable. The PGND cable is connected. -
Page 28: Initial Power-On
Initial Power-On Setting Up the Configuration Environment Set up the configuration environment as follows: Connect a terminal (a PC in this example) to the console port on the switch with a console cable. Figure 4-1 Network diagram for configuration environment setup Connecting the Console Cable Console Cable A console cable is an 8-core shielded cable. -
Page 29: Connection Procedure
RJ-45 Signal Direction DB-9 ← → → → → Connection Procedure When you want to use the terminal to configure the switch, follow these steps to connect a terminal device to the switch using the console cable: Plug the DB-9 female connector of the console cable to the serial port of the console terminal or Connect the RJ-45 connector of the console cable to the console port of the switch. - Page 30 Data bits: 8 Parity: None Stop bits: 1 Flow control: None Emulation: VT100 The specific procedure is as follows: Step1 Select Start > Programs > Accessories > Communications > HyperTerminal to enter the HyperTerminal window. The Connection Description dialog box appears, as shown below. Figure 4-3 Connection description of the HyperTerminal Step2 Type the name of the new connection in the Name text box and click OK.
- Page 31 Step3 Click OK after selecting a serial port. The following dialog box appears. Set Bits per second to 9600, Data bits to 8, Parity to None, Stop bits to 1, and Flow control to None. Figure 4-5 Set the serial port parameters Step4 Click OK after setting the serial port parameters and the system enters the HyperTerminal window shown below.
-
Page 32: Booting The Switch
The console cable is properly connected; the terminal or PC used for configuration has been started; and the configuration parameters have been set. Powering On the Switch The S5120-SI series have the same Boot ROM display style. This document uses the Boot ROM output information on the S5120-28P-SI as an example: Starting.. - Page 33 CPU L1 Cache : 32KB CPU Clock Speed : 333MHz Memory Type : DDR2 SDRAM Memory Size : 128MB Flash Size : 128MB CPLD Version : 001 PCB Version : Ver.B Mac Address : 000ef2005120 Press Ctrl-B to enter Extended Boot menu...1 The last line asks whether you want to enter the Boot ROM menu.
-
Page 34: Changing The Boot Mode
The appearance of "Press ENTER to get started" indicates that the automatic startup of the switch is complete. Press Enter. The following prompt is displayed: <H3C> You can configure the switch now. Changing the Boot Mode By default, the system starts up in fast boot mode. If you want to change the boot mode to normal,... - Page 35 9. Set switch startup mode 0. Reboot Enter your choice(0-9): Enter 0. The system reboots in normal startup mode and displays the following information: Starting..************************************************************************ H3C S5120-28P-SI BOOTROM, Version 107 ************************************************************************ Creation Date : Feb 11 2009 CPU Type : ARM926...
- Page 36 You can configure the switch now. The H3C series switches provide abundant command views. For detailed descriptions about the configuration commands and CLI, refer to H3C S5120-SI Series Ethernet Switches Operation Manual and H3C S5120-SI Series Ethernet Switches Command Manual.
-
Page 37: Loading Software
Loading Software Introduction The S5120-SI series does not provide independent Boot ROM program but integrates it with the application program in host software package with the extension name of .bin. Loading application files: Download the host software package to the flash memory on the switch and set the attribute (main, backup, or none) of the application files. -
Page 38: Introduction To The Boot Rom Menu
Introduction to the Boot ROM Menu Starting..************************************************************************ H3C S5120-28P-SI BOOTROM, Version 107 ************************************************************************ Creation Date : Feb 11 2009 CPU Type : ARM926 CPU L1 Cache : 32KB CPU Clock Speed : 333MHz Memory Type : DDR2 SDRAM Memory Size... -
Page 39: Loading Files Using Xmodem Through Console Port
The items in the Boot ROM menu are described in Table 4-2. Currently, Boot ROM files are not provided separately by the S5120-SI series; instead, they are stored together with application files in the files with the name extension of .bin. - Page 40 Task Remarks Required Set the download rate of the console port on the Log in to the switch through the HyperTerminal switch and then set the download rate of the console port on the switch. Optional Set the baud rate of the serial port on the terminal Change the rate of the serial port on the terminal to be consistent with that of the console port on the switch.
- Page 41 After the system displays “Enter your choice(0-3):”, enter 1 to enter the protocol parameter setting menu. All the Boot ROM files to be loaded are complete Boot ROM files. 1. Set TFTP protocol parameter 2. Set FTP protocol parameter 3. Set XMODEM protocol parameter 0.
- Page 42 Now that the console communication baud rate of the switch has been changed to 115200 bps while that of the terminal is still 9600 bps, the two sides cannot communicate with each other. According to the prompt, you need to change the baud rate of the terminal to 115200 bps. Typically, the size of a .bin file is over 9 MB.
- Page 43 Figure 5-2 Properties dialog box Figure 5-3 Modify the baud rate Step3 Select Call > Call to reestablish the connection.
- Page 44 Figure 5-4 Reestablish the connection The new settings can take effect only after you reestablish the connection. Establish a connection between the terminal and the switch using the changed rate Press Enter to reestablish the connection between the terminal and the switch and download the application file at 115200 bps.
- Page 45 Figure 5-6 File transmission dialog box Step2 Click Send. The following dialog box appears: Figure 5-7 Send the application file using XMODEM Updating the Boot ROM file on the switch After the Boot ROM file is downloaded, the terminal displays the following information: Loading ...CCCC Done! Will you Update Basic BootRom? (Y/N):Y The system asks you whether you want to update the basic Boot ROM section.
- Page 46 Set the baud rate to 9600 bps (refer to “Change the rate of the serial port on the terminal” on page 5-6 for detailed operation). If you select 9600 bps as the download rate, skip this step, that is, you do not need to modify the baud rate of the HyperTerminal.
-
Page 47: Loading Files Using Tftp Through Ethernet Port
Loading Files Using TFTP Through Ethernet Port Introductin to TFTP Trivial File Transfer Protocol (TFTP) is a TCP/IP protocol used for file transfer between client and server. It provides a simple and low-overhead file transfer service. TFTP provides unreliable data transfer over UDP. - Page 48 The PC and the TFTP/FTP server can be the same device. The TFTP/FTP server program is not provided with the S5120-SI series. Make sure that it is available by yourself. Run the TFTP Server program on the sever Run TFTP Server on the server connected with the switch’s Ethernet port, and specify the path of the application file to be downloaded.
- Page 49 Item Description Local IP Address : IP address of the switch (for example, 10.10.10.3) Gateway IP Address : IP address of the gateway (suppose it is not specified) Enter the file name and IP addresses based on the actual condition. If the switch and the server are on the same network segment, you can specify any unused IP address of the network for the switch without specifying the gateway’s IP address;...
-
Page 50: Loading Files Using Ftp Through Ethernet Port
3. Set XMODEM protocol parameter 0. Return to boot menu Enter your choice(0-3):3 You can enter 1 to load the application file. The procedure of loading an application file is similar to that of loading a Boot ROM file. The difference lies in that the system displays the prompt of loading the application file rather than the Boot ROM file. - Page 51 Task Remarks Run the terminal emulation program on the PC connected with the switch’s console port. Start the switch and enter the Boot ROM menu, and Required then enter the protocol parameter setting menu. Log in to the switch through the HyperTerminal and configure the protocol for uploading the Enter the protocol parameter setting menu Boot ROM file.
- Page 52 0. Return to boot menu Enter your choice(0-3): Configure the switch to load the Boot ROM file through FTP In the protocol parameter setting menu, enter 2 to update the Boot ROM file using FTP, and then set the FTP parameters. Load File Name :update.bin Server IP Address...
-
Page 53: Loading Files Through Cli
Updating extended BootRom..Done! Restart the switch to make the updated Boot ROM file effective Press any key to return to the Boot ROM update menu. Press enter key when ready 1. Update full BootRom 2. Update extended BootRom 3. Update basic BootRom 0. -
Page 54: Loading Files Using Ftp
[ftp] get update.bin update.bin [ftp] bye Step2 Load the Boot ROM file. <H3C> bootrom update file update.bin This command will update bootrom file on the specified board(s), Continue? [Y/N]:y Now updating bootrom, please wait... Step3 Load the application file, and specify the file as the main program file. -
Page 55: Loading Files Using Tftp
Loading Files Using TFTP Loading a file through TFTP is similar to loading a file through FTP. The switch can serve only as a TFTP client that downloads the file from the TFTP server to its flash memory. The procedure after download is the same as loading the file remotely through FTP. -
Page 56: Maintenance And Troubleshooting
Maintenance and Troubleshooting File Loading Failure If file loading fails, the system runs steadily using the original system files. In this case, check whether the physical ports are properly connected. If not, reconnect them correctly and restart the loading procedure. If so, view the loading procedure information displayed on the HyperTerminal to check for input errors. -
Page 57: Power Supply Failure
Power Supply Failure You can determine whether the power system of a switch functions normally by viewing the power LED on the front panel. The power LED stays on when power system is normal. Otherwise, please check whether: The power cord is correctly connected, the power receptacle on the switch and the AC power socket function normally. - Page 58 Table of Contents Appendix A Lightning Protection of the Switch······················································································· A-1 Installation of Lightning Arrester for AC Power (Socket Strip with Lightning Protection) ······················ A-1 Appendix B Compliance and Safety Manual ···························································································· B-1 Regulatory Compliance Information······································································································· B-1 Regulatory compliance standards ·································································································· B-1 European Directives compliance····································································································...
-
Page 59: Appendix A Lightning Protection Of The Switch
Appendix A Lightning Protection of the Switch Installation of Lightning Arrester for AC Power (Socket Strip with Lightning Protection) Lightning arrester will not be shipped with the switch. You should purchase it by yourself if needed. If an outdoor AC power cord should be directly led to the switch, please serially connect the lightning arrester for AC power (Socket Strip with Lightning Protection) before you plug AC power cord into the switch, thus to prevent the possible damage to the switch due to lightning strike. - Page 60 Make sure that the arrester is well grounded before using the lightning arrester for power. After inserting AC power cord plug of switch into the socket of lightning arrester, if the green LED is on and the red LED does not alarm, it means that the lightning arrester of power is running and the function of lightning protection has taken effect.
-
Page 61: Appendix B Compliance And Safety Manual
Appendix B Compliance and Safety Manual Regulatory Compliance Information Regulatory compliance standards Table B-1 Regulatory compliance standards Discipline Standards FCC Part 15 (CFR 47) CLASS A ICES-003 CLASS A VCCI-3 CLASS A VCCI-4 CLASS A CISPR 22 CLASS A EN 55022 CLASS A AS/NZS CISPR22 CLASS A CISPR 24 EN 55024... -
Page 62: Usa Regulatory Compliance
Directive and must be disposed of in a responsible manner. USA regulatory compliance FCC Part 15 H3C S5120-SI series comply with Part 15 of the FCC Rules. Operation is subject to the following two conditions: This device may not cause harmful interference. -
Page 63: Canada Regulatory Compliance
CISPR 22 compliance H3C S5120-SI series comply with the requirements of CISPR 22 for Class A Information Technology Equipment (ITE). Warning: If this equipment is used in a domestic environment, radio disturbance may arise. When such trouble occurs, the user may be required to take corrective actions. - Page 64 Before any operation is performed, please read the operation instructions and precautions carefully to minimize the possibility of accidents. The Note, Caution, Warning and Danger items in other manuals do not cover all safety precautions that should be followed. They are only the supplements to the safety precautions for operations as a whole.
- Page 65 为了避免可能发生的事故, 请在进行任何操作前, 仔细阅读设备操作手册和本章节的安全规范。 手册中 出 现的说明、注意、警告、危险,不能涵盖所有的安全预防,仅仅是在整个操作过程中的安全提示和补充。 因此,负责安装和日常维护本设备的人员必须具备安全操作基本技能。 操作人员要按照当地的安全规范进行操作。出现在产品手册中的安全预防措施仅仅是当地安全规范的补 充。 在操作本设备时,请认真执行产品手册规定的安全规范。 设备安装、维护人员必须通过专业培训,并且掌握足够的操作技能和安规预防意识。只有专业人员才能 担任本设备的安装和维护工作。 Conventions Used Symbole Erläuterung 应用惯例 The symbols in this manual are shown in the following table. They are used to remind the reader of the safety precautions during equipment installation and maintenance. Die Symbole in diesem Handbuch verwendeten sind in der folgenden Tabelle dargestellt.
- Page 66 Um das technisch bedingte Restrisiko auf ein Minimum zu begrenzen, ist es unbedingt erforderlich, die folgenden Regeln zu beachten: 为了避免对人和设备造成伤害,请认真执行下列要求: Read all the instructions before operation. Lesen Sie alle Anweisungen sorgfältig durch, bevor Sie mit dem Arbeiten beginnen. 在进行操作前仔细阅读手册内容。 When installing the unit, always make the ground connection first and disconnect it last. Beachten Sie, dass bei der Installation des Systems stets zuerst die Erdverbindung angebracht wird und das die Erdverbindung stets als letztes getrennt wird.
-
Page 67: Electricity Safety Elektrische Sicherheit 用电安全
Electricity Safety Elektrische Sicherheit 用电安全 High Voltage Hochspannung 高电压 High voltage power supply offers electric power for equipment operation. Direct contact or indirect contact (via damp objects) with high voltage and AC mains supply may result in fatal danger. Die Hochspannungsleitungen stellen für die Arbeit der Ausrüstung erforderliche Energie zur Verfügung. Direkter oder indirekter Kontakt (z. - Page 68 Non-standard and improper high voltage operations may result in fire and electric shock. Therefore, AC cable bridging and wiring through a certain area must follow the local rules and regulations. The personnel who perform high voltage operations should be qualified for high voltage and AC operations. Die Nichtbeachtung der Sicherheitsvorschriften bei der Arbeit mit Hochspannung kann zu Feuer und elektrischem Schlag führen.
- Page 69 禁止安装和移动带电的线缆。因为导电体和带电的线缆,即使短暂接触,也会引起电火花或电弧,从而 导致失火或是伤害眼睛。 Before the power cable is installed or removed, the power switch must be turned off. Das System muss stets abgeschaltet werden, bevor die Zuleitung angebracht oder entfernt wird. 在安装、移动线缆之前,请切断电源。 Before the power cable is connected, it must be confirmed that the power cable and label comply with the requirements of the actual installation.
-
Page 70: Laser Laser激光辐射
Arbeiten mit Hochspannung und Wechselstrom oder Arbeiten auf Stahltürmen und masten während eines Gewitters sind verboten. Um die Ausrüstung vor Beschädigung durch Blitzschlag zu schützen, ist eine ordnungsgemäße Erdung erforderlich. 禁止在雷雨天进行高压电源和 AC 交流电源安装操作,对金属架和天线的操作也是不允许的。为保护设 备免遭雷击破坏,设备应可靠接地。 Laser Laser 激光辐射 The laser hazard level of this equipment is Class 1. Die von diesem Laser ausgehende Gefahr entspricht der Kategorie 1.
Need help?
Do you have a question about the S5120-SI Series and is the answer not in the manual?
Questions and answers