
Related Manuals for Blizzard Lighting Stiletto 6


Summary of Contents for Blizzard Lighting Stiletto 6
- Page 1 Blizzard Lighting, LLC www.blizzardlighting.com Waukesha, WI USA Copyright (c) 2015...
-
Page 2: Table Of Contents
DMX Channel Values In-Depth 5. Appendix A Quick DMX Lesson Keeping Your Stiletto™ Z6 As Good As New Returns (Gasp!) Shipping Issues Troubleshooting Tech Specs Dimensional Drawings Page 2 Stiletto™ Z6 User Manual Rev. A (c) 2015 Blizzard Lighting, LLC... -
Page 3: Stiletto™ Z6 Moving Head Fixture
Blizzard Lighting™ assumes no responsibility or liability for any errors or omissions that may appear in this user manual. Blizzard Lighting™ reserves the right to update the existing document or to create a new document to correct any errors or omissions at any time. -
Page 4: Safety Instructions (Don't Stick Your Hand In The Toaster!)
• Avoid direct eye exposure to the light source while it is on. Caution! There are no user serviceable parts inside the unit. Do not open the housing or attempt any repairs yourself. In the unlikely event your unit may require service, please contact Blizzard Lighting at www. blizzardlighting.com/support. Page 4 Stiletto™... -
Page 5: Meet The Stiletto™ Z6
Red Intensity (0% <--> 100%) Green Intensity (0% <--> 100%) Blue Intensity (0% <--> 100%) White Intensity (0% <--> 100%) Full colors and auto mode (slow <--> fast) Motor Reset Page 5 Stiletto™ Z6 User Manual Rev. A (c) 2015 Blizzard Lighting, LLC... -
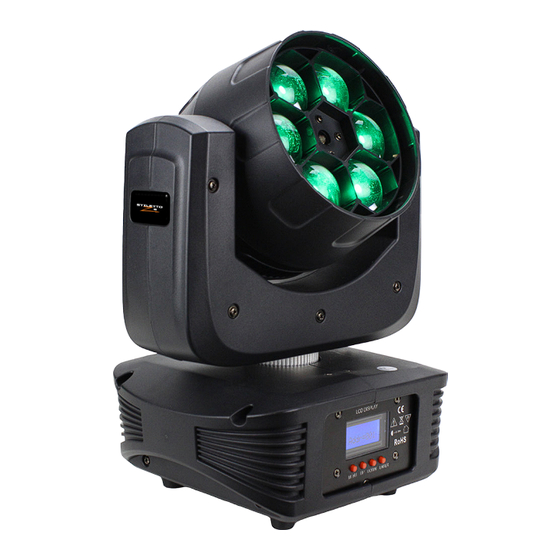
Page 6: The Stiletto™ Z6 Pin-Up Picture
Figure 1: The Stiletto™ Z6 Pin-Up Picture Head/Arms 6x 15W 4-in-1 RGBW LEDs 4-Button Control Panel Menu with LCD Display Figure 2: The Rear Connections DMX Out Power In DMX In Power Out Page 6 Stiletto™ Z6 User Manual Rev. A (c) 2015 Blizzard Lighting, LLC... -
Page 7: Setup
The fuse is field replaceable, however it is an advanced procedure suited to qualified individuals. Should your fixture require replacement, please contact Blizzard Lighting for instructions, or to return your unit for service. Connecting A Bunch of Stiletto™ Z6 Fixtures... -
Page 8: Cable Connectors
Step 3: Connect other fixtures in the chain from output to input as above. Place a DMX terminator on the output of the final fixture to ensure best communication. Page 8 Stiletto™ Z6 User Manual Rev. A (c) 2015 Blizzard Lighting, LLC... -
Page 9: Fixture Linking (Master/Slave Mode)
• Safety cables MUST ALWAYS be used. • Never mount in places where the fixture will be exposed to rain, high humidity, extreme temperature changes or restricted ventilation. Page 9 Stiletto™ Z6 User Manual Rev. A (c) 2015 Blizzard Lighting, LLC... -
Page 10: Mounting Points
Better safe than sorry! Be sure to complete all rigging and installation procedures before connecting the main power cord to the appropriate wall outlet. Page 10 Stiletto™ Z6 User Manual Rev. A (c) 2015 Blizzard Lighting, LLC... -
Page 11: Clamp Mounting
3.) ¼ Turn Quick Lock Fasteners Securing the Fixture Regardless of the rigging option you choose for your fixtures always be sure to secure your fixture with a safety cable. Page 11 Stiletto™ Z6 User Manual Rev. A (c) 2015 Blizzard Lighting, LLC... -
Page 12: Operating Adjustments
Press the <ENTER> button to access the menu function currently displayed or to enable a menu option. To return to the previous option or menu without changing the value, press the <MENU> button. Page 12 Stiletto™ Z6 User Manual Rev. A (c) 2015 Blizzard Lighting, LLC... -
Page 13: Control Panel Menu Structure
3.) Connect all fixtures together via DMX. The first fixture in the DMX chain will be the master fixture, followed by the slave fixtures. 4.) Connect DMX controller to the master unit for DMX control. Page 13 Stiletto™ Z6 User Manual Rev. A (c) 2015 Blizzard Lighting, LLC... -
Page 14: Personal (Customized) Settings
3.) From here, use the <UP/DOWN> buttons to highlight Mic Sens, press <ENTER>, then use the <UP/DOWN> buttons to choose a percentage level from 0% (off), to 99% (highest level). 4.) Press <ENTER> to confirm Page 14 Stiletto™ Z6 User Manual Rev. A (c) 2015 Blizzard Lighting, LLC... -
Page 15: Dmx Channel Values In-Depth
211 <--> 255 Auto - crossfading full colors (slow <--> fast) Motor Reset 000 <--> 079 No function 080 <--> 099 All motors reset 100 <--> 255 No function Page 15 Stiletto™ Z6 User Manual Rev. A (c) 2015 Blizzard Lighting, LLC... -
Page 16: Appendix
It is flexible, robust, and scalable, and its ability to control everything from dimmer packs to moving lights to foggers to lasers makes it an indispensable tool for any lighting designer or lighting performer. Page 16 Stiletto™ Z6 User Manual Rev. A (c) 2015 Blizzard Lighting, LLC... -
Page 17: Keeping Your Stiletto™ Z6 As Good As New
Make sure all connectors are seated properly and securely. Responding / Re- Use Only DMX Cables. sponding Erratically Install a Terminator. Check all cables for defects. Reset fixture(s). Page 17 Stiletto™ Z6 User Manual Rev. A (c) 2015 Blizzard Lighting, LLC... -
Page 18: Tech Specs
Neutrik AG, Neutrik USA, or any related entity. Neutrik® and powerCON® are registered trademarks of Neutrik AG. Page 18 Stiletto™ Z6 User Manual Rev. A (c) 2015 Blizzard Lighting, LLC... -
Page 19: Dimensional Drawings
Dimensional Drawings 9.5 in (24.1 cm) 8.5 in (21.5 cm) 9.5 in (24.1 cm) 3.5 in (9.9 cm) 7 in (17.8 cm) Page 19 Stiletto™ Z6 User Manual Rev. A (c) 2015 Blizzard Lighting, LLC... - Page 20 Enjoy your product! Our sincerest thanks for your purchase! --The team @ Blizzard Lighting...
Need help?
Do you have a question about the Stiletto 6 and is the answer not in the manual?
Questions and answers