
Related Manuals for Blizzard Lighting SnowBank


Summary of Contents for Blizzard Lighting SnowBank
- Page 1 Blizzard Lighting, LLC www.blizzardlighting.com Waukesha, WI USA Copyright (c) 2012...
-
Page 2: Table Of Contents
Standalone (Program) Mode Manual Color Adjustment DMX Channel Values In-Depth Troubleshooting 5. Appendix A Quick DMX Lesson Keeping Your SnowBank™ As Good As New Returns (Gasp!) Shipping Issues Tech Specs Page 2 SnowBank User Manual Rev. A Copyright (c) 2012 Blizzard Lighting, LLC... -
Page 3: Snowbank
• This Lovely User Manual Getting It Out Of The Box Congratulations on purchasing one of the coolest LED fixtures anywhere! Now that you’re the proud owner of a SnowBank™ (or hopefully, MORE!), you should carefully unpack the box and check the contents to ensure that all parts are present and in good condition. If anything looks as if it has been damaged in transit, notify the shipper immediately and keep the packing material for inspection. -
Page 4: Safety Instructions (Don't Stick Your Hand In The Toaster!)
• Avoid direct eye exposure to the light source while it is on. Caution! There are no user serviceable parts inside the unit. Do not open the housing or attempt any repairs yourself. In the unlikely event your unit may require service, please contact Blizzard Lighting at support@blizzardlighting.com. Page 4 SnowBank User Manual Rev. A Copyright (c) 2012 Blizzard Lighting, LLC... -
Page 5: Meet The Snowbank
2. MEET THE SNOwBANk™ LED BLINDER MAIN FEATURES: • User selectable 7 or 26 DMX channels • Powered by 32 Tri-Color RGB LED’s • Full color mixing in standalone, master/slave and DMX modes • Built-in automated programs via master/slave • Built-in sound activated programs via master/slave • Easy to use LED digital control panel • 3-pin male input and 3-pin female output • Dual mounting yoke allows flexibility in positioning • Heavy duty, black aluminum housing OPTICAl: • Beam Angle: 45° • 400hz flicker-free LED drivers • Light Source: 32* 3-watt Tri-Color LEDs, 100,000 hours CONTROl: • USITT DMX-512 (26/7 Channels) • 3-pin Input/Output • LED 4-button control panel DMX Quick Reference (26-Channel Mode) Channel Channel Dimmer 2-25 Individual Pixel R/G/B Intensity Strobe DMX Quick Reference (7-Channel Mode) -
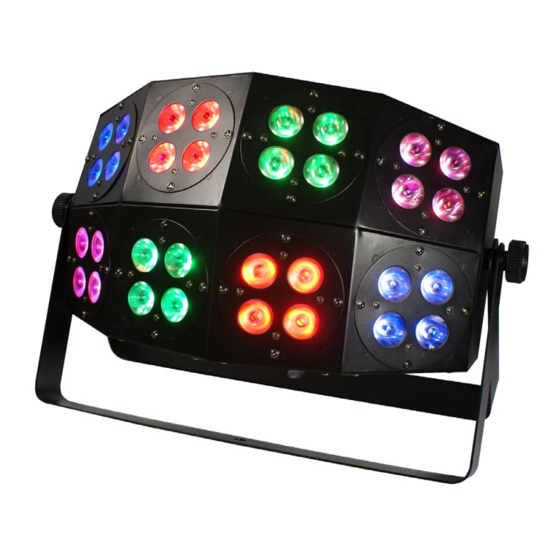
Page 6: The Snowbank™ Pin-Up Picture
Figure 1: The SnowBank™ Pin-Up Picture Black Aluminum High Power Casing Tri-Color LEDs Locking Dual Knobs Mounting Brackets Figure 2: The Rear Connections DMX In DMX Out Microphone AC Power In LED Control Panel Page 6 SnowBank User Manual Rev. A Copyright (c) 2012 Blizzard Lighting, LLC... -
Page 7: Setup
Under normal operating conditions, the fuse should not require replacement. The fuse is field replaceable, however it is an advanced procedure suited to qualified individuals. Should your SnowBank™ fuse require replacement, please contact Blizzard Lighting for instructions, or to return your unit for service. Connecting A Bunch of SnowBank™ Fixtures You will need a serial data link to run light shows using a DMX-512 controller or to run shows on two or more fixtures set to sync in master/slave operating mode. -
Page 8: Cable Connectors
We recommend connecting the fixtures in terms of their proximity to the controller, rather than connecting the lowest fixture number first, and so on. Step 3: Connect other fixtures in the chain from output to input as above. Place a DMX terminator on the output of the final fixture to ensure best communication. Page 8 SnowBank User Manual Rev. A Copyright (c) 2012 Blizzard Lighting, LLC... -
Page 9: Fixture Linking (Master/Slave Mode)
Do not mount to surfaces with unknown strength, and ensure properly “rated” rigging is used when mounting fixtures overhead. Adjust the angle of the fixture by loosening both knobs and tilting the fixture. After finding the desired position, retighten both knobs. • When selecting installation location, take into consideration lamp replacement access (if applicable) and routine maintenance. • Safety cables MUST ALWAYS be used. • Never mount in places where the fixture will be exposed to rain, high humidity, extreme temperature changes or restricted ventilation. Page 9 SnowBank User Manual Rev. A Copyright (c) 2012 Blizzard Lighting, LLC... -
Page 10: Operating Adjustments
Control Panel Menu Structure on page 11. Use the <MODE> button to navigate your choices. To edit a setting, push the <SETUP> button, then use the <UP> and <DOWN> buttons again to scroll through your options. Page 10 SnowBank User Manual Rev. A Copyright (c) 2012 Blizzard Lighting, LLC... -
Page 11: Control Panel Menu Structure
Pr-- Pr01 - Pr22 Built-in programs SP01 - SPFL Speed adjustment (slow <--> fast) AU7O n001 - n100 100 sequences of auto programs SP01 - SPFL Speed adjustment (slow <--> fast) Page 11 SnowBank User Manual Rev. A Copyright (c) 2012 Blizzard Lighting, LLC... -
Page 12: Dmx Mode
2.) From here, you can navigate to and use the <UP/DOWN> buttons to adjust the global intensity of red, green, or 000 - 255. blue from Page 12 SnowBank User Manual Rev. A Copyright (c) 2012 Blizzard Lighting, LLC... -
Page 13: Dmx Channel Values In-Depth
000 <--> 255 Pixel 8 Green Intensity (0% <--> 100%) 000 <--> 255 Pixel 8 Blue Intensity (0% <--> 100%) 000 <--> 009 No Function 010 <--> 255 Strobe (Slow <--> Fast) Page 13 SnowBank User Manual Rev. A Copyright (c) 2012 Blizzard Lighting, LLC... - Page 14 Sound Active (Low <--> High) 000 <--> 063 No Function 064 <--> 255 Speed (Slow <--> Fast) 000 <--> 009 No Function 010 <--> 255 Strobe (Slow <--> Fast) Page 14 SnowBank User Manual Rev. A Copyright (c) 2012 Blizzard Lighting, LLC...
-
Page 15: Troubleshooting
Fixture Not Make sure all connectors are seated properly and securely. Responding / Use Only DMX Cables. Responding Er- Install a Terminator. ratically Check all cables for defects. Reset fixture(s). Page 15 SnowBank User Manual Rev. A Copyright (c) 2012 Blizzard Lighting, LLC... -
Page 16: Keeping Your Snowbank™ As Good As New
Keeping Your SnowBank™ As Good As New The fixture you’ve received is a rugged, tough piece of pro lighting equipment, and as long as you take care of it, it will take care of you. That said, like anything, you’ll need to take care of it if you want it to operate as designed. -
Page 17: Tech Specs
3-pin XLR Male Output 3-pin XLR Female Standalone, Master/Slave, Sound Active, Other Operating Modes Color Preset Coolness Factor Leventy Billion Percent 2-year limited warranty, does not cover Warranty malfunction caused by damage to LED’s. Page 17 SnowBank User Manual Rev. A Copyright (c) 2012 Blizzard Lighting, LLC... - Page 18 This page intentionally left blank. Page 18 SnowBank User Manual Rev. A Copyright (c) 2012 Blizzard Lighting, LLC...
- Page 19 This page intentionally left blank.
- Page 20 Enjoy your product! Our sincerest thanks for your purchase! --The team @ Blizzard Lighting...
Need help?
Do you have a question about the SnowBank and is the answer not in the manual?
Questions and answers