Table of Contents
Advertisement
Quick Links
Advertisement
Table of Contents

Related Manuals for Meyra 1.160


Summary of Contents for Meyra 1.160
- Page 1 OPERATING MANUAL ACTIVE WHEELCHAIR Model 1.160 m o v e p e o p l e .
-
Page 2: Table Of Contents
Contents Introduction ....................4 Indications ..................... 5 Acceptance ....................5 Specifications ....................5 Use ......................... 6 Adjustment ....................6 Life span ......................6 Overview ....................... 7 Brake ......................8 Pressure brake - user ....................8 Locking the brakes ..................8 Releasing the brakes ..................8 Calf belt .........................9 Removing the calf belt ...................9 Attaching the calf belt ..................9... - Page 3 Manoeuvre rollers ..................15 Shunting castors without brakes ..............15 Retaining strap ................... 16 Transport ..................... 16 Carrying the wheelchair ..................16 Transport security ....................17 Maintenance ....................17 Maintenance .......................17 Maintenance schedule ..................18 Technical data ..................... 21 Meaning of the labels on the wheelchair ............24 Meaning of the symbols on the type plate ............25 Inspection certificate .................
-
Page 4: Introduction
For users with visual impairments the PDF-files of the above mentioned doc- uments can be accessed on our web- We thank you for the confidence you site < www.meyra-ortopedia.com >. have placed in our company by choos- ing a wheelchair from this series. ☞... -
Page 5: Indications
INDICATIONS SPECIFICATIONS If the following indications occur we The wheelchair was developed for recommend the application of this adults and adolescents. Three frames mobility product: are available: ☞ Walking disability resp. extremely – short, limited walking ability as part of –... -
Page 6: Use
☞ Retrospective adjustments should be carried out solely by the special- ist dealer! The wheelchair can universally be im- plemented on level, hard surfaces and is therefore an allround-wheelchair: LIFE SPAN – for indoors (e.g. apartment, day care), We expect an average life span of –... -
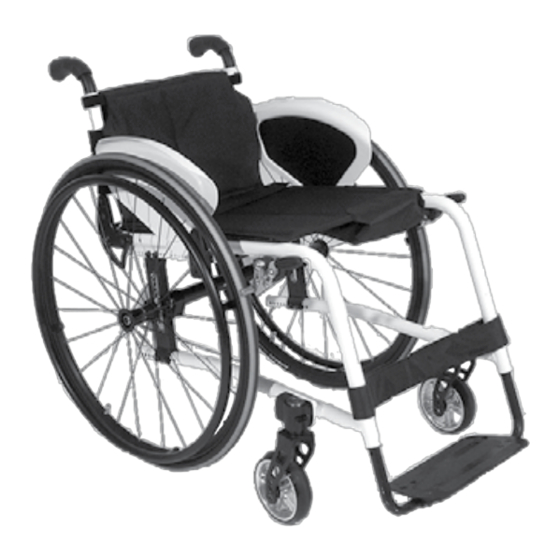
Page 7: Overview
OVERVIEW The overview shows the most important components of the wheelchair. Pos. Description Pos. Description 1 Back support 8 Push handle 2 Arm support / clothes guard 9 Pressure brake 3 Seat belt / seat cushion 10 Handrims 4 Calf strap 11 Drive wheel 5 Footplate 6 Steering wheel... -
Page 8: Brake
BRAKE By locking the brakes with the brake lever (1), the wheelchair is secured against rolling away unintentionally (parking brake). Depending on the version, the wheel- chair can be equipped with pressure brakes (2) or with drum brakes (3). ☞ Note: Therefore observe the Mainte- nance schedule on page 18 as... -
Page 9: Calf Belt
Calf belt The removable calf belt (1) prevents the feet from sliding off the back of the footplates. Attention: Never drive without calf belt (ex- cept when shuffling)! – Danger of accident! Removing the calf belt Removal of the calf belt is achieved by opening the velcro strap. -
Page 10: Arm Supports
ARM SUPPORTS The arm supports (1) serve at the same time as arm support, clothes guard and wind guard. Attention: No not grab between the frame and arm support. – Danger of jam- ming! • Do not lift the wheelchair using the arm supports. -
Page 11: Back Support
BACK SUPPORT Folding over the back support For storage or transport the back sup- port (1) can be folded over and locked into place [4]. – For this swivel the arm supports in first [2]. – Then by pulling or pressing the cord [3] unlock the back support and fold it completely onto the seat [4]. -
Page 12: Fitting The Back Belt
Fitting the back belt The tension of the back support is ad- justable. – Pull off the flap of the back sup- port and fold it to the front [1]. – Open the Velcro fastener of the belt that you wish to adjust and close it again after adjustment. -
Page 13: Wheels
WHEELS Tyre damage on pneumatic tyres ☞ For repairing tyre damage we rec- ommend the use of a foam car- tridge that is available in special- ity shops. – Afterwards look up a specialist workshop as soon as pos- sible. Drive wheels The drive wheels are on a full quick release axle (1). -
Page 14: Support Castors
SUPPORT CASTORS Stick-in support castors Removing/inserting the support castors – Depress the corresponding spring button (1) in order to remove/in- sert a support castor. ☞ The respective spring button (1) must visibly and audibly engage. Swing-out support wheels The support castors (2) can be swiv- elled inward underneath the seat [4]. -
Page 15: Manoeuvre Rollers
MANOEUVRE ROLLERS For driving through tight passages (e.g. in trains) the wheelchair can be pushed over the shunting castors [1] without drive wheels by an attendant. Shunting castors without brakes Attention: The wheelchair may only be parked under the supervision of an attendant! –... -
Page 16: Retaining Strap
RETAINING STRAP The retaining strap [1] is screwed from the back onto the respective back sup- port tube. ☞ Note: The retrospective assembly of a re- taining strap is only to be carried out by a specialist workshop! Attention: The retaining strap is not part of the retaining system for the wheelchair and/or the driver dur- ing transport in motor vehicles. -
Page 17: Transport Security
Transport security The wheelchair is only to be secured through the four securing points (2) and (3). ☞ The anchor positions are marked with the symbol (4). ☞ The procedure for securing the wheelchair can be read in the document < Safety and general handling instructions <... -
Page 18: Maintenance Schedule
Maintenance schedule WHEN WHAT REMARK Carry out test yourself Test brakes for fault- less operation or with a helper. Activate brake lever to the limit. The locked wheels should not be able to turn under op- erating conditions. If they can still turn, the brakes must be re- paired by an author- ised specialist work-... - Page 19 WHEN WHAT REMARK Before starting out Check tyre profile Carry out visual check yourself. If the tyre profile is worn down or if the tyre is damaged, con- sult a specialist work- shop for repairs. Before starting out Check back support Carry out the test your- for stability self or by a helper.
- Page 20 WHEN WHAT REMARK Carry out test yourself Every 8 weeks Check all screw con- nections for secure or with a helper (depending dis- The following is to be tance covered) checked with great care: – Attachment of the back- and seat pro- files at the side frame, –...
-
Page 21: Technical Data
TECHNICAL DATA Tyre filling pressure: Maximum tyre pressure is printed on All model dependent specifications the tyres on each side. within the < Technical data > refer to Full tyre pressure – steering wheel the standard version of the respective Standard: models. - Page 22 TECHNICAL DATA Model: ..................... 1.160 Type plate: ..................on the axle tube Life span: ......................4 years Dimensions: ......... min. / max. / manufacturer setting Length with leg supports Medium frame: ................860 / 980 / 890 mm Long frame: ................920 / 1040 / 950 mm Overall width: w wheel camber 0°: ..............
- Page 23 Wheels Steering wheel ø 100 x 30 mm (4"): ................solid rubber ø 125 x 30 mm (5"): ................solid rubber ø 142 x 37 mm (5.5"): ................solid rubber Driving wheel ø 590 mm (24 x 1“): ..................4.0 bar ø...
-
Page 24: Meaning Of The Labels On The Wheelchair
Meaning of the labels on the wheelchair Do not lift the wheelchair at the arm supports or leg supports. Removable parts are not suited for carrying the wheelchair. Attention! Increased danger of tilting when on inclinations / slopes, especially in combination with short wheel base. -
Page 25: Meaning Of The Symbols On The Type Plate
Meaning of the symbols on the type plate Manufacturer Order number Serial number Production date (Year – Calendar week) Permitted user weight Max. permissible total weight Permitted axle loads Max. permissible rising gradient Max. permissible falling gradient Max. permitted final speed The product is approved as a seat within a motor vehicle. -
Page 26: Inspection Certificate
INSPECTION CERTIFICATE Vehicle data: Model: Delivery note no.: Serial-no. (SN): Recommended safety inspection 2nd year Recommended safety inspection 1st year (at least every 12 months) (at least every 12 months) Stamp of specialist dealer: Stamp of specialist dealer: Signature: Signature: Place, date: Place, date: Next safety inspection in 12 months... -
Page 27: Notes
NOTES... - Page 28 NOTES...
- Page 29 NOTES...
-
Page 30: Warranty / Guarantee
WARRANTY / GUARAN- Interferences through radiation sources such as mobile phones with high transmission power, HiFi-equip- ment and other extreme interference We accept legal liability for this prod- radiators outside of norm specifica- uct within the scope of or general tions cannot be declared as warranty terms and conditions and warranty or guarantee claims. -
Page 31: Inspection Certificate For Transfer
WARRANTEE / GUARANTEE SECTION Please fill out! Copy if necessary and send the copy to the specialist dealer. Warranty / Guarantee Model designation: Delivery note no.: SN (view type plate): Date of delivery: Stamp of the specialist dealer: Inspection certificate for transfer Vehicle data: Serial-no. - Page 32 Your specialist dealer: MEYRA GmbH Meyra-Ring 2 · D-32689 Kalletal-Kalldorf P.O. Box 1 210 · D-32586 Vlotho Fon +49 (0)5733 922-311 Fax +49 (0)5733 922-9311 info@meyra.com www.meyra.com m o v e p e o p l e . 1 075 364 (Status: 2013-10) All technical modifications reserved! •...
Need help?
Do you have a question about the 1.160 and is the answer not in the manual?
Questions and answers