Table of Contents
Advertisement
Quick Links
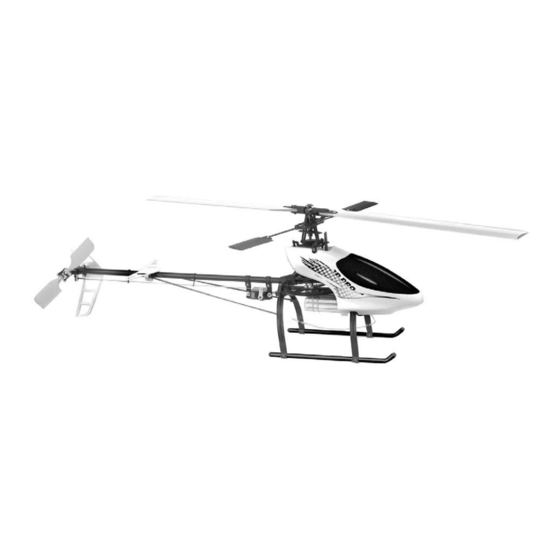
Hummingbird
Elite 3D Pro
This Super-Micro R/C helicopter has the most advanced capabilities and is considered
top-of-the-line. 120 degree eCCPM control, collective main and tail rotors, torque tube tail
drive and brushless motor ensure top performance.
MAX MAIN ROTOR RPM
MOTOR:
MAIN ROTOR DIAMETER:
LENGTH:
WEIGHT:
Century Helicopter Products
SPECIFICATIONS
Designed and Developed in USA
Copyright February 2005. All rights reserved.
Century Helicopter Products
1740-C Junction Ave.
San Jose, CA 95112
Fax: (408) 451-1156
Web:www.centuryheli.com
Instruction
Manual
3000
HIMAX 4100
520mm
485mm
360-380g with electronics and battery
Advertisement
Table of Contents

Subscribe to Our Youtube Channel
Related Manuals for Century Helicopter Products Hummingbird Elite 3D Pro


Summary of Contents for Century Helicopter Products Hummingbird Elite 3D Pro
-
Page 1: Specifications
HIMAX 4100 MAIN ROTOR DIAMETER: 520mm LENGTH: 485mm WEIGHT: 360-380g with electronics and battery Century Helicopter Products Designed and Developed in USA Copyright February 2005. All rights reserved. Century Helicopter Products 1740-C Junction Ave. San Jose, CA 95112 Fax: (408) 451-1156... -
Page 2: Table Of Contents
These rules will help prevent unsafe operation. Attention! If you purchased your Hummingbird Elite 3D Pro with the Lightning Brushless Motor the motor bolts will not be mounted. See below for details. If you are using a motor other than the Lightning Brushless DO NOT ALLOW MAIN BLADES TO EXCEED 3000 RPM. -
Page 3: Getting Started
Your New Elite 3D Pro Helicopter Section 1 Getting Started CHECKING OVER THE MODEL / EXTRAS Some items that are packaged with the Before beginning, check the kit contents. This is a good time to check the “required helicopter are not attached to the helicop- items”... -
Page 4: Testing The Electronics
Connection And Diagnostics For The Section 3 Electronic Components Speed Control Connection TESTING AND PREPARATION OF RADIO EQUIPMENT PLEASE DON’T SKIP THIS SECTION!!!! IMPORTANT: Before modifying or installing any radio gear, please take All connections shown a few minutes to test everything as shown. Time spent in this manual work for becoming familiar with the equipment and testing all the Futaba &... -
Page 5: Servo/Pushrod Setup
Servo Installation And Pushrod Setup Section 5 For The 3D Pro MOUNTING YOUR SERVOS (USE SECTION 4 FOR DETAILS) 1. Insert the pushrod into the hole on the servo arm farthest from the output (10-12mm from center). 2. Place servo tape on the mounting surface before mounting the servo. -
Page 6: Collective Pitch Setup
Section 6 eCCPM Radio Setup Expert Tips: Heli Front/Nose To make the setup go easier on transmitters with 5 or more programmable points on the pitch curve, assuming that the 5 points correspond to low stick, point 1, point 2, point 3 and high stick. -
Page 7: Blade Tracking, Questions And Answers Section
Section 8 Tips, Blade Tracking, Q & A ROUTING THE ANTENNA To provide the best possible reception for the model, the Hummingbird Elite comes with a plastic tube for routing the antenna. Put a small hole in one end and pull the antenna all the way through leaving about 2 to 3 inches of slack. Wrap the antenna around the tube. After the antenna is almost completely wrapped around the plastic tube place a hole at the other end of the tube to secure the end of the antenna. -
Page 8: Your First Flight
Section 9 The First Flight BASIC HOVERING Hovering When all is set, ready and checked, it’s time for the initial flight. Try setting aside a 5 foot diameter circle as a takeoff and landing pad. Keeping the helicopter inside the landing are will help improve your training. 1. -
Page 9: Exploded View Diagram / Warranty Information
Section 10 Construction Diagram... -
Page 10: Replacement Parts And Options
Section 11 Replacement Parts & Upgrades CNE213 CNE207 CNE216 CNE201 CNE250 CNE209A Auto Rotation Hub & Gear Main Shaft Bearings Head Axle & Dampeners Flybar Paddles Antirotation Bracket Swashplate Links (3x6mm -2pc-) CNE213F Bottom Plate Flanged CNE305 CNE304 Bearing (Flanged CNE302 CNE303 CNE301...
Need help?
Do you have a question about the Hummingbird Elite 3D Pro and is the answer not in the manual?
Questions and answers