Advertisement
ALI-NS3014R 4.0 MP IP Bullet
Camera Quick Installation Guide
This document guides you through the basic steps to install and configure the ALI-NS3014R camera. For
more information about the features of these cameras, please refer to the ALIBI IP Camera Software V2
User Manual.
Features
4 Megapixel CMOS progressive scan sensor
•
High definition video streaming up to 2688 x 1520 pixels with Dual-stream video support
•
Video stream compression using H.264 standard
•
3D-DNR noise reduction and Wide Dynamic Range (WDR)
•
Backlight compensation
•
IR sensors for night vision
•
Dual power capable - Power over Ethernet (PoE) or 12 Vdc
•
Weatherproof - IP66 rated
•
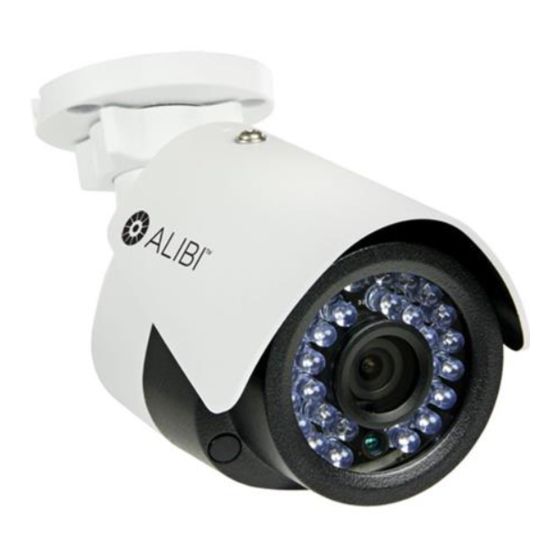
Drop cable
Mounting base
Adjustable bracket
lock nut
Adjustable bracket
Ground terminal
* To reset the camera to its factory state, press and hold the reset button for 10 seconds during reboot or power on.
What's in the box
The box contains this document with the items shown below.
Drill Template
www.observint.com
1
Sun shield adjustment screw
Sun shield
IR array
Lens
Cable channel
Reset button
(recessed)*
Documentation and
Mounting screws
Installation Tool CD
and wall inserts
Weatherproof fitting
for Ethernet cable
Step 1.
Install the camera
1.
Determine the best fasteners for securing the camera to mounting surface. The mounting hardware
provided is suitable for most surfaces.
2.
Using the Drill Template provided, mark the location of the mounting screw holes. If the drop cable
will be routed through the mounting surface, mark the location of the hole for the cable. NOTE: The
drop cable can be routed through the cable channel on the side of the base.
3.
Drill holes for the mounting fasteners, and for the drop cable if needed.
4.
Route the drop cable as planned, then secure the mounting base to the surface with the fasteners.
5.
Wire the ground terminal on the back of the camera to an earth grounded conductor.
Step 2.
Connect the camera to the LAN and power it on
1.
Route a Ethernet LAN cable to the camera and plug it into the Ethernet connector. Seal the
connection from moisture and other contamination. A weatherproof fitting is provided.
Drop cable
If the camera is powered through the LAN cable (PoE), apply power to the cable to power on the
camera, then continue to "Step 3. Install the Alibi Discovery Tool" on page 4
2.
Route a 12 Vdc power cable to the camera and connect it to the 12 Vdc connector on the camera
drop cable. The polarity of the drop cable connector is shown below.
Before applying power to the camera, ensure that the polarity is correct. An incorrect connection
may cause a malfunction and can damage the camera.
CAUTION
Seal the power cable connectors as needed from moisture and other contamination.
Apply power to the cable to power on the camera.
Step 3.
Install the Alibi Discovery Tool
Alibi Discovery Tool is a software utility used to "discover" Alibi cameras and NVRs/DVRs installed on the
physical Ethernet network (LAN) and change their network settings. Discovery Tool is provided on the CD
with your camera and is contained in Alibi Power Tools. To use Discovery Tool:
1.
Insert the software CD provided with your camera into an optical drive on the Microsoft Windows
computer you will use to access your camera on the LAN.
2.
On the CD, find the folder that contains the Alibi Power Tools (Alibi Tools Utility).
3.
Install Alibi Power Tools. Refer to the ALIBI™ Power Tools Installation and User Manual also provided
on the CD. When the program opens, the following screen appears.
Ethernet connector
12 Vdc Power
connector
ALI-NS3014R_CQ
10/13/15
Advertisement
Table of Contents

Related Manuals for ALIBI ALI-NS3014R


Summary of Contents for ALIBI ALI-NS3014R
- Page 1 Using the Drill Template provided, mark the location of the mounting screw holes. If the drop cable This document guides you through the basic steps to install and configure the ALI-NS3014R camera. For will be routed through the mounting surface, mark the location of the hole for the cable. NOTE: The more information about the features of these cameras, please refer to the ALIBI IP Camera Software V2 drop cable can be routed through the cable channel on the side of the base.
-
Page 2: Step 4. Login To The Camera
Double click on the Discovery Tool icon. The tool will automatically discover Alibi cameras and recorders installed on the network. If the IPv4 Address shown for the camera is something other than 192.168.1.64 (default » IP address) and the camera is new or was reset to its factory default configuration, the camera did find a DHCP server on the network and acquired new network parameters that In the example screen shown above, an ALI-NS1024VR camera was discovered. - Page 3 Allow the plug-in installation to complete. When the following window appears, click Finish. If this login is the first login to an Alibi camera from your computer and browser, continue with the following sub-steps to install WebComponents: After a successful login to the camera, a message will appear in the middle of the Live View window requiring you to load a plug-in.
-
Page 4: Step 5. Remote Live View Screen
Step 5. Remote Live View screen If using Auto-Switch, open the Day/Night Switch submenu to select the Sensitivity, — Filtering Time, and Smart IR feature ON or OFF. After logging into the camera, the Live View - Main stream window initially appears. If using Scheduled Switch, set the Start Time and End Time of the switch, then open —... -
Page 5: Specifications
Network Protocols TCP/IP, ICMP, HTTP, HTTPS, FTP, DHCP, DNS, DDNS, RTP, RTSP, RTCP, PPPoE, NTP, UPnP, SMTP, SNMP, IGMP, 802.1X, QoS, IPv6, Bonjour, ONVIF, PSIA Security One-key reset, flash-prevention, dual streams, heartbeat, mirror, password protection, privacy mask, Watermark, IP address filtering, Anonymous access Network Storage NAS (Support NFS, CIFS/SMB) General...
Need help?
Do you have a question about the ALI-NS3014R and is the answer not in the manual?
Questions and answers