
Related Manuals for SEI FA982900TX


Summary of Contents for SEI FA982900TX
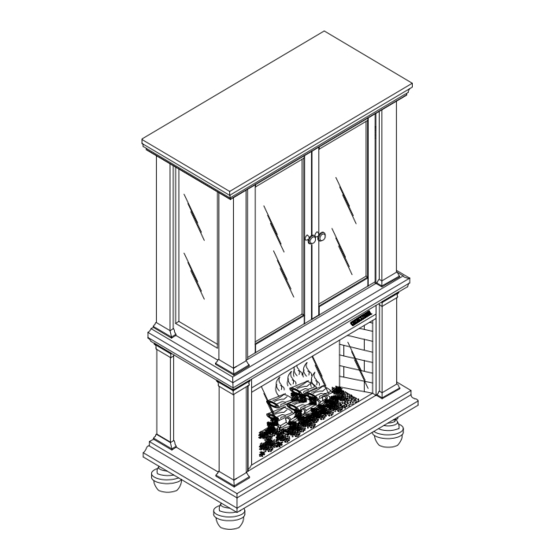
- Page 1 FA982900TX Townsend Fireplace Curio -Espresso For assistance with assembly, contact: Southern Enterprises Inc. Customer Service 1-800-633-5096 service@seidal.com Assembly Instructions www.seidal.com...
- Page 2 Townsend Fireplace Curio Parts List Please check packaging for all parts and hardware before discarding. Unpack and lay parts on clean, padded surface like carpet or blanket. Check that you have all parts indicated. Call customer service if hardware is missing.
- Page 3 Quantity (2L) Quantity of 1 of 1 Top Panel Left Upper Frame (2R) Quantity Quantity of 1 of 1 Right Upper Frame Left Door Quantity Quantity of 1 of 2 Right Door Adjustable Shelf Panel Quantity (7L) Quantity of 1 of 1 Middle Shelf Panel Left Lower Frame...
- Page 4 Townsend Fireplace Curio Assembly Instructions Attach 4pcs legs (9) to bottom panel (8) by rotating the legs (9) clockwise tightly with hand. Figure 1 Attach left lower frame (7L) and right downside frame (7R) to bottom panel (8) by inserting 4pcs wood dowels (A).
- Page 5 Townsend Fireplace Curio Assembly Instructions Attach middle shelf panel (6) to lower frames (7L and 7R) by inserting 4pcs wood dowels (A). Use 4pcs bolts (B) through 4pcs flat washers (C) to connect middle shelf panel (6) to lower frames (7L and 7R).
- Page 6 Townsend Fireplace Curio Assembly Instructions Turn the top panel (1) over and use 2pcs round head screws (J) to connect magnet (I) to top panel (1) with Phillips screwdriver. Figure 5 Attach top panel (1) to the upper frames (2L) and (2R) by inserting 4pcs wood dowels (A).
- Page 7 Attach the back panel (10) onto the back of the unit by using 22pcs screws (E). Figure 7 Use 2pcs pan head bolts (L) to connect knobs (K) to door panels (3) and (4) with Phillips screwdriver as shown. Figure 8...
- Page 8 Use 12pcs screws (F) to connect door panels (3) and (4) to assembled unit with Phillips screwdriver. Figure 9 Place firebox (G) into the back of the unit. Figure 10...
- Page 9 Townsend Fireplace Curio Assembly Instructions Attach wood holder (11) by inserting 2pcs flat head screws (H) into corresponding holes and tighten with Phillips screwdriver. Figure 11 Use screws (N) to connect brackets (O) to the back of the top panel (1) as shown. Tighten screws (N) with Phillips screwdriver.
- Page 10 Parts Replacement Form Customer Information Name Address City/State/Zip Code Phone Number Please indicate where you purchased this item: Store/Website/Catalog Please indicate color/size/style number: Style No Parts Letter Parts Description Quantity Needed Please examine this product carefully upon immediate receipt. Any request for missing parts or damage replacement must be received within 90 days of your receipt of the product.
Need help?
Do you have a question about the FA982900TX and is the answer not in the manual?
Questions and answers