Table of Contents
Advertisement
Quick Links
Advertisement
Table of Contents

Related Manuals for Numark iDJ2


Summary of Contents for Numark iDJ2
- Page 1 REFERENCE MANUAL...
-
Page 3: Table Of Contents
TABLE OF CONTENTS INTRODUCTION..........5 DECK MODE SETTINGS (A AND B)....31 FEATURES ............5 PITCH RANGE .........31 IMPORTANT MESSAGES ....... 6 KEY LOCK..........31 CONNECTION DIAGRAM........ 6 TRACK LOADING ........32 TOP PANEL - GLOBAL CONTROLS ..... 11 TIME DISPLAY .........32 TOP PANEL - MIXER CONTROLS ....13 FADER START.........32 TOP PANEL - DECK CONTROLS.... -
Page 5: Introduction
USB computer keyboard support for fast searching - on USB drives or iPods Computer playlist support including many popular formats Safe Software Updates for future enhancements. Go to www.numark.com for support. ® iPod is a registered trademark of Apple Computer, Inc., registered in the U.S.A. and other countries. -
Page 6: Important Messages
Switch everything on in the following order: • iDJ² • amplifiers or output devices Always reverse this operation by turning off devices in the following order: • amplifiers or output devices • iDJ² More information about this product may be found at http://www.numark.com/iDJ2... - Page 7 Please study the connection diagram below: TV OR PROJECTION SYSTEM USB MASS STORAGE DEVICE USB KEYBOARD (REAR PANEL OF iDJ²) CD PLAYER CD PLAYER TO AMP OR SPEAKER SYSTEM TO CD BURNER TURNTABLE TURNTABLE (FRONT PANEL OF iDJ²) MICROPHONE HEADPHONES...
- Page 8 REAR PANEL OVERVIEW DC IN – Please connect the supplied power adapter (DC 12V 2A) to this power input and connect it o a power source. Please only use the supplied power adapter – using an alternate power adapter may result in damage to the iDJ².
- Page 9 FRONT PANEL OVERVIEW MIC INPUT – Connect a 1/4” inch microphone to this input. MIC GAIN – This knob adjusts the level of the microphone signal. MIC TONE – This knob can be used to adjust the tone of the microphone signal. Turning the knob toward “High”...
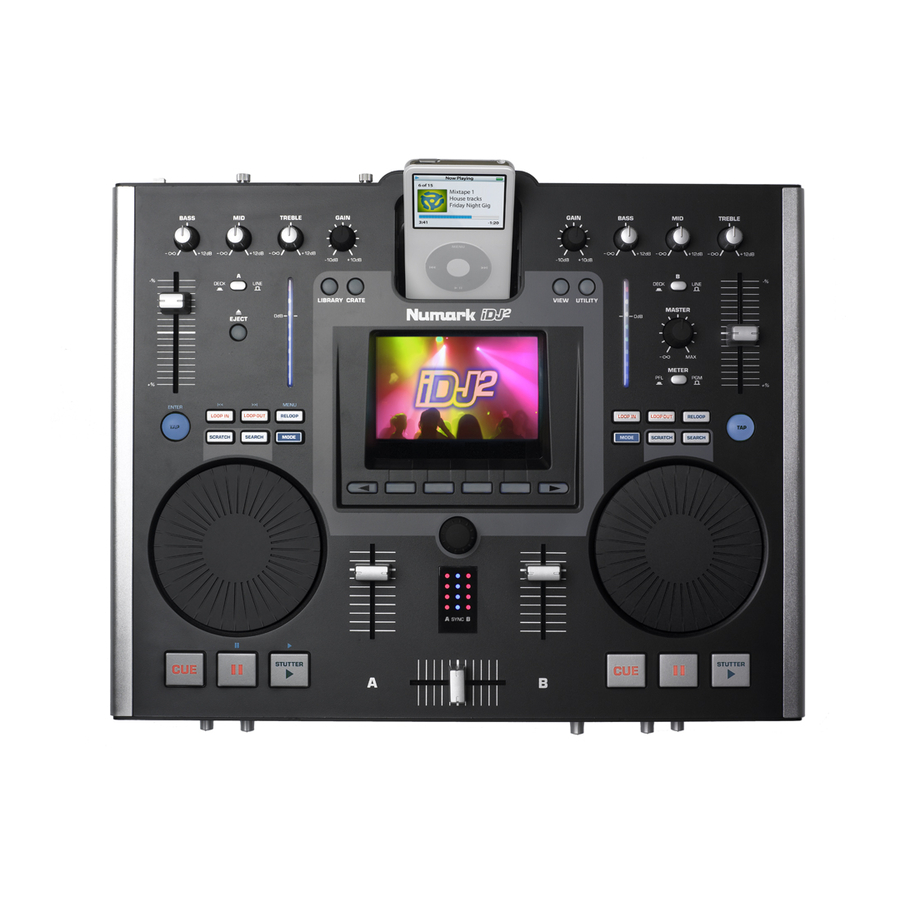
- Page 10 TOP PANEL OVERVIEW iDJ²’s top panel can be generally split into three categories of controls: GLOBAL CONTROLS, MIXER CONTROLS, DECK CONTROLS. Please read the next three sections of this manual to learn about the function of these controls. If you need help identifying where the controls are located on the panel, refer to the following illustration:...
-
Page 11: Top Panel - Global Controls
TOP PANEL - GLOBAL CONTROLS The global controls on the iDJ² allow you to access and navigate many of the unit’s features, such as the Library, the Crate, and various other options. LCD – The large color screen displays information about the iDJ², the decks, your attached... - Page 12 iPOD DOCK – This docking station can be used to dock iPod players. When docked, you can browse the contents of your iPod using iDJ²’s browser and load tracks to each deck or organize them in the Crate. The iDJ² allows you to simultaneously play 2 tracks from your iPod on decks A and B. In addition, the dock will also charge your iPod while the iDJ²...
-
Page 13: Top Panel - Mixer Controls
TOP PANEL - MIXER CONTROLS iDJ² sports a full-featured DJ mixer which can be used to mix audio from USB mass storage devices and iPod players, as well as any additional input devices, such as CD players and turntables connected to the RCA inputs on the rear of the unit. -
Page 14: Top Panel - Deck Controls
TOP PANEL - DECK CONTROLS deck controls become available when a channel’s input selector has been set to Deck. Using these controls you can play,, cue, scratch, pitch bend and loop music from attached USB mass storage devices, such as hard drives, thumb drives and iPod players. -
Page 15: Looping Controls
SCRATCH – Use this button to engage Scratch Mode. Scratch Mode allows you to “scratch” the music on the deck by moving the jog wheel forward and backward. When you stop the wheel, normal playback will resume. To resume with no gap in the audio, “push off” by scratching forward at approximately normal playback speed before releasing the wheel. -
Page 16: Ipop Direct Mode Controls
LOOP OUT - Sets the end point of the loop. The first time you press LOOP OUT while a song is playing, the LOOP OUT button will blink and the song will begin playing in a seamless loop starting from the “loop in” point and ending at the “loop out”... -
Page 17: How To Work With Idj²
It's worth taking some care at this stage to ensure your content is converted to a high standard. You might find products such as Numark's TTUSB computer- attached turntable useful for getting your traditional media converted. - Page 18 Perform the way you always did Once a track is on a deck, you can cue, beat match, scratch and loop using familiar Numark deck controls. iDJ² is fully multi-tasking, so you can work on your set using the Library and Crate at any time, even while mixing on both decks.
-
Page 19: The Graphical Interface
THE GRAPHICAL INTERFACE iDJ² boasts a ground breaking graphical interface, set to revolutionize your DJ experience. The interface provides fast and friendly access to the advanced features of the product, and is designed to fit with how you work. To make this possible, iDJ² is fully multitasking - you can instantly switch between functions, and if one of them is busy for a while (perhaps building a new library) everything else remains accessible. -
Page 20: Menu Bar
Menu Bar At the bottom is the Menu Bar which shows any menu options that are available. Each menu option is displayed above its physical menu button - simply press the button to activate that option. The option will briefly highlight to confirm you have selected it. -
Page 21: Using Lists
Using Lists iDJ² makes extensive use of lists to give you fast access to your tracks. Lists are displayed within the Work Area and are navigated using the rotary PUSH TO ENTER knob and the Menu Bar. To move up and down through a list simply rotate the PUSH TO ENTER knob. -
Page 22: Changing Settings
Changing Settings A Dialog can be used to change settings, in which case each setting is shown with the active setting highlighted. Its value can be changed simply by rotating the PUSH TO ENTER knob - some settings have a textual description for each value, others have a sliding bar. -
Page 23: The Library
The Librarian program, which runs on your PC or Mac computer, is the fastest way to build a library and offers advantages such as building profiles (see “Profile View” section for details). Full documentation is included with the program, which can be downloaded from http://www.numark.com/d2/. Building with iDJ²... -
Page 24: Loading A Library
LOADING A LIBRARY The library is saved onto its storage device so next time you insert the device it isn't necessary to go through the entire procedure again. When a writable device which already contains a library is inserted, the Loading Library dialog appears... To load the existing library without checking for any changes, select Load. -
Page 25: Searching
Searching Searching provides fast, direct access to a track or tracks by matching text that you enter. First, select the type of search you want to perform... Rotate the PUSH TO ENTER knob or use the arrow keys on the keyboard (if connected) to select the type of search. - Page 26 Each list is navigated using the PUSH TO ENTER knob in the usual way, pressing to move to the next level, or selecting the Back option from the menu to move to the previous level. At the top of each intermediate list is an option "All".
-
Page 27: File View
File View File view ("Files" from the top level of the library) is available for any device, whether or not a library has been built. It uses folder and filenames so is particularly useful if you prefer to organize your content on disk instead of (or as well as) with tags. -
Page 28: Ejecting A Library
EJECTING A LIBRARY As with a PC or Mac computer it is very important to always eject a storage device before unplugging it or cutting the power. This ensures that all files are properly closed and that all data has been saved to the device. Failure to follow this instruction can cause file system corruption which might render the device unusable (if this happens, connect the device to your PC or Mac and follow the file system recovery procedure for your particular operating system –... -
Page 29: The Crate
THE CRATE The crate is an innovative tool for the digital DJ based upon one of the oldest tricks of the trade... For decades the vinyl DJ has used his record crate as a scratchpad for organizing a set. Records to be played - or to be considered for play - are pulled out, turned and propped above the rest. -
Page 30: Loading And Saving The Crate
The order of the crate is significant to iDJ² only in continuous play modes (see “Track Loading” section). However, you may choose to maintain a play order as an aid to organizing your set. To change a track’s position in the crate, first highlight it, then press the PUSH TO ENTER knob. Rotate to move the track through the list to its new position and press again or select Done to complete the operation. -
Page 31: Deck Mode Settings (A And B)
DECK MODE SETTINGS (A AND B) MODE buttons, located near the jog wheels of each deck, can be pressed to pop up the settings dialog for Deck A or B. The appropriate button lights up blue while active. Press again to close the dialog. Use the Mode Settings dialogs to adjust those settings for each deck which do not have their own dedicated button. -
Page 32: Track Loading
TRACK LOADING Choose how you want songs loaded and played from the Crate. Manual Tracks are loaded to deck manually, by you. When songs are finished they return to the start and pause. Automatic The next song (at the top of the Crate) will be loaded to deck, and cued at the start. -
Page 33: Ipod Direct Mode
iPod MODE This field allows you to specify the functionality of Deck A when using an iPod. You will notice that there are two different options: USB or Direct. In USB Mode, your iPod will functions as a USB mass storage device. -
Page 34: Views
VIEWS You may use the VIEW button to access different information about the music playing on the decks. The VIEW button will toggle between Track View and Profile View, as explained below. TRACK VIEW Track View displays extra information about the tracks loaded on each deck, other than that shown on the deck displays at the top of the screen. -
Page 35: Utility
The main utility work area displays the unit serial number. This information is useful if you need to contact Customer Care or check for firmware updates at the Numark web site. Tip: It is strongly advised that you periodically compare your firmware version with that available at the Numark web site, and install any more recent version that may be available. -
Page 36: Calibrate
Simply re-run the calibration. Updates The Updates page shows the current software version of the iDJ². Please check http://www.numark.com/d2/ regularly for available software upgrades. If the version of the software upgrade on the website is higher than the version of the current software on your iDJ², please follow the upgrade... -
Page 37: Idj² Software Upgrades
The upgrade procedure is now complete. Now you may power on the iDJ² as you would normally. Be sure to read the release notes at the Numark web site so you'll know what's new! Note: If iDJ² detects that the upgrade file is identical to the firmware already loaded, it will not load the update. -
Page 38: Keyboard Shortcuts
KEYBOARD SHORTCUTS If you have a USB keyboard connected to your iDJ², you can access some handy shortcuts: TEXT ENTRY Used in the text entry 'widget'; when searching and during renaming playlists etc. (When not editing) • Return = starts editing (When editing) •... -
Page 39: Usb Device Compatibility
USB DEVICE COMPATIBILITY This section explores the technical aspects of connecting USB devices to iDJ². For many users much of the detail will be irrelevant - the player will simply do the expected thing. However, it is a good idea to familiarize yourself with this information so you are prepared for any unexpected issue that might occur while working. -
Page 40: Supported File Systems
Each library also has a device name which is displayed within the user interface. This name is taken from the storage device itself and will vary from device to device, manufacturer to manufacturer. Examples include: USB DISK Hard Disk Drive iPod Some badly behaved devices, often flash memory keys, provide gibberish titles. -
Page 41: Explanation Of Digital Audio
EXPLANATION OF DIGITAL AUDIO This section aims to explain a few techie details of digital audio technology. We feel it is important for a DJ to have an understanding of how this technology can be applied, particularly if it is to be used professionally. With the right knowledge you will be able to make informed choices and ensure that your performances meet the highest standard. - Page 42 Some encoders offer a choice of sample rates from 8KHz to 48KHz, however iDJ² always resamples to 44.1KHz so there's nothing to be gained from encoding at a higher rate than that. iDJ² can extract tags from MP3 files using the popular ID3 format. We recommend using ID3v2, as this offers greater flexibility in the length of tags and types of information that can be stored (BPM for example).
-
Page 43: Mixing Tutorial
MIXING TUTORIAL Now that you have familiarized yourself with the iDJ², let’s try a quick mixing tutorial. This tutorial will help you better understand the process and steps required to blend one track into the next. For the purposes of this tutorial, let’s assume that you are mixing music from an attached USB mass storage device or iPod. - Page 44 Use Deck B’s pitch slider to match the tempo of the track to the music on Deck A. When you have matched the tempo, press CUE on Deck B to return and pause at the cue point. When you are ready to start your mix, press PLAY on Deck B. Use the crossfader to transition from Deck A to Deck B.
-
Page 45: Technical Specifications
Linux platform to ensure high reliability and performance. Linux and related portions of this software are provided under the GNU Public Licence (GPL) and the Lesser GNU Public License (LGPL). Numark has made available for download the source code for those portions of the software at: http://www.numark.com/idj2/... - Page 48 www.numark.com...
Need help?
Do you have a question about the iDJ2 and is the answer not in the manual?
Questions and answers