Kramer KW-14T User Manual
Wireless hd
Hide thumbs
Also See for KW-14T:
- Quick start manual (2 pages) ,
- Quick start manual (2 pages) ,
- Quick start manual (2 pages)

Related Manuals for Kramer KW-14T


Summary of Contents for Kramer KW-14T
- Page 1 USER MANUAL MODELS: KW-14T Wireless HD Transmitter KW-14R Wireless HD Receiver P/N: 2900-300501 Rev 2 www.kramerAV.com...
-
Page 4: Table Of Contents
FCC Radio Frequency Interference Statement Figures Figure 1: KW-14T Wireless HD Transmitter Top Panel Figure 2: KW-14T Wireless HD Transmitter Side and Front Panels Figure 3: KW-14R Wireless HD Receiver Top Panel Figure 4: KW-14R Wireless HD Receiver Rear and Side Panels... -
Page 5: Introduction
Room Connectivity; GROUP 10: Accessories and Rack Adapters; GROUP 11: Sierra Video Products; GROUP 12: Digital Signage; GROUP 13: Audio; and GROUP 14: Collaboration. Thank you for purchasing the Kramer KW-14T Wireless HD Transmitter and KW-14R Wireless HD Receiver which are ideal for: ... -
Page 6: Getting Started
Avoid interference from neighbouring electrical appliances that may adversely influence signal quality Position your KW-14T and KW-14R away from moisture, excessive sunlight and dust This equipment is to be used only inside a building. It may only be connected to other equipment that is installed inside a building. -
Page 7: Recycling Kramer Products
Kramer Electronics has made arrangements with the European Advanced Recycling Network (EARN) and will cover any costs of treatment, recycling and recovery of waste Kramer Electronics branded equipment on arrival at the EARN facility. For details of Kramer’s recycling arrangements in your particular country go to our recycling pages at http://www.kramerelectronics.com/support/recycling/. -
Page 8: Overview
The KW-14T and KW-14R are a high-definition, wireless HDMI transmitter and receiver for use indoors over short ranges. The KW-14T converts an HDMI signal into a wireless signal. The KW-14R converts the wireless signal back into HDMI. The transmitter and receiver use MIMO (Multi-Input and Multi-Output) wireless communication technology to transfer HDMI, multi-channel embedded audio, and IR signals. - Page 9 A data rate of 6.75Gbps, Deep Color up to 12 bit A transmission range of up to 30m (100ft) Automatic frequency selection which selects the most suitable frequencies and prevents RF interference KW-14T/KW-14R - Overview...
-
Page 10: Defining The Kw-14T Wireless Hd Transmitter And Receiver
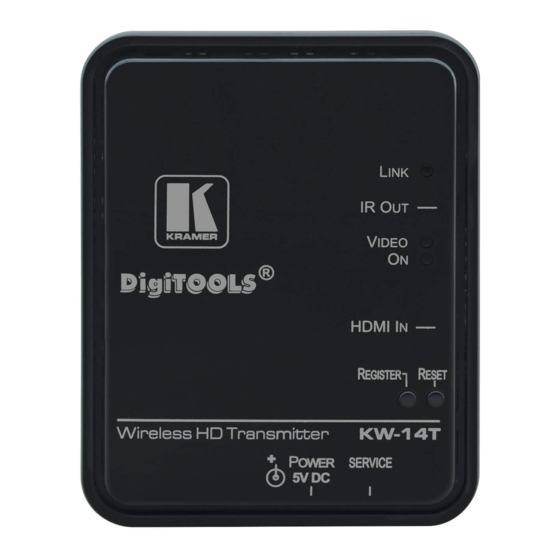
ON LED Lights green when the device is powered on REGISTER Hold this button after starting the registration process on the receiver Button RESET Button Press to reset the device KW-14T/KW-14R - Defining the KW-14T Wireless HD Transmitter and Receiver... -
Page 11: Figure 2: Kw-14T Wireless Hd Transmitter Side And Front Panels
Figure 2 defines the side and front panels of the KW-14T. Figure 2: KW-14T Wireless HD Transmitter Side and Front Panels Feature Function HDMI IN Connector Connect the HDMI source 3.5mm Mini Jack IR Output Connect to the IR emitter... -
Page 12: Defining The Kw-14R Wireless Hd Receiver
Flashes blue while the receiver is searching for a transmitter. Lights blue when a link is established Lights blue when a valid video signal is present and transmitted, VIDEO LED (only when a link is established) KW-14T/KW-14R - Defining the KW-14T Wireless HD Transmitter and Receiver... -
Page 13: Figure 4: Kw-14R Wireless Hd Receiver Rear And Side Panels
Mini USB Power Connector Connect to the USB power supply provided HDMI OUT Connector Connect the HDMI acceptor Sensor for receiving IR commands from the IR remote IR Window control KW-14T/KW-14R - Defining the KW-14T Wireless HD Transmitter and Receiver... -
Page 14: Connecting The Kw-14T And Kw-14R
To connect the KW-14T and the KW-14R as illustrated in the example in Figure 1. On the KW-14T connect the HDMI source, (for example, a VP-553) to the HDMI connector. 2. On the KW-14R connect the HDMI Out connector to the HDMI acceptor, (for example, a smart TV). -
Page 15: Registering A Transmitter And Receiver
IR control in conjunction with the OSD. Registration of more than one transmitter to a receiver can only be done using the IR remote control and the OSD. When purchased as a pair, the KW-14T and the KW-14R are delivered pre-registered. Registration needs to be performed only when: ... - Page 16 OSD while the registration process is in progress. Note: The registration process can take up to 60 seconds to complete. If the process takes longer than this, power cycle both devices and then start the registration process from the beginning. KW-14T/KW-14R - Connecting the KW-14T and KW-14R...
-
Page 17: Standby Mode
When the link is lost or not established When entering sleep mode, the OSD is displayed for three minutes and the video output is muted. When the valid video link is restored the signal is automatically transmitted. KW-14T/KW-14R - Connecting the KW-14T and KW-14R... -
Page 18: Using Ir Remote Control And Osd Menu
Displays the Choose Source to Remove submenu. This menu may also be accessed from the Setup menu by selecting Remove Video Source. Input Press to select the required transmitter if more than one transmitter is Devices registered with the receiver KW-14T/KW-14R - Using IR Remote Control and OSD Menu... -
Page 19: Using The Setup Menu
Figure 7: Select Video Source Menu Using the Setup Menu Figure 8: Setup Menu The Setup menu enables you to set up the KW-14T and the KW-14R and includes the following options: Add new Video Source—Select this option to register a transmitter with a receiver. -
Page 20: Figure 9: Choose Source To Remove Menu
While the transmitter is being unregistered, the message “Removing <transmitter name>… is displayed. After approximately 30 seconds, the OSD closes, indicating that the source has been removed and the transmitter unregistered. KW-14T/KW-14R - Using IR Remote Control and OSD Menu... - Page 21 7. Select a source from the menu to display or press the Exit button to close the OSD. Note: The name is valid only for this specific receiver and does not affect the actual name of the transmitter. KW-14T/KW-14R - Using IR Remote Control and OSD Menu...
-
Page 22: Mounting The Kw-14T And The Kw-14R
Mounting the KW-14T and the KW-14R The KW-14T and the KW-14R can be mounted to a wall or furniture and should not be more than 30m (100ft) apart. Mounting Locations Best Practices For single transmitter installations: Ensure that the receiver(s) is within 30m (100ft) of the transmitter, (the distance is reduced if transmission is not line-of-sight). -
Page 23: Figure 10: Drilling Pilot Holes In The Center Of The Mounting Holes. Not To Scale
5. Insert two screws (the type of screw depends on the surface on which you are mounting the units) into the mounting holes and tighten them until the screw heads protrude from the wall at the following distances: Transmitter—approximately 4.7mm (3/16 inch) KW-14T/KW-14R - Mounting the KW-14T and the KW-14R... - Page 24 6. Align the mounting holes on the back panel of the device with the two screws protruding from the wall. 7. Slide the device downward until both screws are seated in the narrow parts of the two keyholes. KW-14T/KW-14R - Mounting the KW-14T and the KW-14R...
-
Page 25: Frequently Asked Questions
Frequently Asked Questions Q: Why did my registration fail? A: Ensure that both the paired units are the only Kramer devices currently powered A: Ensure that the transmitter and receiver are no closer than 2m (6ft) to each other. A: Keep the number of walls and obstructions between the transmitter and receiver to a minimum. - Page 26 Reset button. Q: Why is there no audio? A: Check the mute and volume settings on the display. A: Check if the audio format setting on the source is compatible with the KW-14 system. KW-14T/KW-14R - Frequently Asked Questions...
- Page 27 Reset button. Q: Why does the Link LED flash rapidly and there is no video on the display? A: Power-cycle the receiver. If the problem persists, contact Kramer technical support. A: Power-cycle the receiver and transmitter. You can also reset the transmitter by pressing the Reset button.
- Page 28 Q: Why can my devices not establish a link, or the audio or video quality is poor? A: Decrease the distance between the transmitter and receiver units, but not to less than 2m (6ft), and remove any obstructions between them. KW-14T/KW-14R - Frequently Asked Questions...
-
Page 29: Technical Specifications
8.0cm x 10.2cm x 3.6cm (3.15" x 9.5cm x 9.5cm x 3.4cm (3.74" x 4.02" x 1.42") W, D, H 3.747" x 1.34") W, D, H WEIGHT: 0.1 kg (0.22lbs.) approx. 0.1 kg (0.22lbs.) approx. SHIPPING WEIGHT: 0.45kg (1.0lbs) approx. KW-14T/KW-14R - Technical Specifications... -
Page 30: Country Certification
They are currently certified for use in various countries including the US and EU. Consult your local sales office for details regarding certification in your country. The KW-14T and KW-14R are certified in the countries listed in the following table. Country Certification Australia... -
Page 31: Supported Video Resolutions And Rates
1440 x 900 1400 x 1050 SXGA+ 1600 x 900 WSXGA+ 1680 x 1050 3D Rates 720p 1280 x 720 1080i 1920 x 1080 1080p 1920 x 1080 KW-14T Mini USB Pinout Figure 11: KW-14T Mini USB Pinout KW-14T/KW-14R - Technical Specifications... -
Page 32: Operating Frequencies
Do not connect 0V Ground Operating Frequencies The KW-14T and KW-14R employ the DFS (Dynamic Frequency Selection) technology which actively monitors the RF spectrum to select the most appropriate operating frequencies. The table below lists the operating frequencies and their range, (DFS or non-DFS). -
Page 33: Fcc Radio Frequency Interference Statement
Consult the dealer or an experienced radio/TV technician for help Kramer Electronics is not responsible for any radio or communication interference caused by using other than specified or recommended cables and battery or by unauthorized changes or modifications to this equipment. Changes or modifications not expressly approved by the manufacturer could void the user’s authority to... - Page 35 SAFETY WARNING Disconnect the unit from the power supply before opening and servicing For the latest information on our products and a list of Kramer distributors, visit our Web site to find updates to this user manual. We welcome your questions, comments, and feedback.
Need help?
Do you have a question about the KW-14T and is the answer not in the manual?
Questions and answers