Advertisement
Advertisement
Table of Contents

Subscribe to Our Youtube Channel
Related Manuals for Freespirit 123 30410-0


Summary of Contents for Freespirit 123 30410-0
- Page 1 123 30410-0 Treadmill User’s Guide...
-
Page 2: Table Of Contents
Table of Contents IMPORTANT PRECAUTIONS ........2 ASSEMBLY . -
Page 3: Important Precautions
Important Precautions SAVE THESE INSTRUCTIONS Read all instructions before using this treadmill. When using an electrical product, basic precautions should always be followed, including the following: Read all instructions before using this treadmill. It is the responsibility of the owner to ensure that all users of this treadmill are adequately informed of all warnings and precautions. - Page 4 WARNING! To reduce the risk of burns, fire, electrical shock or injury to persons: • Never use the treadmill before securing the safety tether clip to your clothing. • If you experience chest pains, nausea, dizziness, or shortness of breath, stop exercising immediately and consult your physician before continuing.
-
Page 5: Assembly
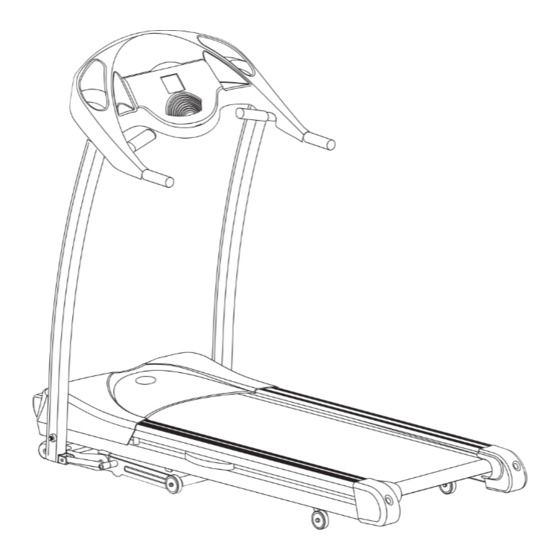
Assembly IMPORTANT: PLEASE READ BEFORE USE! CAUTION! There are several areas during the assembly process of a the treadmill that special attention must be paid. It is very important to follow the assembly instructions correctly and to make sure all parts are firmly tightened. If the assembly instructions are not followed correctly, the treadmill could have frame parts that are not tightened and will seem loose and may cause irritating noises. - Page 6 Console Reading Rack Touch Pad Water Bottle Holder* Grip Pulse Handrails Safety Key Placement Console Mast Motor Cover On/Off Switch Running Belt Circuit Breaker Side Rail Roller End Air Cell Rear Roller Adjustment Bolt Transport Wheel *Water bottle is not included TOOLS (Included) •...
-
Page 7: Assembly Step
NOTE: It is recommended that you apply grease to the threads of each bolt as you assemble your tread- mill, to prevent loosening and noise. Also, during each assembly step, ensure that ALL nuts and bolts are in place and partially threaded in before completely tightening any ONE bolt. Assembly Step 1 1. - Page 8 Assembly Step 3 1. Place console assembly into its correct position. 2. Place Lock Washer (E) and bolt (D) into left upright support and tighten. 3. Place Arc Washer (F) and bolt (D) into left upright support and tighten. 4. Repeat STEPS 2 and 3 for the right-side upright support.
-
Page 9: Before You Begin
Before You Begin CONGRATULATIONS! on choosing your treadmill. You’ve taken an important step in developing and sustaining an exercise program! Your treadmill is a tremendously effective tool for achieving your personal fitness goals. Regular use of your treadmill can improve the quality of your life in so many ways. - Page 10 SAFETY KEY Your treadmill will not start unless the safety key is placed in position. Attach the clip end securely to your clothing. This safety key is designed to cut the power to the treadmill if you should fall. NEVER USE THE TREADMILL WITHOUT SECURING THE SAFETY KEY CLIP TO YOUR CLOTHING.
- Page 11 TENSIONING THE RUNNING BELT (NOTE: Running belt should NOT be moving during adjustments) If you can feel a slipping sensation when running on the treadmill, the running belt must be tightened. In most cases, the belt has stretched from use, causing the belt to slip. This is a normal and common adjustment.
-
Page 12: Treadmill Operation
Operation 3 4 5 6 INCLINE SPEED START SELECT STOP Note: There is a thin protective sheet of clear plastic on the overlay of the console and should be removed. A. MONITOR DISPLAY: Speed, Time, Pulse, Distance, Incline, Calories and Program Profiles. B. - Page 13 MONITOR DISPLAY SPEED Indicates how fast your walking or running surface is moving. TIME Shown as Minutes:Seconds. View the time remaining or the time elapsed in your workout. PULSE Shown as Beats Per Minute. Used to monior your heart rate (displayed when contact is made with both pulse grips or wireless chest is used - included with select models only).
- Page 14 PROGRAMMING QUICK START UP Simply press the START key to begin working out. SELECT A PROGRAM Select a PROGRAM using the SPEED keys. Once a PROGRAM has been chosen, press SELECT. SELECT A LEVEL Select a PROGRAM LEVEL using the SPEED keys. Once a PROGRAM LEVEL has been chosen, press SELECT.
-
Page 15: Exploded Diagrams
Console Set FRAME ENSEMBLE CADRE... - Page 16 Frame Set CONSOLE ENSEMBLE CONSOLE H26 B56...
- Page 17 DECK ENSEMBLE PLATE FORME L06 L07...
- Page 18 Deck Set FRAME ENSEMBLE CADRE...
- Page 19 WEIGHT LOSS - Challenges with various combinations of hills and valleys. Time-based goal with 10 difficulty levels to choose from. Program Segments (all segments last 10 seconds) Warm Up Cool Down Elevation Level 1 Speed Elevation Level 2 Speed Elevation Level 3 Speed Elevation...
-
Page 20: Parts List
Parts No. Description Parts No. Description SZTM123FRM MAIN FRAME SET MZE0501007 SPRING WASHER SP0001087BC FRAME SET MZE0201003 HEX NUT SP0003052BC LEFT CONSOLE MAST TUBE MZE0104073 SCREW, ROUND HEX SOCKET SP0004042BC RIGHT CONSOLE MAST TUBE MZE0104164 SCREW, ROUND HEX SOCKET SP0017009BB ELEVAATION RACK SZTM123CNS CONSOLE SET... -
Page 21: Troubleshooting
Troubleshooting & Maintenance Procedures COMMON PRODUCT QUESTIONS ARE THE SOUNDS MY TREADMILL MAKES NORMAL? All treadmills make a certain type of thumping noise due to the belt riding over the rollers, especially new treadmills. This noise will diminish over time, although may not totally go away. Over time, the belt will stretch, causing the belt to ride smoother over the rollers. - Page 22 TROUBLESHOOTING - TREADMILLS PROBLEM: The running belt does not stay centered during a workout. SOLUTION: Verify that the treadmill is on a level surface. Verify that the belt is properly tightened and centered (Refer to the ADJUSTMENT section). TROUBLESHOOTING - HEART RATE Check your exercise environment for sources of interference such as fluorescent lights, computers, or appliances containing large motors.
- Page 23 MAINTENANCE Cleanliness of your treadmill and its operation environment will keep maintenance problems and serv- ice calls to a minumum. For this reason, we recommend that the following preventive maintenance schedule be followed. AFTER EACH USE (DAILY) Clean and inspect, following these steps: •...
-
Page 24: Conditioning Guidelines
Conditioning Guidelines Always consult your physician before beginning an exercise program. HOW OFTEN? The American Heart Association recommends that you exercise at least 3 to 4 days per week to main- tain cardiovascular fitness. If you have other goals such as weight or fat loss, you will achieve your goal faster with more frequent exercise. - Page 25 TARGET ZONE HEART RATE CHART Your Target Zone is a percentage of your maximum heart rate. Target Zone will vary for each individual, depending on age, current level of conditioning, and personal fitness goals. The American Heart Association recommends working-out at a Target Heart Rate Zone of between 60% and 75% of your maximum heart rate.
- Page 26 DEVELOPING A FITNESS PROGRAM STRETCH FIRST Before using your product, it is best to take a few minutes doing a few gentle stretching exercises. Stretching prior to exercise will improve flexibility and reduce chances of exercise related injury. Ease into each of these stretches with a slow gentle motion. Do not stretch to the point of pain. Make sure not to bounce while doing these stretches.
- Page 27 ACHIEVING YOUR FITNESS GOALS An important step in developing a long term fitness program is to determine your goals. Is your primar goal for exercising on your treadmill to lose weight? Improve muscle? Burn stress? Prepare for the sprin racing schedule? Knowing what your goals are will help you develop a more successful exercise program Below are some common exercise goals: •...
- Page 28 Weekly Log Sheets...
- Page 29 Weekly Log Sheets...
- Page 30 Monthly Log Sheets...
-
Page 31: Limited Warranty
Limited Warranty FRAME • 4 YEARS Sears warrants the frame against defects in workmanship and materials for a period of four years from the date of purchase, so long as the device remains in the possession of the original owner. DRIVE MOTOR •... - Page 32 1-800-LE-FOYER (1-800-533-6937) www.sears.ca HomeCentral ® Trademarks of Sears, Roebuck and Co. used under license by Sears Canada ® Marque deposEe/ Marque de Commerce de Sears, Roebuck and Co. utillisEe en vertu d une licence de Sears Canada FreeSpirit Rev. 1.1...
Need help?
Do you have a question about the 123 30410-0 and is the answer not in the manual?
Questions and answers