Table of Contents
Advertisement
Quick Links
Advertisement
Table of Contents

Related Manuals for LRS T7503


Summary of Contents for LRS T7503
- Page 1 800.437.4996 • www.pager.net...
- Page 3 T7503 Paging System Transmitter U S E R M A N U A L ..I I n n s s t t a a l l l l a a t t i i o o n n , , W W a a r r r r a a n n t t y y a a n n d d S S e e r r v v i i c c e e I I n n f f o o r r m m a a t t i i o o n n Long Range Systems, Inc.
-
Page 5: Table Of Contents
Chapter 5: Simplified Paging Mode ..............15 Paging ....................15 Table Status ..................16 Chapter 6: T901 and Table Management ............17 Chapter 7: Programming Pagers................ 17 Chapter 8: Replacing the T7503 ................. 19 Chapter 9: Fax Back ..................... 19 T7503 User Manual... - Page 6 Chapter 10: Troubleshooting................20 Why does the Display show nothing?..........20 Why do the Pagers not Receive Pages?.......... 20 Why do the Battery Powered Pagers Not Receive Pages?.... 21 How do I connect a USB Mouse? ............ 21 Why is Cell Phone Paging not working? ......... 21 Chapter 11: System Specifications ..............
-
Page 7: Chapter 1: The T7503
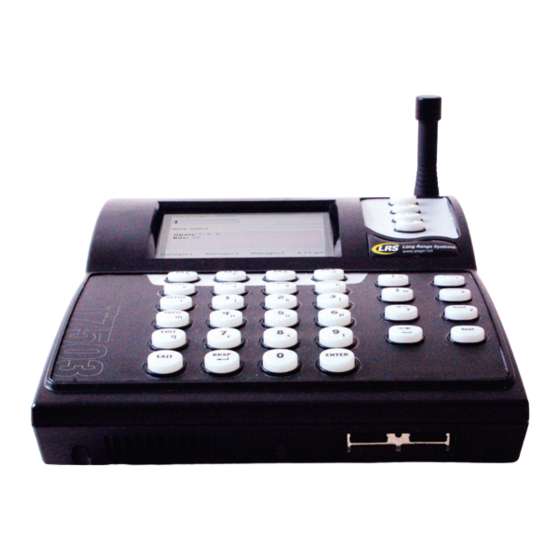
CHAPTER 1: THE T7503 Keyboard Description Before using the T7503, please read the following descriptions. Note that during any functions that the display changes, the keys may perform differ- ent functions, and only the lighted keys are enabled. Main Keypad... -
Page 8: Secondary Keypad
Wait List Key – Returns the system to the wait list function. NOTE: this is the default function. Operation Modes There are two ways to configure a T7503: Simplified Paging and Waitlist Operation. Simplified Paging: This mode is used for simple paging of guests using pagers or cell phones, and also shows a list of tables available for seating. -
Page 9: Chapter 2: Installation And Setup
After it is inserted, a pop-up window will show that a New Card is detected, and will give options to select to use as a Live Backup or to Clone T7503 from the SD Card if the card is transferred from one T7503 to another. -
Page 10: Connecting To The Internet With Optional Cell Phone Paging
Connecting to the Internet with Optional Cell Phone Paging The T7503 can connect to the internet using the LAN Port and page a cus- tomer’s cell phone that their table is ready. This option must be enabled by LRS. Please contact your local representa- tive. -
Page 11: Chapter 3: Setting Menu Options
2) Enter access code and press ENTER. 3) Select PAGERS. 4) Select AUTO-LOCATE. 5) Press M1 to enable Auto-Locate. 6) Enter a time for Auto-Locate to send the locate signal to all pagers. 7) Press EXIT and accept the changes. T7503 User Manual... -
Page 12: Transmit Power
Transmit Power 1) Press SETUP. 2) Enter access code and press ENTER. 3) Select PAGERS. 4) Select TRANSMIT POWER 5) Enter a power level from 0 to 31 and press ENTER. 6) Press EXIT and accept the changes. Assigning Managers to Buttons This feature is used to edit which buttons are assigned to alert a manager pager. -
Page 13: Special Needs Options
6) Type in the text of the special need and press ENTER. 7) Press EXIT and accept the changes. Sending Messages The transmitters use a set of pre-canned messages when paging staff text/alpha pagers. These messages are built in using codes 000 to 076 and cannot be edited. T7503 User Manual... -
Page 14: Adding Or Editing Custom Messages
Example: Send a message to call extension 123 • From Preset Message Table choose – 006 (Call Ext) • Enter code 0-0-6-1-2-3 (Displays: CALL EXT 123) Code Message Phone Call Starter Kitchen Restroom Sales Call Valet Service drive Manager Door Showroom Customer Survey... -
Page 15: Chapter 4: Waitlist Mode Operation
• Enter the Guest Pager if handing out an on-premise pager or Mo- bile Phone to use the guest’s cell phone as a pager and press ENTER. When all fields are entered, press ENTER for Finished. 1) Entering a Party Size 2) Entering the Quoted Wait T7503 User Manual... -
Page 16: Adding A Reservation
) Selecting the Preferences 4) Entering the Party Name 5) Entering Guest’s Phone Number 6) Entering Assigned Pager Number for Paging Adding a Reservation 1) Press the RESERVE button. 2) Enter the party size and press ENTER. 3) Enter the date and time of the reservation and press ENTER. 4) As required, select preferences. -
Page 17: Paging A Party
3) Guest will now be paged and their table number will next to the party’s name. Step 1: Selecting a Guest to Page Step 2: Selecting an Open Table Step 3: View of Paged Guest with Table Assignments T7503 User Manual... -
Page 18: Seating A Party
Seating a Party To seat a party, highlight the party from the waitlist and press SEAT. The party will now be removed from the waitlist. Paging a Manager 1) To page a manager, use the M1, M2, and M3 keys. 2) Type in a 3 digit code for a preset message or press M1 to write a free form message. -
Page 19: Chapter 5: Simplified Paging Mode
ENTER. The number will be saved as a pager number between 501 and 699. When ready to page the Guest, type the Pager Number, and the Guest’s Cell Phone will be called to alert them that their table is ready. T7503 User Manual... -
Page 20: Table Status
This section will show tables that are available as a table number in the Open, Bus, or Hold lists. Tables on this list can be added and removed from the T7503 keypad by pressing the TBL STAT button. When tables are avail- able, the ALERT key on the keypad is lit. -
Page 21: Chapter 6: T901 And Table Management
CHAPTER 6: T901 AND TABLE MANAGEMENT The T901 is a handheld device that works with the T7503 to remotely add guests to the waitlist or change the status of a table. To use a T901, please refer to the separate T901 user instructions or contact LRS. - Page 22 8) For individual pager programming, enter the Pager Number. 9) Reset the Staff Pager using the charger. When the pager finishes flashing/vibrating, press NEXT>. 10) Repeat steps 4 through 9 for each pager to program. To program a Battery Operated Alpha Pager: 1) Press SETUP and enter the access code.
-
Page 23: Chapter 8: Replacing The T7503
2) Disconnect all cables (Ethernet/power) from defective unit and con- nect to the replacement. 3) Remove the SD card from the side of your defective T7503 transmit- ter. 4) Insert SD card into the side of the new T7503 transmitter. -
Page 24: Chapter 10: Troubleshooting
• If no – plug it in Remedy If power supply is good call LRS to get a new transmitter If power supply is bad call LRS for a new power supply. Why do the Pagers not Receive Pages? Be sure pagers are ON, Awake, Charged or have Good Batteries NOTE: The Access Code is needed for Setup functions. -
Page 25: Why Do The Battery Powered Pagers Not Receive Pages
5) EXIT SYSTEM INFO and select CAS/RESERVATION SETTINGS. 6) Select Click Ahead Seating. 7) Turn Click Ahead Seating ON. 8) EXIT the menus and accept all changes. 9) Test Cell Phone Paging. • If Cell Phone Paging still does not work, contact LRS. T7503 User Manual... -
Page 26: Chapter 11: System Specifications
(EIRP) is not more than required for successful communication. Required voltage: One 110/220V outlet for the T7503. Operating Frequency / Radiated Power: 420-470 MHz / 1W (FCC Part 90) 2.4 GHz ISM Band / 100mW (FCC Part 15) -
Page 27: Chapter 12: Service Questions And Answers
Long Range Systems at (800) 437-4996 Monday through Fri- day 8:30 am to 5:00 pm Central Time. For weekend or night emergencies: • Long Range Systems has 24/7 live technical support available • Please keep in mind that options are limited over the weekend. T7503 User Manual... -
Page 28: Warranty
Pagers and equipment that are cleaned with unapproved cleaners and suffer cracking will not be covered under warranty. Do not submerge any LRS paging equipment in any type of liquid as this will also damage the equipment and is not covered under the standard warranty. - Page 29 © Copyright 2009, Long Range Systems, Inc. All Rights Reserved This manual contains proprietary information of Long Range Systems, Inc. (LRS) and is intended for use only by its employees or customers. None of the material contained herein may be copied, reproduced, republished,...
- Page 30 Screen displays, keyboard layouts, hardware descriptions, or software are proprietary to LRS and are subject to copyright and other intellectual prop- erty rights of LRS and shall be treated in accordance with the previous para- graph. All attempts have been made to make the information in this document complete and accurate.
- Page 31 T7503 User Manual...
Need help?
Do you have a question about the T7503 and is the answer not in the manual?
Questions and answers