
Related Manuals for LRS T9100


Summary of Contents for LRS T9100
- Page 1 T9100 & Cancel Panel Paging System Transmitter U S E R M A N U A L Installation, Warranty and Service Information Long Range Systems, Inc. 4550 Excel Parkway, Suite 200 ddison, TX 75001 800.437.4996 www.pager.net •...
-
Page 2: Table Of Contents
Overview of T9100 ........ - Page 3 T9100 Cancel Panel to T9100 ........
-
Page 4: The T9100
Staff Name board, and four mounting bracket kits. Optional Hardware The T9100 and T9100 Cancel Panel have the ability to print a server report to a POS Printer. Contact LRS if you wish to purchase a printer. Hardware Setup Procedure 1. - Page 5 2. Use the #10-32 x 3/8” screws to hold the clamps. Do not fully tighten screws. Clamp Captive Nuts Screws 3. Adjust the distance between clamps until fits to the mounting surface. 4. Tighten screws. Long Range Systems T9100 User Manual...
- Page 6 Because the thumbscrews and brackets can be mounted in many ways, they can be adapted to most locations is possible. Thumbscrew Horizontal Mount Mounting Bracket Mounting Screws Vertical Mount Thumbscrew Mounting Bracket Mounting Screws Long Range Systems T9100 User Manual...
- Page 7 1. Plug the power supply into a standard 110V outlet and the barrel connector end into the jack on the side of the transmitter. 2. Upon completion of the setup, make sure pagers are fully charged. Long Range Systems T9100 User Manual...
-
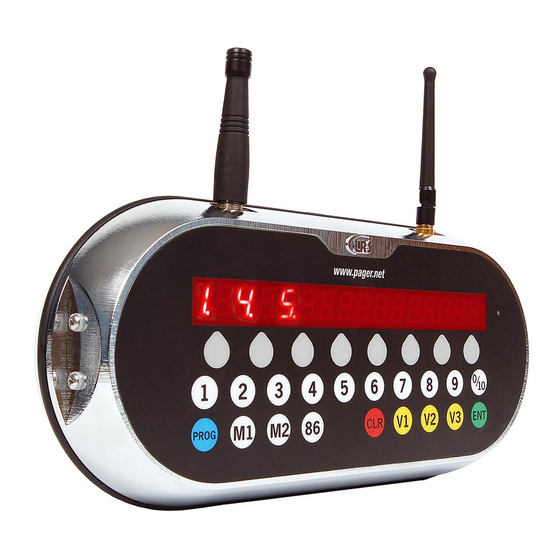
Page 8: Overview Of T9100
Supply Keypad Function Keys The function keys are located along the bottom row of the T9100. - M1 & M2 used to page and program Manager Pagers. - 86 “All Call” button used to page all pagers. - CLR used to clear an entry or to back up one menu level. -
Page 9: Rest Terminals
The Reset Terminals are located to the user’s left side on the transmitter. These are used to reset a pager for programming. Status LED This LED will light green to indicate that the T9100 is sending information to the pagers or T9100 Cancel Panel. System Specifications Notice: Operation is subject to the following: •... -
Page 10: Using The T9100
Using the T9100 Time and Date Initial Power Up During power up, to enter the time and date: • At [enter time], enter the hh mm (hour, minute) using the number keys, and then press ENT. • Press 2 for AM or 10 for PM. -
Page 11: User Preferences
User Preferences The T9100 will come with factory settings for normal operating use. Some features can change per the user’s custom needs. Display Current Settings To view the current settings for the transmitter: • Press PROG – PROG – 1 – 6 – ENT. -
Page 12: Display Clock
To enable: • Press PROG – PROG – 2 – 2 – ENT. • At [beeper] press button under ON. • If done, select Yes (button under Yes), if not, select No (button under No.) Long Range Systems T9100 User Manual... -
Page 13: Preset Message
Preset Message The LRS transmitters come with a list of preset messages that can be sent to Alpha Pagers. To edit which message is sent: • Press PROG – PROG – 1 – 3 – ENT. • Enter the preferred message from the table, then press ENT. -
Page 14: Repeater Delay
• If done, select Yes (button under Yes), if not, select No (button under No.) Restaurant ID The ID of the Restaurant system. Set if more than one LRS system is in an area to prevent interference. To set: • Press PROG – PROG – 1 – 4 – ENT. -
Page 15: Station Id
• If done, select Yes (button under Yes), if not, select No (button under No.) Server Statistics The T9100 can track the daily statistics of the number of times a server was paged, the server’s average re- sponse time, and the number of times a manager is paged. - Page 16 The connection between the transmitter and printer is a “straight-through”. This is achieved with a standard DB9 to DB25 adapter connected to the back of the printer, and a LRS provided serial cable to connect the printer to the transmitter.
-
Page 17: Range Test
00:44 Range Test This can be used to determine the effective range of the T9100 in your environment. To start the range test: • Press PROG – PROG – 8 – ENT. • Press button under Range. The Range Test will begin automatically. -
Page 18: Pager Programming
Pager Programming Star and Alpha Pagers can be reprogrammed from the T9100 transmitter. If the pagers need to have their identification code reprogrammed, contact LRS before proceeding. The following is the basic procedure to use: For Server Pagers: 1. Be sure to set the T9100 for the System ID in use. -
Page 19: T9100 Cancel Panel
T9100 CANCEL PANEL Overview of T9100 Cancel Panel ntenna Cancel Keys www.pager.net CANCEL PANEL Power Supply Reset Terminals Function Keys Number Keys Vibration Keys Keypad Function Keys The function keys are located along the bottom row of the Cancel Panel. -
Page 20: Using The T9100 Cancel Panel
To Cancel a page, press the Cancel Key immediately under the number of the pager. If using a Cancel Panel with T9100, the pager number may be canceled from the Cancel Panel or by press- ing CLR then the pager number on the T9100. -
Page 21: User Preferences
User Preferences The T9100 Cancel Panel operates as a “Slave” to the T9100. Many settings are transmitted to the Cancel Panel via the T9100. To edit preferences, refer to the User Preferences of the T9100. Note: To enter selections greater than 10, the user will need to enter as two numbers. -
Page 22: Ssociating The T9100 Cancel Panel To T9100
• Then display channel and Pan ID. Changing Transmitters as 2.4 GHz Master Any T9101, T9100, or T9100 can act as a single coordinater for the 2.4 GHz network, synchronizing most set- tings and clocks for all transmitters. To Set a Transmitter as Master: 1. -
Page 23: Service Questions And Nswers
Monday – Friday 8:30 am to 5:00 pm Central Time. Weekend or Night Emergencies: • Long Range Systems has 24/7 live technical support available. • Please keep in mind that replacement options are limited over the weekend. Long Range Systems T9100 User Manual... -
Page 24: Lrs P Gers V Il Ble For The T9100
To access the vibe/contrast menu, simply remove the pager from the charger or use the reset terminal on the T9100. While it is vibrating or beeping, press and hold the Select Button for 8 seconds. The following top level menu will display:... - Page 25 7. To exit, wait 8 seconds and the pager will go back to the vibe/contrast menu VIBE CONTRAST 8. To exit this menu wait 8 additional seconds Long Range Systems T9100 User Manual...
-
Page 26: Settings
4. Press the Select Button to continue scrolling forward through the message or messages Time Pager will display the current time. This feature is automatically updated by the T9100 transmitter. If the time does not appear, a flashing star will appear on the right side of LCD to show pager is operational. -
Page 27: Using The Lrs Lph E467
USING THE LRS ALPHA E467 SCROLL UP www.pager.net SCROLL DOWN SELECT/READ BUTTON Menus SCROLL UP Read All 10/25 10:38am SCROLL DOWN Selecting functions 1. From Read All screen, press Up (or Down) Scroll button until desired selection displays 2. Press Read/Select button to select item 3. -
Page 28: Read Message
1. Using the Up (or Down) scroll button scroll until display shows “Set Key Tone” 2. Press Read/Select to set key tone on/off 3. Use the Up (or Down) scroll button to select On or Off 4. Press Read/Select to set Long Range Systems T9100 User Manual... -
Page 29: Select Alert
• Select Loud or Soft and press Read/Select to set • Select Duration (seconds) and press Read/Select to set Vibe Off - Use the Up (or Down) scroll button to select • Press Read/Select to set Long Range Systems T9100 User Manual... -
Page 30: Using The St R P Ger
• Star pagers are intended to vibrate the number of times determined by the Vibe mode selected. On the T9100 this is done by choosing the V1, V2 or V3 button. This can be a way to send ad- ditional information or to identify 1 of 3 stations. -
Page 31: Cleaning & Charging Instructions For Lrs Paging Equipment
Pagers and equipment that are cleaned with unapproved clean- ers and suffer cracking will not be covered under warranty. Do not submerge any LRS paging equipment in any type of liquid as this will also dam- age the equipment and is not covered under the standard warranty. -
Page 32: Warranty
LRS, Inc. products are not designed, intended, or authorized for use as components in sys- tems intended to support or sustain life, or for any other application in which the failure of the LRS, Inc. product could create a situation where personal injury or death may occur.
Need help?
Do you have a question about the T9100 and is the answer not in the manual?
Questions and answers