
Related Manuals for WMF combiNation S/S4/ESeries 8600


Summary of Contents for WMF combiNation S/S4/ESeries 8600
- Page 1 WMF COFFEE MACHINES Operating instructions WMF combiNation S / S4 / E Series 8600 Edition 8 - Printed in 03.08 Item-No. 33 0914 2000...
- Page 2 No-one likes reading operating instructions. Please do so anyway! You will get more pleasure from your WMF COFFEE MA- CHINE afterwards and will find it was worth it after all! In your own interest, please follow all safety and cautionary instructions.
-
Page 3: Table Of Contents
Contents 1 Designation of machine parts ....................85 2 General description ........................86 3 Warnings ...........................87 4 Safety instructions ........................88 5 Technical data...........................89 6 Conditions of use and installation...................90 7 Operation ..........................91 7.1 Starting the machine ......................91 7.2 Filling the coffee beans hopper and/or ground coffee hopper..........91 7.3 Preparing to dispense milk....................92 7.4 Beverage key selection and labelling .................93 7.5 Adjusting the height of the combination spout and/or front door ........95... - Page 4 8.5 Access authorisations (PIN numbers) ................124 8.5.1 System of access authorisations................. 124 8.5.2 Changing access authorisations (PIN numbers) ............125 8.6 Special unit: WMF combiNation S4 ................127 8.6.1 General description....................127 8.6.2 Technical data......................128 8.6.3 Filling the coffee hoppers ..................128 8.6.4 Four-grinder operating concept .................
-
Page 6: Designation Of Machine Parts
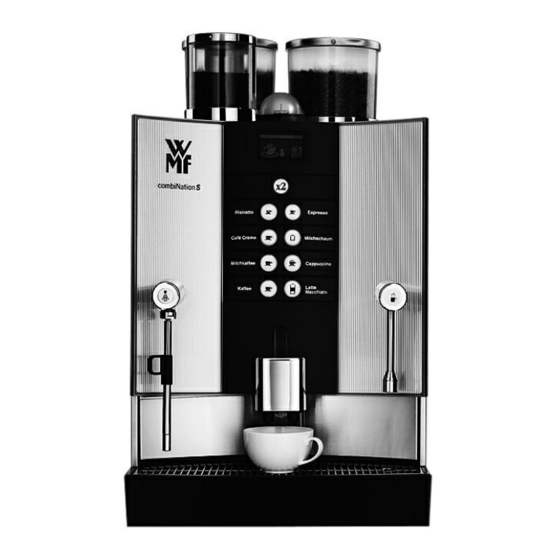
1 Designation of machine parts Coffee beans hopper, optionally lockable Ground coffee hopper, optionally lockable Manual input/cleaning shaft Display Control panel Rotary knob for steam dispensing Combination spout Steam nozzle Drip tray Hot water key Hot water spout Grouts collector Clamping valve Height-adjustable front door On/off key switch... -
Page 7: General Description
2 General description The WMF combiNation S coffee machine is a fully automatic single-cup machine for making Espresso, Café Crème, Cappuccino, White Coffee and Latte Macchiato. Hot water and/or steam dispensing and making filter cof- fee are both available as options. -
Page 8: Warnings
3 Warnings Maximum machine safety is an integral WMF beverage characteristic to which we pay particular attention. In spite of all our safety precautions however, every machine is potentially hazardous if not oper- ated properly. This is why – for your own safety – we have summarised the warnings below and highlighted them in grey throughout the instruction manual. -
Page 9: Safety Instructions
If the safety valve is activated, the machine should be switched off immedi- ately at the customer’s main switch. Switch off the machine if a boiler malfunction occurs. Contact the WMF customer service department and do not switch the machine on again until the fault has been remedied. -
Page 10: Technical Data
If the local water has a carbonate hardness of more than 5° (German hardness), a WMF water filter must be installed in the supply line to the machine. -
Page 11: Conditions Of Use And Installation
The machine operator must arrange for the site preparatory work. This should be carried out by approved contractors in accordance with general and local regulations. WMF customer service technicians are only permitted to connect up the machine to the prepared connections. They are not authorised to carry out plumbing or wiring work on site and will not be responsible for such work. -
Page 12: Operation
7 Operation Starting the machine Before the machine is started up, the main shutoff valve in the fresh water feed line must be opened and the main electrical switch supplying the machine must be turned on. Turn the key switch to position “1”... -
Page 13: Preparing To Dispense Milk
Preparing to dispense milk In order to dispense milk from the machine, the milk tank supplied (e. g. in the WMF auxiliary cooler or, as shown here, the Tetra Pak) has to be connected to the combination spout of the machine by the milk intake hose 16. -
Page 14: Beverage Key Selection And Labelling
121) or alternatively you can choose your own set- tings. You can label the individual beverage keys with differ- ent beverage symbols which your local WMF customer service engineer can replace according to your require- ments. Example: additional beverage alternative key gives you access to a second level of keys. - Page 15 1 cup Ristretto Example: two-cup function Your local WMF customer service engineer will set up one of these alternatives for you at the time of installation of the machine. 1 cup Espresso 2 cups Espresso are pre- pared at the same time...
-
Page 16: Adjusting The Height Of The Combination Spout And/Or Front Door
Adjusting the height of the combination spout and/or front door You can adjust the height of the combination spout pending on the size of the coffee cups you use. Grasp the combination spout and slide it upwards or downwards as required. Caution! Scalding hazard in the area of the combination spout 7. -
Page 17: Preparing Coffee
Preparing coffee 7.6.1 Coffee beverages (Espresso, Ristretto, Café Crème, Filter Coffee, etc.) Caution! Scalding hazard in the area of the combination spout 7. If the coffee beans hopper and/or ground coffee hopper are full (see chapter 7.2 on page 91) and the machine is ready for operation, coffee beverages can be dispensed by press- ing one of the beverage keys. -
Page 18: Coffee Beverages With Milk (White Coffee, Cappuccino, Latte Macchiato Etc.)
4. At the end of the brewing process, the freshly prepared coffee beverage is ready. The used coffee grouts are collected in the built-in grouts collector 12. All the key lights are reactivated again and the display shows the “Ready” message. The machine is ready for the next brewing operation. -
Page 19: Quantity Pre-Selection
4. At the end of the brewing process, the freshly prepared coffee beverage is ready. The used coffee grouts are collected in the built-in grouts collector 12. All the key lights are reactivated again and the display shows the “Ready” message. The machine is ready for the next brewing operation. - Page 20 2. The display asks you to put in the ground coffee. 3. Open the manual input 3. Take the measuring spoon (order no. 33.0724.4000) and pour in the appropriate quantity of ground coffee (max. 25g) for the quantity to be brewed. Then close the manual input 3. 4.
-
Page 21: Hot Water Dispensing
3. Free flow Dispensing continues as long as the hot water key pressed. Your WMF customer service engineer will set your pre- ferred alternative for you as required. During hot water dispensing, the beverage selected is shown in the display. In the example shown here, a small portion of hot water has been dispensed. -
Page 22: Steam Dispensing
Steam dispensing Your WMF combiNation S can be fitted with an optional steam nozzle for manual dispensing and portioning of steam. You can use steam to heat up drinks or to froth milk manually. Caution! Scalding hazard in the dispensing area of the steam nozzle 8. -
Page 23: Coffee Grouts Collector
2. First insert the steam nozzle well into the drink, then turn the rotary steam knob slowly towards the left (di- rection “+”) to start steam dispensing. 3. Now move the jug up and down so that the outlet in the steam nozzle is repeatedly lifted out of the milk. -
Page 24: Unit Number Accounting
(This should be ordered sepa- rately). This enables larger quantities of grouts to be col- lected. Your WMF customer service engineer will set the maximum collection quantity on the machine. 7.10 Unit number accounting... -
Page 25: Waiter Accounting System
To reset the counter to zero, press the soft key. 7.11 Waiter accounting system Your WMF combiNation S can be fitted with a WMF Waiter Accounting System or in conjunction with an accounting system. The coffee machine is equipped with a waiter lock connected to the accounting unit. -
Page 26: Vending Units
WMF coffee machine. In other words, the waiter keys in the bever- age sale information at the till. If the WMF coffee ma- chine shows a credit for a beverage, the beverage can be dispensed either freely or by inserting the appropri- ate waiter key. - Page 27 Note: In this case, please follow the instructions on your WMF coffee machine display. Dimensions (body) Height 600 mm Width...
- Page 28 Settings Once the coin checker has been commissioned by WMF Customer Service, you can program your own sell- ing prices. This is done as follows: Pressing the Multicounter/SE soft key takes you into the menu, where the price-setting is possible.
-
Page 29: Chip) Card Reader
7.12.2 (Chip) card reader The WMF combiNation S can be equipped with a card reader for self-service mode. The card reader is purchased by the customer and sent to WMF for fitting. The card reader manu- facturer’s specific instructions should always be followed. -
Page 30: Coin Changer
Note: The coin changer must only be connected and put into service by WMF Customer Service. The WMF combiNation S can be fitted with a coin changer for self-service mode. The attachment described here is an MEI (Mars Electronics International) CF 7000 ®/TM coin changer with a MDB interface. - Page 31 Settings Filling the tubes with change 1. Set „filling tubes“ at the the changer. 2. Tubes will be filled with chang for the first time. 3. Quit filling-mode. The display „no change“ expires after the first run up. Paying out coins /emptying tubes On pressing the keys, one coin is paid out of the corre- sponding tube each time.
- Page 32 08 = only A or (C and D) 04 = only A 09 = only B and C and D Token The small and large WMF token values can be set in this sub-menu. Blocking the coin device The individual coin canals can be blocked here. Please...
-
Page 33: Switching Off The Machine
Machine cleaning Caution! Turn off the power supply to the machine before cleaning the coin changer. Please follow the manufacturer’s cleaning instructions when clean- ing the coin changer. These instructions can be found in the en- closed Quick Reference sheet, where all the cleaning steps are described in detail. -
Page 34: User Guide
8 User guide The machine user guide is provided in the form of a touch screen display. When the machine is ready for operation, the following display appears: Pressing on the blank area of the display will produce the additional symbol , which can be used to call up user information. -
Page 35: Setting The Milk Froth Quality
Setting the milk froth quality (see chapter 8.1 on page 114), Timer mode, Cleaning (see chapter 10, page 127), Managing access rights (PIN numbers) (see chapter 8.5, page 124), Beverage settings (see chapter 8.2, page 115), Machine settings (see chapter 8.3, page 122), Setting the date and time (see chapter 8.4, page 123), Access authorisations (PIN numbers) (see chapter 8.5, page 124),... -
Page 36: Beverage Settings
The quality of the milk froth (microporosity) is set cen- trally, for all beverages with frothed milk, via the tion in the selection menu. This guarantees swift adapta- tion to fluctuations in the properties of the milk and avoids the need to alter the beverage settings in the setting pro- gram for every single drink made with frothed milk. -
Page 37: Quantity Of Ground Coffee
In the menu that appears next, you are asked to choose whether you wish to alter the beverage settings, machine settings, reset, timer program, date/time or the contrast. Choose the soft key. Beverages The following display appears: Now select the beverage key on the control panel for the beverage which you would like to change. -
Page 38: Quantity Of Water
Caution! Scalding hazard! In the dispensing area for coffee 7, hot water steam there is a scalding hazard. By pressing the soft key at any time during setting, Test you can activate a test brew to check the result of the changes you have made to the settings. -
Page 39: Coffee Temperature
8.2.3 Coffee temperature To alter the coffee temperature, enter the beverage settings menu (see chapter 8.2 on page 115), choose the setting mode for the beverage selected and use the and/or soft keys to scroll to the setting page where the soft key appears. -
Page 40: Quantity Of Milk Or Milk Froth
By pressing the soft key at any time during setting, Test you can activate a test brew to check the result of the changes you have made to the settings. Press the soft key to accept the new settings, or press to quit the set- tings menu without accepting the changes. -
Page 41: Addition Of Milk
8.2.6 Addition of milk To set or alter the setting for adding milk to a coffee bever- age, enter the beverage settings menu (see chapter 8.2 on page 115), choose the setting mode for the beverage se- lected and use the and/or soft keys to scroll to the setting page where the... -
Page 42: Beverage Selection (Acceptance Of Factory Settings)
In the example shown here, the sequence selected was cof- , froth and finally milk . By pressing the Coffee Foam Milk soft key at any time during setting, you can activate a Test test brew to check the result of the changes you have made to the settings. -
Page 43: Storing Beverage Settings
8.2.9 Storing beverage settings When you have finished your beverage settings, at the end you will be asked whether you want to accept these set- tings. Press the soft key to accept the new settings, or press to quit the setting menu without accepting the settings. -
Page 44: Setting The Date And Time
Setting the date and time The machine is ready for operation and the following dis- play is shown: By pressing the soft key you can enter a second level where a selection menu allows you to set the date and time. If you have allocated access authorisations (PIN numbers) (see chapter 8.5 on page 124), on pressing the soft... -
Page 45: Access Authorisations (Pin Numbers)
Access authorisations (PIN numbers) 8.5.1 System of access authorisations The access authorisation system featured in the WMF com- biNation S restricts access to the selection menu, if desired. There are 4 levels of access authorisations: Level 0 Generally accessible information , not secured by a PIN. -
Page 46: Changing Access Authorisations (Pin Numbers)
8.5.2 Changing access authorisations (PIN numbers) The machine is ready for operation and the following dis- play is shown: Pressing the soft key takes you to a second level where a selection menu allows you to change the access authorisations (PIN numbers). If you have already allocated access authorisations (PIN numbers), on pressing the soft key you will be asked... - Page 47 For example, if you have chosen the PIN number 1234 for level 1 the following display will appear if no PIN Cleaning number has been allocated yet for the higher levels 2 and 3: The PIN number for the lower levels is therefore used for the higher levels.
-
Page 48: Special Unit: Wmf Combination S4
The proportions by weight of the types of cof- fee used are shown as bars in the diagram. The WMF combiNation S4 is the ideal machine for use wherever there’s demand for an infinite variety of coffee. A professional barista! -
Page 49: Technical Data
8.6.2 Technical data Rated power 3.3 kW 6.3 kW Hourly output* Espresso 300 cups 300 cups Café Crème 190 cups 240 cups Hot water output, total 24 l/h 48 l/h 4 coffee beans hoppers from 1.09 kg to 1.25 kg 1/N/PE 50 Hz/230 V 3/N/PE 50 Hz/400 V Electricity supply... -
Page 50: Four-Grinder Operating Concept
8.6.4 Four-grinder operating concept You can set up your individual coffee blends and try out coffee recipes with the aid of the touch screen display. The procedure is as follows: When the four-grinder option is selected in the machine data, the following display appears first of all: The four bars in the display represent the four coffee grind- ers. -
Page 51: Beverage Settings
129). The values set are then transferred to the default setting for each beverage. 8.6.6 Special features The WMF combiNation S4 has four coffee beans hoppers with a bayonet fitting and slide. The removable beans hoppers are easy to wash out and clean. -
Page 52: Special Unit: Wmf Combination E
Special unit: WMF combiNation E Attention! This is a supplement to the WMF combiNation S operator’s manual. The warnings and safety in- structions in that manual must be observed as well as the liability conditions. Please also observe all other sections of the combi- Nation S manual not specially mentioned in connec- tion with the combiNation E. -
Page 53: Features
8.7.3 Features Standby display: The user guidance of the coffee machine is done via a touch display. In the standby mode, the combiNation E shows the following display: Exception: Coffee machines in self-service mode do not show any symbols to choose from (see chapter 8 user guid- ance). -
Page 54: Timerstatus
The Timer Program sets on/off times. Main ”Timer Pro- gram” menu contains the following selection options: • Timer State • Set Timer • Timer Overview • Timer Delete • Timer Info Timerstatus Touch Timerstatus. Activate / deactivate Timer. Note: When Timer is activated theTimer symbol, a little clock, appears in the display. -
Page 55: Copy Day
Display programmed event times: Prg Programmed event times are displayed here. Up to 16 event times per day are possible. Programmed times are listed chronologically. Any new time is chronologically sorted immediately on input and confirmed with Touching directly accesses Timer Overview. Copy Day Any day may be copied complete with its switching events to other days. -
Page 56: Care Of The Machine
10 Care of the machine 10.1 Daily cleaning Daily cleaning of the coffee machine is very important in order to ensure correct operation of the machine and opti- mum coffee quality. Accordingly, 24 hours after switch- ing on the machine, a message will appear in the display reminding you to carry out the daily cleaning program. -
Page 57: Cleaning The Machine
10.1.1 Cleaning the machine The machine is ready for operation and the following dis- play is shown: Press the soft key to enter a second level where a se- lection menu allows you to run the cleaning program. If you have allocated access authorisations (PIN numbers) (see chapter 8.5 on page 124), on pressing the soft key you will be asked for your PIN number. - Page 58 Open the manual input 3, insert a cleaning tablet and close the manual input again. Only WMF special cleaning tablets should be used to clean this machine (WMF order no. 33 0681 1000).
-
Page 59: Cleaning The Combination Spout
The cleaning program takes about 10 minutes. While the cleaning program is running, a message appears in the dis- play to let you know how much cleaning time is left. Caution! Irritation and scalding hazard! Never reach under the spouts while cleaning is taking place. - Page 60 Remove the milk intake hose from the clamping valve by pulling both ends of the milk intake hose forward and then pulling it up out of the mounting. Clean the milk intake hose connector with a damp cloth after detaching it from the combination spout as described above.
- Page 61 5 hours. To prepare the cleaning solution, place 5 ml WMF special cleaner (order no. 33 0683 6000) from the measuring bottle in a container with 0.5 l hand-hot water and mix the solution.
- Page 62 The machine is ready for operation and the following dis- play is shown: By pressing the soft key you will enter a second level with a selection menu which allows you to carry out clean- ing of the combination spout. If you have allocated access authorisations (PIN numbers) (see chapter 8.5 on page 124), on pressing the soft...
-
Page 63: Intermediate Cleaning The Combination Spout
Further recommendations: • If operational reasons do not allow time for the five- hour thorough cleaning, we recommend purchasing a second combination spout. • It is advisable in any case and especially with low throughput or when using uncooled milk to carry out intermediate cleaning after four to six hours’... - Page 64 Press the soft key. Intermed.Clean. After making your selection you will be asked again to confirm whether you wish to clean the foamer. Press the soft key to confirm your selection, or press to quit the selection without carrying out cleaning. On completion of rinsing you will be asked whether you have prepared the cleaning beverage for thorough cleaning of the combination spout.
-
Page 65: Automatic Frother Rinsing
15 seconds after the last beverage is dis- pensed. WMF Customer Service can set up an acoustic warning signal to sound shortly before the start of auto- matic frother rinsing, if required. -
Page 66: Cleaning The Manual Input
10.1.5 Cleaning the manual input The machine is ready for operation and the following dis- play appears: To clean the manual input, press the soft key to un- lock the manual input 3. You can now open the manual input and clean the inside of the bowl with a damp cloth. -
Page 67: Forced Intermediate Cleaning Of The Combination Spout (Or Chocolate Dispenser)
10.2 Forced intermediate cleaning of the combination spout (or chocolate dispenser) Important! For hygiene reasons, all surfaces which come into contact with milk must be thoroughly cleaned at least once a day. In addition, the milk intake hose should be replaced at regular in- tervals. -
Page 68: General Cleaning
Avoid abrasive cleaning powders as these can cause scratches. We recommend WMF Purargan® forte for care of the metal panelling parts (matt surface). Order numbers for the WMF care beverage range: WMF special cleaner for milk frothers Order no. -
Page 69: Error Messages And Remedial Action
11 Error messages and remedial action 11.1 Error messages Your WMF combiNation S has a built-in diagnostic pro- gram. Any errors occurring will appear in the display 4. However, the following error messages may also be due to a power failure. -
Page 70: Remedial Action
OK to con- firm that the problem has been corrected. Call WMF Customer Service in the case of any error mes- sages that cannot be dealt with in this way. If water splashes out of the drip tray, a possible reason... -
Page 71: Wmf Customer Service
12 WMF customer service WMF’s comprehensive service network allows every area to be reached in a short period of time. Our personnel are experienced experts and carry special tools and the original spare parts required at all times, so that malfunctions can be remedied on the spot. - Page 72 WMF laid down in the operating manual of the respective percolator type); for defects resulting from the inappropriate or improper use, from the failure to use WMF genuine spare parts or from the faulty installation by the buyer or a third party, or from a faulty or negligent handling;...
-
Page 73: Haccp Cleaning Concept
The milk does not warm up to a critical level during this time. If your milk consumption is less than this, the milk should be cooled while in use. WMF AG offers various options for this purpose (e.g. the WMF auxiliary cooler or the WMF milk cooler). - Page 74 HACCP cleaning concept Use only cooled long-life milk, as otherwise health hazards due to micro-bacteria cannot be ruled out Cleaning steps: 1. Run the fully automatic coffee machine cleaning program and empty the grouts collector 5. Clean the milk frother (leave in cleaning fluid for 5 hours) 6.
Need help?
Do you have a question about the combiNation S/S4/ESeries 8600 and is the answer not in the manual?
Questions and answers