Table of Contents
Advertisement
Quick Links
Advertisement
Table of Contents

Related Manuals for Erbauer ERB107SDR


Summary of Contents for Erbauer ERB107SDR
- Page 1 WARRANTY YEARS ERB107SDR 1/3 Sheet Sander...
- Page 3 Congratulations on your purchase of a quality power tool from Erbauer (UK) Ltd. This product should give you reliable service but for your peace of mind this power tool does carries a 24-month guarantee, the terms of which are detailed below.
-
Page 4: Safety Instructions
SaFetY InStrUCtIOnS WARNING! Read all safety warnings and all instructions. Failure to follow the warnings and instructions may result in electric shock, fire and/or serious injury. Save all warnings and instructions for future reference. The term “power tool” in the warnings refers to your mains-operated (corded) power tool or battery-operated (cordless) power tool. - Page 5 c. Prevent unintentional starting. Ensure the switch is in the off-position before connecting to power source and/or battery pack, picking up or carrying the tool. Carrying power tools with your finger on the switch or energizing power tools that have the switch on invites accidents. d.
- Page 6 addItIOnaL SaFetY InStrUCtIOnS FOr FInIShInG Sander Save these instructions. Refer to them frequently and use them to instruct others who may use this tool. If someone borrows this tool, make sure they have these instructions. 1. Remove the plug from the socket before carrying out any adjustment, servicing or maintenance.
-
Page 7: Double Insulation
Your risk to these exposures varies, depending on how often you do this type of work. To reduce your exposure to these chemicals: • Work in a well ventilated area • Work with approved safety equipment, such as those dust masks that are specifi- cally designed to filter out microscopic particles. - Page 8 VIBratIOn The European Physical Agents (Vibration) Directive has been brought in to help reduce hand arm vibration syndrome injuries to power tool users. The directive requires power tool manufacturers and suppliers to provide indicative vibration test results to enable users to make informed decisions as to the period of time a power tool can be used safely on a daily basis and the choice of tool.
- Page 9 Maintain this tool in accordance with these instructions and keep well lubricated (where appropriate) Avoid using tools in temperatures of 10 C or less Plan your work schedule to spread any high vibration tool use across a number of days. Health Surveillance All employees should be part of an employer’s health surveillance scheme to help identity any vibration related diseases at an early stage, prevent disease progression...
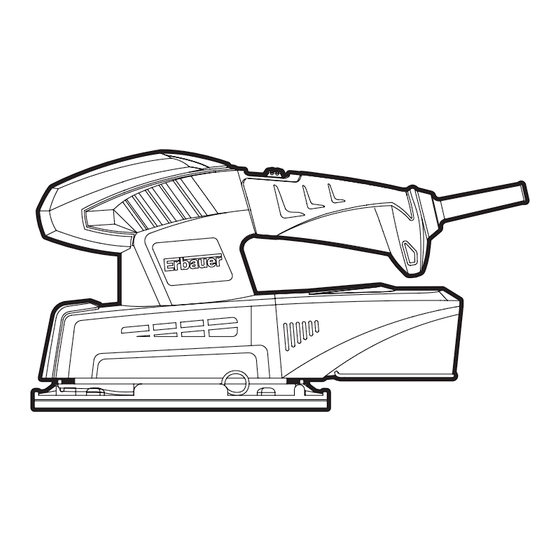
- Page 10 ON/Off SWITCH HAND gRIP AREA DUST bAg SANDINg PAPER CLAMP SANDINg bASE PLATE DUST TUbE PAPER PUNCH...
-
Page 11: Technical Data
teChnICaL data Rated voltage: 230-240V~50Hz Rated power: 220W No load speed: 12000min Protection class: / II Sanding area: 90x187mm Machine weight: 1.7 kg nOISe data A weighted sound pressure 84.5dB(A) Uncertainty(Kpa) 3dB(A) A weighted sound power 95.5dB(A) Uncertainty(Kwa) 3dB(A) Wear ear protection when sound pressure is over 85dB(A) aCCeSSOrIeS Dust bag... -
Page 12: Operation
OPeratIOn NOTE: Before using the tool, read the instruction book carefully. 1. fITTINg THE SANDINg PAPER (SEE fIg A, b & C) To fit the sanding paper, lift up the clamp lever (4) and move away from the clamp lever lock . The sanding paper clamp is now loose. -
Page 13: Operating The On/Off Switch
2. DUST bAg (SEE fIg D, E&f) Your sander is equipped with a dust bag. To attach, insert the dust bag into the back of the sander in correct position, and make sure the bag is tightened securely on the dust extraction nozzle. -
Page 14: Using The Sander
4. PAPER PUNCH (SEE fIg H) If using sanding paper without dust holes, use the paper punch to perforate the holes to ensure correct dust extraction. Position the punch (7) over the base plate with the punch sides on the edges of the base plate. -
Page 15: Maintenance
position otherwise you will remove material and create an uneven surface. WOrKInG hIntS FOr YOUr Sander 1. If your power tool becomes too hot, especially when used at low speed, set the speed to maximum and run it with no load for 2-3 minutes to cool the motor. -
Page 16: Troubleshooting
in a dry place. Keep the motor ventilation slots clean. Keep all working controls free of dust. Occasionally you may see sparks through the ventilation slots. This is normal and will not damage your power tool. If the supply cord is damaged, it must be replaced by the manufacturer, its service agent or similarly qualified persons in order to avoid a hazard. -
Page 17: Environmental Protection
enVIrOnMentaL PrOteCtIOn Waste electrical products should not be disposed of with household waste. Please recycle where facilities exist. For further information visit www.recycle-more.co.uk. PLUG rePLaCeMent The fuse in the main plug of your power tool should always be replaced with one of identical rating. -
Page 18: Declaration Of Conformity
Declaration of Conformity We, Importer Erbauer (UK) Ltd bA22 8RT Declare that the product 1/3 SHEET SANDER ERb107SDR Complies with the essential health and safety requirements of the following directives: Machinery Directive 98/37/EC Low Voltage Directive 2006/95/EC Electromagnetic Compatibility Directive 2004/108/EC... - Page 19 1/3 Sheet Sander...
Need help?
Do you have a question about the ERB107SDR and is the answer not in the manual?
Questions and answers