Table of Contents
Advertisement
Quick Links
Model :
PM60
The Point Mobile name and logo are trademarks of Point Mobile Co., Ltd. in Korea and many other countries.
All rights reserved. This document and any enclosed documents contain confidential or privileged information
belonging to Point Mobile and/or its affiliates. You are hereby notified that any disclosure, copying, distribution
or the taking of any action based on the contents of this information is strictly prohibited.
Originator :
Version :
Jinny Cho
1.0
PM60
User Manual
POINT MOBILE CO., LTD.
B-9F, Kabul Great Valley, 32, Digital-Ro 9Gil
Geumcheon-gu, Seoul, Korea 153-709
www.Pointmobile.co.kr
Dept.
PC/PE/ID/PM/QA
Date :
Aug 26
th
, 2014
Advertisement
Table of Contents

Related Manuals for Point Mobile PM60


Summary of Contents for Point Mobile PM60
- Page 1 PM60 User Manual The Point Mobile name and logo are trademarks of Point Mobile Co., Ltd. in Korea and many other countries. All rights reserved. This document and any enclosed documents contain confidential or privileged information belonging to Point Mobile and/or its affiliates. You are hereby notified that any disclosure, copying, distribution...
-
Page 2: Table Of Contents
CONTENTS INTRODUCTION ················································································· 4 Trademarks ······························································································· 4 About the PM60 Handy Terminal ································································ 5 Accessories ······························································································· 5 SAFETY REGULATIONS HW ·································································· 6 2.1. General Safety Rules ········································································ 6 2.2. Power Supply ·················································································· 7 2.3. Laser Safety ···················································································· 7 2.4. LED Safety ····················································································· 9 2.5. - Page 3 Suspend Mode ··············································································· 31 4.22. Memory Allocation ··········································································· 32 4.23. Care and Cleaning of the Products ······················································ 32 4.24. PM60 Technical Specifications ··························································· 32 USING THE KEYPAD ·········································································· 33 5.1. Numeric Keypad Layout ···································································· 34 5.2. Navigation Keys ·············································································· 34 5.3.
- Page 4 9.3. Program Button properties ································································ 47 9.4. Backlight Properties ········································································· 49 9.5. Scanner Settings ············································································· 49 10. COMMUNICATION ············································································ 52 10.1. Communication Options ···································································· 52 10.2. Installing Additional Software ····························································· 53 10.3. Connecting the USB ActiveSync Cable ················································ 53 10.4. ActiveSync Communication ·······························································...
-
Page 5: Introduction
This manual generally provides you with the safety information and basic features and operations of the PM60 device. Please read all safety precautions and this manual carefully before using your handy terminals and peripherals to ensure safe and proper use. -
Page 6: About The Pm60 Handy Terminal
About the PM60 Handy Terminal The new PM60 is the latest generation handy terminal device, combining a pocket sized rugged form factor built on Microsoft Windows Embedded Pointmobile 6.5 Pro operating system. The PM60 is designed for retail warehousing and logistics applications where maximum performance and durability is required in compact Pointmobile device. -
Page 7: Safety Regulations Hw
Use only the components supplied by the manufacturer for the specific PM60 being used. Do not attempt to disassemble the PM60 handy terminal, as it does not contain parts that can be repaired by the user. Any tampering will invalidate the warranty. -
Page 8: Power Supply
Ne tentez pas de démonter le PM60. Ce produit ne contient aucune pièce ne pouvant être réparée par l'utilisateur. Toute manipulation fera perdre la garantie au produit. Lors du remplacement de la batterie ou en fin de vie du terminal portatif PM60, l'élimination et le recyclage doit être effectuée en conformité avec les lois en vigueur dans votre pays. - Page 9 The following information is provided to comply with the rules imposed by international authorities and refers to the correct use of PM60 handy terminal. Laser Safety Statement This product has been tested in accordance with and complies with CDRH 21 CFR 1040.10 and 1040.11 and IEC 60825-1 Ed 2 (2007) except for deviations pursuant to Laser Notice No 50, dated...
-
Page 10: Led Safety
Pursuant to part 15 of the FCC Rules, you are cautioned that changes or modifications not expressly approved by Pointmobile could void your authority to operate the PM60 handy terminal. This device complies with part 15 of the FCC Rules. Operation is subject to the following two conditions: (1) This device may not cause harmful interference, and (2) this device must accept any interference received, including interference that may cause undesired operation. -
Page 11: Radio Compliance
. Radio Compliance 2.8. PM60 RF terminals are in conformity with all essential requirements of the R&TTE Directive (1999/5/EC). This device is marked with in accordance with the Class II product requirements specified in the R&TTE Directive, 1999/5/EC. -
Page 12: Getting Started
on the natural resources, we encourage you to reuse, recycle and recover the product. If the product is disposed according to the Directive, it will avoid potentially negative consequences to the environment and human health which otherwise could be caused by incorrect disposal. The product marked with crossed out wheeled bin must be disposed separately from municipal waste. -
Page 13: Charge The Batteries
☞ NOTE: Two points of Battery guide stopper must be pertinently inserted to rear cover battery guide stopper hole ☞ NOTE: The battery door must be installed prior to booting the unit. WARNING: Use only Pointmobile-approved Li-Ion battery packs. Unauthorized battery may result in damage not covered by the warranty. -
Page 14: Led Indicators
WARNING: Use only Pointmobile-approved peripherals, power cables, and power adapters. Unauthorized peripherals, cables, or power adapters may cause batteries to explode or damage your device. DO NOT attempt to charge damp/wet handy terminals or batteries. All components must be dry before connecting to an external power source. - Page 15 Rechargeable battery packs is not initially charged. Therefore the initial operation to perform is to charge them. See below. By default, the battery pack is disconnected at the factory to avoid damage due to excessive draining. Annual replacement of rechargeable battery pack avoids possible risks or abnormalities and ensures maximum performance.
- Page 16 combustibles ou de produits chimiques. Ne pas utiliser la batterie en dehors de l’utilisation prévue pour le terminal portable. WARNING Do not short-circuit the battery pack contacts connecting the positive terminal and negative terminal. This might happen, for example, when you carry a spare battery pack in your pocket or purse; accidental short–circuiting can occur when a metallic object such as a coin, clip, or pen causes direct connection of the contacts of the battery pack (these look like metal strips on the battery pack).
-
Page 17: Turn Your Device On
Turn Your Device On 3.5. If you apply the power to your device, it turns on by itself. Do NOT press any keys or interrupt while turning on process. When the process is complete, the Desktop appears, and the terminal is ready for use. Desktop 3.6. -
Page 18: Using The Stylus
Shows phone signal mode Shows the volume Indicates the Battery Control Panel (CPL) Indicates Clock & Alarm CPL zoom in/ out Access the Bluetooth radio Left and right arrows are used to scroll through additional icons Icon Meaning Indicates AC connection mode Indicates WAN (Phone) connection mode Indicates Sound connection mode Indicates LAN / Bluetooth mode... -
Page 19: Pop-Up Menus
4. Get to Know Your Device Feature of Your Device 4.1. The following list outlines a few of the feature included in your device. PM60 Handy Terminal 4.2. Operating Systems: Microsoft Windows Embedded Pointmobile 6.5 Pro Micro Processor: Cortex-A8 1GHz ... -
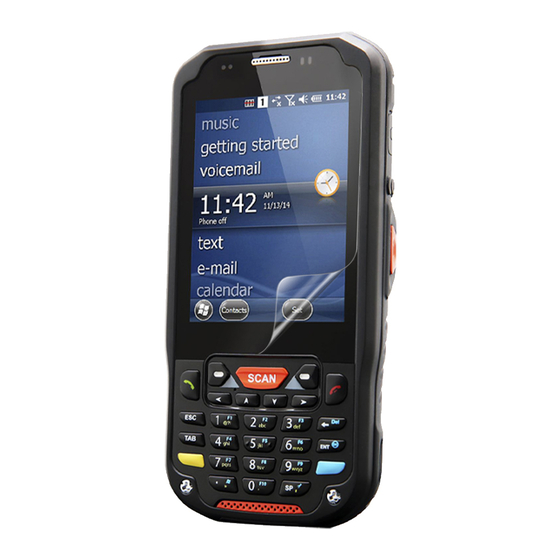
Page 20: Front Panel Layout
UMTS/HSPA+: Five band, 800/850/900/1900/2100MHz GPS: Standalone and Assisted GPS Front Panel Layout 4.3. Proximity sensor Receiver Touch screen display Scan key Keyboard (32-key numeric) LED Indicator Shows the information needed to operate your device as follows: Note: The LED is user-programmable. LED Color Meaning LED Color... -
Page 21: Display Backlight
Green Lights when scanned bar code is successfully decoded. Lights when main battery charging has completed. Blue Lights when a scan Pass Lights when a scan fails Keypad 32 numeric keypad (includes side scan and volume, power button). 55 qwerty keypad (includes side scan and volume, power button). Microphone The integrated microphone can be used for audio recording and phone call. -
Page 22: Keypad Backlight
☞ NOTE: Using the backlight option while on battery power substantially reduces battery life. You may make the same changes when on external power by tapping the External tab. Keypad Backlight 4.5. To turn on the keypad backlight, check the checkbox. The duration of backlight of keypad synchronizes with LCD backlight’s. - Page 23 Clean the touch panel thoroughly with a clean, non-abrasive, lint-free cloth, Make sure nothing is on the touch panel. Blue tag with backing film: Peel off this mask before application. Align the exposed edge of the screen protector along the left edge of the touch panel. Make sure that it lies flush with edges of the touch panel.
-
Page 24: Back Panel Layout
6. Press gently but firmly. Use the card a necessary to smooth out any air pockets or bumps after alloation Press the Power key to weak the terminal and check the touch panel with the stylus. Verify that the screen accepts input from the stylus as usual. If not, re-apply the screen protector. - Page 25 12. For maximum performance, recalibrate the screen Tap Start > Settings > System > Screen 13. Tap Recalibrate the follow the instructions on the screen. Back Panel Layout 4.8. Lanyard mount hole Wire spring mount hole Speaker LED window Camera window Battery cover...
-
Page 26: Left Side Panel Layout
The HANDY TERMINAL comes with Hand strap. You can attach it to the device. Finger Saddle This is a slightly depressed and angled area of the back housing that is designed to cradle or “saddle” your finger while holding the terminal. This unique ergonomic design makes the terminal comfortable to hold and helps prevent you from accidentally dropping the terminal. -
Page 27: Installing Memory Cards
Installing Memory Cards 4.11. The HANDY TERMINAL supports Micro Secure Digital (SD) memory cards up to 32GB. Sandisk, Kingstone and ATP micro SD recommended To access the Micro SD card slot and insert the card, proceed as follows: 1. Press the Power key to put the terminal in Suspend Mode; see Suspend Mode on paragraph 4.23. -
Page 28: Bottom Panel Layout
EarJack 3.5pi 4pole Jack. This connector supports Ear-Mic headset Top Panel Layout 4.13. Image engine window (with engine) Image Engine Window The angled image engine reads and decodes most popular bar code symbolizes. For more information, see Using the Image Engine on paragraph 6. Bottom Panel Layout 4.14. -
Page 29: Peripherals And Accessories
battery, and facilitates communication. This connector supports High speed USB 2.0 communication (up to 480 Mbps) Through this connector, you can communicate with a host workstation via Microsoft ActiveSync; see ActiveSync Communication on paragraph 10.4 The I/O connector supports the following signals: Pin Description Direction DC IN +5V... -
Page 30: Li-Ion Battery Packs
Ethernet port. For more information, see Single Slot cradle/Single Ethernet cradle Device on paragraph 12. USB ActiveSync Cable 4.16. The MicroUSB ActiveSync Cable is used when communicating between the terminal and a host computer to transfer data via the USB interface. Li-ion Battery Packs 4.17. - Page 31 Main battery pack Charging Options When the battery is installed in the terminal, you can use any of the peripherals listed below to charge the battery. • AC Power Supply to USB Port direct. • Single slot docking cradle/Single slot Ethernet cradle •...
-
Page 32: Resetting The Terminal
☞ Start -> Settings -> System -> Power NOTE: You can also check battery power by tapping Resetting the Terminal 4.21. There are three types of system resets: a Soft Reset, a Hard Reset, or a Factory Reset. The soft and hard resets preserve all data stored in the file system. -
Page 33: Suspend Mode
Care and Cleaning of the Products 4.24. When needed, clean the image engine window and the LCD display with a clean, non-abrasive, lint-free cloth. The terminal can be cleaned with a damp cloth. PM60 Technical Specifications 4.25. Model PM60 Operating System Microsoft Windows Embedded Pointmobile 6.5 Pro... -
Page 34: Using The Keypad
1D engine: N4313, uE966 Scan Engine 2D engine : N560x Keypad Numeric , Qwerty Audio Built-in microphone and speaker High speed USB 2.0 from cradle (or I/O cable) Battery Li-ion battery 3.7V / 4000 mAh / 14.8 Wh Expected Hours of 8.5+ hours (with scan and continuously transmitting if using new standard Li-ion battery) Operation Charging... -
Page 35: Numeric Keypad Layout
Dimensions H; 157.4mm x W; 74.2mm x L; 25.8mm(top) 1) 1D ; 330g (239g with battery) Weight 2) 2D ; 330g (239g with battery) 1D Laser model: N4313 laser engine. Decodes all standard 1D codes. Scanner / Decode 2D engine model: N560X 2D Imager. Decodes all standard 1D, 2D, Postal, and OCR Capabilities codes. -
Page 36: Alpha/Numeric Modes
Moves to next control (Indent function to Text editor) Backspace moves the cursor back one space. Backspace If you are typing text, a character is deleted each time you press the backspace key. Enter Performs the same function as the Enter key on a workstation. Power Suspends and resumes the terminal. -
Page 37: Blue Key Combinations
displayed by the alpha indicator. BLUE Key Combinations 5.6. Buttons can be programmed to execute different functions using the Program Button program in the Control Panel. The following buttons on the HANDY TERMINAL are programmed for the listed function. BLUE key modifies the next key pressed to perform specific functions. Key Combination Function BLUE + 1... -
Page 38: Using The Image Engine
BACK SPACE Bksp Key ENTER Return Key Del Key STARTMENU Start Menu Key CALIBRATION Touch Calibration No Action No Action No Action No Action No Action No Action No Action No Action No Action No Action 6. Using the Image Engine Overview 6.1. -
Page 39: Available Image Engines
☞ NOTE: It may not read the barcode according to the direct sunlight or the brightness of the surrounding. Try again away from the direct sunlight. Try again after adjusting the brightness of the surrounding if indoors. ☞ NOTE: It may not read the barcode if it is blue on white background. Try again after changing angle or adjusting the brightness of the surrounding. -
Page 40: Supported Bar Code Symbologies
☞ NOTE: Test Condition: Room Temperature (Approx. 23°C), 0 Lux. New picture : N5600-IM Rev E.pdf base. Supported Bar Code Symbologies 6.4. Symbology Type Symbology Name Codabar 1D Symbologies Code 11 Trioptic Code Code 128 Code 32 Pharmaceutical (PARAF) Code 39 Matrix 2 of 5 Code 93 / 93i Telepen... -
Page 41: Activating The Engine
EAN.UCC Composite Composite Codes Codablock F TCIF Linked Code 39 (TLC39) Postal Codes Postnet British Post(BPO) Canadian Post Australian Post Japanese Post Planet Code KIX (Netherlands) Post China Post Korea Post 4-CB(4-State Customer Barcode) ID-Tag(UPU 4-State) Activating the Engine 6.5. When a scanning application is open, press the Scan key to activate the image engine. -
Page 42: To Decode A Bar Code
6.10. 5. When the bar code is successfully decoded, the decode LED lights green and the terminal beeps. Sample Bar Codes 6.9. You can use the following bar codes to verify decoding: Code 39 PDF 417 Omni-Directional Scanning Positions 6.10. The high-vis aiming pattern frames the bar code to provide you with the best scanning performance. -
Page 43: Using The Laser Engine
7. Using the Laser Engine Overview 7.1. The HANDY TERMINAL (N4313 laser version) contains a laser diode that emits a beam toward an oscillating mirror that scans through the code and the reflected light is bounced off of two mirrors back to the collector. -
Page 44: Supported Bar Code Symbologies
Codabar UPC A 1D Symbologies UPC E Code 39 Interleaved 2of 5 EAN 13 EAN 8 Nec 2of5 Code 93 Straight 2of5 Industrial Plessey GS1 Databar Omnidirectional Straight 2 of 5 IATA Matrix 2 of 5 GS1 Databar Limited) GS1 Databar (Expanded Code 11 China Post Code 128... -
Page 45: Scanning Positions
Scanning Positions 7.9. The aiming beam must be aimed across the entire bar code to provide you with the best scanning performance. The aiming pattern is smaller when the terminal is held closer to the code and larger when the terminal is held farther from the code. Symbologies with smaller bars or elements (mil size) should be read closer to the unit whereas larger bars or elements (mil size) should be read farther from the unit. -
Page 46: Using Control Panel
reception. There is one sound for success and another sound for an error. Enables and disables LED notification for decode/data reception. Vibrator Enables and disables Vibrator notification for decode/data reception. Specifies the method to use when sending the decoded message to the foreground application Keyboard Send decoded bar code data as Keyboard event(stroke) -
Page 47: Power Properties
Terminal Serial Number will be in Device Name section by default. You can modify it Copyrights 9.1.3. Portions of this software are based on NCSA Mosaic. Power properties 9.2. Battery tab 9.2.1. To see main battery level indicators open Start > Settings > System > Power icon . Set up the USB charging and On / Off Advanced tab 9.2.2. -
Page 48: Program Button Properties
3. To exit, press OK from the command bar, or press the < ENT > key on the keypad. ☞ To save battery life it is recommended to set idle time as short as possible. NOTE: CPU Power Tab 9.2.3. To adjust CPU power settings, 1. -
Page 49: Backlight Properties
Scan key – button is used as Scan key. Application – click on Open button and select application to bind with this key. To exit, press OK from the command bar, or press the < ENT > key on the keypad Key define Tab 9.3.2. -
Page 50: Scanner Settings
Battery power Tab 9.4.1. Modify display backlight settings when device runs on batteries. Set display brightness level Set backlight timeout time. Available options: 10 sec (by default) 30 sec 1 min 2 min 3 min 4 min 5 min ... -
Page 51: Scanner Settings Applet
Tap the Scanwedge icon in the System Tray to open the menu shown in image on the right and select Settings to open the Scanner Settings applet or Start > Settings > System > Scanner Settings Scanner Settings Applet 9.5.1. Section Option Description... - Page 52 Specifies the trigger time out in seconds. If a barcode is not Trigger timeout (sec) decoded within the specified timeout, the default Notifier indicates that decoding is failed Enable Auto Scan with specified Enable Auto Scan interval. Auto Scan interval (sec) Set Auto Scan interval time.
-
Page 53: 10. Communication
Enter Suffix to be sent after the Suffix decoded/received data Select barcode types you want to read Symbologies There is “Enable All” and “Disable All” to enable/disable all symbologies Section Option Description Tap/enable this checkbox to Enable this code enable the selected bar code type. -
Page 54: Installing Additional Software
Terminal communication peripherals that connect to a host workstation via USB (1.1 or higher), thus enabling ActiveSync communication. For more information, see ActiveSync Communication on paragraph 10.4. Wireless Radios (Wireless Communication) HANDY TERMINALs can be equipped with an 802.11b/g/n Bluetooth radio and WWAN. For more information, see Wireless Radios on paragraph 10.14. -
Page 55: Activesync Communication
ActiveSync Communication 10.4. To synchronize, ActiveSync 4.1 or higher must be installed and configured for the appropriate communication type on the host workstation and the Handy Terminal. Handy Terminals ship with ActiveSync already installed. Therefore, if ActiveSync is already installed on the host workstation, you just need to connect the Handy Terminal to the host workstation (via Handy Terminal peripheral) to initiate communication. -
Page 56: Software Requirements For Communication
Connection Settings. For USB communication, check Allow USB connections. Communicating with the Handy Terminal 10.9. After setting up both the workstation and the terminal, ActiveSync connection should be automatic. 1. Connect the Handy Terminal to a communication peripheral, such as the Handy Terminal Docking cradle. -
Page 57: Adding Programs Via Activesync
The Handy Terminal is now treated as a mass storage device, and transferring files is as simple as dragging and dropping or copying and pasting as you would for moving files between folders on your hard drive. Adding Programs via ActiveSync 10.12. -
Page 58: Wireless Radios
3. Phone (WWAN configuration): 3G WWAN HSPA+Module 4. GPS: Module inherent to HSPA+ Module ☞ NOTE: PM60 does not provide all Bluetooth profiles. Connecting the Terminal to a Wireless Network 10.14. You connect the terminal to a wireless network through the on-board radio (802.11b/g/n Bluetooth and/or Phone). -
Page 59: Wlan (802.11B/G/N Radio)
☞ NOTE: Suspending the terminal powers off the 802.11 b/g/n radio and drops the radio connection. When the terminal resumes, depending on the radio power mode and security protocol selected, it may take up to 30 seconds for the 802.11 b/g/n radio drivers to re-associate the radio to the network. ☞... -
Page 60: 11. Bluetooth Handler
11. Bluetooth Handler Bluetooth wireless technology is a short-range communications technology to connect portable and/or fixed devices while maintaining high levels of security. Enabling the Bluetooth Radio 11.1. 1. Select the device panel indicated by the UP arrow in the lower, right portion of the display. 2. -
Page 61: Single Slot Docking Cradle/Single Slot Ethernet Cradle Device
1. Make sure that the Bluetooth printer is on and activated. 2. If not done so already, turn Bluetooth On (by selecting the vertical arrow on the Command Bar). 3. Tap Scan Device, which runs a Bluetooth Inquiry, then SDP Query. 4. -
Page 62: Front Panel
Nous recommandons l'utilisation de batteries Li-Ion approuvées par Pointmobile. L'utilisation de toute autre batterie peut causer des dommages non couverts par la garantie Front Panel 12.4. Terminal Well Place the Handy Terminal in the terminal well to communicate with a host device, power the terminal, and charge the terminal’s battery. -
Page 63: Powering The Single Slot Docking Cradle Or Single Slot Ethernet Cradle Device
Using an Ethernet cable, you can connect the Single Ethernet cradle to an Ethernet-compliant device to facilitate Ethernet communication to and from the terminal. This equipment is for indoor use only. The communication wiring is limited to the inside of a building. Powering the Single Slot Cradle or Single Ethernet Cradle 12.6. -
Page 64: Technical Specifications
Technical Specifications for Cradle 12.8. 60-SSC (Single Slot Cradle) Model 60-SEC (Single Ethernet Cradle) Structural Dimensions 135.5mm(L) x 116mm(W) x 81mm(H) Single Slot cradle - 315g Weight Single Ethernet cradle - 320g Material Polycarbonate Color Black Environmental Operating Temperature -20° to 55°C Storage Temperature -25°... -
Page 65: Overview
Green: charged Status LED Red: charging Communication MicroUSB connector supports data transmission of up to 480Mbps OR Interface Ethernet 10/100BASE-T(support only PM60-SEC) Agency Approvals UL listed Power Supply TUV licensed Power Supply compliant to FCC part 15, Class B CE Marking (EMC) -
Page 66: Front Panel
Front Panel 13.3. Battery connector Charging LED Charging Slots The charger contains four charging slots. Each slot holds one battery. When a battery is placed in a slot, it immediately begins charging and its Status LED lights. Rubber Feet The bottom panel has six rubber feet to stabilize the unit on a flat surface. You can set the charger on a dry, stable surface, such as a desktop or workbench near an electrical outlet. -
Page 67: Charging Thebattery
Charging the Battery 13.5. The base powers the terminal and fully charges the battery pack in 5 hours depending on the battery. As battery packs charge, the charging circuitry follows the two-step charging process (CC-CV) that is recommended for Li-Ion batteries. The process monitors changes in temperature, current, and voltage. -
Page 68: Technical Specifications
Technical Specifications for 4-slot battery charger 13.6. Model 4SBC (4- Slot Battery Charger) Structural Dimensions 256mm(L) x 105mm(W) x 37mm(H) Weight 4- Slot Battery Charger - 434g Material Polycarbonate Color Black Environmental Operating Temperature -20° to 55°C Storage Temperature -25° to +70°C 0~45℃...
Need help?
Do you have a question about the PM60 and is the answer not in the manual?
Questions and answers