
Related Manuals for Point Mobile PM67


Summary of Contents for Point Mobile PM67
- Page 1 For Android Enterprise Mobility PM67 User Manual Copyright © 2006 – 2021 Google, Android, Google Play and other marks are Point Mobile Co., Ltd. All rights reserved trademarks of Google LLC.
-
Page 2: Instruction
PM67 Android 11 User Manual Instruction This manual provides information about basic features and using the PM67. Please read this manual carefully before using your handy payment device and peripherals to ensure safe and proper use. Note: Screenshots in this manual may differ from actual screens. -
Page 3: Table Of Contents
Setup Wizard ......................... 23 Home Screen ......................... 24 Status bar ........................... 25 Notification panel ........................ 26 Quick setting panel ......................27 Apps & Widget ........................28 Recently Used Apps ......................32 © 2021 Point Mobile Co., Ltd. All rights reserved... - Page 4 CAMERA ........................ 49 SCANNER ....................... 50 Turn on / off the Scanner ....................... 50 ScanSettings .......................... 51 Basic ........................... 51 Options ..........................52 Notification .......................... 53 Wedge ..........................54 Extended wedge ......................... 55 © 2021 Point Mobile Co., Ltd. All rights reserved...
- Page 5 OS update via OTG port ..................... 71 OS update via FOTA ......................71 Factory Data Reset ........................ 73 Factory data reset via Settings app ..................73 Factory data reset via recovery mode ................74 ACCESSORIES ...................... 75 © 2021 Point Mobile Co., Ltd. All rights reserved...
- Page 6 Mount hand strap ........................ 80 Single Slot Cradle (SSC / SEC) ..................... 81 4SC (4 Slot Cradle) ........................ 81 4SBC (4 Slot Battery Cradle) ....................81 SAFETY INFORMATION ..................82 Battery Safety Information ..................... 82 © 2021 Point Mobile Co., Ltd. All rights reserved...
-
Page 7: Getting Started
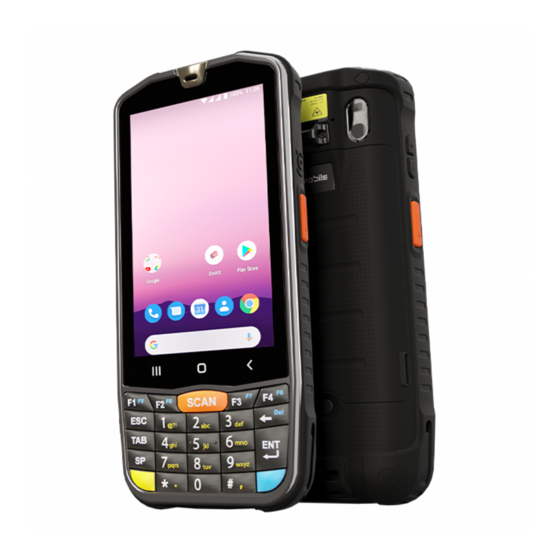
USB 2.0 Type C / OTG I/O connector Pogo 12 pin type Numeric keypad Keypad (For more details, refer to Using the Keypad) Scan button (Left) Scan a barcode by pressing Volume button Control the volume © 2021 Point Mobile Co., Ltd. All rights reserved... - Page 8 Press to release the battery cover and replace the battery Hand strap hole Mount hand strap Speaker Ring system sound Scan button (Right) Scan a barcode by pressing Power button Turn on/off the device Scanner Scan a barcode © 2021 Point Mobile Co., Ltd. All rights reserved...
-
Page 9: Product Standard Accessories
Battery pack AC/DC Power supply Country plug USB type C cable LCD protection film Hand strap (Mounted on the device) Stylus pen Note: The images may differ from the actual accessory. © 2021 Point Mobile Co., Ltd. All rights reserved... -
Page 10: Install Sim & Sd Card
To install the SIM card, 1. Open the battery cover while pressing the battery cover release button. Using the small hole on both sides of the cover, pull it up. Figure 3 Open battery cover © 2021 Point Mobile Co., Ltd. All rights reserved... -
Page 11: About Sd Card
To install the micro SD card, 1. Open the battery cover. 2. Lift the rubber on the bottom side of the slot. Figure 5 Opening rubber of the SD card slot © 2021 Point Mobile Co., Ltd. All rights reserved... - Page 12 Getting Started 3. Slide the card into the slot with the contacts facing down. Figure 6 Inserting SD card 4. To remove the card, gently slide the card out from the slot. © 2021 Point Mobile Co., Ltd. All rights reserved...
-
Page 13: Install & Remove Battery
3. Insert top of the battery directly into the top of the slot. Figure 8 Insert battery_1 Caution: Don’t slide the battery over the battery connector of the device while inserting the battery. It may damage the connector pin. © 2021 Point Mobile Co., Ltd. All rights reserved... - Page 14 4. Push down the bottom side of the battery. Figure 9 Insert battery_2 5. Engage the battery cover from the top, and then press the edge of the cover to close it firmly. Figure 10 Close battery cover © 2021 Point Mobile Co., Ltd. All rights reserved...
-
Page 15: Remove The Battery
Figure 11 Remove battery Battery Hot Swap PM67 supports the Battery hot swap mode which allows you to replace the battery without turning off the device. When the battery is removed from the device, the display turns off and the device enters Hot swap mode (For verification, a red LED will be turned on). -
Page 16: Charge The Device
PM67 Android 11 User Manual Getting Started Charge the device Before using PM67, charge the device enough to use. PM67 can be charged with power adapter or charging cradle. Battery specification - Capacity: 4,200mAh / 3.85V - Rechargeable & Removable battery Charge with power adapter Caution: Always use an original charger and cable from Point Mobile. -
Page 17: Charging Cradle
PM67 Android 11 User Manual Getting Started Charging Cradle There are three types of charging cradle for PM67. Single slot cradle (SSC / SEC), 4 slot cradle (4SC), 4 slot battery cradle (4SBC). The cradles are sold separately. SSC / SEC SSC (Single Slot Cradle) and SEC (Single slot Ethernet Cradle) can charge one PM67 and one battery of PM67. - Page 18 PM67 Android 11 User Manual Getting Started 4SC (4 Slot Cradle) can charge up to four unit of PM67 at the same time. To charge PM67 using 4SC, 1. Assemble the power adapter and cable, and connect it to the cradle to provide power.
- Page 19 Getting Started 4SBC 4SBC (4 Slot Battery Cradle) can charge up to four pieces of PM67 battery at the same time. To charge the battery using 4SBC, 1. Assemble the power adapter and cable, and connect it to the cradle to provide power.
-
Page 20: Led Indicator
Charging temperature is too low or too high (With charger) Blinking red / Battery is critical low (Without charger) Solid green Device is fully charged Blinking blue Notification existing Notification Red flash Barcode reading failed Blue flash Barcode reading success © 2021 Point Mobile Co., Ltd. All rights reserved... -
Page 21: Turn On & Off Pm67
Getting Started Turn on & off PM67 To turn on the device, - Press and hold the power button on the right side of the PM67 until SMART BEYOND RUGGED logo displays on the screen. Figure 17 Power button To turn off the device, Press and hold the power button until the power menu is shown when the screen is on. -
Page 22: Use A Touch Screen
One-finger press, wait, lift for select action Drag, Swipe, or Fling One-finger press, move, lift for scroll or tilt action Long-press drag One-finger press, wait, move, lift for pick up and move, or select multiple items action © 2021 Point Mobile Co., Ltd. All rights reserved... - Page 23 Vertical or horizontal swipe in a single direction Pinch Open & Close Two-finger press, move outwards and inwards, lift for zoom in / out action Rotate When PM67 is turning sideways, screen orientation is changing © 2021 Point Mobile Co., Ltd. All rights reserved...
-
Page 24: Learning The Basics
Learning the Basics Setup Wizard When PM67 starts very first time or boot after factory reset, Setup wizard is launched. Following the steps on the screen, set system language, Google account, Wi-Fi connection and copy the data, etc. Some settings can be skipped, but there may be restrictions on the use of system. -
Page 25: Home Screen
Long-press to see the application's options Google search Search an item with Google Favorites tray Place the frequently used apps App folder Apps are organized in the folder. Tap to open the App folder © 2021 Point Mobile Co., Ltd. All rights reserved... -
Page 26: Status Bar
Phone mic is mute Scanner turned on, Scanner turned on but trigger turned off Alarm is set Numeric input mode Uppercase alphabet input mode Lowercase alphabet input mode Functions input mode © 2021 Point Mobile Co., Ltd. All rights reserved... -
Page 27: Notification Panel
Notification panel displays a list of all notifications. Tap a notification to respond. To open the Notification panel, drag the Status bar down. To close the panel, swipe it up. Figure 22 Notification panel © 2021 Point Mobile Co., Ltd. All rights reserved... -
Page 28: Quick Setting Panel
3. Tap a setting icon to enable / disable the setting or long-press an icon to see more detail. To edit the configuration of Quick settings panel, 1. Tap on the bottom of the panel. 2. By long-press and dragging the icon, customize the configuration of the panel. © 2021 Point Mobile Co., Ltd. All rights reserved... -
Page 29: Apps & Widget
To create the app folder, long-press an app icon and drag it to another app icon. Figure 24 Create app folder To change the folder name, tap the Unnamed Folder and input a new name. Figure 25 Change app folder name © 2021 Point Mobile Co., Ltd. All rights reserved... - Page 30 1. Long-press an app icon from the App drawer. Then, drag it slightly until the Home screen is shown. 2. Place the app icon in the Favorites tray. Figure 27 Add an app to Favorites tray © 2021 Point Mobile Co., Ltd. All rights reserved...
- Page 31 Figure 28 Place app in Home screen Widget To add a widget in the Home screen, 1. Long-press the empty space of the Home screen. 2. In three menus, select Widgets. Figure 29 Widget menus © 2021 Point Mobile Co., Ltd. All rights reserved...
- Page 32 4. Place the widget to the Home screen by dragging. Note: To remove an app or a widget from the Home screen, long-press and drag it to Remove area. Figure 31 Remove from Home screen © 2021 Point Mobile Co., Ltd. All rights reserved...
-
Page 33: Recently Used Apps
Touch Recent apps button to see recently used apps list. Figure 32 Recent apps button From the list, tap an app to open or completely close the app by swiping it up. Figure 33 Recently used apps © 2021 Point Mobile Co., Ltd. All rights reserved... -
Page 34: Call
PM67 Android 11 User Manual Learning the Basics Call To make or receive a phone call, SIM card is required. Insert SIM card to PM67 first regarding Install SIM & SD card. Making a call 1. Tap Phone from Home screen or App drawer. - Page 35 Figure 35 Calling screen Icon Function Name Description Mute Mute microphone Keypad Open the keypad Speaker Speakerphone mode Add call Add another call (Enable when receiver answer the phone) © 2021 Point Mobile Co., Ltd. All rights reserved...
-
Page 36: Answering A Call
Answering a call Check the caller’s name and number and tap ANSWER button to answer the phone call. Or tap DECLINE button to decline the phone call. Figure 36 Receiving call © 2021 Point Mobile Co., Ltd. All rights reserved... -
Page 37: Contacts
Add a contact via contacts app Navigate to Contacts from App drawer and tap to add a new contact. Figure 37 Add new contact via Contacts Enter the contact details and tap Save. © 2021 Point Mobile Co., Ltd. All rights reserved... -
Page 38: Contact Detail
Send a message Make a Make a video voice call call Tap to edit this contact to open advanced options such as delete, share, block, etc. Figure 39 Contact advanced options © 2021 Point Mobile Co., Ltd. All rights reserved... -
Page 39: Message
1. Launch Message from App drawer. 2. Tap Start Chat and type the receiver’s name or phone number. Figure 40 Message list 3. Input a message. 4. Tap icon to send. © 2021 Point Mobile Co., Ltd. All rights reserved... -
Page 40: Mtp Connection With Pc
1. Drag down Status bar and tap Android System notification to change USB preference option Figure 41 USB connection notification 2. Change the option to File Transfer from No data transfer. Figure 42 USB Preferences setting © 2021 Point Mobile Co., Ltd. All rights reserved... -
Page 41: Manage The Files
PM67 Android 11 User Manual Learning the Basics 3. Now PC can recognize the connected device. Find PM67 device from file explorer of the PC. Figure 43 File explorer on PC Manage the Files Figure 44 FileExplorer main screen Description... - Page 42 - Compress: Create Zip file with the selected files or folders - Rename: Rename the file or folder - Get info: Display the file information Selected file or folder is highlighted © 2021 Point Mobile Co., Ltd. All rights reserved...
-
Page 43: Lock The Screen
- Swipe: Swipe the lock screen to unlock (Default) - Pattern: Draw a pattern to unlock - PIN: Input a PIN to unlock (At least 4 digits) - Password: Input a password to unlock (At least 4 characters) © 2021 Point Mobile Co., Ltd. All rights reserved... -
Page 44: Settings
> Sound and control the Media, Call, Ring, Alarm volume bars. Figure 49 Volume bars Caution: Using high volume levels for long periods may cause ear strain and increase battery consumption. © 2021 Point Mobile Co., Ltd. All rights reserved... -
Page 45: Adjust Font Size
If the font size of the screen is too small or too large, adjust the font size. 1. Go to Settings > Display 2. Tap Advanced 3. Tap Font size 4. Referring to the Preview, set the font size Figure 50 Set font size © 2021 Point Mobile Co., Ltd. All rights reserved... -
Page 46: Using The Keypad
Figure 51 PM67 Keypad Yellow Blue Description Function 1~4 (5~8) Function keys F1 to F4 (or F5 to F8 in Functions input mode) Scan Scan the barcode Escape function Tap function Space Space function © 2021 Point Mobile Co., Ltd. All rights reserved... - Page 47 - Back to default input mode Press once Function (Blue) - Activate Functions input mode (Shown on the keypad in blue). The icon appears on status bar Press twice - Back to default input mode © 2021 Point Mobile Co., Ltd. All rights reserved...
-
Page 48: Use The Buttons
Pictures > Screenshots folder in the internal storage. Program buttons All buttons on the PM67 except power button can be optimized as you want. To map the button to other functions from default, 1. Navigate to EmKit >... - Page 49 FORWARD_DEL: DEL button on the functions input mode. 3. Choose one function you want to remap 4. Tap OK 5. After changing all key mapping, tap Apply to save the changes © 2021 Point Mobile Co., Ltd. All rights reserved...
-
Page 50: Camera
PM67 Android 11 User Manual Camera PM67 has rear camera. To use the camera, open App drawer and tap Camera application Figure 54 is a main screen of Camera application, and Figure 55 is a screen that is displayed when you swipe the screen to right. -
Page 51: Scanner
PM67 Android 11 User Manual Scanner Scanner is placed on the top of the PM67. Optimize the scanner settings for working environment and improve the efficiency. Figure 56 PM67 scanner location Turn on / off the Scanner The scanner is turned off by default. To turn on the scanner, follow the steps. -
Page 52: Scansettings
- Enable or disable the TouchScan, which is a software scanner button. Place a scan icon in any position and tap the icon to read a barcode. Figure 58 ScanSettings - Basic Figure 59 ScanSettings - TouchScan © 2021 Point Mobile Co., Ltd. All rights reserved... -
Page 53: Options
- Tab - LF - Tap & LF Options Enable / Disable the center window, Aimer, Illumination. Set Decode mode & Power save mode. Figure 60 ScanSettings - Options © 2021 Point Mobile Co., Ltd. All rights reserved... -
Page 54: Notification
PM67 Android 11 User Manual Scanner Notification Control the beep sound, LED and vibration option. Figure 61 ScanSettings - Notification © 2021 Point Mobile Co., Ltd. All rights reserved... -
Page 55: Wedge
Wedge Set below items in Wedge settings Barcode ID Aim ID Group separator Prefix Suffix Character set Extended Wedge Figure 62 ScanSettings - Wedge © 2021 Point Mobile Co., Ltd. All rights reserved... -
Page 56: Extended Wedge
Configuration extended wedge. Figure 63 ScanSettings - Extended wedge For example, make a rule that add a string “Point Mobile” at the start of decoded data whenever decoding CODE128. 1. Tap Style (1) and select Condition (2). - Page 57 PM67 Android 11 User Manual Scanner 2. Tap Symbologies and select CODE128 among the symbologies. Figure 65 Extended wedge example_2 3. Tap Style (1) and select Actions (2). Figure 66 Extended wedge example_3 © 2021 Point Mobile Co., Ltd. All rights reserved...
- Page 58 4. Tap ADD and select Move to start to point the start of the decoded data. Figure 67 Extended wedge example_4 5. Add another action of which action type is Send string. Set value as “Point Mobile”. Figure 68 Extended wedge example_5...
- Page 59 PM67 Android 11 User Manual Scanner 6. “Point Mobile” string will be added to decoded COD 128 data. Before After © 2021 Point Mobile Co., Ltd. All rights reserved...
-
Page 60: Symbologies
Enable or disable the specific symbology or set detail options. By tapping each symbology name to access detail options. Figure 69 ScanSettings - Symbologies About Find the scanner information or restore the scanner settings to default. Figure 70 ScanSettings - About © 2021 Point Mobile Co., Ltd. All rights reserved... -
Page 61: Scan A Barcode
PM67 Android 11 User Manual Scanner Scan a Barcode Point the scanner at the barcode and press any scan button on the PM67. If another button is set as Use the Buttons – Program scan trigger using Program buttons (Refer to buttons), it can trigger the scan action, too. -
Page 62: N6603 Scanner Sku (Sku3)
1. Execute EmKit > ScanDemo 2. Scan a barcode by pressing the scan button on the device or tapping Start scan button on the screen. 3. Find scan result Figure 74 ScanDemo © 2021 Point Mobile Co., Ltd. All rights reserved... -
Page 63: Wireless
Mobile Network (LTE SKU Only) Note: Mobile network is supported on PM67 LTE SKU (SKU2, SKU3) only. Check your PM67 is LTE SKU. To connect mobile network, SIM card is required. Insert SIM card into PM67 first referring Install SIM & SD card. -
Page 64: Wi-Fi
If there is a saved Wi-Fi network, simply turn on the Wi-Fi through the Quick setting panel. The saved network will be connected automatically. Figure 81 Wi-Fi in Quick setting panel © 2021 Point Mobile Co., Ltd. All rights reserved... -
Page 65: Bluetooth
3. Select the device you want to pair among Available devices list. Figure 83 Bluetooth available devices 4. Follow instructions on the screen (Pairing code or pairing confirmation dialog) and tap PAIR. © 2021 Point Mobile Co., Ltd. All rights reserved... -
Page 66: Unpair And Disconnect
To unpair the device, select the name of the device you want to unpair from CURRENTLY CONNECTED list and tap FORGET Or tap DISCONNECT to disconnect only and not unpair. Figure 86 Forget device © 2021 Point Mobile Co., Ltd. All rights reserved... -
Page 67: Change The Bluetooth Device Details
If no devices are listed under the PREVIOUSLY CONNECTED DEVICES, tap See all. Figure 87 Bluetooth device detail - To change the device’s name, tap on the top of the screen - Turn other settings on or off (Available on some devices) © 2021 Point Mobile Co., Ltd. All rights reserved... -
Page 68: Nfc (Nfc Sku Only)
Quick setting panel. PM67’s NFC antenna is located on the battery cover. Bring the NFC tag close to the center of the battery cover (Rear side of the device) as below. Figure 88 PM67 NFC tagging area... -
Page 69: System Maintenance
Manufacturer information (Serial number, Part number, etc.) Device information (Scanner, Camera, Audio, Display, etc.) Battery information (Battery charging status, etc.) App version information (Version of EmKit apps) © 2021 Point Mobile Co., Ltd. All rights reserved... -
Page 70: Check Device Health
- Battery Level - Pre-EOL Information - Battery Health - Device life time estimation type A - Battery Voltage - Device life time estimation type B - Battery Temperature - System Temperature © 2021 Point Mobile Co., Ltd. All rights reserved... -
Page 71: Os Update
System Maintenance OS Update Periodic update improves the performance of the device. Point Mobile provides up-to-date OS version via Service Portal and FOTA. Update the device via storage, OTG port, and FOTA server. Depending on the workspace environment, choose more suitable method. -
Page 72: Os Update Via Otg Port
5. Check if the OS image file shows up under AVAILABLE VERSIONS 6. Tap UPDATE to start the update process OS update via FOTA If PM67 can connect to a network, use the FOTA server for the update. 1. Connect the device with a network 2. Go to Settings >... - Page 73 Note: Basically, OS update via FOTA works over Wi-Fi or Ethernet only. To enable the OS update over Mobile Network too, uncheck the setting value in FOTA Settings. Downloading over the Mobile network may result in additional charges. Figure 93 FOTA Settings © 2021 Point Mobile Co., Ltd. All rights reserved...
-
Page 74: Factory Data Reset
System Maintenance Factory Data Reset When PM67 work abnormal or there is a need to reset the device, follow the steps below to perform a factory data reset. Caution: Factory data reset will erase all personalized settings and data saved in the device, such as Google account, apps, user data, etc. -
Page 75: Factory Data Reset Via Recovery Mode
If device works abnormal so does not turn on, try to perform factory data reset through Android recovery mode. 1. Press and hold power button + volume up + front scan buttons simultaneously when PM67 turned off. Figure 95 Recovery mode button combination 2. -
Page 76: Accessories
PM67 Android 11 User Manual Accessories PM67 supports below optional accessories. All accessories are compatible with PM66. Category Accessory Name Usage Provide additional scan trigger button Gun handle Gun handle (Programmable) Charge one PM67 and one PM67 battery SSC (Single Slot Cradle) -
Page 77: Mount Hand Strap
2. Tighten the screws using a screwdriver. Figure 97 Mount hand strap (bracket) 3. Pass the end of the strap through the hand strap hole. Figure 98 Pass strap through hole © 2021 Point Mobile Co., Ltd. All rights reserved... -
Page 78: Remove Hand Strap
Figure 99 Attach hand strap velcro Remove hand strap 1. Pull the end of the strap to detach the Velcro. Figure 100 Detach hand strap velcro 2. Pull the strap off through the hand strap hole. © 2021 Point Mobile Co., Ltd. All rights reserved... -
Page 79: Gun Handle
Notice: If you completely removed the hand strap, keep the screws for future use. Gun Handle Attach a gun handle to PM67 and use additional programmable button. The button is used for triggering scanner usually. Figure 102 PM67 gun handle... -
Page 80: Attach Gun Handle
Make sure that the lockers on either side of the gun handle are locked. They make the device engage firmly and protect the device from detaching accidentally. 1. Slide the PM67 into the retention fixture of the gun handle. Figure 103 Attaching PM67 to gun handle 2. -
Page 81: Mount Hand Strap
Figure 106 Pass strap through the fixture side hole 4. Slide the strap through the buckle and latch the buckle at the appropriate length. Figure 107 Latch buckle to secure the strap © 2021 Point Mobile Co., Ltd. All rights reserved... -
Page 82: Single Slot Cradle (Ssc / Sec)
Accessories Single Slot Cradle (SSC / SEC) SSC / SEC has one device slot and one battery slot so that it can charge a PM67 and a battery at the same time. In addition to the charging function, the cradles also provide a communication port as follows. -
Page 83: Safety Information
Notice: The battery is consumable goods. Point Mobile provides warranty for battery in 6 months after purchase. If you suspect the battery swelling, change the battery and contact Point Mobile to use safely. © 2021 Point Mobile Co., Ltd. All rights reserved...
Need help?
Do you have a question about the PM67 and is the answer not in the manual?
Questions and answers