
Related Manuals for Fakir Cafe Passion


Summary of Contents for Fakir Cafe Passion
- Page 1 CAFE PASSION Kaffeeautomat – Bedienungsanleitung Coffee Machine – Instruction Manual Kahve Makinesi – Kullanma Kılavuzu...
- Page 22 Girifl yenisi ile de¤ifltirilmelidir. Uzun y›llar sorunsuz çal›flmas› için • Fakir taraf›ndan tedarik edilmeyen tasarlanan ve üretilen Fakir Cafe Passion aksesuarlar›n kullan›lmas› yang›n, elektrik Kahve Makinesi’ni sat›n alm›fl oldu¤unuz çarpmas› ve ya kiflisel yaralanmalara sebep olabilir. için teflekkür ederiz. Benzer ürünleri kullanmaya al›fl›k •...
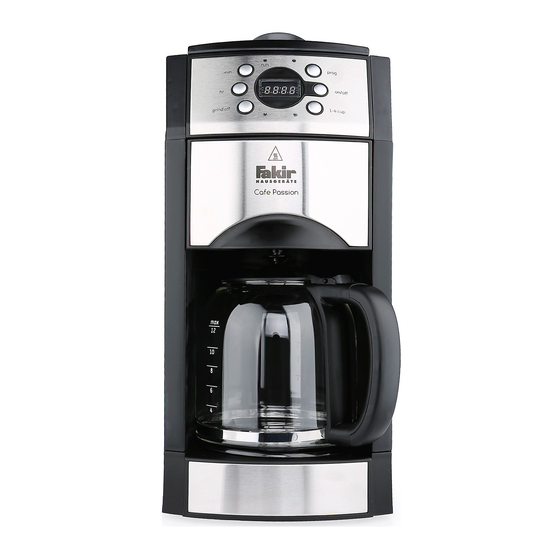
- Page 23 Ürün Bilgileri: Güç: 1000W Voltaj: 230V-50Hz Koruma S›n›f›: II Ürün Parçalar›n›n Tan›t›m›: Tank kapa¤ı Pencere Su tankı Ö¤ütücü kutusu kapa¤ı Ö¤ütücü kutusu Kontrol paneli ‹ç kapak Filtre kapa¤ı Su seviye Filtre göstergesi Cam sürahi kapa¤ı Filtre bölmesi Cam sürahi Cam sürahi tutma sapı Isıtma plakası...
- Page 24 Kullan›m: Not: Otomatik çal›flma saat ayar›n› program ‹lk kullan›mdan önce, kahve makinenizin (prog.) tufluna basarak görebilirsiniz. içindeki herhangi küçük bir parçac›¤›n ya da kirin temizlenmesi için, en az iki defa su • Önceden ayarlanm›fl program› iptal etmek için, on/off (açma/kapama) tufluna iki kez tank›n›...
- Page 25 Bu ifllemden sonra ö¤ütücü kutusunu kahve Not: Filtre içine filtre k⤛d› koymay› makinesine geri tak›n›z. Ö¤ütücü kutusunun unutmay›n›z. Filtre, kahvenin cam sürahi ba¤lant› noktas› motor flaft›na do¤ru içine akmas›n› sa¤lar. kilitlenmelidir (fiekil 2). Aksi takdirde ö¤ütücü kutusu yerine tam olarak oturmayacak ve •...
- Page 26 k›sm›nda belirtildi¤i biçimde ayarlaya Not: Maksimum filtre kahve kapasitesi 10 bilirsiniz. kafl›k kadard›r. Bu miktar›n afl›lmas›, • Çekirdek kahveyi ö¤ütme süreci bittikten taflmaya sebep olabilir. sonra, kahvenin demlenme süreci • Filtre kapa¤›nı yerine tak›p, filtre bölmesini bafllayacakt›r. yerine yerlefltiriniz. Not: Kahvenin demlenmesi esnas›nda, cam •...
- Page 27 Cam sürahi alt›ndaki kahve üstündekine y›kanabilmektedirler. Her kullan›mdan sonra oranla her zaman için daha sert olacakt›r. parçalar› durulay›n›z. Demleme iflleminden sonra, cihaz kahveyi • Ö¤ütücü kutusu cihazdan ç›kart›ld›ktan 2 saat boyunca s›cak tutacak ve ard›ndan sonra kesinlikle cihaz› suya de¤dirmeye çal›flmay›n›z.
- Page 28 zamanda yerine tekrar koyabilirsiniz, cihaz çal›flmaya devam edecektir. Kirecin temizlenmesi: Kireç temizleme, kahve makinenizin metal k›s›mlar›nda zaman içinde oluflmufl olan kirecin temizlenmesini sa¤lar. Ürününüzden en iyi performans› alman›z için, zaman zaman cihaz›n›z›n kirecini temizlemeniz önerilmektedir. Kireci temizleme s›kl›¤›n›z cihaz›n›z› ne kadar kulland›¤›n›za ve suyunuzun sertlik oran›na göre de¤iflmektedir.
- Page 30 Voltage: 230V- 50Hz • The use of accessory attachments not Protection class: II recommended by Fakir may result in fire, electric shock or injury to people. • Do not let cord hang over edge of table or counter, or touch hot surface.
- Page 31 Parts of description: Tank cover Viewing window Water tank Grinder box lid Grinder box Control panel (see below) Inner cover Filtre cover Water gauge Filter Carafe lid Filter comparment Carefe Carafe handle Warming plate Control Panel: LED Display: Program indicator Run indicator prog on/off...
- Page 32 Usage: Note: You can see the automatic start time Before first use, it is recommended that you by pressing the “program”. You can fill to the maximum level mark with fresh determine the display time is programmed water, boil and empty the coffee maker at time or current time by seeing the lower indicator on the LED (the details refer to least 2 times to clear coffee maker of any...
- Page 33 level. Do not overfill or the Grinder box may Note: Please do not forget to place the filter be blocked and/or the coffeemaker may paper in to the filter. Permanent filter may overflow. After that assemble the grinder allow some ground coffee to flow into carafe. box into the coffee maker, it must be noted the connector groove must be locked into •...
- Page 34 program time” on the above. keeping warm plate and have placed a • When finish grinding bean, the brewing filter in the filter compartment, replace the process begins. filter cover. • Plug the cord into an electrical outlet. Note: During operation, you can take out “18:88”...
- Page 35 Caution: Return carafe to warming plate liquid. To clean base, simply wipe with a within 30 seconds. Hot water continues to clean, damp cloth and dry before storing. flow into the filter basket when this feature • Wipe the keeping warm plate with a clean, is used.
Need help?
Do you have a question about the Cafe Passion and is the answer not in the manual?
Questions and answers