Table of Contents
Advertisement
Quick Links
Advertisement
Table of Contents

Related Manuals for BlackVue DR530W


Summary of Contents for BlackVue DR530W
- Page 2 BLACKVUE 2CH Wi-Fi Lite DR530W-2CH...
-
Page 3: Table Of Contents
Installation Video Recording Normal Recording Parking Mode Recording Event Recording Simple Video Playback Normal Recording How to Playback using the BlackVue App How to use the BlackVue Viewer Installation & Execution Screen Description Video Playback Configuration Firmware Upgrade Product Specifications & Standards... -
Page 4: Introduction To The Manual
Caution y A formatted microSD card is provided when you purchase the product. Insert the microSD card into BlackVue, and turn on the power. The microSD card will be initialized, and programs such as BlackVue Viewer will be installed. BLACKVUE 2CH Wi-Fi Lite... -
Page 5: Getting Started
Otherwise it can cause explosion, fire, or malfunction. y Do not operate the product with wet hands. It can cause electric shock. y Do not install it in an environment with high humidity, or combustible gases or liquids. It can cause explosion & fire. DR530W-2CH... - Page 6 Connect the power cord firmly so that it cannot easily be disconnected. Otherwise it can cause fire. y Do not cover the product with any material. It can cause external deformation of the product or fire. Use the product and peripherals where ventilation is ensured. BLACKVUE 2CH Wi-Fi Lite...
- Page 7 The data may be damaged or malfunction caused. y Do not use the product with its cover opened. y It is recommended to install the product at the BlackVue installation center. You can check the the BlackVue installation center from the BlackVue homepage (www.blackvue.com).
- Page 8 If the recorded video suffers from break-up, format the microSD card. y For stable function, format it with programs recommended by the SD card association. For more details, refer to the BlackVue web site (www.blackvue.com). y Before formatting it, copy important files to other storage media to store them.
-
Page 9: Product Features
Clearer vision with high-resolution megapixel lens during both day/night-time driving VOD & real-time live view function With the BlackVue app, video can be played regardless of place and time (iOS/Android supported) High-quality wide-angle lens (128°) Maximized viewing angle to record accurate video of any accident Diverse recording options (Normal/Event/Parking) Event recording and automatic conversion &... - Page 10 Pictures of the components may differ from the actual ones. y To enhance the performance of the product, components may be changed without prior notice. y The package components can be purchased additionally from the BlackVue homepage (www.blackvue. com).
- Page 11 (Format Button: Press for 10 seconds for Formatting) Note y Tap the voice On/Off button to turn the voice recording function on or off. y Press the Wi-Fi button on the side for 10 seconds to format the microSD card without using a PC. DR530W-2CH 11...
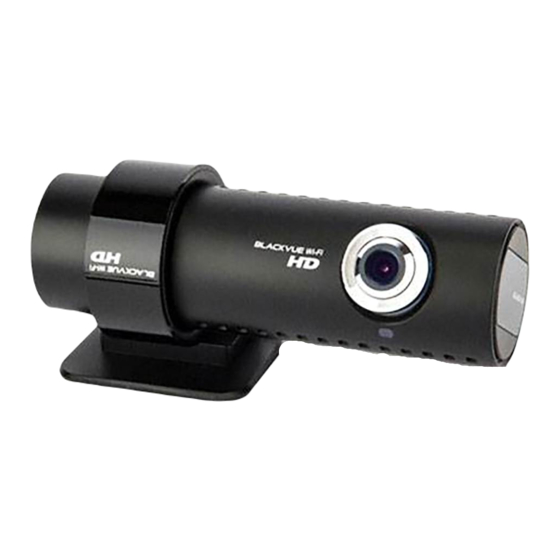
- Page 12 Rear Camera Mounting Bracket Camera Lens Rear Security LED AV out (Front camera connection port) 12 BLACKVUE 2CH Wi-Fi Lite...
- Page 13 How to Attach & Detach the Mounting Bracket of the Rear Camera Hold the mounting bracket and pull the the front camera out of the mounting bracket. Insert the rear camera into the Mounting Bracket until you hear clicking sound, to attach it. DR530W-2CH 13...
-
Page 14: How To Install The Blackvue
It is recommended to install the rear camera at the top of the rear window of the vehicle. Note y Do not install the product where it can interfere with the driver's vision. y It is recommended to install the product at the designated BlackVue installation center. 14 BLACKVUE 2CH Wi-Fi Lite... - Page 15 Copy important data to other storage media to store. PittaSoft Co., Ltd. will not be held responsible for data loss due to user negligence. Note y Insert or remove the microSD card only when the product is turned off. y microSD cards are consumables. Replace them after prolonged use. DR530W-2CH 15...
- Page 16 It is necessary to use Power Magic (the Battery Discharge Prevention Device) to record video while the car is parked. y To use BlackVue with other equipment that uses a power cable, purchase and use a dual power outlet adaptor.
- Page 17 Do not remove the microSD card while it is saving or reading data. The data may be damaged or malfunction caused. y Set the time (time zone) first before using the BlackVue for the first time. (34 page) Note y After a test drive, check if video was correctly recorded.
-
Page 18: Video Recording
When the BlackVue is turned on, normal recording is automatically started. Note y If Power Magic (Battery Discharge Prevention Device) is connected, the BlackVue is not turned off. y The normal recording function can be disabled in the BlackVue viewer configuration. (34 page) - Page 19 Sensitivity to impact can be adjusted in the BlackVue viewer configuration. (36 page) y Event recording time can be adjusted in the BlackVue viewer conguration. (34 page) If you set the event recording time for 2 minute, it records video for 5 seconds before and 115 seconds after the impact.
-
Page 20: Simple Video Playback
If there are many recorded videos in the microSD card, it may take a long time to load the file. y With the BlackVue App, it's easy to play back videos and the Live View function can be used. For details of the BlackVue App, refer to How to Playback using the BlackVue App. - Page 21 Open an application to play back recorded videos and select the movie you want to play back from the removable drive. Note y For how to play back using the BlackVue viewer, refer to Video Playback. (28 page) DR530W-2CH 21...
- Page 22 Google Play store, Apple App Store, and Windows store. Note y The BlackVue application can be used with Android 2.3 or later, iOS 5.0 or later, and Windows 8.0. y Some functions may not be supported depending on the smartphone.
- Page 23 Tap the Live View button to check the video in real time. y For the details about the BlackVue App, please refer to the BlackVue App manual. You can download the BlackVue App manual from the BlackVue website (www.blackvue.com).
-
Page 24: How To Use The Blackvue Viewer
Double-click the BlackVue Viewer icon to execute the program. Note y Only the English version of BlackVue viewer is available for Mac, and the functions & screen may be different from the BlackVue viewer for Windows. 24 BLACKVUE 2CH Wi-Fi Lite... - Page 25 How to Execute Without Installation It is possible to execute the dedicated BlackVue viewer without installation. Insert the provided microSD card into a microSD card reader. Connect the microSD card reader to the PC. Double-click 'BlackVue.exe' in the 'BlackVue\Application' folder.
- Page 26 Videos can be played back using this screen. The mouse can be used to zoom in/out. Videos If you change the language on playback screen, the language for BlackVue Viewer Language Setting can be changed. For details about language configuration for BlackVue, refer to the Basic Configuration.
- Page 27 You can adjust the screen, playback speed or volume while a recorded video is played Playback Option back. For the details on the playback option buttons, refer to How to Control the Button Playback of Recorded Video. (28 page) DR530W-2CH 27...
-
Page 28: Video Playback
ESC to return to default view. y While playing back a recorded video, use the mouse wheel to zoom in/out. y While playing back a recorded video, right-click the screen to view 100 % zoom-in screen. 28 BLACKVUE 2CH Wi-Fi Lite... - Page 29 To use the Magnifier function, you should enable only either front video display or rear video display by pressing Front or Rear on the recorded video list. y You can use the Magnifier function only in BlackVue Viewer for Windows. DR530W-2CH 29...
- Page 30 Month Selection Min Selection Selection Note y In the date selection area, the date with a recorded video is marked by a red circle and the currently- selected date is marked by a yellow circle. 30 BLACKVUE 2CH Wi-Fi Lite...
- Page 31 When you select Sound Off, the voice is removed from the recorded video to be saved. Press the OK button and select the file name you want, together with the path. Press the Save button to finish. DR530W-2CH 31...
- Page 32 How to Verify Files With the recorded video list, a file can be verified forgery. Select a file from the recorded video list and right-click it. Click Verify and click OK button. 32 BLACKVUE 2CH Wi-Fi Lite...
- Page 33 Select a file from the recorded video list and play it back. From the image to be saved, click the button. Note y Use the timeline or press the button to explore detailed images. Press the button. Select the printer and click the OK button. DR530W-2CH 33...
- Page 34 The time zone can be configured for where it is used. The configured time zone is used Configuration as information for recorded video. Image Setting The quality and brightness of the recorded front/rear video can be configured. 34 BLACKVUE 2CH Wi-Fi Lite...
- Page 35 Access the BlackVue website (www.blackvue.com) and download the time setting program. Run the time setting program before setting the time. Note y The time should be set to the time BlackVue turns on. Booting time for BlackVue is about 15 seconds after power is connected. DR530W-2CH 35...
- Page 36 It is possible to configure the G-sensor sensitivity to start event recording during on Recording always-on recording. Apply to Parking It is possible to configure the G-sensor and motion detection sensitivity to start Mode event recording during parking mode recording. 36 BLACKVUE 2CH Wi-Fi Lite...
- Page 37 Sensitivity tab. Click the Click the Advanced Setting button of the configuration you want. Play back a recorded video. Saved G-sensor information is displayed at the bottom of the recorded video which is played back. DR530W-2CH 37...
- Page 38 If an event recording is started due to the sensitivity configured while a recorded video is being played back, the edge of the playback screen blinks in orange. After changing the configuration, click Save & Close. Wi-Fi & Other Configuration Configurations for Wi-Fi, LED indication, and voice direction can be changed. 38 BLACKVUE 2CH Wi-Fi Lite...
- Page 39 You can change Autorun Wi-Fi feature, SSID and your password for the Wi-Fi connection. Wi-Fi Setting The BlackVue App can be accessed with the SSID and password chosen by the user and you can also reset the password if you have forgotten it.
-
Page 40: Firmware Upgrade
Note y After firmware upgrade, all the user's configurations including the Wi-Fi setting are initiated. y When the firmware upgrade is finished, the BlackVue viewer is automatically installed. If you don't want it to be installed, click the Cancel button. - Page 41 After the firmware upgrade is finished, insert the microSD card into the BlackVue. Note y For details on how to insert the microSD card, refer to How to Insert & Remove the microSD Card. (15 page) y Insert the microSD card only when the product is turned off.
-
Page 42: Product Specifications & Standards
Video Compression Mode Wi-Fi Built-in (802.11b/g/n(2.4~2.4835GHz), Max150Mbps, OFDM/CCK/16-QAM/64-QAM) Microphone Built-in Built-in Speaker ※ Voice Directions Front: Recording LED, MIC LED, Wi-Fi LED, Front Security LED LED Indicators Rear: Rear Security LED Sensor 3-Axis Acceleration Sensor 42 BLACKVUE 2CH Wi-Fi Lite... - Page 43 KC, FCC, CE, RoHS, Telec BlackVue Viewer Software ※ Windows XP or later (Up to Windows 8), Mac Leopard OS X(10.5) or later Application BlackVue App (Android 2.3 or later & iOS 5.0 or later & Windows 8.0 or later) DR530W-2CH 43...
- Page 44 3Mbps bit rate Rear 2Mbps 1.5Mbps Note y There may be some variation with actual recording time depending on the user's environment. y Depending on the image quality, the microSD card lifespan can be shorten. 44 BLACKVUE 2CH Wi-Fi Lite...
- Page 45 Before Requesting A/S Service y It is required for users to back up important data regularly from storage device (to other separate media). Depending on the situation, it will be necessary to delete the data from the internal storage device (component). It might be needed to delete all the data from the product for A/S. So it is required for users to back up important data by themselves before requesting A/S.
-
Page 46: Product Warranty
Product Warranty The term of this product warranty is 2 year from the purchase date. (Accessories such as Battery/microSD Card : 6 Months) We, PittaSoft Co., Ltd., provide the product warranty according to Consumer Dispute Settlement Regulations (drawn up by the Fair ... - Page 47 MEMO...
Need help?
Do you have a question about the DR530W and is the answer not in the manual?
Questions and answers