Table of Contents
Advertisement
Advertisement
Table of Contents

Related Manuals for Alcatel temporis 500


Summary of Contents for Alcatel temporis 500
-
Page 1: User Guide
Page 1 User Guide... -
Page 2: Table Of Contents
Page CONTENTS DESCRIPTION OF THE TEMPORIS 500 PAGE Display ........................4 Equipment supplied ....................5 Characteristics ......................5 INSTALLING YOUR TEMPORIS 500 PAGE Connecting the handset ..................Connecting the base ....................Wall mounting ......................Inserting or replacing the batteries ................ - Page 3 Page Lock / Unlock ......................24 Creating / Modifying or deleting a directory record / direct access memories ... 25 Changing the PIN ...................... 28 Programming the mailbox number ................29 USING THE "CALLER IDENTIFICATION" SERVICES PAGE List of Calls ........................30 To consult the call log ....................
-
Page 4: Description Of The Temporis 500
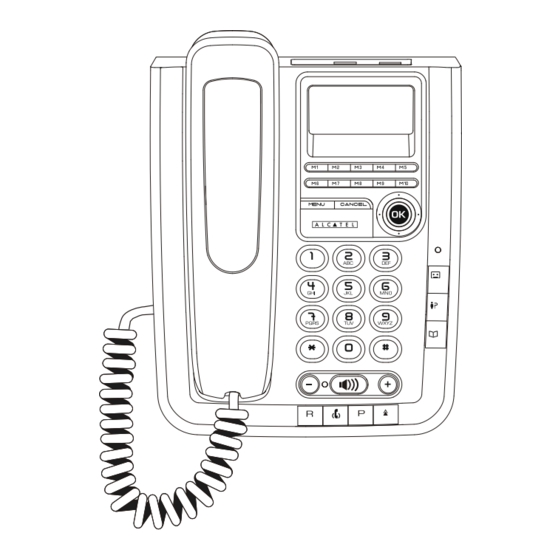
Page 4 1. DESCRIPTION OF THE TEMPORIS 500 Peg for wall Memory label MENU button Display mounting M1..M10 memory keys CANCEL button Navigator button Confirm menu button LED for ringer, new events Voice mail Call list menu button Phonebook button... -
Page 5: Display
Page 1.1 DISPLAY The TEMPORIS 500 has a three-line display: 1 line of icons and information about the functions 1 line 16 digits. 1 line of 16 alphanumerical characters. Mute microphone and hold Phone Lock Battery status Icon Missed calls (New calls) with total... -
Page 6: Equipment Supplied
Page 1.2 EQUIPMENT SUPPLIED 1 TEMPORIS 500 telephone set 1 coiled cable 1 RJ11/ RJ11 telephone cable (depends on countries) 1 memory label 7 user guides (English, French, Spanish, German, Dutch, Portugese and Italian) 1 plug adapter (depends on countries) 1.3 CHARACTERISTICS... -
Page 7: Installing Your Temporis 500
Page 7 2. INSTALLING YOUR TEMPORIS 500 2.1 CONNECTING THE HANDSET Connect one end of the coiled cable (A) to the handset and the other end (B) to the plug on the left-hand side of the base. -
Page 8: Connecting The Base
Page 8 2.2 CONNECTING THE BASE Connect one end of the telephone cable to the socket on the back left-hand side of the base (C) NOTE: The other socket (D) is for connecting a modem. 2.3 WALL MOUNTING To wall mount the telephone set, remove, reverse and reinsert the mounting peg as shown in the figure below. -
Page 9: Inserting Or Replacing The Batteries
The TEMPORIS 500 is certified in accordance with European regulations, as indicated by the CE marking. The TEMPORIS 500 is intended to transmit and receive telephone calls and for connection behind a private branch exchange (PBX) or a public network of the European community. -
Page 10: General Use
If you have subscribed to the "Caller Identification" service, the light also indicates that there are new calls or messages in the list of calls. If you are connected to a private ALCATEL telephone system with a messaging service, this light indicates that there is a message in your voice mailbox. -
Page 11: Dialing Using A Memory
Page 11 • OTHER WAYS OF MAKING A CALL You can also make a call in other ways: Dialing the number and then lift up the handset. • Press the • button and then dial the number. Lift up the handset and then dial the number. •... -
Page 12: Receiving A Call
Page 3.5 RECEIVING A CALL There are two ways to answer the call: Lift the handset. Press the button, then start the conversation in hands-free mode. NOTE: If the ringer is disabled, the incoming call will signal on both the display and LED (flashing). -
Page 13: Putting A Call On Hold / Transferring A Call
Pick up the handset to resume the conversation. Pick up the handset of the second telephone set to resume the conversation on that phone. The TEMPORIS 500 releases the line. 3.10 REDIALING THE LAST NUMBERS CALLED The redial memory's capacity is 32 digits. - Page 14 Page 14 IN ON-HOOK MODE - EXTENDED REDIALING OF LAST NUMBER The TEMPORIS 500 records the last 5 numbers called. Press the button. The last number called is displayed. Use the buttons to display the last 5 numbers called. Press the button or lift the handset or press the hands-free key The telephone will dial the number automatically.
-
Page 15: Programming Your Temporis 500
YOUR TEMPORIS 500 Your TEMPORIS 500 has a configuration menu. To access the dif ferent sub-menus, when the telephone is in stand-by mode, follow the instructions given below. You can return to stand-by mode from any point in the menu or sub-menu by pres- sing the button again. -
Page 16: Contrast
CONTRAST button to adjust the contrast. Press the CONTRAST button to confirm. Press the SAVED 4.2 LANGUAGE The TEMPORIS 500 offer 7 languages display: English, French, Spanish, German, Dutch, Portuguese, Italian. • Press the button. CONTRAST Press the button. LANGUAGE Press the button. -
Page 17: Selecting And Adjusting The Melody & The Volume
Page 17 4.3 SELECTING AND ADJUSTING THE MELODY & THE VOLUME There are two ways of selecting and adjusting the melody: - You can change the melody while the telephone is ringing before answering the call. Use the buttons to adjust the volume. CALL buttons to select the melody. -
Page 18: Setting Date And Time
Page 18 4.4 SETTING DATE AND TIME The date and time icons flash until the date and the time are updated. Press the button. CONTRAST button until the screen displays "DATE/TIME". Press the DATE/TIME Press the button. 18/04 10:20 SET DATE Use the keypad to change the date in DD/MM. -
Page 19: Call Setting
Page 19 4.5 CALL SETTING • 4.5.1 AREA CODE When receive a CLI number tha t does not match with the area code, a prefix number should be added to the first number for redial. Press the button. CONTRAST Select "CALL SETTING" using the button. -
Page 20: Prefix Number
Page 20 • 4.5.2 PREFIX NUMBER Press the button. CONTRAST Select "CALL SETTING" using the button. CALL SETTING to confirm, and select "PREFIX NUM" Press the button using the button. PREFIX NUM to confirm. The prefix number will be Press the button displayed and flashing. -
Page 21: Voicemail Setting
Page 21 • 4.5.3 VOICEMAIL SETTING To verify or change voicemail number (16 digits): Press the button. CONTRAST Select "CALL SETTING" using the button. CALL SETTING to confirm, and select "VOICEMAIL" Press the button using the button. VOICEMAIL to confirm and the v oicemail number Press the button will be displayed . -
Page 22: Dial Mode Setting
Page 22 • 4.5.4 DIAL MODE SETTING To select dial mode (tone / pulse 40 / 60 / pulse 33 / 66): Press the button. CONTRAST Select "CALL SETTING" using the button. CALL SETTING to confirm, and select "DIAL MODE" Press the button using the... -
Page 23: Flash Time Setting
Page 23 • 4.5.5 FLASH TIME SETTING Press the button. CONTRAST Select "CALL SETTING" using the button. CALL SETTING to confirm, and select "FLASH TIME" Press the button using the button. FLASH TIME to confirm, and select "FLASH TIME Press the button INPUT"... -
Page 24: Pause Time Setting
Page 24 • 4.5.6 PAUSE SETTING Press the button. CONTRAST Select "CALL SETTING" using the button. CALL SETTING to confirm, and select "PAUSE TIME" Press the button using the button. PAUSE TIME Select input (Either 2 or 4 sec) using the button PAUSE TIME INPUT Press the... -
Page 25: Lock / Unlock
Page 25 4.6 LOCK / UNLOCK When your telephone is locked: You can receive a call. You can dial up to 6 digits. The default PIN is 0000. • LOCKING until you reach "LOCK?" menu. Press the button, use LOCK? Press the button. -
Page 26: Creating / Modifying Or Deleting A Directory Record / Direct Access Memories
Page 26 4.7 CREATING / MODIFYING OR DELETING A DIRECTORY RECORD / DIRECT ACCESS MEMORIES You can use this sub-menu to program both the directory and the direct access memories. Your telephone has a directory with 50 entries. Each record is made up of a name and a number. - Page 27 Page 27 MODIFYING A DIRECTORY RECORD Press the button then use buttons to select the record. Press the button. EDIT? Press the button to confirm the selection. to modify the number and then Modify the name, press press 123 45 67 89 MARY button to delete any characters.
- Page 28 Page 28 ERASING A DIRECTORY RECORD Repeat step "ERASE?" using the Select buttons. ERASE? button to confirm. Press the ERASED ERASING ALL DIRECTORY RECORD Repeat step "ERASE ALL?" using the Select buttons. ERASE ALL? button to confirm. Press the ALL ERASED...
-
Page 29: Changing The Pin
Page 29 4.8 CHANGING THE PIN To access some features of the TEMPORIS 500 you need to use a PIN. The default PIN is 0000. You can change it to your own code. Press the button. CONTRAST button until the screen displays "CHANGE PIN CODE?". -
Page 30: Programming The Mailbox Number
Page 30 4.9 PROGRAMMING THE MAILBOX NUMBER If you have programmed a mailbox number, it will dial automatically when you press the mailbox key. Press the button. CONTRAST button until the screen displays "CALL SETTING". Press the CALL SETTING Press the button. -
Page 31: Using The "Caller Identification" Services
SERVICES* Your operator offers some services that are only available if you subscribe to them. The TEMPORIS 500 can work with the Caller Identification (CLI) service in on-hook mode or in conversation mode with a call waiting. The CLI service informs you of the calling party's number or name before you answer the call. -
Page 32: To Consult The Call Log
Page 32 5.2 TO CONSULT THE CALL LOG 13585686845 The message light flashes. 12 NEW CALLS New calls in the list of calls. New message your mailbox. Press the button. New calll Date of last call from JOHN Call number Time of last call from JOHN 09/10 08:05 13585686845... -
Page 33: Saving A Record From The List Of Calls
Page 33 5.3 SAVING A RECORD FROM THE LIST OF CALLS When a call record is displayed: Press the button. STORE? Press the button. Enter the name, if not already proposed, and press to confirm. to save record. Modify the number if necessary and press SAVED 5.4 DELETING A RECORD FROM THE LIST OF CALLS When a call record is displayed:... -
Page 34: Connecting And Using Aheadset
* Not included with the TEMPORIS 500. Your headset must have an RJ9 connector. Please use headsets that are compliant with EN60950-1 and designed to be used with telephones. -
Page 35: Additional Information
Page 35 7. ADDITIONAL INFORMATION 7.1 TROUBLESHOOTING PROBLEM CAUSE SOLUTION The screen have no display. The telephone is not properly Try re-connecting the telephone. There is no dial tone. connected. The screen have no display. The telephone was not Pick up the handset and wait for There is dialing tone. -
Page 36: Defaults Settings
Page 36 7.2 DEFAULTS SETTINGS Contrast Level 3 Language French Ring tone Area code Empty Voice mail Empty Dial mode Tone Flash time 100ms Pause time... -
Page 37: Guarantee
Page 37 7.3 GUARANTEE Your TEMPORIS 500 telephone is approved in conformity with European regula- tions, as attested by the CE mark. You are covered by a legal guarantee on this product. For all information concerning this guarantee, please contact your reseller. -
Page 38: Environment
Page 38 7.4 ENVIRONMENT This symbol means that your inoperative electronic appliance must be collected separately and not mixed with the household waste. The European Union has implemented a specific collection and recycling system for which producer's are responsible. This appliance has been designed and manufactured with high quality materials and components that can be recycled and reused. -
Page 39: Precautions
Page 39 7.6 PRECAUTIONS Warning, your telephone must never come into contact with water. You may, however, use a damp cloth to clean it. Never use solvents (trichlorethylene, acetone, etc.), which may damage the plastic surfaces. Never spray cleaning products on your phone. We advise you not to use the telephone during storms. - Page 40 Page 40 Thomson Telecom Head office: 46, quai Alphonse Le Gallo 92648 Boulogne Cedex - France SAS Capital 130 037 460 - 390 546 059 RCS Nanterre...
Need help?
Do you have a question about the temporis 500 and is the answer not in the manual?
Questions and answers