Table of Contents
Advertisement
Advertisement
Table of Contents

Subscribe to Our Youtube Channel
Related Manuals for Phonak roger guide-u


Summary of Contents for Phonak roger guide-u
- Page 1 Roger Guide-U User Guide...
-
Page 2: Table Of Contents
Contents 1. Welcome 2. Getting to know your Roger Guide-U system 2.1 Roger inspiro Guide-U 2.2 Roger Receiver Guide-U 2.3 Roger Receiver Guide-U indicator light 3. Getting started Step 1. Charging Roger inspiro Guide-U Step 2. Switching Roger inspiro Guide-U on Step 3. - Page 3 4.1 How to access Roger inspiro Guide-U’s menu 4.2 Using Roger inspiro Guide-U to connect devices in a network 4.2.1 Connecting Roger Guide-U receivers 4.2.2 Connecting FM receivers 4.2.3 Connecting Roger DigiMaster devices 4.3 Using Roger inspiro Guide-U in a guided tour network 4.4 Using Roger inspiro Guide-U in a...
- Page 4 Contents 5. More detailed information 5.1 Checking the Roger inspiro Guide-U software version 5.2 Customizing the softkeys 5.3 Changing the Application mode 5.4 Adjusting the audio volume of Roger DigiMaster loudspeakers 5.5 Adjusting the volume of a Roger DigiMaster’s external audio input 5.6 Joining an existing network 5.7 Creating a new network ID 5.8 Viewing list of connected devices...
- Page 5 5.13 Re-activating the first-time use menu 5.14 Changing menu type 5.15 Connecting audio devices with Roger inspiro Guide-U 5.16 Verification mode 5.17 Roger inspiro Guide-U settings 5.18 Help 5.19 Technical data 5.20 About accessories 6. Troubleshooting 7. Important information 8. Service and warranty 9.
-
Page 6: Welcome
1. Welcome Congratulations on choosing Roger Guide-U from Phonak. Roger Guide-U is a high performing and versatile tour guiding system. Your Roger Guide-U is a Swiss premium-quality product developed by Phonak, the world’s leading hearing healthcare company. Please read this User Guide thoroughly to benefit from all the possibilities your Roger Guide-U system offers. -
Page 7: Getting To Know Your Roger Guide-U System
2. Getting to know your Roger Guide-U system Your typical tour-guiding system consists of four main elements: Roger Receiver Guide-U and a headset (listener) and Roger inspiro Guide-U and microphone (speaker). Roger inspiro Guide-U transmits the speaker’s voice wirelessly to your headset via the Roger Receiver Guide-U. - Page 8 2. Getting to know your Roger Guide-U system The Roger inspiro Guide-U and any Roger Receiver Guide-U typically work within a range of up to 40 meters / 130 feet. Note that human bodies and walls may reduce this distance. The furthest range is possible when Roger inspiro Guide-U and Roger Receiver Guide-U are line of sight.
-
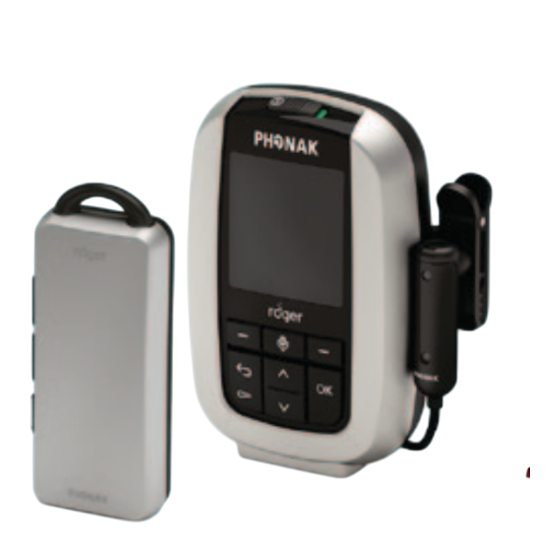
Page 9: Roger Inspiro Guide-U
2.1 Roger inspiro Guide-U Roger inspiro Guide-U a On / off slider b Color screen c Softkeys d Keypad lock and Back key e Microphone mute f 3.5 mm audio input g Mini-USB for charging... - Page 10 2. Getting to know your Roger Guide-U system h Hook for attaching belt clip and neckloop i Cable wrapper iLapel microphone j Microphone openings k Clothing clip EasyBoom microphone (optional) l Microphone...
-
Page 11: Roger Receiver Guide-U
2.2 Roger Receiver Guide-U a Volume control b On / off c Green / orange status indicator d Charging socket e Headphone socket (2.5 mm) -
Page 12: Roger Receiver Guide-U Indicator Light
2. Getting to know your Roger Guide-U system 2.3 Roger Receiver Guide-U indicator light General Switching Roger Receiver Guide-U on The green light is visible for 3 seconds Battery status 60 seconds 3 orange flashes (and 3 beeps), repeated every... - Page 13 Meaning User action Roger Receiver Guide-U Switch on the Roger has been switched on and inspiro Guide-U. is ready for use. Battery is almost empty. Charge Roger Receiver Guide-U as soon as possible (within an hour). Battery is completely Charge Roger Receiver exhausted.
- Page 14 2. Getting to know your Roger Guide-U system Charging Green double-flashes every 5 seconds The green light is constantly visible Volume One orange flash (and a double beep) One green flash (and a single beep)
- Page 15 Meaning User action Roger Receiver Guide-U is Wait until battery is connected to the charger charged. Charging a and is being charged. completely exhausted battery takes around two hours. The battery will be 80% charged within one hour. Roger Receiver Guide-U’s Unplug the charger.
-
Page 16: Getting Started
3. Getting started Step 1. Charging Roger inspiro Guide-U Roger inspiro Guide-U contains a built-in rechargeable state-of-the- art lithium polymer battery with fast- charge capability. A fully-discharged battery will reach its maximum charge in approximately 2 hours. - Page 17 Check the message on the Roger inspiro Guide-U’s screen and follow the instructions. Once the Roger inspiro Guide-U’s battery is completely exhausted, its battery symbol will turn red. Use only the original Phonak charging unit for Roger inspiro Guide-U.
-
Page 18: Step 2. Switching Roger Inspiro Guide-U On
3. Getting started Step 2. Switching Roger inspiro Guide-U on To switch on, push the top slider to the left until the green mark appears and the screen is illuminated. To save power, the backlight of the Roger inspiro Guide-U LCD will switch off after a few seconds. Pressing any button reactivates this backlight. -
Page 19: Step 3. Wearing Roger Inspiro Guide-U
Step 3. Wearing Roger inspiro Guide-U Roger inspiro Guide-U can … or worn around either be clipped to the belt … the neck... - Page 20 3. Getting started Attach the clip to the button on the back of the “click” Roger inspiro Guide-U. Make sure it is secure. The clip can also be fixed to the belt or trousers before Roger inspiro Guide-U is attached.
- Page 21 To remove the clip, press its top button.
- Page 22 3. Getting started Slot the neckloop into Roger inspiro Guide-U’s button.
-
Page 23: Step 4. Wearing The Ilapel Microphone
Step 4. Wearing the iLapel microphone iLapel is an easy-to-use directional lapel microphone which provides excellent sound quality. You must switch Roger inspiro Guide-U off before changing the microphone. a) Unwind the iLapel from the Roger inspiro Guide-U. - Page 24 3. Getting started b) Fix the iLapel to your shirt and ensure the distance between microphone and mouth is approximately 20 cm / 7 inches. Wrong! Do not cover either of the two microphone openings!
-
Page 25: Step 5. Wearing The Optional Easyboom Microphone
Step 5. Wearing the optional EasyBoom microphone EasyBoom is a comfortable, easy-to-use and robust boom microphone, best suited for noisy surroundings. You must switch Roger inspiro Guide-U off before changing the microphone. Make sure the head of the microphone is well positioned, as depicted above (A). - Page 26 3. Getting started Fix the clip on your clothing as depicted and ensure the cable is not stretched between the clip and the ear, or the clip and Roger inspiro Guide-U. Position the microphone correctly as depicted below.
-
Page 27: Step 6. Muting The Microphone
Classic FM Classic FM Step 6. Muting the microphone Judy Smith Judy Smith Channels Sync Channels Sync Roger inspiro Guide-U’s microphone can be muted simply by pressing its microphone key. J This symbol confirms that the microphone is active: J This symbol confirms that the microphone has been muted:... -
Page 28: Step 7. Activating The Keypad Lock
3. Getting started Classic FM Classic FM Step 7. Activating the keypad lock Judy Smith Judy Smith Channels Sync Channels Sync It is recommended to activate the keypad lock whenever possible. To activate this, go to the highest menu level, press the key symbol, then press OK. -
Page 29: Step 8. Charging Roger Receiver Guide-U
An empty Roger Receiver Guide-U battery is: J 80% charged after one hour J 100% charged after two hours Plug the charging unit into an easily accessible power socket. ! Only use original Phonak charging units. - Page 30 3. Getting started Plug the connector from the charger into the Roger Receiver Guide-U charging socket. J Once fully charged, Roger Receiver Guide-U can be used for 10 or more hours. J Roger Receiver Guide-U cannot be used when the charger is still attached.
-
Page 31: Step 9. Fitting The Roger Receiver Guide-U Around The Neck
Step 9. Fitting the Roger Receiver Guide-U around the neck Plug in the protection cap after charging Make sure the headphone’s cable is plugged into the Roger Receiver Guide-U audio output. To benefit from maximum hearing comfort, we recommend using official Roger Receiver Guide-U head-on earphones. -
Page 32: Step 10. Wearing The Roger Receiver
3. Getting started Step 10. Wearing the Roger Receiver Guide-U around the neck as shown Step 11. Switching Roger Receiver Guide-U on... -
Page 33: Step 12. Connecting Roger Receiver Guide-U To Roger Inspiro Guide-U
Step 12. Connecting Roger Receiver Guide-U to Roger inspiro Guide-U To connect a single Roger Receiver Guide-U, hold Roger Receiver Guide-U within 10 cm / 4 inches of the Roger inspiro Guide-U and and short press Connect on the Roger inspiro Guide-U. Connect Distance 0–10 cm/... - Page 34 3. Getting started To connect multiple Roger Receiver Guide-U, press and hold Connect on Roger inspiro Guide-U and slide across every Roger Receiver Guide-U within 10 cm / 4 inches. Distance 0–10 cm/ Connect 0–4 inches Press and hold Step 12 is only required the first time you use Roger Receiver Guide-U.
-
Page 35: Step 13. Adjusting Roger Receiver Guide-U's Volume
Step 13. Adjusting Roger Receiver Guide-U’s volume Volume up Volume down Short button press: The volume will increase / decrease only slightly. Long button press: The volume will continue to increase / decreased until the upper / lower volume limit is reached or until you stop pressing the button. -
Page 36: Using Roger Inspiro Guide-U
4. Using Roger inspiro Guide-U 4.1 How to access Roger inspiro Guide-U’s menu J Press either Up / Down arrow ( ) or ‘OK’ ( ) on the keypad. All these keys provide instant access to the main Roger inspiro Guide-U menu. J Press Back ( ) to go back a step in the Roger inspiro Guide-U’s menu. -
Page 37: Connecting Roger Guide-U Receivers
J Turn Roger inspiro Guide-U on. J Hold Roger inspiro Guide-U within 10 cm (4 inches) of the Roger Guide-U receiver. J The Roger Guide-U receivers must be switched on. J To connect a single receiver: Press the Roger inspiro Guide-U‘s right Connect softkey less than 1 second. -
Page 38: Connecting Fm Receivers
4. Using Roger inspiro Guide-U 4.2.2 Connecting FM receivers (analog Guide-U receivers) An unlimited number of FM receivers can be connected to Roger inspiro Guide-U when Roger inspiro Guide-U is in its Roger + FM application mode (see 5.3 Changing the Application mode). -
Page 39: Connecting Roger Digimaster Devices
Guide-U and the Talker can talk into the Roger inspiro Guide-U microphone. Repeat these steps to connect any additional receivers. Roger Guide-U and FM (analog Guide-U) receivers can be used simultaneously with the same Roger inspiro Guide-U. 4.2.3 Connecting Roger DigiMaster devices... -
Page 40: Using Roger Inspiro Guide-U In A Guided Tour Network
4. Using Roger inspiro Guide-U J The Roger DigiMaster device is now connected with Roger inspiro Guide-U and the Talker can talk into the Roger inspiro Guide-U microphone. 4.3 Using Roger inspiro Guide-U in a guided tour network (Primary Talker) Several transmitters (Roger DynaMic, Roger inspiro Guide-U etc.) can be used together in a guided tour network. -
Page 41: Creating A Sub-Network For Use By An Additional Talker
How to select Primary Talker mode: J In the Roger inspiro Guide-U menu go to: Settings / Modes / MTN mode / Primary Talker 4.4 Using Roger inspiro Guide-U in a conference network (Equal Talker) Several transmitters (Roger DynaMic, Roger inspiro Guide-U etc.) can be used together in a conference network. -
Page 42: Using Roger Inspiro Guide-U In A Conference Network
4. Using Roger inspiro Guide-U does not need to be heard by the whole group but only by these specific persons. The Roger inspiro Guide-U’s Sub-Network (SubNet) function creates a sub-network that allows the additional talker to communicate with these persons directly, without disrupting the existing main network. -
Page 43: Using Roger Inspiro Guide-U To Check Devices
4.6 Using Roger inspiro Guide-U to check devices (Check) A network device’s data can be checked wirelessly using Roger inspiro Guide-U. First, assign the Check function to Roger inspiro Guide-U’s left customizable softkey: J Go to: Settings / Config. SoftKeys / Left SoftKey J Select the Check function and press J Press the key to go back to main menu. -
Page 44: More Detailed Information
5. More detailed information 5.1 Checking the Roger inspiro Guide-U software version To check which software version Roger inspiro Guide-U is using, use its ‘About Roger inspiro’ function. How to check: J Go to: Help / About inspiro J The installed software version will be displayed. 5.2 Customizing the softkeys The functions of Roger inspiro Guide-U’s two softkeys can be customized to help optimize your daily usage. -
Page 45: Changing The Application Mode
Roger mode: to use Roger inspiro Guide-U with the Roger Guide-U receivers and Roger DigiMasters. Roger + FM mode: to use Roger inspiro Guide-U with the Roger Guide-U receivers, Roger DigiMasters and FM receivers. How to change the Application mode: J Go to: Settings / Modes / Application mode J Select the required application mode in the menu. -
Page 46: Adjusting The Audio Volume Of Roger Digimaster Loudspeakers
5. More detailed information 5.4 Adjusting the audio volume of Roger DigiMaster loudspeakers This can be done wirelessly using Roger inspiro Guide-U. How to change Roger DigiMaster’s volume: J Go to: SoundField / Adjust volume J Use the Up / Down arrow keys to adjust the Roger DigiMaster’s volume. -
Page 47: Joining An Existing Network
5.6 Joining an existing network (JoinNet) If a network already exists, Roger inspiro Guide-U can simply join this network. How to join an existing network: J Hold Roger inspiro Guide-U within 10 cm (4 inches) of any device that is already connected to the network. J Go to: Network / JoinNet J Roger inspiro Guide-U will join the existing network. -
Page 48: Viewing List Of Connected Devices
5. More detailed information 5.8 Viewing list of connected devices This function shows which transmitters or Roger Dynamic SoundField devices are currently connected to a network. These devices must be switched on. To View MultiTalkers (transmitter microphones such as Roger inspiro Guide-U, Roger DynaMic etc.): J Go to: Network / View MultiTalkers To View Roger DigiMasters (Roger Dynamic SoundField devices):... -
Page 49: Viewing A Device's Total Usage Time
5.9 Viewing a device’s total usage time The total usage time of any Roger device refers to the time during which that device has been used (since its purchase or last service). This time can be viewed using the primary Roger inspiro Guide-U’s Check function. How to view a device’s total usage time: J Ensure both Roger inspiro Guide-U and the device are turned on. -
Page 50: Changing Roger Inspiro Guide-U's Fm
5. More detailed information 5.10 Changing Roger inspiro Guide-U’s FM (analog Guide-U) channel The FM channel in Roger inspiro Guide-U can easily be changed. How to change Roger inspiro Guide-U’s FM channel: J Go to: FM / Change channel J Select the required FM channel and press J The selected FM channel will be activated. -
Page 51: Changing Fm Receiver Settings
5.12 Changing FM (analog Guide-U) receiver settings FM receiver settings can be managed directly from Roger inspiro Guide-U. Several functions are available: Scan for channels Searches for an existing transmission from another wireless microphone, e. g. if a speaker is already using an FM transmitter at a lecture or presentation. - Page 52 5. More detailed information Change channel Changes the receiver’s channel without changing the current Roger inspiro Guide-U channel. This can be useful if several groups need to be created in the room. Set beep tone Choose between the different beeping tones available to indicate when the FM receivers are being synchronized or monitored.
-
Page 53: Re-Activating The First-Time Use Menu
5.13 Re-activating the first-time use menu The Roger inspiro Guide-U is pre-configured in our factory. However after switching Roger inspiro Guide-U on for the first time, you are given the option of changing the Roger inspiro Guide-U’s configuration. To ensure you are asked about this configuration again when you next turn on Roger inspiro Guide-U, select Reactivate and reboot the device. -
Page 54: Connecting Audio Devices With Roger Inspiro Guide-U
5. More detailed information J When the microphone symbol appears in the top left corner of the Roger inspiro Guide-U screen, press and the left softkey simultaneously, then press again. J Select the menu type you prefer then 5.15 Connecting audio devices with Roger inspiro Guide-U Roger inspiro Guide-U can be directly connected to any audio device via Roger inspiro Guide-U’s audio input... -
Page 55: Verification Mode
Roger inspiro Guide-U, Roger DigiMaster devices and Phonak receivers. 5.16 Verification mode The Verification mode is a mode for Professionals to verify a device according to the POP (Phonak Offset Protocol). How to activate Verification mode: J Go to: Settings / Verification / Activate J The device will restart automatically in Verification mode. -
Page 56: Roger Inspiro Guide-U Settings
5. More detailed information 5.17 Roger inspiro Guide-U settings Under Settings in the menu different Roger inspiro Guide-U settings can be changed. Setting language Choose Roger inspiro Guide-U’s on-screen language. Setting the Roger inspiro Guide-U desktop image Choose the desktop image you prefer. Setting date &... -
Page 57: Help
Setting the Roger inspiro Guide-U display Set Roger inspiro Guide-U’s display parameters. Viewing Roger inspiro Guide-U battery status View battery status. 5.18 Help Help index Summarizes all Roger inspiro Guide-U’s help topics. Web support Displays a website that provides further useful information for users. -
Page 58: About Accessories
Up to 40 m / 130 feet depending on surroundings Battery operating time Approx. 12 hours Charging time: approx. 2 hours 5.20 About accessories Specific accessories are available for Roger inspiro Guide-U. Please visit www.phonak-communications.com / www.phonak.com to learn more. -
Page 59: Troubleshooting
6. Troubleshooting The following is a summary of frequently asked questions and the answers to them. Most probable cause Solution Roger device cannot be switched on J The battery is run down J Charge the Roger device for at least two hours Poor speech intelligibility J The microphone is not J Move the microphone closer... - Page 60 6. Troubleshooting Most probable cause Solution J Roger Receiver Guide-U is not J Connect Roger Receiver connected to Roger inspiro Guide-U with Roger inspiro Guide-U Guide-U by pressing ‘Connect’ on the latter. Note that Roger Guide-U needs to be within 10cm/4 inches of Roger inspiro Guide-U J Roger Receiver Guide-U is...
- Page 61 Most probable cause Solution Whistling sound from Roger DigiMaster loudspeaker J Audio feedback between J Move away from Roger loudspeaker and microphone DigiMaster loudspeaker and / or reduce Roger inspiro Guide-U’s volume The signal is interrupted during audio streaming J Roger Receiver Guide-U is J Move closer to the Roger too far away from the Roger transmitter to move within...
- Page 62 6. Troubleshooting Most probable cause Solution Unintended talker can be heard in receivers J Talker has not muted or J Mute or turn off talker’s turned off their Roger inspiro Roger inspiro Guide-U Guide-U (i.e. when leaving the room)
-
Page 63: Important Information
7. Important information Please read the information on the following pages before using your Phonak Roger Guide-U system. 7.1 Hazard warnings Persons with pacemakers or other medical devices should ALWAYS consult their physician, the manu- facturer of their device BEFORE using the Roger Receiver Guide-U. - Page 64 The Roger Guide-U system may only be repaired by an authorized service center. Changes or modifications to the device that were not explicitly approved by Phonak are not permitted.
- Page 65 Using your Roger Guide-U system cables in any way contradictory to their intended purpose can cause injury. When operating machinery, ensure that no parts get caught in the machine. Do not charge Roger Guide-U system while it is on your body.
- Page 66 Roger Guide-U system. Protect the Roger Guide-U system from excessive shock and vibration. Do not expose your Roger Guide-U system to temperatures and humidity outside of the recommended conditions stated in this user guide.
- Page 67 Roger Guide-U system to the different cables. Protect all openings (microphones, audio input and charger) from dirt and debris. If the Roger Guide-U system has been dropped or damaged, if it’s overhead during charging, has a damaged cord or plug, or has been dropped into liquid, discontinue use of Roger Guide-U system and contact your service contact.
- Page 68 Roger Receiver Guide-U. Do not connect an USB or audio cable exceeding 3 meters (9 ft) in length to the Roger Guide-U system. When the Roger Guide-U system is not in use, turn it off and store it safely.
-
Page 69: Other Important Information
7.3 Other important information J High-powered electronic equipment, larger electronic installations and metallic structures may impair and significantly reduce the operating range. J Roger inspiro Guide-U collects and stores internal technical data. This data may be read by a hearing care professional in order to check the device, as well as to support you in being able to use the device in the ideal manner. - Page 70 7. Important information J Be aware that the FM radio signals might also be picked up and overheard by other FM receivers. J Be aware that the wireless transmission from the transmitter to the receiver may be interrupted due to interferences or out of range reasons and that words which has been spoken by the wearer of the transmitter may not be heard by the wearer of the receiver.
-
Page 71: Service And Warranty
Please ask your sales contact, where you purchased your device, about the terms of the local warranty. 8.2 International warranty Phonak offers a one-year limited international warranty, valid as of the date of purchase. This limited warranty covers manufacturing and material defects. The warranty only comes into force if proof of purchase is shown. - Page 72 8. Service and warranty 8.3 Warranty limitation This warranty does not cover damage from improper handling or care, exposure to chemicals, immersion in water or undue stress. Damage caused by third parties or non-authorized service centers renders the warranty null and void. This warranty does not include any services performed by a hearing care professional in their office.
-
Page 73: Information And Explanation Of Symbols
9. Information and explanation of symbols With the CE symbol, Phonak AG confirms that this Phonak product meets the requirements of the R&TTE Directive 1999/5/EC on radio and telecommunications equipment. The alert sign means that potential restrictions on its use are applicable in one or more EU Member States. - Page 74 9. Information and explanation of symbols Important information for handling and product safety. Operating This device is designed such that conditions it functions without problems or restrictions if used as intended, unless otherwise noted in these user guides. Australian EMC and Radiocommunica- tions compliance label.
- Page 75 The symbol with the crossed-out garbage bin is to make you aware that this device may not be thrown away as normal household waste. Please dispose of old or unused device, at waste disposal sites intended for electronic waste, or give your device to your sales contact for disposal.
- Page 76 Manufacturer: Phonak Communications AG Laenggasse 17 CH-3280 Murten Switzerland www.phonak-communications.com www.phonak.com...
Need help?
Do you have a question about the roger guide-u and is the answer not in the manual?
Questions and answers