Table of Contents
Advertisement
Quick Links
Download this manual
See also:
User Manual
SETUP GUIDE
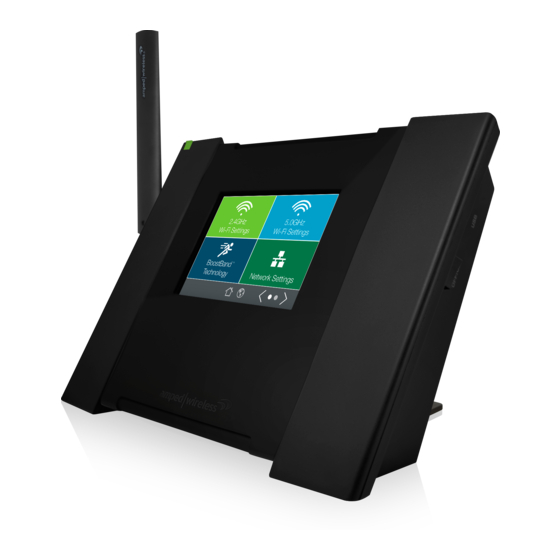
HIGH POWER TOUCH SCREEN AC1750 WI-FI ROUTER
LCD Screen:
1
Stylus:
2
3
Antenna
Connector:
4
USB Port:
5
Power Switch:
6
Stand/Cable
Organizer:
7
Power (PWR):
8
Modem:
9
Wired Ports:
Reset:
10
Disconnect & Power Off your
1
Existing Router
Disconnect your existing router from your computer, your
broadband modem, and a power outlet. If you do not have
an existing router please continue to Step 2.
2
Power Off your Modem
Power off the modem by disconnecting the modem's power
adapter from the power outlet. If your modem has a backup
battery, remove the backup battery from your modem.
Do NOT power on your modem until Step 4.
3
Connect the Router to your Modem
a
Power Adapter
Modem
4
Power On your Modem
Plug in the power adapter and reinsert the backup battery
(if available) to power on the modem.
Allow a minute or two for the modem to initiate.
5
Attach Antenna & Power On
Internet
Modem
6
Welcome to the Dashboard
7
Internet Connection Setup
8
Automatic Setup - Welcome to the Setup Wizard
9
Personalize your Wi-Fi Settings
10
Setup Summary
Navigating the Touch Menu
Getting to Know the Router
4" LCD touch screen. Displays the user interface for
configuring the Router.
Input tool that assists in navigating the LCD
touch screen menu.
RJ-SMA antenna connector. Compatible with
antennas that have RP-SMA connectors.
USB 2.0 Port used to attach USB storage devices, such as
a USB flash drive or external hard drive, for file sharing.
Turn the Router on or off.
Attach and fasten to the mounting holes on the
back of the Router.
Power adapter port. DC 12V, 2A.
RJ-45 Gigabit port for connecting to your Broadband Modem.
RJ-45 Gigabit ports for connecting wired computers or network devices.
Button used to reset device. Push down once to reboot,
hold down for 5-10 seconds to reset to factory default settings.
Setting Up Your Router
(if available)
b
a
c
b
Home Button:
Language Selection:
Back Arrow:
Navigation:
Keyboards/Keypads:
See back for additional connection instructions and features.
READ FIRST
Use the included blue Ethernet cable and
a
connect one end of the cable to your modem.
Connect the other end of the cable to the blue
b
Modem
Do NOT connect the power adapter to the
Router at this time.
Attach the included antenna and product
a
stand.
Attach the Power Adapter to the Router's
b
power outlet.
(On the right panel, make sure switch is ON.)
The Amped Wireless logo will appear
c
as the unit boots up, then the Dashboard
screen will appear.
Included product stand doubles as a cable organizer.
The Dashboard will provide you with the current status
of the Router.
If your router is already configured and has Internet
access, tap
Wi-Fi Setup
networks and skip ahead to Step 9 of this Setup
Guide.
If your router is not configured yet, tap
launch the Setup Wizard.
If you have not already done so in Step 2, please
reboot your Modem and check that your Modem is
connected to the Router. Once this is complete tap
Next.
Select
Automatic Setup (DHCP)
automatically configure your Internet connection.
For more advanced users who wish to manually
configure their IP address settings, please tap
Manual/Static
IP.
For Internet Service Providers that require a login and
password to access the Internet, tap
a
Login. This login is not the login you use to access
the Wi-Fi network. If you are not sure what this is
please contact your Internet Service Provider.
The Wizard will try to detect your Internet settings and
configure the Router. Please be patient.
If there is a problem with the Automatic Setup, the
Wizard will notify you of the issue. If you continue to
have problems, contact our Elite Support department
at 888-573-8820.
If the Internet connection detection was successful, you
will see a green check mark.
Tap
Next
to continue.
The default IDs of your 5GHz Wi-Fi network and
2.4GHz Wi-Fi network are:
Amped_TAPR3_2.4
To change it, tap the SSID field to configure the name of your
Wi-Fi network. Users connecting wirelessly to the Router will
use these IDs to identify your Wi-Fi networks.
The default Security Key of your Wi-Fi networks is: wireless.
To change it, tap the Security Key field and enter a new key for
each Wi-Fi network. The keys must be at least 8 characters long.
Click
Next
to apply your settings.
Congratulations, the Router is now configured. The
Setup Summary provides you with the details of your
setup. You may now connect additional devices directly
to the 4 wired ports on the bottom panel or connect
wirelessly to the Router.
Enjoy your new Amped Wireless network!
Tap the
Home
icon, found on the bottom of many screens,
to return to the Dashboard at any time.
Tap the
Globe
icon, found on the bottom of the Settings
screen, to change the language of the menu.
Tap the
Left
Arrow, found on the upper left corner of many
screens, to navigate back to the previous page.
Tap the
Left
or
Right Arrow
pages for one screen. The dots in this example indicate
there are 3 pages to see.
Tap on a
Blank Field
for entering in information such as your Network ID and
Security Key.
GOT QUESTIONS?
Phone: 888-573-8820 or 909-217-3168
Email: techsupport@ampedwireless.com
Web: www.ampedwireless.com/support
TAP-R3
Stylus
2
1
3
7
Modem
Existing Router
Remove
Backup Battery
port on the back of the Router.
Reinsert
Backup Battery
port and plug it into an available
PWR
to configure your Wi-Fi
Basic Setup
to have the Wizard
Setup Requiring
Amped_TAPR3_5.0
to navigate between multiple
to access a keyboard or keypad
4
5
6
8
9
10
Modem
Modem
to
and
v070715
Advertisement
Table of Contents

Related Manuals for Amped Wireless TAP-R3


Summary of Contents for Amped Wireless TAP-R3
- Page 1 Attach the Power Adapter to the Router's port and plug it into an available power outlet. (On the right panel, make sure switch is ON.) The Amped Wireless logo will appear as the unit boots up, then the Dashboard Internet Modem screen will appear.
- Page 2 Visit our website for more support information and answers to frequently asked questions: www.ampedwireless.com/support Amped Wireless A Division of Newo Corporation Copyright © 2015 Amped Wireless / Newo Corporation. All rights reserved. Amped Wireless, Newo Corporation, Amped Wireless Logo are registered trademarks or trademarks of Newo Corporation. v062715...
Need help?
Do you have a question about the TAP-R3 and is the answer not in the manual?
Questions and answers