
Related Manuals for V-Tec DT31M


Summary of Contents for V-Tec DT31M
-
Page 1: User Manual
ENGLISH 2 WIRE INTERCOM SYSTEM USER MANUAL Please read this manual carefully before using the product, and keep it well. -
Page 2: Parts And Functions
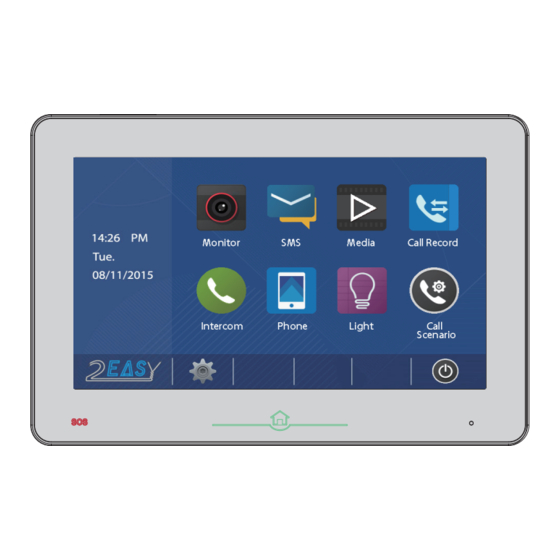
1. Parts and Functions Speaker Digital TFT Antenna LCD Screen RING Microphone Emergency Button Home Button Connection Port Key functions Digital TFT LCD screen Display the visitors' image Emergency button Press it 3 seconds to send the SOS message Home button Press it to return home page Microphone Receive voice from the user... -
Page 3: Monitor Mounting
2. Monitor Mounting 1. Use the screws to fix the Mounting Bracket on the mounting box.(fitting accesories includes a Bracket (Two pieces of 4X25 screws are needed for fastening the Mounting Bracket), Special 2 wire connectors to connect with Monitor) 2. -
Page 4: Intercom Function
1. During talking state, touch icon to open the door for the visitor.(if two locks are unlock 2nd icon to release the second lock ) connected to door camera, touch 2. When the monitor is in standby mode, touch Monitor icon on main menu to get into the door camera switching mode, if multi door stations are installed, you can select the door station or CCTV camera you want to monitor, and then the screen can display the view of outside. - Page 5 : If multi slave monitors are installed in the same apartment, Inner Broadcast select Inner Broadcast, all the other monitors will mandatory receive broadcast content at the same time, whichever slave monitors doesn't need to answer the broadcast, and whichever slave monitors also doesn't need to open the scrccn. Note that this mode is not supported call between monitors.
- Page 6 Video/Picture Playback Touch Media icon on main menu, and touch Graphics Playback icon to play the recorded videos/pictures on screen, please note that touch icon to Start/Pause the videos recorded. And touch Visitor Message icon to play the visitor message, for details, see section 13.
-
Page 7: Sms Function
8. Call Record Function Call Record:All the calls concerning the montior, including Door-station-to-monitor call, monitor-to-monitor call, will be recored and can be reviewed afterwards. Touch Call Record icon on main menu to get into the call record mode.When there are unread call records, arrow color red. Press the unread call record, and then touch icon to play it. -
Page 8: Phone Function
Select Receiver Name List Inbox Outbox Write a Divert Numbers Keypad [ 00 ] Select Receiver [00] [01] [02] [03] [04] [05] 10. Phone Function Touch Phone icon on main menu to get into the phone mode, you have 3 item to select:Phone Call, Divert and Phone Device. -
Page 9: Staircase Light
Divert icon to get into the divert numbers mode page, touch the empty item, it Select will enter the editor page,and input the telephone number by pressing the digital keypad, then touch 'OK' return divert numbers mode page, and then touch icon to save. - Page 10 12. Call Scenario Setting Call Scenario icon on main menu to get into the call scenario mode, you Touch have 6 item to select: Normal: If you select this mode, the monitor as usual. Do Not Disturb: If you select this mode, outdoor station and other monitors can not call the monitor.
-
Page 11: Basic Setup Instructions
14. Basic Setup Instructions Sounds Settings Touch icon on main menu page, then select "Sounds" item to enter the sounds settings page.You can set a variety of ring tones on this page.(touch icon to exit the setting and return main menu page. Note: Door Ring have 2 mode:United Ring Tone 01 Popular... - Page 12 Rename & Monitor Time Settings Touch icon on main menu page(or on door camera switching mode page), then select More... " item to enter the Rename & monitor time settings page. You can rename " door station and camera, change monitor time on this page.(touch icon to exit the setting and return main menu page) Door Station Rename...
-
Page 13: Screen And Volume Adjustment
Screen and Volume Adjustment During monitoring or talking, touch icon, the Adjust icon will be displayed. 1. The Scene mode selection: Total 4 screen modes can be selected in sequence: Normal, Whenever you modify Brightly, Soft User. Brightness colour, Scene item will be set to mode automatically. -
Page 14: Monitor Parameter Setting
17. Monitor Parameter Setting How to enter the installation setting page INSTALLER SETUP About Local Address 00.00 Video Standard AUTO System Verson 00.01.00 Display Driver Front 1.Touch icon on 2.Touch and hold 'SOS' 3.A digital keypad main menu page. button for 2s. will be shown. - Page 15 How to set the monitor panel on In default mode, when receive a calling, the master and slave monitors will ring at the same time, and just the master monitor can display the image while the slave monitors will not. But the settings can be changed, you can set the master monitor and all the slave monitors to panel on at the same time when receiving a call, just input the code number of 8006 on each slave monitor.
- Page 16 How to set the user code for the monitor In the DT system,every apartment must have a unique identification called User Code. The DIP swiches are used to configure the User Code for each Monitor. Bit-1 to Bit-5 are used to User Code setting. The value is from 1 to 32, which have 32 •...
-
Page 17: Specification
18. Specification ● Power supply: DC 20~28V ● Power consumption: Standby 20.9mA; Working 350mA ● Monitor screen: 10 Inch digital color TFT ● Display Resolutions: 800*3(R, G, B) x 480 pixels ● Video signal: 1Vp-p, 75Ω, CCIR standard ● Wiring: 2 wires, non-polarity ●...
Need help?
Do you have a question about the DT31M and is the answer not in the manual?
Questions and answers