
Subscribe to Our Youtube Channel
Related Manuals for V-Tec DT37MG


Summary of Contents for V-Tec DT37MG
-
Page 1: User Manual
ENGLISH 2 WIRE INTERCOM SYSTEM USER MANUAL DT-ENG-37MG/TD7-V1 Please read this manual carefully before using the product, and keep it well. -
Page 2: Parts And Functions
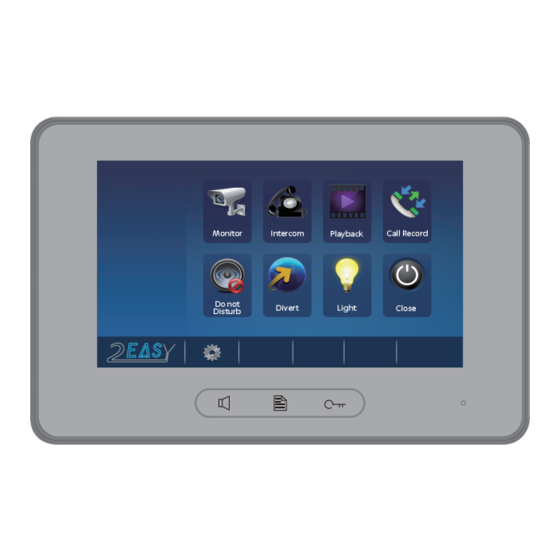
1. Parts and Functions Digital TFT LCD Screen SD card Talk/MON Button Menu Button Unlock Button Microphone Mounting Hook Connection Port Speaker Key functions LCD screen Display the visitors' image Unlock button Press to release the door Menu button Press to open the menu shortcuts Talk/Mon button Press to communicate hands free with visitor Press to view the outdoor condition in standby mode... -
Page 3: Monitor Mounting
2. Monitor Mounting 1. Use the screws to fix the Mounting Bracket on the mounting box.(fitting accesories includes a Bracket (Two pieces of 4X25 screws are needed to fasten the Mounting Bracket), Special 2 wire connectors to connect with Monitor) 2. -
Page 4: Intercom Function
1. During talking state, Press UNLOCK Button or touch icon to open the unlock door for the visitor.(if two locks are connected to door camera,touch 2nd icon to release the second lock ) 2. When the monitor is in standby mode, press TALK/MON Button, The screen Monitor icon on main menu to get can display the view of outside. - Page 5 Call, all the other Monitors will ring at the same time, whichever Monitor answers the call, conversation is started.and the other monitors will stop ringing at the same time. : User in one apartment can call other apartments in the system. Name List Call Touch Name List Call icon (the namelist will be created automatically by the...
- Page 6 Image:008/020 2014/06/23 14:36:55 Note: When the system without SD card: 1.118 pictures in inner memory 2.Manage each picture. When the system with SD card:1.A brand new SD card needs to be formated by the monitor, then can it be used for video recording. 2.Up to 32G Micro SD card.
-
Page 7: Do Not Disturb Function
8. Do Not Disturb Function Do Not Disturb Touch icon on main menu to get into the don't disturb mode , you have 4 item to select:Normal, For 1 Hour, For 8 Hours and Always. You can select the appropriate item according to your needs. Do Not Disturb Normal For 1 Hour... -
Page 8: Staircase Light
Note:1.Touch icon to detect the transfer device info. 2.Touch icon to send message. Transfer Options Transfer Device Info Don't Transfer Device If No Answer Simutaneously Network Signal Level 10. Staircase Light Note: the staircase light function will be activated only when the system connect light via SC6V module, otherwise, this function is unvalid in normal. -
Page 9: Date And Time Settings
Date & Time Settings Touch icon on main menu page(or on door camera switching mode page), then select Date & Time " " item to enter the date & time settings page.You can set the date & time on this page.(touch icon to exit the setting and return main menu page. -
Page 10: Screen And Volume Adjustment
Note: If you want to rename, please touch the place of name, then it will turn keypad page ,you can input your new name in this page. DOOR3 RENAME DS-3_ Screen and Volume Adjustment During monitoring or talking state, touch icon,the Adjust page will be displayed. -
Page 11: Monitor Parameter Setting
About Memo Information Local Address 00.00 SD Card Video Standard Video Capacity AUTO ---- System Verson 00.01.00 Video Usage ---- Display Driver Flash Front Image Capacity 0118 Image Usage 0000 Memo Information SD Card Video Capacity Copy Pictures To SD ? ---- Format SD Card And Restart ? Video Usage... - Page 12 How to set the slave monitor address Maximum 4 monitors can be connected in one apartment,one master monitor together with 3 slave monitors, so you should set the address correctly.(note:must have one monitor to be set as master monitor) The code of 8000 is used to set the master monitor. The code of 8001 is used to set the first slave monitor .
- Page 13 How to set the user code for the monitor In the DT system,every apartment must have a unique identification called User Code. The DIP swiches are used to configure the User Code for each Monitor. Bit-1 to Bit-5 are used to User Code setting. The value is from 1 to 32, which have 32 •...
-
Page 14: Specification
14. Specification ● ● Power●supply●for●indoor●monitor:●● ● DC●20~28V● ● ● Power●consumption:● ●● Standby●12.4mA;●Working●270mA ● ● Monitor●screen:● ● 7●Inch●digital●color●LCD ● ● Display●Resolutions:● ● 800*3(R,●G,●B)●x●480●pixels ● ● Video●signal:● ● 1Vp-p,●75Ω,●CCIR●standard ● ● Wiring:● ● 2●wires,●non-polarity ● ● Dimension:● ● 139(H)×212(W)×15(D)mm 15. Precautions 1) All components should be protected from violence vibration. And not allow to be impacted, knocked and dropped. - Page 15 Note -14-...
- Page 16 DT-ENG-37MG/TD7-V1 The design and specifications can be changed without notice to the user. Right to interpret and copyright of this manual are preserved.
Need help?
Do you have a question about the DT37MG and is the answer not in the manual?
Questions and answers