Table of Contents
Advertisement
Quick Links
Advertisement
Table of Contents
Troubleshooting

Related Manuals for AIRLESSCO Spray & Stripe 3500


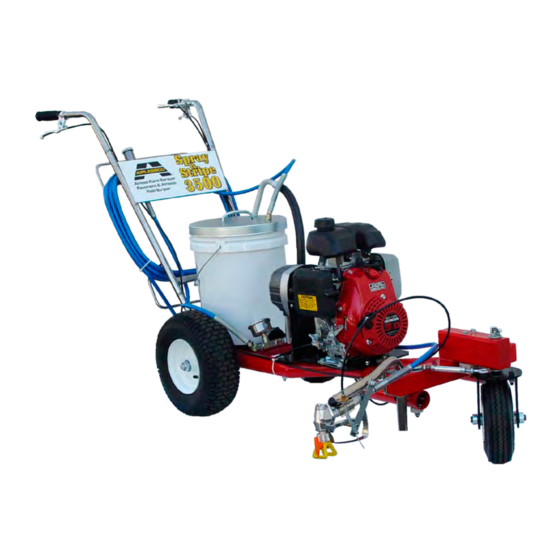
Summary of Contents for AIRLESSCO Spray & Stripe 3500
- Page 1 SERVICE/OPERATION MANUAL Form No. 001-683 APR0705...
-
Page 2: Table Of Contents
Bypass Valve Assembly Suction Assembly Frame Assembly Swivel Wheel Assembly Manufactured by: AIRLESSCO BY DUROTECH CO. P.O. Box 8006, Moorpark, CA. 93020-8006, Ship to: 5397 Commerce Ave., Moorpark, CA 93021 Tel: 805-523-0211 Fax: 805-523-1063 www.airlessco.com email: techsupport@airlessco.com SUBJECT TO CHANGE WITHOUT NOTICE. -
Page 3: Introduction
FOLLOW the Pressure Relief Procedure on Page 10 understand all warnings on pages 2 thru 6. All Service Procedures to be performed by an Authorized Airlessco Service Center ONLY. NO MODIFICATIONS or alterations of any Airlessco Equipment or part is allowed. -
Page 4: Safety Warnings
Safety Warnings TOXIC FLUID HAZARD Hazardous fluid or toxic fumes can cause serious injury or death if splashed in eyes or on skin, inhaled or swallowed. Know the hazards of the fluid you are using. Store & dispose of hazardous fluids according to manufacturer, local, state & national guidelines. - Page 5 Safety Warnings HIGH PRESSURE SPRAY CAN CAUSE EXTREMELY SERIOUS INJURY. OBSERVE ALL WARNINGS. INJECTION HAZARD Fluids under high pressure from spray or leaks can penetrate the skin and cause extremely serious injury, including the need for amputation. • NEVER point the spray gun at anyone or any part of the body. •...
- Page 6 Safety Warnings GROUNDING Ground the sprayer and other components in the system to reduce the risk of static sparking, fire or explosion which can result in serious bodily injury and property damage. Always ground all of these components: • Fluid Hose: use only grounded hoses. •...
- Page 7 Safety Warnings FLUSHING Reduce risk of injection injury, static sparking or splashing by following the specific cleaning procedure on page 7. • ALWAYS follow the PRESSURE RELIEF PROCEDURE on page 10. • ALWAYS remove the spray tip before flushing. Hold a metal part of the gun firmly to the side of a metal pail and use the lowest possible fluid pressure during flushing.
- Page 8 Safety Warnings WHEN TRANSPORTING EQUIPMENT • Transport with fuel tank EMPTY or with fuel shut-off valve OFF. Running engines produce heat. Engine parts, especially mufflers, become extremely hot. WHEN STORING GASOLINE OR EQUIPMENT WITH FUEL IN TANK Severe thermal burns can occur on contact. •...
-
Page 9: How To Flush
How to Flush FIGURE 1 FIGURE 3 - Honda Engine LOCK TRIGGER TO REMOVE SPRAY TIP FIGURE 2 CONTROL VALVE FIGURE 4 1. Be sure the gun safety latch is engaged and there is no spray tip in the gun. Refer to Fig. 1. Refer to your separate instruction manual provided with your gun Maintain firm metal on its safety features and how to engage safety latch. -
Page 10: Flushing
Read prior to using your sprayer 1. New Sprayer Your Airlessco unit was factory tested in an antifreeze solution which was left in the pump. Before using oil-base paint, flush with mineral spirits only. Before using water-base paint flush with soapy water, then do a clean water flush. -
Page 11: Setting Up
4. Flush the sprayer As per "Flushing Procedure" in this manual. 3. Fill the packing nut/wet cup with 5 drops of Airlessco Throat Seal Oil (TSO) and then reinstall snap-on piston cover plate Failure to lubricate the piston properly with throat seal oil can cause premature... -
Page 12: Pressure Relief Procedure
(priming) to relieve fluid pressure. Daily Maintenance 1. Keep the displacement pump packing nut/wet cup lubricated with Airlessco TSO (Throat Seal Oil) at all times. The TSO helps protect the rod and the packings. 2. Inspect the packing nut daily. Your pump has a patented Triple Life Packing System. Packing life will be extended a minimum of three times if the following "Packing Adjustment"... -
Page 13: Starting Up
Starting Up 1. Learn how to operate the control valve. The control valve sets the prime or pressure position as well as the spraying pressure. When the valve is fully counter-clockwise the unit is in the prime position. As the control valve is turned clockwise, the unit’s output pressure to the gun is gradually increased until the control valve is fully clockwise and the unit is at it’s maximum output pressure of 2500 psi. -
Page 14: Striping Operation
Striping Operation 1. Choose handle location 1. Setting the Swivel Wheel The choices are, installing the handle opposite of the Refer to figure below single wheel assembly (standard set up) or placing a. Release Swivel Wheel Trigger to adjust the the handle directly over the single wheel assembly. -
Page 15: Striping Tip Guide
Striping Tip Guide Striping Tips should not be used for regular spraying. Striping tips are designed for a single pass application, while spray tips are designed for the 1/3 overlap technique used for spray painting. Spray Tip Replacement: During use high pressure will cause the orifice to grow larger. This destroys the flat spray pattern or will leave tailing or two heavy lines on the outside of the pattern. -
Page 16: Spray Gun Operation
Spray Gun Operation SPRAY GUN Attach spray gun to airless unit and tighten fittings securely. Set the gun safety latch. (Also may be called gun safety lock, or trigger lock) * The gun safety latch should always be set when the gun is not being triggered. -
Page 17: Spray Gun Troubleshooting
Spray Gun Troubleshooting DEFECTS CAUSE CORRECTION Coarse spray Low pressure Increase the pressure Excessive fogging High pressure Reduce pressure for satisfactory pattern (overspray) Material too thin Use less thinner Pattern too wide Spray angle too large Use smaller spray angle tip Pattern too narrow Spray angle too small Use larger spray angle tip. -
Page 18: Field Troubleshooting
Field Troubleshooting PROBLEM CAUSE SOLUTION Unit doesn't prime Airleak due to: • Loose Suction Nut • Tighten Suction Nut • Worn O-Rings • Replace O-Ring (106-011) on suction seat, & O-Ring (106- 020) below suction seat • Hole in Suction Hose •... -
Page 19: Servicing The Fluid Pump
6. Tighten the packing nut clockwise until resistance is felt against the Belleville Springs, then go 3/4 of a turn more. Put five drops of Airlessco Throat Seal Oil into the packing nut. 7. Run the machine at full pressure for several minutes. -
Page 20: Servicing The Piston Rod
Before reinstalling the outlet seat support, apply two drops of Loctite No. 242 (blue) on the threads & torque to 20 ft-lbs. NOTE: Airlessco LP pump tool kit 188-197 is suggested for this task. Kit includes: Packing Tightening Bar (189-211), Packing Removal Tool (331-153), Piston Holder (331-195), 3/8”... -
Page 21: Packing Replacement
Packing Replacement Procedures Replacement Instructions: REASSEMBLY - Figure 5 & 6 1. Take lower male gland (331-014) & place it down on Fluid Pump Removal - Refer to Figure 1 the flat side. 1. Follow the Pressure Relief Procedure on page 9. 2. -
Page 22: Packing Replacement Procedures
76 Tighten packing nut clockwise until resistance is felt against the Belleville Springs, then go 3/4 of a turn more. Put five drops of Airlessco Throat Seal Oil into the packing nut. 7. Run the machine at full pressure for several minutes. -
Page 23: Inspection & Replacement Of Control Valve, Ball & Seat
Pressure Control Calibration DO NOT USE THIS PROCEDURE WITHOUT A TEST GAUGE! 1. Install a gun, flexible airless hose and Airlessco part # 111-045 glycerin filled test gauge onto unit. 2. Prime unit. 3. Turn the control valve knob fully clockwise (maximum pressure setting). -
Page 24: Gearbox Assembly
Gear Box Assembly - Part No. 305-196 Part Number Description Part Number Description 100-028 Pipe Plug 331-047 Ball Bearing 331-061 Sleeve Bearing 100-226 45 degree Elbow 100-318 HXHD Screw 331-062 Retaining Ring 100-380 Screw 331-074 Spacer 100-381 Screw 331-103 Flat Washer 100-398 Retaining Ring 331-111... -
Page 25: Gun Assembly
Spray Gun Assembly - Part No. 305-280 Part Number Description 100-011 Airless 1/4” x 50’ Hose 116-103 Cable Retainer Spring 120-115 008 Silver Gun w/o Tip 305-275 Gun Mount Ass’y 305-280 Spray Gun Assembly 561-025 Rev-Tip Male Seal 561-026 Rev- Tip Seal 116-103 563-317ST Striping Tip... -
Page 26: Bypass Valve Assembly
Bypass Valve Assembly Part No. 305-264 Part Number Description Qty. 100-040 Hose, Whip 115-016 Control Valve Seat Ass’y 115-017 Ball 115-058 Control Valve 115-028 Stat-O-Seal 115-031 Guide T.C. 188-377 Return Tube 305-194 PR Regulator Housing... -
Page 27: Suction Assembly
Suction Assembly Part No. 331-290 Part Number Description Qty. 106-020 PTFE O-Ring 141-015 Hose Clamp (some models only) 331-034 Suction Nut 331-035 Suction Elbow 331-217 Suction Filter... -
Page 28: Frame Assembly
Frame Assembly Fixed Wheel Part No. 305-213 301-533 Paint Bucket Lid Part Number Description Qty. Part Number Description Qty. 100-317 Nut 5/16-18 Centerlock 301-165 Wheel 100-320 Wing Screw, 3/8 301-170 Axel, 22 5/8” 100-370 Screw, Hex Cap 301-547 Screw, HXHD 113-031 Spacer, 5/8 x 1.00 305-051M... -
Page 29: Swivel Wheel Assembly
Swivel Wheel Option Part No. 305-288 Part No. Description Qty. Part No. Description Qty. Part No. Description Qty. 100-223 Grease Fitting 136-163 Eye & Eye Turnbuckle 260-029 Hex Nut 100-318 HXHD Screw 136-223 Spring 305-092 Cable Ass’y 75” 100-393 SCHD Screw 136-230 Axel 305-253... -
Page 30: Throat Seal Oil
120-090CX Coarse 120-090FX Fine 90° Pole to Gun Adapter 120-088 Filter Spring 032-042 Gun Nut “F” Thread 11/16-16 032-010 Gun Nut “G” Thread For a complete listing of all available accessories see 032-011 the Airlessco Accessories Catalog, Part # 001-357. - Page 31 100-011 50’ x 1/4” Hi-Flex Airless Hose no-drip application ■ Finger-tight nut, no tools See Airlessco REV-TIP ™ Brochure (Form 001-449) for required current listings of available tip sizes including “W” wide and FINE FINISH tips for Spraying, & Striping tips.
Need help?
Do you have a question about the Spray & Stripe 3500 and is the answer not in the manual?
Questions and answers