Table of Contents
Advertisement
Quick Links
Operation/Repair/Parts
Airless Paint Sprayer
For application of architectural paints and coatings. For professional use only.
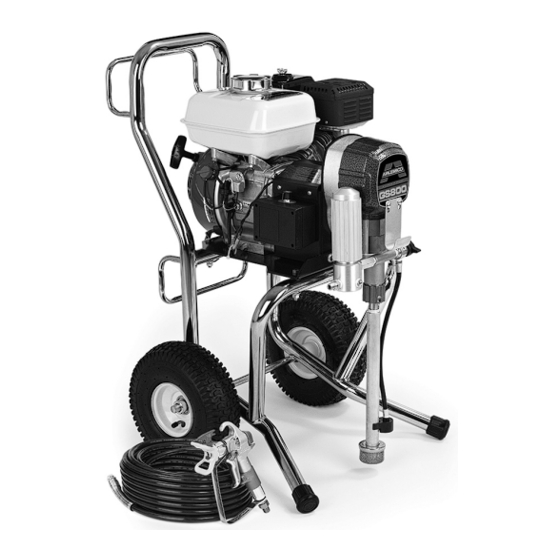
Airlessco - GS800 (24F574)
3000 psi (20.7 MPa, 207 bar) Maximum Working Pressure
Important Safety Instructions
Read all warnings and instructions in this
manual. Save these instructions.
Related Manuals
Gun Manual
312363 - English
312364 - Spanish
312365 - French
3A1186A
ENG
ti16161a
Advertisement
Table of Contents

Subscribe to Our Youtube Channel
Related Manuals for AIRLESSCO 3A1186A


Summary of Contents for AIRLESSCO 3A1186A
- Page 1 Operation/Repair/Parts 3A1186A Airless Paint Sprayer For application of architectural paints and coatings. For professional use only. Airlessco - GS800 (24F574) 3000 psi (20.7 MPa, 207 bar) Maximum Working Pressure Important Safety Instructions Read all warnings and instructions in this manual. Save these instructions.
- Page 2 Pressure Relief Procedure for turning off the unit. • Check hoses and parts for signs of damage. Replace any damaged hoses or parts. • This system is capable of producing 3000 psi. Use Airlessco replacement parts or accessories that are rated a minimum of 3000 psi.
- Page 3 • Do not kink or over-bend the hose. • Do not expose the hose to temperatures or to pressures in excess of those specified by Airlessco. • Do not use the hose as a strength member to pull or lift the equipment.
- Page 4 This equipment includes but is not limited to: • Protective eyewear, and hearing protection. • Respirators, protective clothing, and gloves as recommended by the fluid and solvent manufacturer. 3A1186A...
-
Page 5: Component Identification
It is in the Open position when there is a wider gap between valve handle and cam body. Prime/Pressure (PR) Relief Valve Pressurizes system when closed. It is in the Closed position Closed Position when there is only a slight gap between handle and body. 3A1186A... -
Page 6: Operation
2. Connect an airless spray gun to the other end of the hose. Do not install spray tip. NOTE: Do not use thread sealer on swivel unions as they are made to self seal. NOTE: The 6’ whip hose should always be 3/8”. 3A1186A... -
Page 7: Prime And Flush Storage Fluid
3. Place the suction tube into the pail or place the pail Before beginning a new spraying project you need to under the pump. prime the sprayer and flush the storage fluid out of the sprayer. 3A1186A... - Page 8 Close the prime valve. 1. Prepare the material according to the material man- Closed ufacturer’s recommendations. (Pressure) 2. Place the suction tube into the material container. 3. Start the sprayer. Prime/PR Valve must be “OPEN” in the prim- ti14790a ing position. 3A1186A...
-
Page 9: Adjusting The Pressure
1. Flush sprayer with compatible solvent before stor- ing, then fill the pump and hoses with an oil based Adjusting the Pressure solvent such as mineral spirits or Graco or Airlessco Pump Armor. • For oil base paint: flush with mineral spirits •... -
Page 10: Daily Maintenance
(9) from the machine. Keep displacement pump packing nut/wet cup lubri- cated with Airlessco Throat Seal Oil at all times. The TSO helps protect the packings and rod. Inspect the packing nut daily. If seepage of paint into the packing nut... -
Page 11: Servicing The Outlet Valve
6. While piston is still locked in the holder, install parts against the Belleville Springs, go 3/4 of a turn more. back into the piston in the following order: Put five drops of Airlessco Throat Seal Oil in the packing nut. •... -
Page 12: Servicing The Inlet Valve
O-ring, suction ball and suction tion retainer. ball guide in the suction nut and screw onto fluid pump body. 3. Clean all parts and inspect them for wear or dam- age, replacing parts as needed. ti16055a 3A1186A... -
Page 13: Packing Replacement Procedures
(14). 17. Tighten the packing nut (21) into the top of the fluid pump body (4) and tighten until you feel slight resis- tance against the Belleville Springs (16). Using the 3A1186A... -
Page 14: Replacement Of Electrical Control Board
350-400 psi, the clutch will engage and build pressure to 3000 psi and disengage. Trigger gun several times to ensure proper pressure setting. 6. Turn Pressure Control Knob to minimum position. The clutch should disengage and pump stop mov- ing. 3A1186A... - Page 15 7. Secure leads with tie strap. 8. Replace cover on unit. Ensure the leads are not pinched or damaged in the process of replacing covers. PRESSURE CALIBRATION TRIMPOT BLACK BLACK BLUE TO CLUTCH BLUE BLACK GREEN TO ENGINE ti16165a 3A1186A...
-
Page 16: Troubleshooting
Clean or replace prime valve. bypassing Packings and/or piston worn Tighten packing nut, repack unit. Unit does not maintain good Blown spray tip Replace spray tip. spraying pressure Packings and/or pistons worn Repack unit. Upper seat worn Replace upper seat. 3A1186A... - Page 17 Check the spacing between the clutch field and plate. The gap should be about .015”. If the gap is greater than .015, replace the clutch assem- bly. Electrical Control Board If the magneto and sensor are functioning, replace the electrical control board. 3A1186A...
- Page 18 Incompatible drop placed on top of paint mixes or flattens out on the paint mixture and thinners on the surface. If not, try different thinner in fresh batch of paint. Test the Pattern Spotty Pattern, Good, Full Increase Pressure ti15991a 3A1186A...
-
Page 19: Manifold Filter
Parts Parts Manifold Filter (865627) Ref. Part Description Qty. 867145 Base 301356 Spring 867377 O-Ring 867214 Filter 60 Mesh 867647 Support 867077 Base 867004 Swivel 867420 Plug 3/8” 867309 Nipple 3/8”M x 1/4”M 867417 Plug 1/4” ti16052a 3A1186A... -
Page 20: Outlet Valve
331027 Outlet Ball 111457 O-Ring 331026 Outlet Seat 331314 Outlet Seat Retainer ti16054a Inlet Valve Ref. Part Description Qty. 331011 Fluid Pump Body 331029 Suction Ball Guide 331030 Suction Ball 108526 O-Ring 331292 Suction Seat 331034 Suction Nut ti16055a 3A1186A... -
Page 21: Fluid Pump
331117 Sleeve 331062 Retaining Ring 867277 Hose Connector 867277 Hose Connector 867238 Swivel 331034 Suction Nut 867539 Bolts 331209 Fluid Pump 331093 Piston Rod 331074 Tube Spacers 5, 6 331111 Connection Rod Shield 331038 Connecting Rod 331537 Cover Assembly ti16053a 3A1186A... -
Page 22: Packing Replacement
331037 Packing Leather 331292 Suction Seat 331307 Packing Leather 331034 Suction Nut 331306 Packing Leather 331314 Outlet Seat Retainer 107313 White O-Ring 331026 Outlet Seat 867363 Black O-Ring 111457 O-Ring 867783 331027 Outlet Ball 331210 Packing Kit 331708 Piston 3A1186A... - Page 23 24F115 Mounting Box Bracket 331074 Spacer 867494 Screw 331061 Sleeve Bearing 301666 Clutch Assembly 867539 Screw 331495 PTFE Lined Bushing 331197 Screw 866212 Key 331103 Washer 114530 Motor Honda GX160 331111 Cover Guard 331496 Set Screw 114819 Grease (1 lb) 867301 Washer 3A1186A...
-
Page 24: Clutch Assembly
Clutch 867339 Nylon Tie 331178 Rubber Extension 867306 Mounting Base 867494 Screw 867302 Locknut 24E115 Mounting Box Bracket 867489 Screw 136217 867729 Lock Washer 867496 Screw 866212 Key 305310 Gearbox and Pump Assembly 305279 Clutch Adapter 3016666 Clutch Assy 3A1186A... -
Page 25: Frame Assembly
331048 Rubber Boot 342402▲ Label, Warning (Not Shown) 867325 Centerlock Nut 342404▲ Label, Warning (Not Shown) 867234 Nut 342473▲ Label, Warning (Not Shown) 867301 Lock Washer 342506▲ Label, Warning (Not Shown) ▲ Additional warning labels are available at no cost. 3A1186A... -
Page 26: Suction Assemblies
187651 Inlet Strainer 867370 PTFE O-Ring Drain Hose 241920 Threaded Deflector ti16063a 867759 Male Connector 865721 Includes (4, 5, 6, 8) Ref. Part Description Qty. 276888 Drain Line Clip 865013 Adaptor 235014 Drain Valve 867102 Cam 867404 Pin 867263 Handle 3A1186A... -
Page 27: Electrical System
Parts Electrical System PRESSURE CALIBRATION TRIMPOT BLACK BLACK BLUE TO CLUTCH BLUE BLACK GREEN TO ENGINE ti16165a Ref. Part Description Qty. Ref. Part Description Qty. 331184 Spacer 865676 Control Board 867291 Knob 866334 Sensor 867352 O-Ring 3A1186A... -
Page 28: Technical Data
Wetted parts..........zinc and nickel-plated carbon steel, nylon, stain- less steel, PTFE, acetal, leather, UHMWPE, aluminum, tungsten carbide 3A1186A... - Page 29 Notes Notes 3A1186A...
-
Page 30: Airlessco Standard Warranty
With the exception of any special, extended, or limited warranty published by Airlessco, Airlessco will, for a period of twelve months from the date of sale, repair or replace any part of the equipment determined by Airlessco to be defective.
Need help?
Do you have a question about the 3A1186A and is the answer not in the manual?
Questions and answers