Kenwood TS-570D, TS-570S Instruction Manual
Kenwood multi-bander ts-570d, hf transceiver ts-570d instruction manual
Hide thumbs
Also See for TS-570D, TS-570S:
- Service manual (96 pages) ,
- Instruction manual (90 pages) ,
- Adjustment manual (15 pages)
Table of Contents
Advertisement
Quick Links
INSTRUCTION MANUAL
POWER
POWER
PF
PF
HF TRANSCEIVER TS-570D
HF TRANSCEIVER TS-570D
ATT
ATT
PRE-AMP
PRE-AMP
VOX
VOX
PROC
PROC
SEND
SEND
AT TUNE
AT TUNE
CH1
CH1
CH2
CH2
CH3
CH3
PHONES
PHONES
1
2
3
ANT
ANT
REC
REC
FINE
FINE
4
5
6
MIC
MIC
NB
NB
AGC/TONE
AGC/TONE
REV
REV
7
8
9
F.LOCK
F.LOCK
0
CLR
CLR
ENT
ENT
Intelligent Digital Enhanced Communications System
ALL MODE MULTI-BANDER
TS-570S
HF TRANSCEIVER
TS-570D
KENWOOD CORPORATION
© B62-0898-00 (K,E,M)(MC)
09 08 07 06 05 04 03 02 01 00
DOWN
DOWN
MIC
MIC
LSB
LSB
USB
USB
PWR
PWR
CW
CW
FSK
FSK
SPLIT
SPLIT
KEY
KEY
FM
FM
AM
AM
M/V
M/V
DELAY
DELAY
MENU
MENU
1MHz
1MHz
SCAN
SCAN
DSP SLOPE
DSP SLOPE
HIGH
HIGH
LOW
LOW
N.R.
N.R.
B.C.
B.C.
CW TUNE
CW TUNE
FILTER
FILTER
A F
A F
R F
R F
RIT/XIT
RIT/XIT
4
6
UP
UP
MR
MR
2
–
+
M.IN
M.IN
0
10
10
TF-SET
TF-SET
A/B
A/B
RIT
RIT
CH
CH
IF SHIFT
IF SHIFT
SQL
SQL
4
6
A=B
A=B
CLEAR
CLEAR
XIT
XIT
2
M>VFO
M>VFO
M.IN
M.IN
0
10
10
8
8
Advertisement
Table of Contents

Related Manuals for Kenwood TS-570D, TS-570S


Summary of Contents for Kenwood TS-570D, TS-570S
-
Page 1: Instruction Manual
MENU MENU 1MHz 1MHz Intelligent Digital Enhanced Communications System ALL MODE MULTI-BANDER TS-570S HF TRANSCEIVER TS-570D KENWOOD CORPORATION © B62-0898-00 (K,E,M)(MC) 09 08 07 06 05 04 03 02 01 00 DSP SLOPE DSP SLOPE HIGH HIGH N.R. N.R. B.C. -
Page 2: Supplied Accessories
APPLICABLE MODEL This manual applies to the following model: TS-570S: All mode multi-bander TS-570D: HF Transceiver Intelligent Digital Enhanced Communications System SUPPLIED ACCESSORIES Carefully unpack the transceiver. We recommend that you identify the items listed in the table below. In addition, it is safe to keep the box and the packing material. -
Page 3: Writing Conventions Followed
Thank you for choosing the KENWOOD TS-570 series. This Intelligent Digital Enhanced Communications System was developed by a team of engineers determined to continue the tradition of excellence and innovation in KENWOOD HF transceivers. This transceiver includes a 16-bit Digital Signal Processing (DSP) unit to process audio frequencies. -
Page 4: Table Of Contents
PRECAUTIONS CHAPTER 1 INSTALLATION ANTENNA CONNECTION ... 1 GROUND CONNECTION ... 2 LIGHTNING PROTECTION ...2 DC POWER SUPPLY CONNECTION ... 2 REPLACING FUSES ... 2 ACCESSORY CONNECTIONS ... 3 FRONT PANEL ... 3 Headphones (PHONES) ... 3 Microphone (MIC) ... 3 REAR PANEL ... - Page 5 ATTENUATOR ... 37 PREAMPLIFIER ... 37 DSP TOOLS ... 37 CHANGING RECEIVE BANDWIDTH ... 37 SSB/ FM/ AM Modes ... 37 CW/ FSK Modes ... 38 BEAT CANCEL ... 38 NOISE REDUCTION ... 38 Changing NR1 Performance ... 38 Setting NR2 Time Constant ... 38 CHAPTER 10 MEMORY FEATURES MICROPROCESSOR MEMORY BACKUP ...
-
Page 6: Precautions
Please read all safety and operating instructions before using this transceiver. For best results, be aware of all warnings on the transceiver and follow these operating instructions. Retain these safety and operating instructions for future reference. 1 Power Source Connect this transceiver only to the power source described in the operating instructions or as marked on the transceiver itself. -
Page 7: Chapter 1 Installation
INSTALLATION |nstall and connect an antenna system {page 1}. Install a ground system that satisfies DC and RF grounding requirements {page 2}. Install lightning protection to protect the antenna system, your personal safety, and your property {page 2}. ANTENNA CONNECTION The type of the antenna system, consisting of the antenna, ground, and feed line, will greatly affect the successful performance of the transceiver. -
Page 8: Ground Connection
1 INSTALLATION GROUND CONNECTION At the minimum, a good DC ground is required to prevent such dangers as electric shock. For superior communications results, a good RF ground is required, against which the antenna system can operate. Both of these conditions can be met by providing a good earth ground for your station. -
Page 9: Accessory Connections
ACCESSORY CONNECTIONS FRONT PANEL Headphones (PHONES) Use headphones having 4 to 32 can also use stereo headphones. When headphones are used, no sound is heard from the internal (or optional external) speaker. Use a 6.0 mm (1/4") diameter, 2-conductor (mono) or 3-conductor (stereo) plug. -
Page 10: Chapter 2 Your First Qso
2 YOUR FIRST QSO Since you’ve now installed the TS-570, why not try it? The instructions below are abbreviated. They are intended only to act as a quick introduction. If you encounter problems or there’s something you don’t understand, you can read about the subject in more detail later. -
Page 11: Transmitting
POWER PRE-AMP PROC SEND AT TUNE PHONES FINE AGC/TONE F.LOCK After tuning in a few stations as explained in the previous section “RECEIVING”, try making a contact. q Assuming you are already on the correct band with the correct mode selected (steps 1~7 in “RECEIVING”), use the Tuning control to tune in a station or to select an unused frequency. -
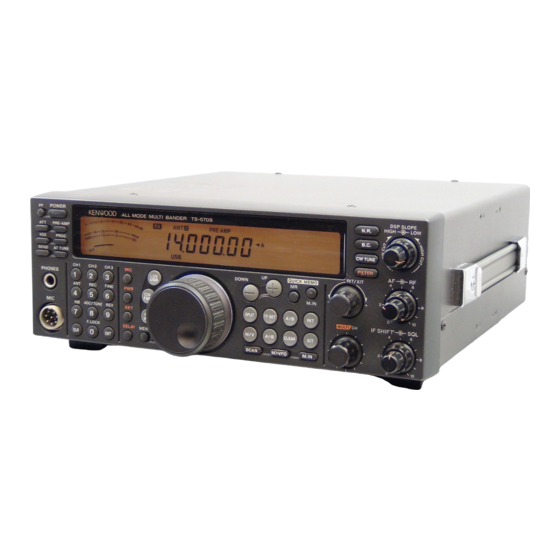
Page 12: Front Panel View
GETTING ACQUAINTED FRONT PANEL POWER PRE-AMP PROC SEND AT TUNE PHONES q q q q q POWER switch Press and hold down briefly to switch ON the transceiver power. Press again to switch OFF the power {page 13}. w w w w w PF button A function can be assigned by the user to this Programmable Function button {page 49}. - Page 13 POWER PRE-AMP PROC SEND AT TUNE PHONES FINE AGC/TONE F.LOCK • REV button In CW or FSK mode, press to select either the upper or lower sideband while receiving {pages 21, 26}. • CLR button Press to exit from, abort, or reset various functions. Also used for erasing memory channels {page 43} or for locking out memory channels from the scan list {page 44}.
- Page 14 3 GETTING ACQUAINTED POWER PRE-AMP PROC SEND AT TUNE PHONES !7 !7 !7 !7 !7 Frequency control buttons These buttons control functions related to selecting a frequency, a VFO, or a memory channel. • UP/DOWN buttons Press to step through all Amateur bands consecutively {page 13} or to step the transceiver frequency in 1 MHz increments {page 29}.
-
Page 15: Microphone
POWER PRE-AMP PROC SEND AT TUNE PHONES FINE AGC/TONE F.LOCK @6 @6 @6 @6 @6 DSP SLOPE (HIGH) control In SSB or AM mode, turn to change the high cut-off frequency of the receive pass band. Use the control to improve readability of the desired signal when higher frequency interference is present {page 37}. -
Page 16: Rear Panel
3 GETTING ACQUAINTED REAR PANEL ANT 2 q q q q q ANT 1 and ANT 2 connectors Connect the feed lines from your antennas to these connectors. Refer to pages 1 and 48 for details. w w w w w AT connector Mates with the connector on the cable supplied with the external antenna tuner. -
Page 17: Display
DISPLAY w e r t q q q q q METER While receiving, serves as an S-meter to measure and display the received signal strength. While transmitting, serves as a calibrated power meter plus an ALC meter, an SWR meter, or a Speech Processor compression meter. - Page 18 3 GETTING ACQUAINTED @1 @1 @1 @1 @1 Shows the current operating frequency. Also shows Menu selections while in Menu mode. @2 @2 @2 @2 @2 “tA” or “As” appears while VFO A is being selected {page 13}. “A” appears while Menu A is being accessed {page 16}.
-
Page 19: Chapter 4 Operating Basics
OPERATING BASICS SWITCHING POWER ON/OFF Switch ON the DC power supply, then press and hold down [POWER] until “HELLO” appears on the display. Release [POWER] when you see “HELLO”. POWER PRE-AMP • After the “HELLO” message, the frequency and other indicators appear. To switch OFF the transceiver, press [POWER]. -
Page 20: Selecting A Mode
4 OPERATING BASICS SELECTING A MODE Depending on which operating mode you want to select, press the [LSB/USB], [CW/FSK], or [FM/AM] button. The second function on each button is accessed by again pressing the same button. For example, repeatedly pressing [LSB/USB] toggles between LSB and USB modes. -
Page 21: Transmitting
TRANSMITTING Methods for transmitting include the following: • Press [SEND]. • Press and hold down Mic [PTT]. • Connect a key or keyer paddle, select the CW mode, press [VOX] to switch ON the Break-in function, and close the key or keyer paddle. POWER PRE-AMP PROC... -
Page 22: Chapter 5 Menu Setup
MENU SETUP WHAT IS A MENU? Many functions on this transceiver are selected or configured via a software-controlled Menu instead of physical controls on the transceiver. Once familiar with the Menu system, you will appreciate the versatility it offers. No longer is the number and complexity of features restricted by the physical controls and switches on the front panel. -
Page 25: Cross Reference For Menu Functions
i n i z i l CROSS REFERENCE FOR MENU FUNCTIONS Use this table arranged by subject to help you locate the function that you are interested in checking or changing. Consult “MENU CONFIGURATION” {page 17} for more detail on each function. Function AMPLIFIER Linear amplifier relay... -
Page 26: Chapter 6 Basic Communicating
BASIC COMMUNICATING SSB TRANSMISSION SSB is now the most commonly-used mode on the HF Amateur bands. Compared with other voice modes, SSB requires a narrow bandwidth for communications. SSB also allows long distance communication with minimum transmit power. These reasons, combined with the fact that modern Amateur transceivers deliver reasonably good audio quality, make SSB the mode that most prefer on HF. -
Page 27: Cw Transmission
CW TRANSMISSION CW operators know that this mode is a reliable method of communicating under the worst conditions. Although it’s true that newer digital modes rival CW as being equally as useful in poor conditions, these modes do not have the long history of service yet nor the simplicity that CW can have. -
Page 28: Fm Transmission
6 BASIC COMMUNICATING FM TRANSMISSION FM operation on HF frequencies solves the problem of how to have long distance voice communication with the finest audio quality. When combined with the full- quieting aspect of FM signals that suppress background noise on the frequency, FM can be the best method for maintaining regular schedules with friends. -
Page 29: Chapter 7 Specialized Communicating
SPECIALIZED COMMUNICATING SPLIT-FREQUENCY OPERATION Usually you can communicate with other stations using the same frequency for receiving and transmitting. In this case, you select only one frequency on either VFO A or VFO B. However, there are cases where you must select one frequency for receiving and another frequency for transmitting. -
Page 30: Fm Repeater Operation
7 SPECIALIZED COMMUNICATING FM REPEATER OPERATION Most Amateur radio voice repeaters use a separate receive and transmit frequency. The transmit frequency may be higher or lower than the receive frequency. In addition, some repeaters may require the transceiver to transmit a subtone before the repeater can be used. Compared to simplex communication, you can usually transmit over much greater distances by using a repeater. -
Page 31: Selecting Subtone Frequency
SELECTING SUBTONE FREQUENCY Some 10-meter FM repeaters require the transceiver to transmit a subtone, to prevent other repeaters on the same frequency from locking each other up. The required subtone frequency depends on the repeater you are accessing. In Europe, a 1750 Hz tone is generally used to access repeaters. -
Page 32: Digital Operation
7 SPECIALIZED COMMUNICATING DIGITAL OPERATION Since Multimode Communications Processors (MCP) have become popular, many Amateurs enjoy operating using a number of digital modes. The power and variety of Amateur radio increased greatly with the development of MCP that can use your transceiver as the communications link. -
Page 33: Amtor/ Packet/ Pactor/ G-Tor
AMTOR/ PACKET/ PACTOR/ G-TOR Due to their error-handling capability and speed of transmission, these modes are more efficient than earlier forms of digital communication by machine. In the case of G-TOR , it was developed specifically to handle the adverse conditions of communicating across the solar system with spacecraft during their missions. -
Page 34: Slow Scan Tv/ Facsimile
7 SPECIALIZED COMMUNICATING SLOW SCAN TV/ FACSIMILE SSTV is now increasing in popularity as a result of the capability of computers. Using this technique, you can transmit and receive still monochrome or full-color images. Instead of trying to describe your station, just showing it is much faster. -
Page 35: Chapter 8 Communicating Aids
COMMUNICATING AIDS RECEIVING SELECTING YOUR FREQUENCY In addition to turning the Tuning control or pressing Mic [UP]/[DWN], there are several other ways to select your frequency. This section describes additional methods of frequency selection that may save you effort and time. Direct Frequency Entry When the desired frequency is far removed from the current frequency, directly entering a frequency from... -
Page 36: Equalizing Vfo Frequencies (A=B)
8 COMMUNICATING AIDS Equalizing VFO Frequencies (A=B) This function allows you to copy the frequency and modulation mode of the active VFO to the inactive VFO. 1 Select the frequency and mode on VFO A or VFO B. 2 Press [A=B]. •... -
Page 37: Transmitting
TRANSMITTING VOX (VOICE-OPERATED TRANSMIT) VOX eliminates the necessity of manually switching to the transmit mode each time you want to transmit. The transceiver automatically switches to transmit when the VOX circuitry senses that you have begun speaking into the microphone. When using VOX, develop the habit of pausing between thoughts to let the transceiver drop back to receive briefly. -
Page 38: Speech Processor
8 COMMUNICATING AIDS SPEECH PROCESSOR The Speech Processor levels large fluctuations in your voice while you speak. When using SSB, FM, or AM mode, this leveling action effectively raises the average transmit output power, resulting in a more understandable signal. The amount of voice compression is fully adjustable. -
Page 39: Customizing Transmit Signal Characteristics
CUSTOMIZING TRANSMIT SIGNAL CHARACTERISTICS The quality of your transmitted signal is important regardless of which on-the-air activity you pursue. However, it’s easy to be casual and overlook this fact since you don’t listen to your own signal. The following sub-sections provide information that will help you tailor your transmitted signal. -
Page 40: Cw Break-In
8 COMMUNICATING AIDS CW BREAK-IN Break-in allows you to transmit CW without manually switching between transmit and receive modes. Two types of Break-in are available, Semi Break-in and Full Break-in. Semi Break-in: When the key contacts open, the transceiver automatically waits for the passage of the time period that you have selected. -
Page 41: Changing Locked-Weight
CHANGING LOCKED-WEIGHT Switching Auto Weighting OFF locks the dash/dot weighting to 3:1. It is also possible to change this default locked-weight. Use Menu No. 49 to select from 16 ratios, in the range from 2.5:1 to 4.0:1. “2.7”, visible while making selections, for example, designates 2.7:1. Note: When the Auto Weighting or Bug Key function is ON, the selection made in Menu No. -
Page 42: Chapter 9 Rejecting Interference
REJECTING INTERFERENCE IF FILTER The IF filters are designed for selecting the exact range of intermediate frequencies that are sent to the next stage in the receive circuit. Interference adjacent to the desired signal can be reduced by selecting a narrow bandwidth filter and/or shifting the center frequency of the filter. -
Page 43: Attenuator
30 kHz to 7.5 MHz, and ON for the bands from 7.5 MHz to 60.0 MHz (TS-570D: 30.0 MHz). Note: Switching Preamplifier OFF has the same effect as activating the AIP function on other KENWOOD transceivers. 9 REJECTING INTERFERENCE DSP TOOLS KENWOOD digital signal processing (DSP) technology is used for the functions described in this section. -
Page 44: Cw/ Fsk Modes
9 REJECTING INTERFERENCE CW/ FSK Modes 1 Select CW or FSK mode. 2 Press [FILTER]. • The current filter selection appears. 3 Turn the MULTI/CH control clockwise to widen the bandwidth, or counterclockwise to narrow the bandwidth. Desired Interfering signal signal 4 Press [FILTER] to complete the setting. -
Page 45: Chapter 10 Memory Features
If you find the transceiver powers-up with default settings, and VFO and memory channel data is lost, have the lithium battery replaced. Contact an authorized KENWOOD service facility or dealer. CONVENTIONAL MEMORY Conventional memory is used for storing data that you want to recall many times in the future. -
Page 46: Split-Frequency Channels
10 MEMORY FEATURES Split-Frequency Channels 1 Press [A/B] to select VFO A or VFO B. • “tA” or “tB” appears to show which VFO is selected. 2 Select the frequency, mode, etc. to be stored. • The frequency and mode selected here will be used for transmitting. -
Page 47: Memory Scroll
Memory Scroll 1 Press [M.IN] to enter Memory Scroll mode. • The memory channel that was last selected appears. 2 Turn the MULTI/CH control, or press Mic [UP] or [DWN] to step through the memory channels. • Entering a 2-digit number such as 05 using the numeric keys can also be used to change channels. -
Page 48: Memory Transfer
10 MEMORY FEATURES MEMORY TRANSFER Memory VFO Transfer After retrieving frequencies and associated data in Memory Recall mode, you can copy this data to the VFO. This function is useful, for example, when the frequency you want to monitor is near the frequency stored in a memory channel. -
Page 49: Storing Frequency Ranges
STORING FREQUENCY RANGES Memory channels 90 to 99 allow you to store frequency ranges for VFO tuning and Program Scan. Program Scan is described in the next chapter. To tune or scan frequencies in a desired range only, store start and end frequencies for that range in advance. -
Page 50: Memory Channel Lockout
10 MEMORY FEATURES Memory Channel Lockout You can lock out Conventional memory channels that you prefer not to monitor during Memory Scan. Memory Scan is described in the next chapter. 1 Press [M/V] to enter Memory Recall mode. 2 Turn the MULTI/CH control, or press Mic [UP] or [DWN] to select a memory channel. -
Page 51: Recalling Quick Memory
RECALLING QUICK MEMORY You can recall a Quick memory channel, only when using VFO frequencies for both transmitting and receiving. 1 Press QUICK MEMO [MR]. • The current memory channel number appears. • If there is no data stored in any Quick memory channel, then this step will not access Quick memory. -
Page 52: Chapter 11 Scan
SCAN Scan is a useful function for hands-off monitoring of your favorite frequencies. By becoming comfortable with how to use all types of Scan, the monitoring flexibility gained will increase your operating efficiency. The transceiver provides the following types of Scan: Scan Type Monitors frequencies in Program Scan... -
Page 53: Memory Scan
MEMORY SCAN Memory Scan monitors all memory channels in which you stored frequencies (All-channel Scan) or only a desired group of memory channels (Group Scan). Scan automatically stops at a channel in which a signal is present. The transceiver remains on the same channel for either a short time (Time-operated mode) or until the signal drops (Carrier-operated mode). -
Page 54: Chapter 12 Operator Conveniences
OPERATOR CONVENIENCES MICROPROCESSOR RESET If your transceiver seems to be malfunctioning, resetting the microprocessor default settings may resolve the problem. INITIAL SETTINGS For each VFO, the factory defaults for operating frequency and mode are as follows: • VFO A: 14.000.000 MHz/ USB •... -
Page 55: Beep Function
BEEP FUNCTION The purpose of the Beep function is to provide an audible signal that conveys information. There are three types of signals: • To confirm that a button has been pressed. • To report an error condition; Morse codes are used for some errors. -
Page 56: Quick Data Transfer
When connecting with another TS-570 or the TS-870S, use the same COM connector baud rate on each transceiver. If transferring to or from other KENWOOD transceivers, select 4800 bps and 2 stop bits on the TS-570. Use Menu No. 35 to select these parameters. -
Page 57: Computer Control
COMPUTER CONTROL By connecting this transceiver to a computer, you can change the computer into an electronic console from which you can remotely control functions of the transceiver. This capability makes possible remote operation of your transceiver from across the room, from another room, or, when coupled with other commercially available products and where lawful, from another city, state, or country via a telephone... -
Page 58: Automatic Antenna Tuner
12 OPERATOR CONVENIENCES AUTOMATIC ANTENNA TUNER As explained in “ANTENNA CONNECTION” {page 1}, matching the impedance of the coaxial cable and antenna is very important. To do this, you have the choice of using the internal or an external tuner. This section describes how to use the internal tuner. -
Page 59: Dru-3A Digital Recording Unit (Optional)
DRU-3A DIGITAL RECORDING UNIT (OPTIONAL) The optional DRU-3A unit allows you to record a voice message on up to 3 channels. After recording a message via your transceiver microphone, you can then send that message. The maximum recording time for each channel is as follows: Channel 1: Approx. -
Page 60: Sending Messages
12 OPERATOR CONVENIENCES Sending Messages 1 Select SSB, FM, or AM. • Use the same mode for transmitting and receiving. 2 Press [VOX] to switch VOX ON or OFF. • Depending on this selection, the subsequent procedures differ. 3 If you switch OFF VOX in step 2, press [SEND], or press and hold Mic [PTT]. -
Page 61: Voice Synthesizer (Optional)
VS-3 VOICE SYNTHESIZER (OPTIONAL) Install the optional VS-3 unit to use this function. Each time you change the transceiver mode such as VFO A/B or Memory Recall, the transceiver automatically announces the new mode. In addition, you can program the front panel [PF] button so that pressing [PF] makes the transceiver announce the displayed information. -
Page 62: Chapter 13 Optional Accessories
OPTIONAL ACCESSORIES PS-53 Regulated DC Power Supply (22.5 A) MC-80 Desktop Microphone HS-6 Small Headphones DRU-3A Digital Recording Unit IF-232C Interface Unit YK-88SN-1 SSB Filter (1.8 kHz) MC-43S MC-47 Hand Microphone Multi-function Microphone MC-85 MC-90 Multi-function Desktop DSP-compatible Desktop Microphone Microphone Microphone sensitivity is low in FM mode. -
Page 63: Chapter 14 Installing Options
INSTALLING OPTIONS The following equipment is required for installing the optional units. • Large Philips screwdriver • Small Philips screwdriver • 25 W pencil soldering iron (for the SO-2 unit only) REMOVING THE BOTTOM CASE When installing the optional DRU-3A, VS-3, or SO-2 unit, remove the bottom case first. -
Page 64: Vs-3 Voice Synthesizer Unit
14 INSTALLING OPTIONS VS-3 VOICE SYNTHESIZER UNIT CAUTION: SWITCH OFF THE POWER AND UNPLUG THE DC POWER CABLE BEFORE BEGINNING INSTALLATION. 1 Remove the bottom case (8 screws). 2 Hold the VS-3 unit with the component side facing inward, and insert the VS-3 connector into the transceiver CN16 connector. -
Page 65: Temperature-Compensated Crystal Oscillator (Tcxo)
SO-2 TEMPERATURE-COMPENSATED CRYSTAL OSCILLATOR (TCXO) CAUTION: SWITCH OFF THE POWER AND UNPLUG THE DC POWER CABLE BEFORE BEGINNING INSTALLATION. 1 Remove the bottom case (8 screws). 2 Remove the protective cover installed on the PC board (6 screws). 3 Remove the 13 screws that fasten the PC board to the chassis. -
Page 66: Connecting Peripheral Equipment
When transferring data to or from another TS-570 or the TS-870S, directly connect the two transceivers using the COM connectors. When transferring data to other KENWOOD transceivers, use the optional IF-232C interface unit. Connect the IF-232C to the ACC 1 connector located on the compatible transceiver. 6-pin DIN plugs (E07-0654-XX) are available as options. -
Page 67: Rtty Equipment
RTTY EQUIPMENT Use the ACC 2 connector to connect to the RTTY equipment. Connect the RTTY key output line to pin 2 of the ACC 2 connector. Connect the demodulation input line of the RTTY equipment to pin 3 of the ACC 2 connector. Note: Do not share a single power supply between the transceiver and the RTTY equipment. -
Page 68: Mcp And Tnc
15 CONNECTING PERIPHERAL EQUIPMENT MCP AND TNC Use the ACC 2 connector to connect the input/output lines from a Terminal Node Controller (TNC) for Packet operation, a Multimode Communications Processor (MCP) for operation on Packet, PacTOR, AMTOR, G-TOR a Clover interface. Also use the ACC 2 connector to connect SSTV and phone patch equipment. •... -
Page 69: Chapter 16 Maintenance
You may return your transceiver for service to the authorized KENWOOD dealer from whom you purchased it or any authorized KENWOOD service center. A copy of the service report will be returned with the transceiver. Please do not send subassemblies or printed circuit boards. -
Page 70: Internal Adjustments
16 MAINTENANCE INTERNAL ADJUSTMENTS REFERENCE FREQUENCY CALIBRATION Note: The transceiver is adjusted at the factory prior to shipping. Unless necessary, DO NOT perform this adjustment. If you have installed the optional SO-2 unit, you cannot perform this adjustment. 1 Set the following on the transceiver: •... -
Page 71: Troubleshooting
Partial Reset. If the problem remains, do a Full Reset. Have a new battery installed by your dealer or at a KENWOOD Service Center. 1 Review “WRITING CONVENTIONS FOLLOWED”. 2 Press [F.LOCK] to switch OFF function. - Page 72 16 MAINTENANCE No signals are 1 The SQL control is fully clockwise. received or receive sensitivity seems 2 The Attenuator function is ON. poor. 4 Mic [PTT] is pressed. 5 The receive bandwidth was 6 The wrong antenna connector 7 The receive preamplifier is OFF. No signals are The RF control was set too low.
- Page 73 Attempting to 1 The antenna was not connected transmit results in the correctly. “HELLO” message 2 The impedances of the antenna appearing and the and transceiver are not properly receive mode being matched. restored. 3 The input voltage is outside 13.8 V DC 15% (11.7 to 15.8 V DC).
-
Page 74: Specifications
SPECIFICATIONS Mode Number of memory channels Antenna impedance Supply voltage Grounding method Current Usable temperature range Frequency stability (–10 C ~ 50 C) Frequency accuracy (at room temperature) Dimensions [W x H x D] (Projections included) Weight Frequency range Output power Modulation Spurious emissions Carrier suppression... - Page 75 Circuit type Frequency range Intermediate frequency SSB, CW, FSK (at 10 dB (S+N)/N) Sensitivity (at 10 dB (S+N)/N) (at 12 dB SINAD) SSB, CW, FSK Selectivity Image rejection 1st IF rejection RIT shift frequency range SSB, CW, FSK, AM Squelch sensitivity Audio output (8 , 10% distortion) Audio output impedance...
-
Page 76: Appendix: Com Connector Protocol
APPENDIX APPENDIX: COM CONNECTOR PROTOCOL HARDWARE DESCRIPTION This transceiver uses a full-duplex, asynchronous, serial interface for communicating through the male 9-PIN RS-232C COM connector. Bytes are constructed with 1 start bit, 8 data bits, and 1 stop bit (4800 bps can be configured for 1 or 2 stop bits). -
Page 77: Computer Control Commands
COMPUTER CONTROL COMMANDS A computer control command is composed of an alphabetical command, various parameters, and the terminator that signals the end of the control command. EXAMPLE: Command to set VFO A to 7 MHz 00007000000 Terminator Parameters Alphabetical command Commands can be classified as shown below: Input command... - Page 78 APPENDIX Alphabetical Command Table Command Function Antenna Tuner THRU/IN-LINE, and tuning START/CANCEL Sets or reads AF gain. Auto information Selects antenna connector (ANT 1/ANT 2). Sets or reads Beat Cancel. Reads busy signals. Sets or reads CW Auto Zero-beat (OFF/ON). Sets or reads CTCSS tone number (01~39).
- Page 79 Parameter Table s t i r i f v i t o i t o i t “ ” + – “ , ” s t i n i l . ) . s t i . y l APPENDIX s t i + “...
- Page 80 APPENDIX Menu Selection Table for “EX” Command [ / ] t i l x i f t l i f z i l c t i c i t y t i t f i y t i t l i f i f i l t l i f z i l...
-
Page 81: Reading Command Tables
READING COMMAND TABLES Antenna Tuner THRU/IN -LINE, and tuning START/CANCEL q Command w Name e Function of the command r The format of the Set command is shown. When oblique lines are drawn in the 1st and 2nd columns, there is no Set command. - Page 82 APPENDIX BEAT CANCEL Sets or reads Beat Cancel. 3 4 5 6 7 8 9 10 11 12 13 14 B C P1 1 2 3 4 5 6 7 8 9 10 11 12 13 14 1 2 3 4 5 6 7 8 9 10 11 12 13 14 B C P1 ;...
- Page 83 FILTER WIDTH Sets or reads filter bandwidth. 3 4 5 6 7 8 9 10 11 12 13 14 1 2 3 4 5 6 7 8 9 10 11 12 13 14 F W ; 1 2 3 4 5 6 7 8 9 10 11 12 13 14 AUTO GAIN CONTROL TIME CONSTANT Sets or reads AGC time constant.
- Page 84 APPENDIX MEMORY CHANNEL Sets or reads memory channels. 3 4 5 6 7 8 9 10 11 12 13 14 1 2 3 4 5 6 7 8 9 10 11 12 13 14 1 2 3 4 5 6 7 8 9 10 11 12 13 14 MODE Sets or reads modulation modes.
- Page 85 POWER CONTROL Sets or reads transmit power. 1 2 3 4 5 6 7 8 9 10 11 12 13 14 1 2 3 4 5 6 7 8 9 10 11 12 13 14 1 2 3 4 5 6 7 8 9 10 11 12 13 14 SPEECH PROCESSOR Sets Speech Processor OFF/ON or reads status.
- Page 86 APPENDIX RX, TX Selects receive/transmit mode. 1 2 3 4 5 6 7 8 9 10 11 12 13 14 RX/TX 1 2 3 4 5 6 7 8 9 10 11 12 13 14 1 2 3 4 5 6 7 8 9 10 11 12 13 14 RX/TX SCAN...
- Page 87 VOX DELAY TIME Sets or reads VOX delay time. 1 2 3 4 5 6 7 8 9 10 11 12 13 14 1 2 3 4 5 6 7 8 9 10 11 12 13 14 1 2 3 4 5 6 7 8 9 10 11 12 13 14 VOX GAIN Sets or reads VOX gain.
-
Page 88: Index
AGC ... 30 Transmitting ... 22 Amplifier, Linear Connection (REMOTE) ... 61 AMTOR Connection (ACC 2) ... 62 Operation ... 27 Antenna Connection ... 1 Feed Line Loss ... 1 Antenna Tuner Operation ... 52 Presetting ... 52 Attenuator, RF ... 37 Automatic Gain Control ...
Need help?
Do you have a question about the TS-570D, TS-570S and is the answer not in the manual?
Questions and answers